Skip to content

...

Silk Gray Sweater - Free Knitting Pattern

Silk Gray - Free Pattern
Photo above © Gralina

Silk Gray by Gralina Frie is a relaxed knitted pullover designed around a simple silhouette, wide neckline and understated ribbed details.

The original sweater was knitted in a bourette silk-blend yarn, producing an airy fabric with a softly textured, slightly tweedy appearance.

Its uncomplicated shape makes Silk Gray especially appealing if you like casual sweaters that can be layered over a tank top, T-shirt or lightweight dress.

Best of all, Silk Gray is still officially available as a free knitting pattern from designer Gralina Frie on Ravelry.

✓ Free Pattern Available

Silk Gray by Gralina Frie remains listed as a free Ravelry download. Use the designer's current pattern page linked below for the complete original instructions.

Silk Gray Sweater at a Glance

Pattern: Silk Gray

Designer: Gralina Frie

Published: May 2013

Category: Pullover

Original Yarn: BC Garn Granite

Yarn Weight: Sport

Approx. Yardage: 1000 yd / 914 m

Gauge: 21 sts × 27 rows = 4 in in stockinette

Needles: 3 mm / US 2½ and 4 mm / US 6

Published Size: One size

Suggested Fit Range: Approx. 36–40 in

Availability: Free Ravelry download

About the Silk Gray Sweater

Silk Gray is designed as a relaxed everyday sweater rather than a heavily fitted garment.

Its appeal comes from the combination of a simple stockinette body, understated ribbed edges and the distinctive character of the original silk-blend yarn.

The wide neckline gives the sweater an easy layering shape, while the relatively simple surface lets the yarn provide much of the visual interest.

The Original Yarn

Gralina Frie's original sample was knitted with BC Garn Granite.

The designer used approximately:

4 skeins / 200 g

with an approximate total requirement of:

900 m / 1000 yd

The original light-gray yarn contributes significantly to the soft, understated appearance of the sweater.

What Makes the Yarn Interesting?

The original design uses a bourette silk-blend yarn.

Bourette or noil-style silk can have a more textured, matte and slightly rustic appearance than the perfectly smooth, glossy silk many knitters first imagine.

That subtle texture works particularly well with a simple stockinette garment because the yarn itself becomes part of the design.

Can You Substitute the Yarn?

Yes.

The designer specifically notes that the original yarn can be replaced with a suitable silk/wool or silk/merino blend that produces an even but airy fabric at the required gauge.

When substituting, concentrate on:

  • Matching gauge
  • Creating a lightweight fabric
  • Choosing yarn with comfortable drape
  • Checking the fiber against your skin
  • Buying enough total meterage or yardage

Gauge

The published stockinette gauge is:

21 stitches × 27 rows = 4 inches / 10 cm

Gauge is particularly important here because the original pattern is written as one size and the amount of ease changes depending on the wearer's measurements.

Needle Sizes

The original pattern specifies:

  • 3 mm / US 2½ for the ribbing
  • 4 mm / US 6 for the main body

These are starting points. Use the needle size that allows you to obtain the published gauge with your chosen yarn.

Why Two Needle Sizes?

Using a smaller needle for ribbing helps the edge look neat and gives it a little more structure.

The larger needle used for the main fabric allows the stockinette section to remain lighter and more relaxed.

This contrast is especially useful in a sweater designed to have an airy rather than dense fabric.

One-Size Pattern

Silk Gray is published in one size.

The designer describes it as suitable for approximately 36–40 inch sizing, depending on the amount of ease you prefer.

On a smaller wearer it will appear more oversized, while toward the upper end of the suggested range it will have a closer fit.

Fit Note

Because this is an older one-size design rather than a modern extensively graded sweater pattern, compare your measurements with the designer's published information before choosing the project.

The Wide Neckline

One of the recognizable features of Silk Gray is its wide, flattering neckline.

A small ribbed detail finishes the neck without creating a heavy collar.

The result suits the casual layering character of the sweater and allows a shirt, tank or dress neckline underneath to remain visible.

1×1 Rib Details

Small sections of 1×1 ribbing are used around the edges.

Alternating knit and purl stitches creates an elastic edge while providing a subtle visual contrast with the stockinette body.

Keep the ribbing tension even, particularly around the neckline.

An Optional Open Side Detail

In the designer's original version, the lower ribbing is left open at the sides.

Gralina Frie notes that this feature is optional.

That makes it possible to preserve the original split-edge appearance or adapt the finishing according to your preference while following the designer's instructions.

Why Swatching Matters with Silk Blends

Different silk blends can behave very differently.

Some have substantial drape, while others contain enough wool to provide more bounce and structure.

Knit a reasonably large swatch and wash it in the same way you intend to care for the finished sweater.

Measure gauge only after the fabric has relaxed and dried.

Check Drape as Well as Gauge

Two yarns can produce the same number of stitches per inch while creating very different sweaters.

One may feel firm and structured while another falls softly against the body.

For Silk Gray, aim for the light, relaxed character intended by the designer rather than matching the gauge with an excessively rigid fabric.

Stockinette Makes Yarn Choice Important

The simple main fabric means there is little lace or cable work competing with the yarn.

This makes Silk Gray a useful project for a yarn with subtle texture, tweedy flecks or gentle natural variation.

A very smooth yarn will create a cleaner appearance, while a rustic silk blend can move the finished sweater closer to the character of the original sample.

Is Silk Gray Beginner Friendly?

The designer describes Silk Gray as an uncomplicated sweater, and the simple stockinette-and-rib combination makes it approachable compared with heavily patterned garments.

However, it is still a sweater project.

You should be comfortable with:

  • Knitting and purling
  • Stockinette stitch
  • 1×1 ribbing
  • Reading garment instructions
  • Checking gauge
  • Basic shaping
  • Finishing a garment

An adventurous beginner who has already completed a few smaller projects may find the straightforward design a useful first step into adult sweater knitting.

Choose Your Ease Before Starting

Because the pattern is written in one size, think about the silhouette you want before investing in yarn.

If you prefer an oversized sweater, compare your bust measurement with the finished dimensions and the designer's suggested fit range.

If you prefer a closer-fitting garment, make sure the resulting amount of ease will still allow comfortable movement.

Layering Ideas

The designer specifically presents Silk Gray as an easy casual layering piece.

Depending on yarn and season, it can be worn over:

  • A simple tank top
  • A T-shirt
  • A lightweight summer dress
  • A long-sleeved base layer in cooler weather

Blocking the Finished Sweater

Blocking is particularly useful when the project contains silk.

Follow the care instructions for your specific yarn and avoid assuming that every silk blend should be treated identically.

Support the weight of the wet garment carefully so it does not stretch unexpectedly.

Lay it out to the intended dimensions and allow it to dry completely.

Important: Don't Confuse It with Another Silk Gray Pattern

Same Name, Different Pattern

A separate knitting pattern called Silk gray was published by Irina Gorbacheva in 2021. That is a different sweater with different yarn, gauge, needles and sizing. The Amazing Knitting page featured here refers to the earlier Silk Gray by Gralina Frie, first published in 2013.

Is Silk Gray Still Free?

Yes.

Gralina Frie's current Ravelry pattern store continues to list Silk Gray as a free knitting pattern.

The pattern record also identifies the design as a pullover first published in May 2013.

Amazing Knitting does not reproduce the designer's complete copyrighted knitting instructions. Use the official designer listing for the full pattern.

Get the Free Silk Gray Pattern

Visit Gralina Frie's official Ravelry listing for the complete free pattern:

Get the Free Silk Gray Pattern →

More Free Sweater Patterns on Amazing Knitting

Explore More Sweater Knitting

Before You Cast On

Start by checking whether the one-size fit works for the silhouette you want.

Then make a generous stockinette swatch, wash it, confirm the 21-stitch × 27-row gauge, and evaluate the drape of your chosen yarn.

A successful substitute does not need to duplicate the original yarn exactly, but it should create the light, comfortable and relaxed fabric that gives Silk Gray its distinctive character.

Pattern credit: Silk Gray was designed by Gralina Frie and first published in 2013. Amazing Knitting provides an independent project guide and does not reproduce the designer's complete copyrighted knitting instructions. Please retain the existing photograph and its original credit from the previous Amazing Knitting page.

Speed Bumps Knitting Pattern - Historical Pattern Guide

Speed Bumps - Free Pattern
Photo above © annamal

Speed Bumps is an older knitting design associated with designer Audrey Bochantin.

If this distinctive knitted design brought you to Amazing Knitting, this guide will help you identify the original pattern, understand the information that can still be verified, and avoid confusing it with several newer knitting patterns that use the same name.

The original pattern was previously referenced online through Ravelry, but we could not confirm a currently active authorized download for Audrey Bochantin's exact Speed Bumps pattern.

The good news is that the design can still be documented accurately as part of the knitting archive, and there are currently available free projects with a similar easy, textured-knitting appeal.

Pattern Availability Update

Historical references identify this design as Speed Bumps by Audrey Bochantin. We could not verify a current authorized download page for this exact pattern, so Amazing Knitting does not label it as currently free or provide copied instructions from archived third-party sources.

Speed Bumps at a Glance

Pattern: Speed Bumps

Designer: Audrey Bochantin

Craft: Knitting

Historical Gauge: 16 sts × 20 rows = 4 in in stockinette

Current Availability: Exact authorized source not verified

About the Original Speed Bumps Pattern

Speed Bumps appeared online as a knitting pattern by Audrey Bochantin and was circulated through knitting communities and pattern directories.

Older references still identify the designer and preserve a small amount of technical information, including a stockinette gauge of 16 stitches and 20 rows over 4 inches.

However, an old reference is not the same thing as a current authorized pattern source.

Because the original listing can no longer be reliably verified as an active download, Amazing Knitting does not reconstruct the missing pattern or reproduce instructions from unofficial copies.

Important: There Are Several Patterns Called Speed Bumps

The name Speed Bumps is not unique.

Today you may find completely different knitting patterns with the same or very similar title, including:

  • A women's top by Suzanne Bryan
  • A textured scarf or cowl by another designer
  • Dishcloth patterns using similar wording
  • Sock patterns and other accessories with "Speed Bumps" in the title

These should not be treated as alternate editions of Audrey Bochantin's original design.

Do Not Mix Pattern Specifications

One of the easiest mistakes with an older pattern is to search only by title and then accidentally combine information from another design.

For example, a current Speed Bumps top may have completely different:

  • Yarn weight
  • Needle size
  • Gauge
  • Garment construction
  • Sizes
  • Designer

For that reason, this guide only includes details that can be connected specifically to Audrey Bochantin's pattern.

What Can Still Be Verified?

Historical knitting references preserve two particularly useful pieces of information:

  • The pattern name was Speed Bumps.
  • The designer was Audrey Bochantin.

A historical pattern preview also records a stockinette gauge of:

16 stitches × 20 rows = 4 inches

We are deliberately not adding yarn, needle size, finished measurements or construction details unless they can be confirmed from the exact original source.

Why We Do Not Reconstruct the Missing Pattern

It may be tempting to use photographs, old project notes or snippets from the web to reverse engineer a complete set of instructions.

That would create two problems.

First, reconstructed instructions may not accurately represent the designer's original pattern.

Second, an unavailable pattern does not automatically become free to copy or republish.

Amazing Knitting therefore keeps this page as a useful historical pattern guide rather than pretending to provide the original directions.

If You Already Own the Original Pattern

If you downloaded or purchased a legitimate copy of Speed Bumps in the past, your own copy remains the best source for:

  • Cast-on numbers
  • Pattern repeats
  • Needle size
  • Yarn requirements
  • Shaping instructions
  • Finishing details

Keep that copy together with notes about the yarn and size you used, since the original online listing may be difficult to recover later.

Gauge Still Matters

The surviving historical gauge reference of 16 stitches and 20 rows over 4 inches suggests that gauge was an important part of the original design.

If you are working from a legitimate saved copy, make a swatch with the yarn and needle combination specified there rather than choosing needles based only on the photograph.

Your personal tension can change the finished dimensions substantially.

Why Pattern Names Can Be Confusing

Knitting pattern titles are not always unique identifiers.

Two independent designers may choose the same descriptive name without their projects being related.

For old patterns, always check at least:

  • Designer name
  • Publication date
  • Project category
  • Yarn weight
  • Pattern photograph

before assuming you have found the correct pattern.

A Current Free Pattern with the Same Name

There is currently another pattern called Speed Bumps by Suzanne Bryan.

It is a completely separate design: a loose-fitting women's top worked flat in two main panels.

Suzanne Bryan's version is currently available as a free pattern, but it should not be confused with the older Audrey Bochantin pattern featured on this Amazing Knitting page.

View Suzanne Bryan's Free Speed Bumps Pattern →

About Suzanne Bryan's Version

If you simply liked the name and want a currently available project, Suzanne Bryan's free Speed Bumps top offers a legitimate option.

Her pattern uses fingering-weight yarn and is worked flat in two main panels before being joined.

It is an independent design and is included here only as a clearly labeled alternative.

More Free Knitting Projects on Amazing Knitting

You can also continue with patterns whose current free sources have already been verified:

Explore More Knitting Patterns

Pattern Availability Summary

The historical Speed Bumps pattern associated with Audrey Bochantin can still be identified, but we could not confirm a current authorized download for that exact design.

For that reason, Amazing Knitting preserves this page as a pattern guide rather than presenting an unofficial copy or incorrectly linking to one of the unrelated patterns with the same title.

If an authorized Audrey Bochantin listing becomes available again, this page can be updated with a direct link to that source.

Editorial note: Speed Bumps is credited here to Audrey Bochantin based on historical pattern references. Amazing Knitting does not reproduce unavailable copyrighted instructions or substitute another designer's same-name pattern for the original. Please preserve the photograph and its existing credit from the previous version of this page.

Baby Ballerina Booties - Free Knitting Tutorial

Baby Ballerina Booties - Easy Pattern & Tutorial
Photos above © Creativa Atelier

These charming Baby Ballerina Booties are inspired by classic ballet flats and are knitted almost entirely in garter stitch.

The original tutorial was created by Marta Porcel of Creativa Atelier and shows how to make a soft pair of knitted baby shoes using straight needles.

The simple construction makes this a lovely next project for knitters who already know how to cast on, knit garter stitch, pick up stitches, decrease and bind off.

The complete step-by-step tutorial is still available for free on the original Creativa Atelier website.

✓ Free Original Tutorial Available

The original Baby Ballerina-style knitted shoe tutorial by Marta Porcel remains available free on Creativa Atelier. Amazing Knitting provides an independent project guide and links to the creator for the complete instructions.

Baby Ballerina Booties at a Glance

Original Tutorial: Knitted Baby Shoes - Garter Stitch Ballerinas

Creator: Marta Porcel

Source: Creativa Atelier

Project: Knitted baby ballerina shoes

Size Shown: 3–6 months

Main Stitch: Garter stitch

Needles: 4 mm / US 6 straight needles

Yarn: Wool or cotton suitable for 4 mm needles

Finishing: Seamed heel and knitted ankle ties

Availability: Free official web tutorial

About These Knitted Baby Shoes

The defining feature of this project is its ballet-flat shape.

Rather than creating a tall traditional baby bootie, the design sits low around the foot and uses knitted ties around the ankle to help keep the shoes in place.

The garter stitch texture gives the shoes a soft handmade appearance and also keeps the stitch pattern uncomplicated.

Designed for 3–6 Months

The free tutorial is written for approximately 3–6 months.

The designer notes that tying the shoes around the ankle can help them stay in place on a younger baby, while the natural stretch of knitting may allow some continued use as the baby's feet grow.

This should be understood as general fit flexibility rather than a set of officially graded additional sizes.

Yarn and Needles

The original tutorial recommends wool or cotton yarn suitable for 4 mm / US 6 needles.

Marta Porcel used leftover yarn from a matching baby romper project, demonstrating that these shoes can be a useful small project when you have suitable yarn remaining from another baby garment.

Before substituting yarn, check that the finished fabric is soft, comfortable and not excessively loose.

Straight Needles

One attractive feature for beginners is that the shoes are knitted on straight needles.

You do not need to learn double-pointed needles or Magic Loop before attempting this particular design.

The shaping is created while the work is flat, followed by a small amount of finishing.

Why Garter Stitch Works Well Here

Garter stitch is created by knitting every row when working flat.

Its ridged fabric is flexible and forgiving, which makes it useful for small baby accessories.

It also makes individual rows easy to count because the horizontal ridges are clearly visible.

How the Shape Develops

The project begins as a flat knitted piece and gradually develops into a three-dimensional shoe.

The construction can be understood in four broad stages:

  • Forming the upper ankle section
  • Working the central toe area
  • Shaping the sole
  • Adding the ankle ties and finishing the heel

For the exact stitch counts and row sequence, use the creator's original tutorial linked below.

The Central Toe Section

One useful technique in the pattern is temporarily working only a central group of stitches.

This allows the toe section to extend forward while the side stitches wait on the needles.

Later, stitches are picked up along the edges of this central section so the surrounding fabric can continue around it.

Picking Up Stitches

If you have never picked up stitches before, this project provides a small and manageable opportunity to practice.

The designer uses visible edge bumps from the garter-stitch fabric as convenient pickup points.

Keep the picked-up stitches evenly spaced so the sides of the shoe do not become puckered.

Shaping the Sole

The sole is formed by working a small central section while gradually joining it to the surrounding stitches.

Conceptually, this is similar to shaping techniques used in some socks and traditional baby booties.

The process turns the formerly flat knitting into a recognizable little shoe.

Ankle Ties

The finished ballerina shape includes knitted ties that wrap around the ankle.

They are both decorative and practical because the low-cut shoe has less fabric around the ankle than a conventional bootie.

Tie them gently and never tightly around a baby's ankle.

Skills Used in This Project

You should be comfortable with:

  • Casting on
  • Knit stitch
  • Garter stitch
  • Turning the work
  • Picking up stitches
  • Knitting stitches together for decreases
  • Binding off
  • Basic seaming

Is This a Good Beginner Project?

Yes, provided you already know the very basic knitting movements.

The project is more interesting than a plain rectangle but still avoids complicated lace, cables or circular knitting.

It can therefore work well as a first introduction to shaping.

Choose Soft Baby-Friendly Yarn

Because the shoes sit directly against a baby's feet, softness matters.

Look for yarn that is:

  • Comfortable against delicate skin
  • Easy to wash
  • Smooth enough to show the garter texture
  • Strong enough to tolerate gentle stretching

Always follow the care instructions for the yarn you choose.

Cotton or Wool?

Either can work when the yarn is appropriate for the required needle size.

Cotton can create a light, crisp shoe that works well in mild weather, while soft wool may provide additional warmth for cooler conditions.

Different fibers behave differently, so make a small swatch when changing substantially from the yarn used in the original project.

Good Project for Leftover Yarn

Baby shoes require much less yarn than a sweater or blanket.

If you have leftover yarn from a matching baby cardigan, romper or hat, a pair of ballerina booties can turn those leftovers into a coordinated accessory.

Just make sure you have enough of the same yarn to complete both shoes.

Make Both Shoes the Same Size

Small differences in tension are particularly obvious when two matching pieces sit side by side.

To help both shoes match:

  • Use the same needles
  • Use yarn from the same project or dye lot where possible
  • Count garter ridges carefully
  • Keep the ankle ties the same length
  • Compare the first and second shoe as you work

Why Counting Garter Ridges Helps

Garter stitch produces clear horizontal ridges.

These can act as a visual reference when checking whether the two booties contain the same amount of knitting.

This is often easier than trying to judge the size only by stretching the pieces next to each other.

Finishing the Heel

The original construction requires a small seam at the back of the heel.

Use the yarn tail neatly and avoid making a bulky ridge on the inside of the shoe.

Baby items benefit from smooth finishing because thick internal seams can be uncomfortable against small feet.

Check the Finished Shoes Carefully

Before using any handmade baby accessory, inspect the finished item.

Make sure:

  • No yarn ends are loose
  • The heel seam is secure
  • The ankle ties are firmly attached
  • There are no loose decorative pieces
  • The shoe fits comfortably without constricting the foot

A Note About Baby Safety

These booties are soft handmade footwear rather than protective walking shoes.

They are best suited to a non-walking baby and should always fit loosely enough that the toes and ankle are not compressed.

If you add your own decorations, avoid unsecured beads, buttons or other small detachable components.

When Can You Use Them?

Creativa Atelier presents the ballerina shoes as a light option for spring, fall and cooler summer evenings.

They can also make an attractive handmade accessory for photographs, visits or gift sets.

For colder weather, a more fully enclosed baby bootie may provide greater coverage.

Do Not Copy the Original Tutorial

Respect the Designer's Pattern Terms

Marta Porcel states that the original tutorial, pattern and images are protected under a Creative Commons Attribution-NonCommercial-NoDerivatives license and asks other websites to link to the tutorial rather than republish the pattern. For that reason, Amazing Knitting does not copy the complete stitch-by-stitch instructions here.

Is the Baby Ballerina Tutorial Still Free?

Yes.

The original Creativa Atelier article is still online and provides the free step-by-step tutorial for the 3–6 month size.

That makes this a verified current free source rather than an old Pinterest link with uncertain availability.

Get the Free Baby Ballerina Booties Tutorial

Visit Marta Porcel's original Creativa Atelier tutorial for the complete stitch counts, photographs and step-by-step instructions:

View the Free Baby Ballerina Tutorial →

Want Another Free Ballerina Bootie Pattern?

There is also a separate free knitting pattern called Baby Ballerina Booties by Adeline Too.

This is not the same pattern as the Creativa Atelier tutorial featured above, but it is a useful alternative if you prefer a downloadable PDF worked in the round.

Adeline Too's version uses DK-weight yarn, 4 mm / US 6 needles and has a published finished foot length of approximately 4 inches.

View the Free Adeline Too Pattern on Ravelry →

More Free Baby Booties on Amazing Knitting

Explore More Baby Knitting

Before You Cast On

Choose soft yarn suitable for 4 mm needles, make sure you are comfortable with garter stitch and basic decreases, and read through the complete original tutorial before starting.

Pay particular attention to the central toe construction and picked-up stitches, because those steps are what transform the flat knitted fabric into the little ballerina-shoe shape.

Most importantly, use the original Creativa Atelier page for the exact instructions so the creator's work, photographs and publishing terms are respected.

Pattern credit: The original Knitted Baby Shoes - Garter Stitch Ballerinas tutorial was created by Marta Porcel of Creativa Atelier. The existing Amazing Knitting photographs are credited to Creativa Atelier. Amazing Knitting provides an independent project guide and does not reproduce the creator's complete copyrighted knitting instructions or tutorial photographs.

Tulips & Rosebuds Baby Blanket - Knitting Pattern

Tulips & Rosebuds Baby Blanket - Free Pattern
Photos above © KarenFM

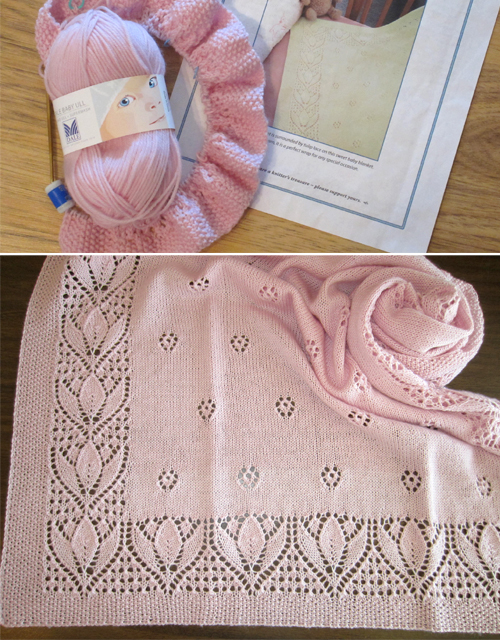
The Tulips & Rosebuds Baby Blanket by Eugen Beugler is an elegant lace baby blanket featuring tiny rosebud motifs surrounded by a decorative border of knitted tulips.

Originally published by Fiber Trends, this heirloom-style design combines delicate lace with fine yarn to create a special-occasion baby blanket. The pattern includes both written and charted lace instructions.

Tulips & Rosebuds Baby Blanket at a Glance

Pattern: Tulips & Rosebuds Baby Blanket (CH51)

Designer: Eugen Beugler

Publisher: Fiber Trends

Craft: Knitting

Category: Baby Blanket

Yarn Weight: Fingering

Yardage: About 1,100 yards / 1,006 meters

Needle Size: US 4 / 3.5 mm

Gauge: 24 stitches = 4 inches in stockinette stitch

Finished Size: About 32 × 36 inches / 81 × 91 cm

Construction: One-piece rectangular blanket

Lace Instructions: Written and charted

Pattern Availability: Paid pattern

About the Tulips & Rosebuds Baby Blanket

Designed by Eugen Beugler, Tulips & Rosebuds is an heirloom-style knitted baby blanket built around two delicate floral ideas.

Small rosebud motifs decorate the center of the blanket, while a much more elaborate tulip lace design creates the surrounding border.

The combination gives the blanket an ornate appearance without relying on multiple yarn colors. The flowers are created through the structure of the knitted lace itself.

A Floral Lace Baby Blanket

Floral lace is the defining feature of this design. Instead of adding flowers after the blanket is finished, the rosebuds and tulips emerge as part of the knitted fabric.

The center uses repeating rosebud motifs, while the border introduces the larger tulip lace sections that give the blanket its distinctive frame.

This makes Tulips & Rosebuds especially appealing to knitters who enjoy lace patterns with recognizable botanical motifs.

Written and Charted Instructions

The original pattern provides the lace instructions in both written and charted form.

This is useful because knitters approach lace in different ways. Some prefer following symbols visually on a chart, while others find row-by-row written directions easier to track.

Whichever method you prefer, it is worth using stitch markers and checking your stitch count regularly when working a large lace project.

Finished Blanket Size

The published finished size is approximately:

32 × 36 inches / approximately 81 × 91 cm

This creates a generously sized baby blanket while still keeping the project considerably smaller than a full-size adult throw.

Yarn Requirements

The original pattern calls for approximately:

1,100 yards / 1,006 meters of fingering-weight yarn

Fine yarn helps preserve the definition of the lace motifs and contributes to the delicate appearance of the finished blanket.

When substituting yarn, consider not only the yarn weight but also how well the fiber holds lace definition after washing and blocking.

Needles and Gauge

The published needle size is:

US 4 / 3.5 mm

The listed gauge is:

24 stitches = 4 inches in stockinette stitch

Your individual needle size may need adjustment to achieve the intended gauge and fabric.

Knitting Skills Used

This is a lace project rather than a basic beginner blanket. Helpful skills include:

  • Comfortable knit and purl stitches
  • Reading written lace instructions or charts
  • Yarn overs
  • Lace increases and decreases
  • Keeping track of repeating stitch patterns
  • Checking stitch counts regularly
  • Blocking knitted lace

Knitters new to lace may find it helpful to practice a smaller lace swatch before beginning the full blanket.

Blocking Makes a Difference

Lace often looks very different immediately after it comes off the needles. Careful blocking helps open the eyelets and allows the floral motifs and border to become more visible.

Always follow the care instructions for your chosen yarn and avoid stretching the finished fabric beyond what the fiber can comfortably support.

Important Pattern Update

Fiber Trends has published corrections and updated information for this pattern. Ravelry notes that stitch counts for the Tulip Border section were updated in November 2022. If you are knitting this blanket, use the current official pattern and check the designer/publisher's latest errata rather than relying on an older copy found elsewhere online.

Is the Tulips & Rosebuds Baby Blanket Free?

No. The official Tulips & Rosebuds Baby Blanket (CH51) is currently a paid knitting pattern.

Older pages around the web have sometimes described or redistributed this design as a free pattern. However, the current official listing from Fiber Trends is a paid pattern.

Amazing Knitting does not reproduce the designer's copyrighted lace charts, written row-by-row instructions, or pattern PDF.

Get the Original Tulips & Rosebuds Pattern

Visit the official Ravelry listing for the current pattern, purchase information, project details, and pattern updates.

View the Original Tulips & Rosebuds Pattern →

Pattern credit: Tulips & Rosebuds Baby Blanket (CH51) was designed by Eugen Beugler and published by Fiber Trends. Pattern pricing, availability, errata, and technical information are controlled by the publisher and may change over time.

Looking for a Free Alternative?

If you came to this page specifically looking for a free baby blanket knitting pattern, you do not have to leave empty-handed. Amazing Knitting has other free lace baby blankets in the archive.

Waving Lace Baby Blanket — Free Pattern

This is a different design — not a free version of Tulips & Rosebuds — but it is another elegant knitted baby blanket featuring lace and texture, making it a useful free alternative for knitters drawn to the delicate style of the original.

View the Free Waving Lace Baby Blanket →

More Baby Blanket Knitting Patterns

Explore more baby blanket knitting patterns, lace baby blankets, and free baby blanket knitting patterns from the Amazing Knitting archive.

Before You Start

If you choose the original Tulips & Rosebuds pattern, download or purchase the current official version rather than relying on an old copy circulating elsewhere. Check the latest Fiber Trends corrections, then confirm the yarn, gauge, needle size, stitch counts, and finished measurements before casting on.

Knitting Tote - Free Bag Knitting Pattern

Knitting Tote - Free Pattern
Photo above © Berroco Inc.

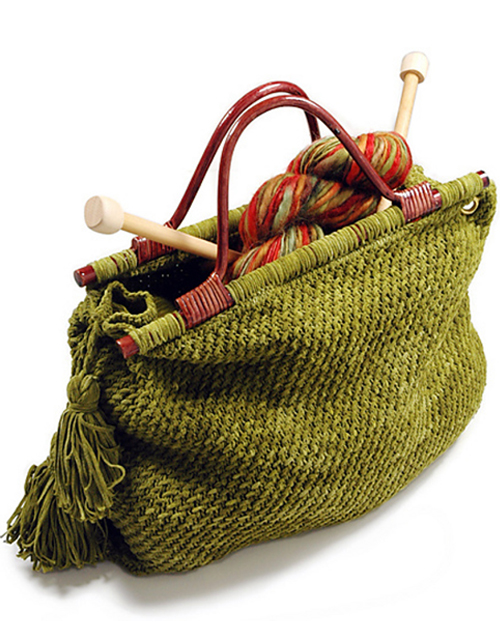
Knitting Tote by Donna Yacino for Berroco is a sturdy, structured knitted bag designed especially for carrying yarn, needles and works in progress.

The combination of textured knitting, wooden handles, decorative grommets and a reinforced bottom gives the tote a polished look while keeping it practical enough for everyday use.

Originally designed in Berroco Suede, this project is a great choice for knitters who want to make something functional rather than another garment or accessory.

Best of all, the complete Knitting Tote pattern is still officially available for free from Berroco.

✓ Free Pattern Availability

Berroco still publishes Knitting Tote by Donna Yacino as a free pattern download on its official website.

Knitting Tote at a Glance

Pattern: Knitting Tote

Designer: Donna Yacino

Publisher: Berroco

Project Type: Knitted tote bag

Skill Level: Intermediate

Suggested Yarn: Berroco Suede

Yarn Weight: Worsted

Approx. Yardage: 500 yd / 457 m

Needles: US 8 / 5 mm, 24-inch circular

Crochet Hook: 4 mm

Gauge: 24 sts × 30 rows = 4 in in pattern stitch

Finished Size: Approx. 15 in wide × 11 in high × 4½ in deep

Availability: Free official Berroco pattern

About the Berroco Knitting Tote

This tote was designed as a practical project bag with enough structure to hold knitting supplies while still looking like a finished handbag.

Berroco describes the design as sturdy and stylish, and the construction supports that goal with a firm knitted fabric, wooden handles and a reinforced base.

Unlike a soft drawstring project pouch, this tote is intended to keep its shape and stand more like a traditional bag.

Finished Size

The official finished measurements are approximately:

15 in wide × 11 in high × 4½ in deep

The height measurement does not include the handles.

This gives the bag enough room for yarn, tools and a medium-sized work in progress without making it excessively bulky.

Original Yarn: Berroco Suede

The original design uses Berroco Suede, a worsted-weight novelty yarn that gives the knitted fabric a distinctive suede-like appearance.

The official materials list calls for:

5 balls of Berroco Suede

The Ravelry record lists the project at approximately 500 yards / 457 meters.

What If Berroco Suede Is Hard to Find?

If you substitute yarn, focus on the finished fabric rather than trying to match only the original fiber appearance.

A tote needs more structure than a soft scarf or sweater.

Look for a yarn that can:

  • Match the published gauge
  • Create a reasonably firm fabric
  • Show the textured stitch clearly
  • Handle the weight of items placed inside the bag
  • Resist excessive stretching

Make a swatch before committing to the full tote, especially if your substitute is much more elastic than the original yarn.

Needles and Gauge

The official pattern specifies a 24-inch US 8 / 5 mm circular needle.

The published gauge is:

24 stitches × 30 rows = 4 inches in pattern stitch

Use the needle size required to obtain gauge rather than assuming that US 8 will produce the correct fabric for every yarn.

Why Gauge Matters for a Tote Bag

Gauge affects more than appearance in a bag project.

If your stitches are too loose, the tote may stretch when filled. If they are too tight, the fabric can become difficult to work and the finished dimensions may be smaller than expected.

A firm, consistent swatch is especially useful before starting a structural project like this.

Worked in the Round

The pattern is designed to be worked in the round using a circular needle.

Circular construction reduces the need for long side seams and helps create a continuous body around the bag.

If you are new to circular knitting, check carefully that the cast-on edge is not twisted before joining.

Textured Pattern Stitch

The tote uses a textured pattern stitch rather than plain stockinette.

This gives the surface more visual interest while also contributing to the structured appearance of the bag.

The Ravelry pattern record also identifies slipped stitches among the techniques used.

Extra Materials You Will Need

This is not a yarn-and-needles-only project.

Berroco's official materials list also includes:

  • A 4 mm crochet hook
  • One pair of wooden handles with a 13-inch lower bar
  • Four 7/16-inch grommets
  • A piece of cardboard for the bottom insert

Check that you can obtain suitable handles and grommets before beginning the knitting.

Wooden Handles

The wooden handles are an important part of the original design.

They provide structure and keep the weight of the bag from being carried entirely by a knitted strap.

If you substitute another style of handle, compare its attachment points and width with the original construction before making permanent changes.

Decorative Grommets

Four metal grommets are used near the upper section of the tote.

These become attachment points for decorative twisted cords and tassels.

When installing hardware in knitted fabric, make sure it is secure and does not cut or damage the surrounding yarn.

Reinforcing the Bottom

One of the most practical details in this pattern is the reinforced base.

Berroco specifies a piece of cardboard approximately:

15 in long × 4½ in wide

as a bottom insert.

The insert helps keep the base flat when yarn and tools are placed inside.

Consider a More Durable Bottom Insert

If you plan to use the tote frequently, you may prefer to cut a removable insert from a suitable lightweight plastic or another moisture-resistant material with similar dimensions.

This would be your own modification rather than part of the original Berroco pattern.

Any substitute insert should have smooth edges so it does not catch the knitted fabric.

Do You Need to Line the Tote?

The original pattern does not require a full fabric lining in order to create the bag.

However, adding a lining can be a useful optional modification if you plan to carry small knitting tools.

A fabric lining can help prevent items such as stitch markers or needle tips from working through the knitted fabric.

Add Pockets If You Want More Organization

A handmade lining also gives you the opportunity to add internal pockets.

Useful pocket sizes might accommodate:

  • Scissors
  • Stitch markers
  • Tape measure
  • Cable needles
  • Crochet hooks
  • Pattern notes

Again, these are optional customizations and not part of the original Donna Yacino instructions.

Decorative Tassels and Twisted Cords

The original Berroco design includes tassels and twisted cords as finishing details.

They give the bag its distinctive decorative appearance and also make use of the installed grommets.

Follow the official pattern for the original finishing method rather than relying on reconstructed instructions from third-party sites.

Skills Used in This Project

This tote is a good project for practicing several skills in one useful object:

  • Knitting in the round
  • Maintaining a textured stitch pattern
  • Working slipped stitches
  • Checking gauge
  • Using a crochet hook for finishing
  • Attaching bag hardware
  • Making twisted cords
  • Making tassels
  • Adding structural reinforcement

Is the Knitting Tote Beginner Friendly?

Berroco classifies the project as Intermediate.

That makes sense because the knitting itself is only one part of the project.

You also need to work a pattern stitch, maintain gauge, handle circular construction and complete several finishing and hardware steps.

An adventurous beginner who is comfortable following detailed instructions may still enjoy it, but it is probably not the ideal first-ever knitting project.

A Useful Project for Practicing Bag Construction

Garments require careful body sizing, while a tote allows you to focus more on structure and finishing.

This makes the project a useful introduction to how knitted fabric can be combined with rigid components such as handles and base inserts.

Prevent the Bag from Stretching

Knitted fabric naturally has some elasticity.

To keep the tote looking its best:

  • Match the intended gauge
  • Avoid extremely loose fabric
  • Use the reinforced bottom
  • Attach the handles securely
  • Avoid routinely overloading the bag
  • Consider a fabric lining for frequent use

Use It as a Knitting Project Bag

The finished tote is particularly well suited to holding an active knitting project.

Depending on the size of your work, it can hold yarn, circular needles, pattern notes and everyday knitting notions together in one place.

The flat reinforced bottom also makes it more practical than an unstructured knitted sack.

Or Use It as an Everyday Tote

Nothing limits the finished bag to knitting supplies.

It can also function as a general-purpose handmade tote, especially if you add a lining and internal pockets.

Keep in mind that the amount of weight it can comfortably carry depends on your yarn, gauge, finishing and hardware.

Is the Berroco Knitting Tote Still Free?

Yes.

Berroco currently maintains an official page for Knitting Tote by Donna Yacino and labels it Free Pattern Download.

Ravelry also currently lists the same pattern as free.

Amazing Knitting does not reproduce Berroco's complete copyrighted knitting instructions. Use the authorized publisher page for the full pattern.

Get the Free Knitting Tote Pattern

Use the official Berroco page for the current free pattern:

Get the Free Knitting Tote Pattern →

Pattern Details on Ravelry

Ravelry is also useful for checking the pattern record and browsing projects made by other knitters:

View Knitting Tote on Ravelry →

More Free Knitting Projects

If you would like to continue with another free project from the Amazing Knitting archive, explore:

Explore More Knitted Bags

Before You Cast On

Read through the complete Berroco materials list before buying yarn.

This project requires more than needles and yarn, so having the handles, grommets, crochet hook and bottom insert ready will make the finishing process much easier.

Make a gauge swatch, aim for a firm structured fabric, and use the current official Berroco instructions for the complete stitch pattern and assembly details.

Pattern credit: Knitting Tote was designed by Donna Yacino and published by Berroco. The existing Amazing Knitting photograph is credited to Berroco Inc. Amazing Knitting provides an independent project guide and does not reproduce Berroco's complete copyrighted pattern instructions.

Beach Baby - Free Dress and Hat Knitting Pattern

Beach Baby - Free Pattern
Photo above © DROPS Design

Beach Baby by DROPS Design is a charming short-sleeved baby and toddler dress with a matching knitted hat.

The design combines a simple summer silhouette with delicate patterned details, making it an attractive handmade outfit for warmer weather, special occasions or a thoughtful baby gift.

Originally published as DROPS Baby 10-7, the pattern includes several sizes from baby through approximately 3–4 years.

Best of all, the complete Beach Baby dress and hat knitting pattern is still officially available for free from DROPS Design.

✓ Free Pattern Availability

Beach Baby / DROPS Baby 10-7 remains available as a free official knitting pattern directly from DROPS Design.

Beach Baby Dress and Hat at a Glance

Pattern: Beach Baby

Pattern Number: DROPS Baby 10-7

Designer / Publisher: DROPS Design

Projects: Short-sleeved dress and matching hat

Sizes: 6/9 months, 12/18 months, 2 years, 3/4 years

Suggested Yarn: DROPS Safran

Yarn Amount: 150-150-200-200 g

Needles: 3 mm / US 2½

Gauge: 24 sts × 32 rows = 10 × 10 cm / 4 × 4 in in stockinette

Buttons: 4

Availability: Free official DROPS pattern

About the Beach Baby Knitting Pattern

Beach Baby is a coordinated child's outfit consisting of a knitted short-sleeved dress and matching hat.

The dress has a light, classic appearance that works especially well in cotton yarn, while the decorative pattern sections add enough interest to make the finished garment feel special.

The matching hat turns the dress into a complete handmade set.

Sizes Included

The official DROPS pattern includes four sizes:

  • 6/9 months — 62/68 cm
  • 12/18 months — 74/80 cm
  • 2 years — 86/92 cm
  • 3/4 years — 98/104 cm

This gives the design a useful size range from baby through early childhood.

Finished Measurements

The published finished bust measurements are:

46-54-60-66 cm / 18-21¼-23⅝-26 in

The published full lengths are:

37-47-51-55 cm / 14½-18-20-21⅝ in

Use the finished garment measurements when choosing a size rather than relying only on the child's age.

Original Yarn: DROPS Safran

The original pattern is written for DROPS Safran.

The published yarn quantities are:

  • 6/9 months: 150 g
  • 12/18 months: 150 g
  • 2 years: 200 g
  • 3/4 years: 200 g

The official sample is shown in white, but the design can naturally be adapted to other suitable colors.

Why Cotton Works Well for This Dress

A smooth cotton yarn is a natural choice for a short-sleeved warm-weather garment.

It can provide good stitch definition for the decorative pattern while keeping the finished dress relatively light.

When substituting yarn, look for a yarn that can reproduce the published gauge and has a comfortable feel suitable for children's clothing.

Needles and Gauge

The official pattern specifies:

3 mm / US 2½ needles

with a stockinette gauge of:

24 stitches × 32 rows = 10 × 10 cm / 4 × 4 in

Both circular and double-pointed needles are used in the published instructions.

Why Gauge Matters

Gauge is especially important for a child's dress because it affects the bust circumference, overall length and fit of the yoke.

If your gauge is tighter than the pattern, the finished dress will become smaller. If it is looser, the garment may become noticeably larger.

Make a gauge swatch before beginning, particularly if you are using a substitute yarn.

Patterned Sections

The design includes decorative stitch patterns represented in the official DROPS charts.

These patterned areas provide contrast with the simpler stockinette sections and give the dress its distinctive appearance.

When following the pattern, use the current official diagrams rather than relying on a copied chart from another website.

Reading DROPS Charts

If DROPS charts are new to you, take a moment to review the symbol key before starting the decorative sections.

Remember that chart symbols represent stitches and that the diagrams are read according to the direction of the row or round being worked.

Place stitch markers between repeats if that helps you keep track of the pattern.

The Yoke and Button Opening

The design includes a buttoned opening on the yoke.

The official instructions specify four buttonholes, with their placement adjusted for each size.

This detail gives the dress a practical opening while also becoming part of the decorative upper section.

Four Buttons

The materials list calls for:

4 buttons

Choose securely attached buttons that are appropriate for a child's garment.

Always check that buttons remain firmly sewn in place before the finished garment is worn.

Short Sleeves for Warmer Weather

The short sleeves are one of the features that distinguish Beach Baby from many heavier knitted children's dresses.

Combined with cotton yarn, they make the design particularly suitable for spring and summer layering.

The dress can be worn on its own in mild weather or over another layer when temperatures are cooler.

The Matching Hat

The included hat allows you to create a coordinated outfit using the same yarn and color.

You can make both pieces as a complete set or knit only the dress if that better suits your project.

A matching hat can also be a practical way to use remaining yarn after the dress is complete, provided you have enough yardage.

Choosing a Yarn Substitute

If DROPS Safran is not available to you, choose a substitute based on the fabric rather than brand name alone.

Check:

  • Gauge
  • Yarn weight
  • Fiber content
  • Softness
  • Washability
  • Stitch definition
  • Total meterage or yardage

The official DROPS page also provides tools for finding alternative yarns.

Choose a Color That Shows the Stitch Pattern

Smooth solid colors tend to make textured and openwork details easy to see.

Light colors can emphasize shadows and stitch structure, but the design can also look beautiful in pastel shades or stronger solid colors.

If you use a strongly variegated yarn, make a swatch first to see whether the color changes compete with the decorative motifs.

Skills You May Practice

  • Working stockinette stitch
  • Working garter stitch
  • Following charted stitch patterns
  • Working in the round
  • Using circular needles
  • Using double-pointed needles
  • Creating buttonholes
  • Garment shaping
  • Finishing a child's garment

Is Beach Baby Suitable for Beginners?

This is probably better viewed as an advanced beginner to intermediate project rather than a first-ever knitting project.

The basic stitches are manageable, but the garment also involves patterned sections, sizing, buttonholes and circular knitting.

If you already know knit and purl stitches and have completed a few simpler projects, Beach Baby can be an appealing next challenge.

Check the Pattern Before Casting On

Read through the complete official instructions once before beginning.

Pay particular attention to:

  • Your selected size
  • The stitch-pattern diagrams
  • Buttonhole placement
  • Where shaping begins
  • When circular or double-pointed needles are required

Highlighting or noting only the numbers for your chosen size can make a multi-size pattern easier to follow.

Is Beach Baby Still Free?

Yes.

Beach Baby / DROPS Baby 10-7 is still published as a complete free knitting pattern by DROPS Design.

The official page includes the materials, sizing, diagrams and complete knitting instructions.

Amazing Knitting does not reproduce the publisher's complete copyrighted row-by-row directions or charts. Use the official DROPS page for the full pattern.

Get the Free Beach Baby Pattern

Use the official DROPS Design page for the complete current pattern:

Get the Free Beach Baby Pattern →

More Free Baby and Child Knitting Patterns

Continue exploring these verified free designs in the Amazing Knitting archive:

Explore More Children's Knitting

Before You Cast On

Choose the size based on the finished measurements, check your gauge, and make sure you have enough yarn for both the dress and hat if you want the complete matching set.

Review the chart symbols and buttonhole placement before reaching the patterned yoke, and use the current official DROPS instructions throughout the project.

With its cotton yarn, short sleeves and matching hat, Beach Baby is a lovely example of a knitted outfit designed specifically for lighter, warmer-weather wear.

Pattern credit: Beach Baby / DROPS Baby 10-7 is a DROPS Design pattern. Amazing Knitting provides an independent project guide and does not reproduce the complete copyrighted charts or row-by-row knitting instructions. Please retain the existing photograph and its original credit from the previous Amazing Knitting post.

Easy Knitting Projects for Beginners - Where to Start

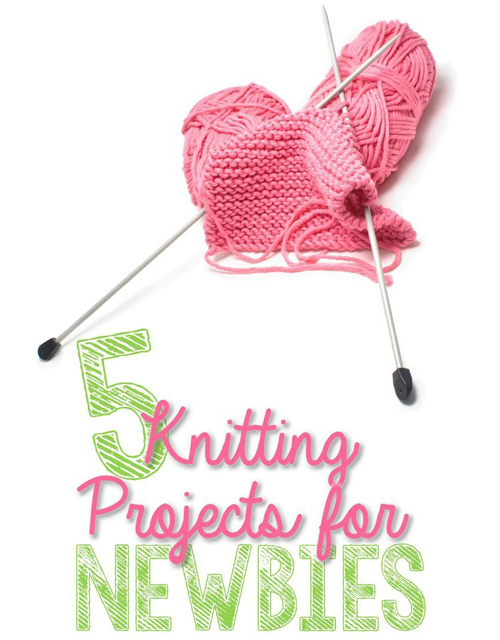
Knitting Projects for Newbies
Photo above © You put it up

Looking for your first knitting project can be more confusing than learning the knit stitch itself.

Hundreds of patterns are described as "easy" or "beginner friendly," but not every easy-looking project is suitable for someone who has only just picked up knitting needles.

A good first project should help you practice a small number of skills, give you visible progress, and be forgiving enough that a few uneven stitches do not ruin the finished result.

This guide will help you choose beginner knitting projects in a sensible order — from simple rectangular pieces to hats, baby projects, lace and your first sweater.

Beginner Knitting Guide

This page is an independent Amazing Knitting learning resource rather than one specific knitting pattern. Use it to choose a project that matches the skills you already know and the skill you want to learn next.

What Makes a Good First Knitting Project?

The best beginner project is not necessarily the smallest or the simplest-looking project.

A useful first project usually has several of these characteristics:

  • A manageable number of stitches
  • Little or no complicated shaping
  • A short repeating stitch pattern
  • Yarn that is easy to see and handle
  • Enough repetition to build muscle memory
  • A finished item you actually want to use

Your first few projects should gradually introduce new techniques rather than requiring you to learn everything at once.

Skills to Learn Before Your First Project

You do not need to know dozens of knitting techniques before starting.

For a very simple first project, focus on:

  • Making a slip knot
  • Casting on stitches
  • The knit stitch
  • Keeping stitches on the needle
  • Binding off
  • Weaving in yarn ends

Once those movements feel comfortable, add the purl stitch, decreases, increases and circular knitting one project at a time.

1. Start with a Garter Stitch Scarf

A garter stitch scarf remains one of the most practical first knitting projects.

When worked flat, you can create garter stitch simply by knitting every row.

That gives you time to practice:

  • Holding the needles
  • Controlling yarn tension
  • Recognizing stitches
  • Turning your work
  • Binding off

The shape is just a rectangle, so there is no garment fitting or complex shaping to worry about.

Why a Scarf Is Useful for Learning

Repetition is one of the fastest ways to make the basic knitting movement feel natural.

A scarf gives you hundreds of opportunities to repeat the same motion while still producing something useful.

The main disadvantage is that a full-length scarf can take time, so a small headband or cowl may be more motivating if you prefer quick projects.

2. Try a Dishcloth or Washcloth

A knitted washcloth is a good alternative when you want a project that finishes quickly.

It gives you a small square where you can practice basic stitches without worrying about exact garment fit.

Cotton yarn is commonly chosen for washable household cloths.

Once you know the knit stitch, a washcloth can also become your practice space for:

  • Purl stitches
  • Seed stitch
  • Ribbing
  • Simple eyelets
  • Textured stitch patterns

3. Knit a Simple Cowl

A cowl can feel more like a finished wearable than a practice square while still remaining relatively simple.

Some beginner cowls are worked flat as rectangles and seamed at the end. Others introduce circular needles and knitting in the round.

Choose the flat version first if circular knitting is still unfamiliar.

4. Try an Easy Baby Blanket

A baby blanket can be an excellent first larger project because it does not require body measurements or garment shaping.

Simple blanket patterns often repeat the same stitches across many rows, allowing you to improve consistency.

The main consideration is commitment: even a baby blanket contains many more stitches than a washcloth or headband.

Free Beginner Blanket Idea: Waffle Blanket

Once you are comfortable maintaining a repeating texture, explore the free Waffle Blanket pattern in the Amazing Knitting archive.

Explore the Waffle Blanket →

5. Move On to a Simple Hat

A basic hat introduces one important new idea: shaping.

Many hats gradually decrease stitches near the crown.

Depending on the pattern, a hat may be:

  • Worked flat and seamed
  • Worked in the round on circular needles
  • Finished with double-pointed needles or another small-circumference method

If you are completely new, a flat-knit hat may feel easier.

6. Try a Textured Scarf

After plain garter stitch feels comfortable, a textured scarf is a good way to learn something new without adding garment shaping.

You can practice new stitches while keeping the overall project shape extremely simple.

Free Next-Step Project: Morning Surf Scarf

Morning Surf Scarf is a verified free pattern already available in the Amazing Knitting archive.

It is a useful option when you are ready to move from plain knitting into a more decorative fabric.

View Morning Surf Scarf →

7. Learn Your First Lace Pattern

Lace does not have to mean an enormous, complicated shawl.

A small lace scarf is a much friendlier introduction because the stitch count is limited and the overall shape remains rectangular.

Before starting, become comfortable with:

  • Yarn overs
  • Basic decreases
  • Counting stitches
  • Reading repeat instructions

Free Beginner Lace Project: Little Leaf Lace Scarf

Little Leaf Lace Scarf by Sivia Harding is a particularly useful bridge into lace knitting because it combines a straightforward scarf shape with a repeating leaf motif.

Explore Little Leaf Lace Scarf →

8. Try Your First Triangle Shawl

A triangular shawl introduces increases and teaches you how knitted shaping develops row by row.

The project can look sophisticated even when the basic construction is relatively logical.

Free Shawl Idea: June Bunnies Shawl

June Bunnies Shawl is a customizable top-down triangular shawl and is especially useful when you are ready to explore simple lace.

Explore June Bunnies Shawl →

9. Try a Baby Cardigan

A baby cardigan can be a practical introduction to garment knitting because the project is much smaller than an adult sweater.

It may introduce:

  • Garment sizing
  • Increasing
  • Sleeves
  • Button bands
  • Reading a multi-size pattern

A top-down construction can be particularly attractive because you can see the garment shape develop as you work.

Free Baby Cardigan: Fuss Free Baby Cardigan

Louise Tilbrook's Fuss Free Baby Cardigan is a free DK-weight pattern with a top-down raglan construction and is a useful next step once your basic knitting feels secure.

Explore Fuss Free Baby Cardigan →

10. Knit Your First Simple Sweater

You do not need to wait years before making a sweater.

The important thing is to choose a design whose construction matches the skills you already have.

Look for patterns with:

  • Simple shapes
  • Clear sizing
  • Minimal complicated stitch work
  • Good construction notes
  • Few finishing steps

Free First-Sweater Idea: French Macaroon

French Macaroon by The Noble Thread is a small garter-stitch children's pullover with a simple boat-neck shape and uncomplicated construction.

It can be a useful way to understand how knitted pieces become a garment without beginning with a large adult sweater.

Explore French Macaroon →

A Simple Beginner Project Progression

A practical learning path:

1. Garter-stitch square or washcloth

2. Simple scarf or headband

3. Textured scarf or cowl

4. Simple blanket

5. Hat with basic shaping

6. Lace scarf or shawl

7. Baby cardigan

8. Simple sweater

This is not a rule. If one particular project excites you, motivation can be more valuable than following a perfect sequence.

What Yarn Is Easiest for Beginners?

A smooth, medium-weight yarn is often easier to learn with than extremely thin, fuzzy or novelty yarn.

You want to be able to see individual stitches clearly so that you can recognize mistakes.

Avoid choosing yarn only because it looks beautiful in the skein.

For your first project, ease of handling is usually more useful than an unusual texture.

Light Colors Can Be Easier to Read

Very dark yarn can make it difficult to see where one stitch ends and the next begins.

A light or medium color can make the structure clearer while you are learning.

Once you can recognize stitches easily, yarn color becomes much less important.

Don't Begin with Extremely Fuzzy Yarn

Mohair-like or heavily textured yarns can hide stitches.

They can also be difficult to unravel when you need to correct an error.

Save highly fuzzy yarn for a later project unless you are already comfortable identifying stitches by touch.

What Needles Should a Beginner Use?

Choose the needle size required by the pattern and appropriate for the yarn rather than buying one universal "beginner needle."

For practice knitting, medium-sized needles and medium-weight yarn can make the stitches easier to see and manipulate.

The important thing is that the needle should not make the fabric so tight that inserting the tip becomes difficult.

Wood or Metal Needles?

Both can work well.

Wooden or bamboo needles tend to offer more surface grip, which some new knitters find reassuring because stitches are less likely to slide away.

Smooth metal needles can feel faster once you become comfortable controlling the stitches.

There is no single correct material for every beginner.

Don't Choose a Project Only Because It Says "Easy"

Difficulty labels vary between designers.

Before starting, scan the skills required.

A project described as beginner-friendly may still require techniques such as:

  • Knitting in the round
  • Cables
  • Lace
  • Short rows
  • Picking up stitches
  • Seaming

None of these techniques is impossible for a beginner, but you should know what you are agreeing to learn.

Choose One New Skill at a Time

A particularly effective approach is to choose each new project because it adds one unfamiliar technique.

For example:

  • Project 1: knit stitch
  • Project 2: purl stitch
  • Project 3: ribbing
  • Project 4: decreases
  • Project 5: knitting in the round
  • Project 6: yarn overs and lace
  • Project 7: garment shaping

This prevents a single project from becoming a collection of ten new problems at once.

Make a Swatch When Size Matters

You can often practice freely on a scarf or washcloth.

But once you begin hats, sweaters, cardigans or fitted baby garments, gauge becomes much more important.

A gauge swatch tells you whether your personal knitting tension produces the dimensions expected by the pattern.

Learn How to Fix Mistakes

Becoming a confident knitter does not mean never making mistakes.

It means learning to recognize and repair them.

Useful early skills include:

  • Recognizing a dropped stitch
  • Unknitting stitches one at a time
  • Counting stitches
  • Checking pattern repeats
  • Using stitch markers
  • Using a lifeline in lace

Finish Your First Projects

A very simple finished project often teaches more than five ambitious projects abandoned halfway through.

Finishing teaches additional skills such as binding off, weaving in ends, seaming and blocking.

Choose something achievable enough that you are likely to reach that final stage.

Don't Worry About Perfect Tension

Your first rows may look different from your twentieth row.

That is normal while your hands are learning a completely new movement.

Concentrate on forming stitches consistently rather than trying to make your first project look machine-made.

More Beginner-Friendly Patterns on Amazing Knitting

Beginner Knitting Stitch Guides

When you want to practice new textures before using them in a full project, explore these Amazing Knitting stitch guides:

Explore More Easy Knitting Patterns

What Should You Knit First?

If you have never completed a project before, start with a small rectangle: a washcloth, headband or simple scarf.

If you already know knit and purl, choose a project that adds one new skill — perhaps ribbing, a simple decrease or a textured stitch.

If you can comfortably follow a basic pattern, move to a hat, shawl or baby cardigan.

The goal is not to remain a "beginner" until you know every technique. Each finished project should teach you enough to make the next project slightly more interesting.

Editorial note: This Amazing Knitting page is an independent beginner-knitting resource. It does not reproduce another publisher's pattern collection or copyrighted instructions. Individual project pages linked above identify and direct readers to their respective designers and authorized pattern sources. Please retain the photograph and original photo credit from the previous version of this page.

Discover More From the Archive

A fresh mix of knitting patterns and tutorials from the Amazing Knitting archive.

Finding patterns from the archive…