Skip to content

...

Showing posts sorted by relevance for query textured knitting. Sort by date Show all posts

Rabbit Ears Knitting Stitch - Textured Stitch Guide

Colorful Rabbit Ears Knitting Stitch - Tutorial
Photos above © canselin örgü dünyası

Rabbit Ears Knitting Stitch is a decorative textured knitting stitch with small raised motifs that create a playful, repeating surface across the fabric.

The stitch has appeared in online knitting tutorials under names such as Rabbit Ears Stitch, particularly in visual and video-based knitting lessons.

Its textured appearance can add interest to simple projects such as scarves, hats, children's garments, sweater panels and other knitted accessories.

This guide explains how to approach the texture, choose yarn and needles, swatch successfully, recognize common problems and decide where this decorative stitch can work best.

About This Stitch

"Rabbit Ears Stitch" is a descriptive name used in online knitting tutorials rather than a standardized pattern name with one universally documented designer, gauge or yarn requirement. Different tutorials using similar names may not necessarily use identical instructions.

Rabbit Ears Knitting Stitch at a Glance

Technique: Rabbit Ears Knitting Stitch

Category: Decorative textured knitting

Appearance: Repeating raised motifs

Best For: Scarves, hats, sweater panels and children's garments

Yarn: Choose a yarn that gives clear stitch definition

Needles: Match to your yarn and desired fabric

Recommended First Step: Make a swatch before using the stitch in a project

What Is Rabbit Ears Knitting Stitch?

Rabbit Ears Stitch is a descriptive name used for a decorative knitted texture in which repeating stitch formations create small raised shapes across the fabric.

The texture is more visually active than ordinary stockinette, making it useful when you want the knitted fabric itself to provide the decoration.

Instead of adding colorwork, embroidery or sewn embellishments, the surface interest comes directly from manipulating the knitted stitches.

Why the Name "Rabbit Ears"?

The name refers to the appearance of the individual textured motifs.

When repeated across the fabric, the raised elements can suggest pairs of small ears emerging from the knitted background.

As with many informal stitch names, the exact appearance can vary between tutorials and knitting traditions.

Important: The Name Is Not a Universal Formula

When searching for Rabbit Ears Stitch online, you may find different tutorials using similar terminology.

Do not automatically assume that every tutorial called Rabbit Ears uses the same:

  • Cast-on multiple
  • Number of repeat rows
  • Stitch manipulation
  • Yarn weight
  • Needle size
  • Right-side and wrong-side sequence

Follow one complete version consistently rather than combining individual rows or techniques from unrelated tutorials.

Why Swatching Matters

A textured stitch can behave very differently from ordinary stockinette.

Before using Rabbit Ears Stitch in a scarf, sweater or hat, make a reasonably sized sample.

Your swatch will help you answer several important questions:

  • Are the motifs clearly visible?
  • Is the fabric too stiff?
  • Does the yarn hide the texture?
  • Does the fabric curl?
  • How much does the stitch contract horizontally?
  • How does it change after washing or blocking?

Choosing Yarn for Rabbit Ears Stitch

Because the attraction of this stitch is its surface texture, yarn selection can make a major difference.

A smooth yarn with good stitch definition usually makes small textured motifs easier to see.

Very fuzzy yarn may soften the edges of the pattern and make the individual shapes less distinct.

Solid Colors Show Texture Clearly

A solid color is often the easiest choice when your goal is to emphasize stitch structure.

Light and medium shades can make shadows around raised stitches more visible, especially in photographs.

Dark yarn can also look beautiful, but very dark shades may make subtle stitch details harder to see.

Can You Use Variegated Yarn?

Yes, but swatch first.

Strong color changes and a strong textured stitch are both competing for visual attention.

Sometimes that combination produces an exciting fabric; in other cases the color variation makes the individual motifs difficult to recognize.

Gently tonal yarn is often a useful middle ground.

Choosing Needle Size

There is no single universal needle size for a stitch called Rabbit Ears.

Begin with a needle appropriate for your yarn, then evaluate the actual fabric rather than relying only on the recommendation printed on the yarn label.

If the texture feels compressed and difficult to work, experiment with a slightly larger needle.

If the motifs look loose and poorly defined, a slightly smaller needle may give the fabric more structure.

Do Not Invent Gauge from a Photograph

A photograph can show the character of a stitch, but it cannot reliably tell us the original yarn, needle size or gauge.

If you are adapting this texture to your own project, measure the gauge from your own washed or blocked swatch.

This is especially important for fitted garments.

Using Rabbit Ears Stitch in a Scarf

A scarf is one of the easiest ways to experiment with a new textured stitch.

The rectangular construction lets you concentrate on maintaining the stitch repeat without worrying about armholes, neck shaping or garment sizing.

Before casting on a full scarf, check whether the edges of your swatch lie reasonably flat.

Using It in Hats

A textured motif can make an otherwise simple hat much more interesting.

However, converting a stitch worked flat into circular knitting is not always automatic.

Wrong-side rows in a flat pattern may need to be reconsidered when the work is always facing you in the round.

Use a version specifically written for circular knitting unless you are comfortable adapting stitch patterns yourself.

Using It in Sweaters and Pullovers

Rabbit Ears texture does not necessarily have to cover an entire sweater.

It can be used as a decorative panel on:

  • The center front
  • The upper yoke
  • Sleeves
  • Pockets
  • A cardigan front
  • A children's pullover

Combining textured and simpler sections can also keep a garment from becoming visually overwhelming.

Children's Knitting Projects

The playful name and raised texture make Rabbit Ears Stitch particularly appealing for children's garments and accessories.

Possible uses include:

  • Cardigans
  • Pullovers
  • Vests
  • Hats
  • Scarves
  • Blanket panels

For children's clothing, choose comfortable yarn and avoid adding loose decorative pieces simply to enhance the rabbit theme.

Adding a Border

If your textured swatch tends to curl or the edges look unfinished, consider surrounding it with a simple border.

Depending on the project, possibilities include:

  • Garter stitch
  • Seed stitch
  • Ribbing
  • Another simple non-curling edge

Keep the border visually simple so it does not compete with the central texture.

Keep Your Tension Consistent

Textured stitches often exaggerate changes in tension.

If one motif is worked tightly and the next loosely, the difference may be much more obvious than it would be in plain stockinette.

Work at a comfortable pace and avoid pulling the working yarn sharply after each manipulated stitch.

Learn to Read the Texture

After several repeats, stop looking only at the instructions and examine the fabric itself.

Identify where each motif begins and how it relates to the motifs in the previous row.

Learning to recognize the structure visually can help you notice mistakes much sooner.

Use Stitch Markers for Wide Projects

If the stitch pattern repeats several times across a wide scarf, blanket or sweater panel, markers can help separate the repeats.

If the stitch count is wrong at one marker, you know the problem is probably within that section rather than somewhere across the entire row.

Common Problem: The Motifs Look Uneven

Uneven motifs are often related to tension.

Give yourself enough yarn when forming each textured element and try to make the same movement consistently throughout the row.

The fabric usually becomes more uniform as your hands become familiar with the technique.

Common Problem: The Texture Is Hard to See

Several things can hide a textured stitch:

  • Very fuzzy yarn
  • Highly variegated colors
  • Extremely loose gauge
  • Extremely dark yarn
  • Too few completed repeats

Try changing only one variable at a time so you can see which adjustment improves your swatch.

Common Problem: The Fabric Is Too Dense

If the fabric feels much stiffer than expected, compare your gauge and tension with the type of project you want to make.

A structured fabric may work beautifully for a bag or cushion but feel uncomfortable as a scarf.

Moving up a needle size and making another swatch is a simple experiment.

Blocking a Textured Stitch

Blocking can help even the fabric, but the goal is not necessarily to stretch every raised element completely flat.

Use a method appropriate for your yarn fiber and allow the natural texture to remain visible.

Always test your finishing method on a swatch first when using an unfamiliar yarn.

Rabbit Ears Stitch vs. Lace

A decorative textured stitch and an open lace stitch create visual interest in different ways.

Lace relies heavily on deliberate openings, increases and decreases, while textured knitting may emphasize raised or manipulated stitch formations.

If you want a warmer, more substantial surface, a textured stitch may be preferable to very open lace.

Rabbit Ears Stitch vs. Cables

Cable patterns usually create strong crossing lines, ropes or braided structures.

Rabbit Ears-style texture can create smaller individual motifs instead, making it useful when you want repeated surface detail rather than large cable columns.

Make a Reference Swatch

When you find a Rabbit Ears technique you enjoy, keep the swatch instead of unraveling it.

Attach a small note recording:

  • Yarn name and weight
  • Needle size
  • Stitch multiple used by your tutorial
  • Gauge after washing
  • Source of the instructions

This turns a practice piece into a useful addition to your personal stitch library.

About the Original Tutorial Referenced by This Page

The original Amazing Knitting post was created as a short discovery page pointing readers toward an external video tutorial for the colorful Rabbit Ears Stitch shown in the photograph.

Because third-party videos and links can change over time, and because we could not verify a definitive original designer or standardized published specification for this exact stitch, Amazing Knitting does not reproduce or reconstruct another creator's row-by-row instructions here.

Instead, this page is maintained as an independent educational guide to help you understand the texture and use a legitimate tutorial safely and successfully.

More Knitting Stitch Guides

Continue exploring textured knitting with these Amazing Knitting guides:

Before You Start

Choose a yarn that shows texture clearly and begin with a swatch rather than a full garment.

Learn one complete Rabbit Ears technique from a reliable source, work several repeats until you understand how the motifs develop, and measure the finished fabric after washing or blocking.

Once you know how your chosen version behaves, you can decide whether it is best suited to a scarf, hat, sweater panel, vest or another textured knitting project.

Editorial note: "Rabbit Ears Stitch" is used here as a descriptive name for the textured knitting technique shown in the original Amazing Knitting post. We could not verify a single definitive designer or standardized specification for the exact stitch, so this page does not claim one. Amazing Knitting provides an independent educational guide and does not reproduce another creator's complete video or row-by-row instructions. Please retain the original photograph credit: Photos above © canselin örgü dünyası.

Baby Honeycomb Pattern - Tutorial

Baby Honeycomb Pattern - Tutorial
Photos above ©  Knitting Knife Crochet Paradise

Baby Honeycomb Stitch is a beautifully textured knitting pattern that creates a repeating surface inspired by small honeycomb cells.

It is especially attractive for baby blankets, cardigans, scarves and other projects where you want more depth and interest than plain stockinette or garter stitch.

This guide will help you understand the look of the stitch, how to practice it successfully, where it works best, and what to watch for before using it in a larger project.

The original Amazing Knitting post was inspired by a video tutorial from Knitting Knife Crochet Paradise. Rather than reproducing another creator's full instructions here, this updated page focuses on helping you understand and use the honeycomb texture with confidence.

About This Tutorial

This page is an Amazing Knitting educational guide to the Baby Honeycomb texture. It does not reproduce the complete instructions from the original video source.

Baby Honeycomb Stitch at a Glance

Type: Textured knitting stitch

Appearance: Repeating honeycomb / cell-like texture

Best For: Baby blankets, sweaters, cardigans, scarves and accessories

Fabric Character: Raised and dimensional

Recommended First Step: Practice on a swatch

Page Type: Educational stitch guide

What Does a Honeycomb Knitting Pattern Look Like?

Honeycomb knitting patterns use repeating stitches to create raised sections that resemble the cells of a honeycomb.

Depending on the exact technique, the shapes may appear as small hexagons, diamonds or softly rounded cells.

What makes the texture attractive is the combination of recessed and raised areas. Light catches the surface differently across the fabric, giving even a single-color yarn much more visual depth.

Why It Works So Well for Baby Knits

Textured stitches are especially popular in baby knitting because they can make a simple project feel special without relying on complicated colorwork.

A honeycomb texture can be used to add interest to:

  • Baby blankets
  • Cardigans
  • Pullovers
  • Hats
  • Scarves
  • Blanket borders
  • Decorative panels

Even a narrow section of honeycomb texture can become the focal point of an otherwise simple garment.

Start with a Swatch

Before using any textured stitch in a large project, make a generous practice swatch.

This is particularly useful with honeycomb patterns because the texture can change the width and elasticity of the fabric compared with plain stockinette.

A swatch lets you check:

  • Whether you like the texture in your chosen yarn
  • How much the fabric contracts
  • Whether the stitch definition is clear
  • How the fabric behaves after washing
  • Whether your needle size gives the drape you want

Choose Yarn with Good Stitch Definition

Honeycomb textures tend to look best when the individual stitches remain easy to see.

Very fuzzy yarn can soften the raised structure and make the honeycomb effect less obvious.

Smooth yarns often show the pattern particularly well, although the best choice depends on the project you plan to make.

Solid Colors Can Show the Texture Beautifully

You do not need complicated color changes to make this stitch interesting.

A single solid or lightly heathered shade often allows the raised honeycomb structure to stand out more clearly than a highly variegated yarn.

Soft cream, gray, pastel blue, blush, sage and warm neutral shades can all work beautifully for baby projects.

Watch Your Tension

Textured stitches can expose differences in tension more clearly than basic garter stitch.

Try to keep your working yarn relaxed and consistent throughout the repeat.

If some honeycomb cells look noticeably tighter or larger than others, check whether you are pulling certain stitches more firmly than the rest.

Do Not Judge the Texture Too Early

Many dimensional knitting stitches look slightly uneven during the first few rows.

Give the pattern enough vertical repeats to develop before deciding whether the stitch is working correctly.

The honeycomb effect often becomes much easier to recognize after several complete repeats.

Use a Light-Colored Practice Yarn

If you are learning the technique for the first time, a medium or light solid color makes it easier to see where each stitch belongs.

Very dark yarn can make the structure harder to read, particularly when you are trying to identify mistakes.

Count Your Stitches Regularly

Textured patterns often depend on maintaining an exact stitch repeat.

If you accidentally add or lose a stitch, the honeycomb cells can begin to shift out of alignment.

Count the stitches at the end of a repeat section rather than waiting until the fabric looks obviously wrong.

Use Stitch Markers for Wide Projects

If you adapt the stitch for a wide baby blanket, markers can help divide the row into smaller repeat sections.

That makes it easier to identify exactly where a mistake occurred instead of recounting an entire blanket-width row.

Honeycomb as an All-Over Pattern

One way to use the texture is across an entire project.

An all-over honeycomb baby blanket can look rich and detailed even when knitted in only one color.

If you choose this approach, consider adding a simpler border so the textured center remains the main visual feature.

Honeycomb as a Decorative Panel

You can also use the texture more selectively.

A central honeycomb panel surrounded by stockinette or garter stitch can add interest without making the whole project heavily textured.

This approach works particularly well on sweaters and cardigans.

Using Honeycomb in a Baby Blanket

If you want to design a simple blanket around a honeycomb stitch, begin by deciding the finished width and making a swatch.

Measure how many stitches your swatch produces per inch or centimeter, then use that measurement to estimate the number of repeats needed for your blanket.

Add border stitches separately if you want a garter, seed-stitch or ribbed frame.

Remember That Texture Changes Gauge

Do not assume the gauge from stockinette will be the same in the honeycomb pattern.

Raised and crossed structures can pull the fabric inward, sometimes producing a narrower piece than expected.

Measure the actual textured swatch rather than using the yarn-label gauge alone.

Blocking the Honeycomb Texture

Blocking can help even out the fabric after knitting, but avoid stretching the piece so aggressively that you flatten the texture.

The goal is to relax the stitches and straighten the edges while preserving the raised honeycomb structure.

Always use a blocking method appropriate for the fiber in your yarn.

Choosing Yarn for Baby Projects

If you plan to use the honeycomb stitch for a baby item, consider the practical qualities of the yarn as well as its appearance.

  • Soft against sensitive skin
  • Easy to wash
  • Durable enough for repeated use
  • Good stitch definition
  • Comfortable drape
  • Suitable care instructions for the recipient

Simple Borders Pair Well with Honeycomb

Because the center texture already provides plenty of visual detail, simple borders often work best.

Garter stitch, seed stitch or a basic rib can frame the honeycomb without competing with it.

Common Problems to Watch For

If your honeycomb fabric does not look as expected, check these common causes:

  • A missed stitch in the repeat
  • Uneven tension
  • Beginning the next repeat in the wrong place
  • Working the wrong-side row incorrectly
  • Losing track of the row number
  • Using yarn that hides too much stitch definition

Keep Track of Rows

A row counter or simple paper checklist can be extremely helpful.

Textured stitch patterns usually become easy once the rhythm is familiar, but losing your place halfway through a repeat is one of the easiest ways to distort the pattern.

Is Baby Honeycomb a Specific Garment Pattern?

No. The original Amazing Knitting page is best understood as a stitch tutorial, not as a complete baby sweater or blanket pattern with fixed sizing and yardage.

That is actually useful because the stitch can be adapted to many different knitting projects.

Looking for a Complete Baby Project?

If you like textured knitting but would rather follow a complete published baby pattern with established sizing and yarn requirements, these free patterns already verified in the Amazing Knitting archive are good places to continue:

Explore More Knitting Stitches

If stitch patterns are what brought you here, continue exploring Amazing Knitting:

Before You Use This Stitch in a Project

Knit a swatch first and allow several complete repeats to develop.

Measure the fabric in the actual honeycomb texture rather than relying on stockinette gauge, and wash or block the swatch the same way you plan to treat the finished project.

Once you are happy with the stitch definition, drape and dimensions, you can confidently adapt the texture to a blanket, scarf, cardigan panel or another project of your choice.

Source note: The original 2019 Amazing Knitting post credited its reference image and video inspiration to Knitting Knife Crochet Paradise. This updated Amazing Knitting article is an independent educational guide and does not reproduce another creator's complete video instructions.

Triple Slip Rib Square - Free Loom Knitting Pattern

Triple Slip Rib Square - Free Pattern
Photos above © Bethany A Dailey

Triple Slip Rib Square by Bethany A Dailey is a textured loom-knitting square from the Knitting Board Stitchology series.

The design uses slipped stitches and ribbed texture to create long, alternating raised lines with a rustic woven appearance.

Best of all, the original pattern is still available free, making this an excellent small project for practicing textured loom knitting before using the stitch in a larger scarf, cowl or blanket.

✓ Free Loom Knitting Pattern

Triple Slip Rib Square: Stitchology 17 by Bethany A Dailey remains available as a free loom-knitting pattern. This is a loom knitting project, not a traditional two-needle knitting pattern.

Triple Slip Rib Square at a Glance

Pattern: Triple Slip Rib Square: Stitchology 17

Designer: Bethany A Dailey

Series: Stitchology

Publisher: Knitting Board Blog

Published: January 2016

Craft: Loom Knitting

Project: Afghan Block / Stitch Square

Finished Size: Approx. 8 × 8 in / 20 × 20 cm

Yarn Weight: Worsted

Yardage: Approx. 75 yd / 69 m

Original Sample Yarn: Berroco Vintage

Stitch Repeat: 8 rows

Availability: Free

Important: This Is a Loom Knitting Pattern

Before You Begin

Triple Slip Rib Square was specifically designed for loom knitting. The original instructions refer to loom pegs and loom-knitting techniques rather than conventional knitting needles.

This distinction matters because the words "knitting pattern" are often used for both loom knitting and needle knitting.

If you normally knit with two needles or circular needles, do not assume that conventional needle-knitting instructions can be substituted directly for the original loom pattern.

About the Stitchology Series

Triple Slip Rib is part of the Stitchology collection published through the Knitting Board Blog.

The series explores different stitch patterns that can be created on a knitting loom, often presenting them as small squares.

These squares allow loom knitters to learn a texture on a manageable project before adapting the idea to larger pieces.

What Does Triple Slip Rib Look Like?

The finished fabric features long alternating raised lines that create a strong vertical and horizontal rhythm.

Bethany A Dailey describes the appearance as resembling a rustic weave.

The slipped-stitch structure also creates a relatively thick and sturdy panel.

An 8-Row Repeat

One of the attractive features of Triple Slip Rib is that the texture is based on a relatively short:

8-row repeat

Once the sequence becomes familiar, the repetitive structure can make the stitch easier to remember than textures with very long row repeats.

Use the designer's original instructions for the exact peg-by-peg sequence.

Finished Square Size

The Stitchology sample is designed to produce an approximately:

8 × 8 inch square

approximately 20 × 20 cm

This makes it useful as a practice swatch, sampler square or building block for a larger afghan.

Original Yarn

The published sample uses Berroco Vintage, a worsted-weight yarn.

The original square requires approximately:

75 yards / 69 meters

You do not necessarily need to use the exact sample yarn, but a worsted-weight yarn with good stitch definition will help the slipped texture remain visible.

Choosing a Substitute Yarn

When choosing another worsted-weight yarn, consider:

  • Stitch definition
  • Fiber elasticity
  • Finished fabric thickness
  • Washability
  • Whether the yarn suits your final project

A smooth yarn will generally display the long slipped-stitch lines more clearly than a very fuzzy or highly textured yarn.

Solid Colors Work Especially Well

The Triple Slip Rib texture creates much of its visual interest through light and shadow.

A solid or gently tonal yarn allows those raised and recessed areas to remain easy to see.

Variegated yarn can also work, but strong color changes may compete with the stitch structure.

Original Loom Setup

The designer's sample was created using an Authentic Knitting Board Adjustable Hat Loom configured with rounded pieces and peg connectors for approximately a 3/8-inch gauge.

The designer also identifies the Sock Loom 2 and All-n-One Loom as possible loom options.

Check the current original instructions before setting up your loom, because peg spacing and configuration affect the finished dimensions.

Tools and Notions

In addition to the loom and yarn, the original project calls for basic loom-knitting tools such as:

  • Loom tool
  • Yarn needle
  • Scissors

Helpful optional tools include:

  • Peg markers
  • Row counter
  • Blocking pins

Why a Row Counter Helps

An eight-row repeat is not especially long, but keeping track of your position is important because the alternating slipped sections create the overall woven effect.

A simple row counter can prevent accidentally repeating or skipping part of the sequence.

Use Peg Markers While Learning

Peg markers can help identify repeating sections while you are becoming familiar with the pattern.

As the stitch becomes easier to recognize visually, you may find that you need fewer reminders.

Understanding Slipped Stitches

A slipped stitch is carried without being worked in the same way as its neighboring stitches.

Repeating this strategically allows elongated strands and raised areas to develop in the fabric.

In Triple Slip Rib, those effects contribute to the distinctive long dash-like texture.

A Thick and Sturdy Fabric

The designer specifically notes that Triple Slip Rib creates a fairly thick and sturdy panel.

That characteristic makes it useful for projects where you want more substance than a lightweight open stitch.

More Than an Afghan Square

Although Stitchology presents the pattern as an 8-inch square, the texture can inspire larger projects.

The designer suggests it would work particularly well for:

  • Cowls
  • Scarves
  • Blankets
  • Sampler afghans

Using Triple Slip Rib for a Scarf

The long linear texture can create a strong visual effect when repeated along the length of a scarf.

Before adapting the square, make a sample first so you can evaluate the fabric thickness, drape and reverse side.

Using It for a Cowl

A thick slipped-stitch texture can be particularly suitable for a warm cowl.

However, adapting a flat Stitchology square into a different construction may require changes to the setup and finishing.

Do not assume that the square instructions automatically become an in-the-round cowl pattern.

Using the Squares for a Blanket

The original 8-inch format naturally lends itself to sampler blankets.

You can create multiple loom-knit squares and join them later, or combine Triple Slip Rib with other Stitchology textures for a varied afghan.

Before making many squares, check your first finished and blocked square to make sure its dimensions work with the rest of your project.

Blocking the Square

Blocking can help even the edges and bring a sample closer to its intended dimensions.

Choose a blocking method suitable for the fiber content of your yarn.

Avoid stretching so aggressively that the raised slipped-stitch texture becomes flattened.

Is Triple Slip Rib Beginner Friendly?

It can be a good next project for someone who already understands the basic operation of a knitting loom.

The eight-row repeat is relatively manageable, and the designer describes it as a stitch that does not require excessive tricky finger work.

A complete first-time loom knitter may want to practice basic loom knitting and yarn handling before beginning the square.

Skills You Will Practice

  • Loom setup
  • Working across loom pegs
  • Slipped-stitch texture
  • Following an 8-row repeat
  • Maintaining even tension
  • Binding off
  • Finishing and blocking a square

Keep Your Tension Consistent

Slipped-stitch patterns can exaggerate differences in tension.

Avoid pulling the working yarn excessively tight across the slipped areas, because this can distort the square or make the fabric less flexible.

Consistent yarn handling becomes easier as you repeat the sequence.

Don't Confuse Loom and Needle Instructions

Important

Triple slip rib can also describe textures used in conventional needle knitting. The specific project featured here is Bethany A Dailey's Triple Slip Rib Square: Stitchology 17 and was designed for a knitting loom. Do not combine its specifications with unrelated needle-knitting patterns that happen to use a similar stitch name.

Is Triple Slip Rib Square Still Free?

Yes.

Triple Slip Rib Square: Stitchology 17 is currently documented as a free loom-knitting pattern from the Knitting Board Stitchology series.

Amazing Knitting provides this independent project guide rather than reproducing the designer's complete peg-by-peg instructions.

Get the Free Triple Slip Rib Square Pattern

Visit the original Knitting Board Stitchology resource for the complete loom-knitting instructions:

Get the Free Triple Slip Rib Square Pattern →

Pattern Record on Ravelry

Ravelry also maintains the pattern record with project specifications and designer information:

View Triple Slip Rib Square on Ravelry →

More Stitch Guides on Amazing Knitting

Explore More Knitting Techniques

Before You Begin

Make sure you are following the loom-knitting version of Triple Slip Rib, select an appropriate worsted-weight yarn, and configure your loom according to the designer's current instructions.

Use markers and a row counter if helpful while learning the eight-row sequence, and pay particular attention to maintaining relaxed, consistent tension across the slipped sections.

Once you are comfortable with the square, the same texture can become a useful starting point for larger loom-knitting projects.

Pattern credit: Triple Slip Rib Square: Stitchology 17 was designed by Bethany A Dailey and published through the Knitting Board Stitchology series. Amazing Knitting provides an independent editorial guide and does not reproduce the complete copyrighted pattern instructions. Preserve the existing photograph and its exact original credit from the current Amazing Knitting page.

Lattice with Seed Stitch - Knitting Stitch Guide

Lattice with Seed Stitch - Free Pattern
Photos above © mgb

Lattice with Seed Stitch is a beautiful textured knitting pattern that combines the appearance of broad woven bands with a background of small seed-stitch texture.

Although the finished fabric can look surprisingly complex, the underlying idea is created primarily with basic knit and purl stitches.

This Amazing Knitting guide explains how the texture is constructed, how to recognize the different sections, where it works best, and what to watch for when using it in your own knitting projects.

About This Stitch Guide

Lattice with Seed Stitch is a textured knit-and-purl stitch concept rather than one specific garment pattern. Different stitch references may arrange or begin the repeat differently, so always follow one complete version consistently when knitting a project.

Lattice with Seed Stitch at a Glance

Type: Textured knitting stitch

Main Techniques: Knit and purl

Visual Style: Lattice / basketweave over seed-stitch texture

Common Repeat: 18-row texture sequence

Common Flat-Knitting Multiple: Multiple of 14 + 2 stitches

Skill Level: Advanced beginner / confident beginner

Good For: Blankets, scarves, cushions, panels and home accessories

What Is Lattice with Seed Stitch?

Lattice with Seed Stitch is a textured knitting pattern that creates the illusion of broad strips passing over and under one another.

Between these larger visual bands is a smaller, pebbled texture similar to seed stitch.

Together, these elements create a fabric that can resemble woven basketry even though the effect is produced with ordinary knitting stitches rather than actual weaving.

It Looks More Complicated Than It Is

One of the most appealing things about this texture is the difference between its appearance and its underlying technique.

At first glance, the broad lattice sections can look like cables or crossed stitches.

In common versions of the stitch, however, the effect is created mainly by carefully arranging knit and purl stitches.

This makes it an interesting next step for someone who already knows the basic stitches but wants to create a more sophisticated-looking fabric.

Understanding the Three Textures

It helps to stop thinking of the design as one complicated pattern and instead look for the simpler textures inside it.

1. Seed-Stitch Areas

The small alternating knit-and-purl sections create the pebbled background.

Seed-style texture visually separates the larger bands and gives the fabric additional depth.

2. Smooth Vertical Sections

Columns of smoother stitches help form part of the apparent lattice.

Because smooth stockinette-style areas reflect light differently from seed stitch, they appear to sit above or apart from the background.

3. Horizontal Ridges

Horizontal garter-like sections interrupt the vertical areas.

When these sections alternate across successive repeats, the eye begins to interpret them as strips weaving over and under each other.

Why It Resembles Basketweave

Basketweave knitting does not require actual strands to cross one another.

Instead, contrasting knit-and-purl surfaces create blocks that appear to change direction.

Lattice with Seed Stitch takes that visual idea further by combining the larger woven-looking structure with a finer seed-textured background.

No Cable Needle Is Required

Despite the interlaced appearance, common versions of this stitch do not require traditional cable crossings.

That means you can achieve a surprisingly architectural texture using skills you may already know.

The Repeat Structure

Widely published versions of Lattice with Seed Stitch use an 18-row repeat.

For flat knitting, a commonly published setup is:

Multiple of 14 stitches + 2

The additional stitches help frame the repeating lattice units when the fabric is worked flat.

Why We Are Not Reprinting 18 Rows Here

A Note About Stitch Variations

Published references do not all begin and arrange the 18-row sequence in exactly the same way. Rather than mixing instructions from several tutorials, choose one complete version and follow it consistently from beginning to end.

This is especially important when comparing online stitch dictionaries.

Two instructions may create essentially the same visual texture while numbering the beginning of the repeat differently.

Mixing the first half of one version with the second half of another can destroy the alignment of the lattice.

Is Lattice with Seed Stitch Reversible?

Treat this as a right-side texture.

The decorative lattice effect is intended to be viewed from the front, while the reverse side has a different appearance.

This does not prevent you from using it in scarves or blankets, but it is worth considering when both sides of a finished project will be visible.

What Yarn Works Best?

This stitch is not tied to one specific yarn weight.

You can experiment with different yarns as long as you use needles appropriate for the yarn and create a fabric with enough definition to display the texture.

Smooth yarns usually make the lattice easier to see.

Solid Colors Show the Texture Clearly

If the lattice effect is the main feature of your project, a solid or gently tonal yarn is often a good choice.

The shadows created by knit and purl stitches become part of the design.

Highly variegated yarn can still be attractive, but strong color changes may compete visually with the stitch texture.

Choose Needles for the Fabric You Want

There is no single universal needle size for Lattice with Seed Stitch.

Choose a needle appropriate for your yarn, then make a swatch.

If the fabric is too loose, the woven-looking structure may become less distinct.

If it is too tight, the fabric can become stiff and the knitting may be uncomfortable to work.

Swatching Is Especially Useful

A swatch lets you evaluate more than gauge.

Before committing to a large project, check:

  • How clearly the lattice appears
  • Whether the seed texture is visible
  • How much the fabric curls or lies flat
  • The drape
  • The appearance of the wrong side
  • How the yarn behaves after washing or blocking

Keep Track of the 18-Row Repeat

The individual stitches are straightforward, but an 18-row sequence is long enough to lose your place.

A row counter can make this stitch much easier to manage.

You can also keep a printed or handwritten repeat beside your work and mark each completed row.

Learn to Read the Fabric

As the pattern develops, try to identify the lattice sections visually instead of relying only on the row number.

Ask yourself whether the next section should continue a vertical band, create a horizontal interruption, or return to the seeded background.

Learning to read the fabric makes mistakes easier to spot before they continue through several rows.

Watch Your Knit-to-Purl Transitions

Because this texture frequently switches between knit and purl stitches, pay attention to the position of the working yarn.

Move the yarn between the needle tips when changing from knit to purl or purl to knit.

Accidentally taking the yarn over the needle can create an unwanted extra stitch.

Seed Stitch Can Reveal Tension Differences

Alternating knit and purl stitches can make uneven tension more visible than plain stockinette.

Try to keep your movements relaxed and consistent.

With practice, the small irregularities often become less noticeable, especially after appropriate blocking.

Good Projects for Lattice with Seed Stitch

This texture works particularly well when you want the knitted fabric itself to be the main decorative feature.

  • Blankets and throws
  • Cushion and pillow fronts
  • Scarves
  • Home-decor panels
  • Bag panels
  • Sampler blankets
  • Textured garment panels

Using It for a Blanket

A blanket gives the lattice enough space to repeat several times across the fabric.

Before casting on a full-size blanket, knit a repeat swatch and measure its width after washing.

You can then use that measurement to estimate how many repeats are needed for your desired blanket width.

Using It for a Pillow

A cushion front is an excellent smaller project for experimenting with this texture.

The right side remains visible most of the time, so the non-reversible nature of the stitch is less important.

A simple stockinette or fabric back can keep the lattice as the main decorative feature.

Using It for a Scarf

Lattice with Seed Stitch can create an attractive textured scarf, but remember that the two sides look different.

If you want an identical appearance on both sides, choose a truly reversible stitch instead.

If you are happy with a decorative front and different reverse, the lattice can make a striking scarf fabric.

Is This a Beginner Stitch?

The individual techniques are beginner-friendly because the texture is based primarily on knit and purl stitches.

However, keeping track of a longer repeat requires more concentration than basic garter, stockinette or seed stitch.

For that reason, it is a particularly good project for a confident beginner or advanced beginner.

Skills to Know First

  • Casting on
  • Knit stitch
  • Purl stitch
  • Moving yarn correctly between knit and purl
  • Reading repeated instructions
  • Counting stitches
  • Binding off

Practice on a Small Swatch

There is no need to begin with an entire blanket.

Cast on enough stitches for a few repeats and work until you can clearly see the lattice forming.

A practice swatch gives you a chance to understand the structure before committing yarn to a larger project.

Blocking the Finished Texture

Gentle blocking can help even out the seed-stitch background and make the larger lattice sections look more consistent.

Always use a blocking method appropriate for the fiber content of your yarn.

Avoid overstretching the swatch, because excessive stretching can flatten the raised texture that gives the pattern its character.

Learn the Lattice Seed Stitch

For a complete current demonstration of this stitch, Studio Knit provides both written guidance and a video tutorial for flat knitting and knitting in the round.

View the Lattice Seed Stitch Tutorial →

More Knitting Stitches on Amazing Knitting

Explore More Stitch Tutorials

Before You Begin

Choose a smooth yarn that lets you see the texture clearly and make a small swatch before planning a larger project.

Keep track of your repeat carefully, pay particular attention when moving between knit and purl stitches, and periodically step back to check that the lattice sections remain aligned.

Most importantly, remember that online stitch references may begin the sequence at different points. Follow one complete version consistently rather than combining rows from several tutorials.

Editorial note: This Amazing Knitting page is an educational guide to the Lattice with Seed Stitch texture. Stitch dictionaries and tutorials may present variations or different starting points for similar lattice textures. Always follow the instructions for the specific version you choose.

Speed Bumps Knitting Pattern - Historical Pattern Guide

Speed Bumps - Free Pattern
Photo above © annamal

Speed Bumps is an older knitting design associated with designer Audrey Bochantin.

If this distinctive knitted design brought you to Amazing Knitting, this guide will help you identify the original pattern, understand the information that can still be verified, and avoid confusing it with several newer knitting patterns that use the same name.

The original pattern was previously referenced online through Ravelry, but we could not confirm a currently active authorized download for Audrey Bochantin's exact Speed Bumps pattern.

The good news is that the design can still be documented accurately as part of the knitting archive, and there are currently available free projects with a similar easy, textured-knitting appeal.

Pattern Availability Update

Historical references identify this design as Speed Bumps by Audrey Bochantin. We could not verify a current authorized download page for this exact pattern, so Amazing Knitting does not label it as currently free or provide copied instructions from archived third-party sources.

Speed Bumps at a Glance

Pattern: Speed Bumps

Designer: Audrey Bochantin

Craft: Knitting

Historical Gauge: 16 sts × 20 rows = 4 in in stockinette

Current Availability: Exact authorized source not verified

About the Original Speed Bumps Pattern

Speed Bumps appeared online as a knitting pattern by Audrey Bochantin and was circulated through knitting communities and pattern directories.

Older references still identify the designer and preserve a small amount of technical information, including a stockinette gauge of 16 stitches and 20 rows over 4 inches.

However, an old reference is not the same thing as a current authorized pattern source.

Because the original listing can no longer be reliably verified as an active download, Amazing Knitting does not reconstruct the missing pattern or reproduce instructions from unofficial copies.

Important: There Are Several Patterns Called Speed Bumps

The name Speed Bumps is not unique.

Today you may find completely different knitting patterns with the same or very similar title, including:

  • A women's top by Suzanne Bryan
  • A textured scarf or cowl by another designer
  • Dishcloth patterns using similar wording
  • Sock patterns and other accessories with "Speed Bumps" in the title

These should not be treated as alternate editions of Audrey Bochantin's original design.

Do Not Mix Pattern Specifications

One of the easiest mistakes with an older pattern is to search only by title and then accidentally combine information from another design.

For example, a current Speed Bumps top may have completely different:

  • Yarn weight
  • Needle size
  • Gauge
  • Garment construction
  • Sizes
  • Designer

For that reason, this guide only includes details that can be connected specifically to Audrey Bochantin's pattern.

What Can Still Be Verified?

Historical knitting references preserve two particularly useful pieces of information:

  • The pattern name was Speed Bumps.
  • The designer was Audrey Bochantin.

A historical pattern preview also records a stockinette gauge of:

16 stitches × 20 rows = 4 inches

We are deliberately not adding yarn, needle size, finished measurements or construction details unless they can be confirmed from the exact original source.

Why We Do Not Reconstruct the Missing Pattern

It may be tempting to use photographs, old project notes or snippets from the web to reverse engineer a complete set of instructions.

That would create two problems.

First, reconstructed instructions may not accurately represent the designer's original pattern.

Second, an unavailable pattern does not automatically become free to copy or republish.

Amazing Knitting therefore keeps this page as a useful historical pattern guide rather than pretending to provide the original directions.

If You Already Own the Original Pattern

If you downloaded or purchased a legitimate copy of Speed Bumps in the past, your own copy remains the best source for:

  • Cast-on numbers
  • Pattern repeats
  • Needle size
  • Yarn requirements
  • Shaping instructions
  • Finishing details

Keep that copy together with notes about the yarn and size you used, since the original online listing may be difficult to recover later.

Gauge Still Matters

The surviving historical gauge reference of 16 stitches and 20 rows over 4 inches suggests that gauge was an important part of the original design.

If you are working from a legitimate saved copy, make a swatch with the yarn and needle combination specified there rather than choosing needles based only on the photograph.

Your personal tension can change the finished dimensions substantially.

Why Pattern Names Can Be Confusing

Knitting pattern titles are not always unique identifiers.

Two independent designers may choose the same descriptive name without their projects being related.

For old patterns, always check at least:

  • Designer name
  • Publication date
  • Project category
  • Yarn weight
  • Pattern photograph

before assuming you have found the correct pattern.

A Current Free Pattern with the Same Name

There is currently another pattern called Speed Bumps by Suzanne Bryan.

It is a completely separate design: a loose-fitting women's top worked flat in two main panels.

Suzanne Bryan's version is currently available as a free pattern, but it should not be confused with the older Audrey Bochantin pattern featured on this Amazing Knitting page.

View Suzanne Bryan's Free Speed Bumps Pattern →

About Suzanne Bryan's Version

If you simply liked the name and want a currently available project, Suzanne Bryan's free Speed Bumps top offers a legitimate option.

Her pattern uses fingering-weight yarn and is worked flat in two main panels before being joined.

It is an independent design and is included here only as a clearly labeled alternative.

More Free Knitting Projects on Amazing Knitting

You can also continue with patterns whose current free sources have already been verified:

Explore More Knitting Patterns

Pattern Availability Summary

The historical Speed Bumps pattern associated with Audrey Bochantin can still be identified, but we could not confirm a current authorized download for that exact design.

For that reason, Amazing Knitting preserves this page as a pattern guide rather than presenting an unofficial copy or incorrectly linking to one of the unrelated patterns with the same title.

If an authorized Audrey Bochantin listing becomes available again, this page can be updated with a direct link to that source.

Editorial note: Speed Bumps is credited here to Audrey Bochantin based on historical pattern references. Amazing Knitting does not reproduce unavailable copyrighted instructions or substitute another designer's same-name pattern for the original. Please preserve the photograph and its existing credit from the previous version of this page.

7 Free Baby Blanket Knitting Patterns for Beautiful Handmade Gifts

Looking for a beautiful baby blanket to knit for a new arrival? These 7 free baby blanket knitting patterns include simple stripes, textured hearts, classic heirloom designs and cozy stitch patterns that make wonderful handmade gifts.

Every pattern in this collection links to an updated Amazing Knitting guide where you can find the current pattern details and the original free source.

✓ All 7 patterns in this collection are free

Click any photo, title or pattern link below to visit the corresponding Amazing Knitting guide.

1. Easy Striped Baby Blanket

Easy Striped Baby Blanket free knitting pattern

Photos © Jamey - Dabbles and Babbles

Easy Striped Baby Blanket by Jamey of Dabbles & Babbles is a lovely choice for newer knitters. Soft three-color stripes are framed by a textured seed-stitch border, giving the blanket a clean, modern finish.

It is worked flat in DK yarn and measures approximately 34 × 33 inches after blocking.

View the Free Easy Striped Baby Blanket Pattern →


2. Heart Baby Blanket

Heart Baby Blanket free knitting pattern

Photo © katalysis

Heart Baby Blanket by Ann Saglimbene uses knit-and-purl texture to create repeating heart motifs directly in the fabric.

There is no stranded colorwork or intarsia involved, which makes the design especially attractive for knitters who want a decorative single-color blanket.

Our updated guide also explains why knitters should use the designer's corrected March 2024 version rather than an older copy.

View the Free Heart Baby Blanket Pattern →


3. Jordan Baby Blanket

Jordan Baby Blanket free knitting pattern

Photo © danelle1977

Jordan Baby Blanket by marianna mel is a beautiful textured design made with basic knit and purl stitches.

The raised stitch pattern gives the blanket plenty of visual interest without relying on lace or multiple yarn colors, making it a strong choice for a classic handmade baby gift.

The pattern also comes in several sizes and can be adjusted depending on the project you want to make.

View the Free Jordan Baby Blanket Pattern →


4. Treasured Heirloom Baby Blanket

Treasured Heirloom Baby Blanket free knitting pattern

Design © Lion Brand

Treasured Heirloom Baby Blanket is a classic corner-to-corner design with alternating garter and eyelet sections.

The diagonal construction gives the blanket an elegant traditional appearance while allowing the entire project to be worked as one piece.

It is a particularly nice option if you want a baby blanket that feels more like a keepsake than an everyday basic.

View the Free Treasured Heirloom Baby Blanket Pattern →


5. Rice Stitch Baby Blanket

Rice Stitch Baby Blanket free knitting pattern

Photo © Liz Chandler / PurlsAndPixels

Rice Stitch Baby Blanket by Liz Chandler is a practical textured blanket that works beautifully when you want visual interest without complicated lace or colorwork.

The pattern includes two approaches to creating the textured fabric and is a useful project for practicing knit-and-purl combinations.

The finished blanket measures approximately 40 × 40 inches and is worked in worsted-weight yarn.

View the Free Rice Stitch Baby Blanket Pattern →


6. Waffle Blanket

Waffle Blanket free knitting pattern

Waffle Blanket by Alexis Layton is all about texture. Its repeating stitch pattern creates a deeply raised surface that gives the finished blanket a cozy, substantial appearance.

The original pattern is worked in Aran-weight yarn and measures approximately 40 × 51 inches.

It can work well as a larger baby blanket, stroller blanket or small family throw.

View the Free Waffle Blanket Pattern →


7. Little Girl Pink Baby Blanket

Little Girl Pink Baby Blanket free knitting pattern

Little Girl Pink Baby Blanket by Marlaine DesChamps combines cable and lace panels for a more decorative, traditional baby-blanket look.

The original design measures approximately 35 × 46 inches and was designed for Caron Simply Soft worsted-weight yarn.

This is a lovely option when you want a handmade baby gift with a more detailed heirloom-style finish.

View the Free Little Girl Pink Baby Blanket Pattern →

Which Free Baby Blanket Should You Knit?

If you want something simple and modern, start with the Easy Striped Baby Blanket.

For textured knitting, the Jordan Baby Blanket, Rice Stitch Baby Blanket and Waffle Blanket are especially good choices.

If you are knitting for a baby shower or keepsake gift, the Heart Baby Blanket, Treasured Heirloom Baby Blanket and Little Girl Pink Baby Blanket have a more decorative, traditional feel.

Tips for Choosing a Baby Blanket Yarn

Baby blankets are used and washed often, so softness and easy care are both important. Check the original pattern's recommended yarn weight before substituting another yarn, and make a gauge swatch when the finished dimensions matter.

Smooth yarns also tend to show textured stitches, hearts, cables and lace more clearly than very fuzzy yarns.

Before You Cast On

Pattern availability can change over time. Amazing Knitting reviews the projects featured in our collections and links each one to an updated guide with the current pattern information and original designer or publisher source.

More Free Knitting Patterns

Amazing Knitting is gradually reviewing and updating its pattern archive so that older favorites are easier to identify and their current availability is clearer.

Save this collection for your next baby shower or handmade gift and explore the individual guides above to find the blanket that best matches your yarn, skill level and knitting style.

Editorial note: The knitting patterns featured in this collection belong to their respective designers and publishers. Amazing Knitting provides independent pattern guides and links to authorized sources rather than reproducing complete copyrighted pattern instructions.

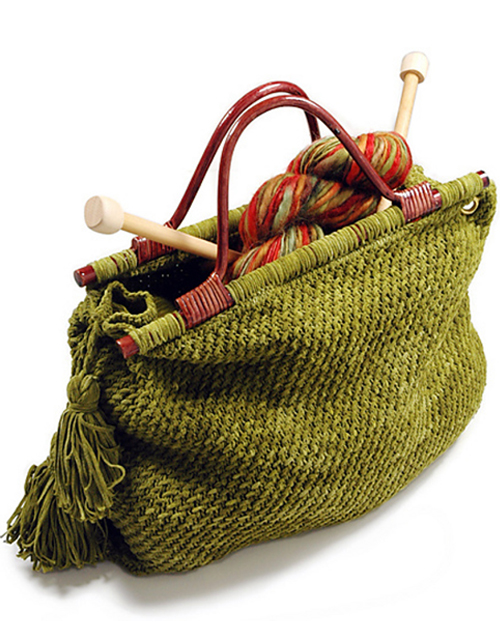
Knitting Tote - Free Bag Knitting Pattern

Knitting Tote - Free Pattern
Photo above © Berroco Inc.

Knitting Tote by Donna Yacino for Berroco is a sturdy, structured knitted bag designed especially for carrying yarn, needles and works in progress.

The combination of textured knitting, wooden handles, decorative grommets and a reinforced bottom gives the tote a polished look while keeping it practical enough for everyday use.

Originally designed in Berroco Suede, this project is a great choice for knitters who want to make something functional rather than another garment or accessory.

Best of all, the complete Knitting Tote pattern is still officially available for free from Berroco.

✓ Free Pattern Availability

Berroco still publishes Knitting Tote by Donna Yacino as a free pattern download on its official website.

Knitting Tote at a Glance

Pattern: Knitting Tote

Designer: Donna Yacino

Publisher: Berroco

Project Type: Knitted tote bag

Skill Level: Intermediate

Suggested Yarn: Berroco Suede

Yarn Weight: Worsted

Approx. Yardage: 500 yd / 457 m

Needles: US 8 / 5 mm, 24-inch circular

Crochet Hook: 4 mm

Gauge: 24 sts × 30 rows = 4 in in pattern stitch

Finished Size: Approx. 15 in wide × 11 in high × 4½ in deep

Availability: Free official Berroco pattern

About the Berroco Knitting Tote

This tote was designed as a practical project bag with enough structure to hold knitting supplies while still looking like a finished handbag.

Berroco describes the design as sturdy and stylish, and the construction supports that goal with a firm knitted fabric, wooden handles and a reinforced base.

Unlike a soft drawstring project pouch, this tote is intended to keep its shape and stand more like a traditional bag.

Finished Size

The official finished measurements are approximately:

15 in wide × 11 in high × 4½ in deep

The height measurement does not include the handles.

This gives the bag enough room for yarn, tools and a medium-sized work in progress without making it excessively bulky.

Original Yarn: Berroco Suede

The original design uses Berroco Suede, a worsted-weight novelty yarn that gives the knitted fabric a distinctive suede-like appearance.

The official materials list calls for:

5 balls of Berroco Suede

The Ravelry record lists the project at approximately 500 yards / 457 meters.

What If Berroco Suede Is Hard to Find?

If you substitute yarn, focus on the finished fabric rather than trying to match only the original fiber appearance.

A tote needs more structure than a soft scarf or sweater.

Look for a yarn that can:

  • Match the published gauge
  • Create a reasonably firm fabric
  • Show the textured stitch clearly
  • Handle the weight of items placed inside the bag
  • Resist excessive stretching

Make a swatch before committing to the full tote, especially if your substitute is much more elastic than the original yarn.

Needles and Gauge

The official pattern specifies a 24-inch US 8 / 5 mm circular needle.

The published gauge is:

24 stitches × 30 rows = 4 inches in pattern stitch

Use the needle size required to obtain gauge rather than assuming that US 8 will produce the correct fabric for every yarn.

Why Gauge Matters for a Tote Bag

Gauge affects more than appearance in a bag project.

If your stitches are too loose, the tote may stretch when filled. If they are too tight, the fabric can become difficult to work and the finished dimensions may be smaller than expected.

A firm, consistent swatch is especially useful before starting a structural project like this.

Worked in the Round

The pattern is designed to be worked in the round using a circular needle.

Circular construction reduces the need for long side seams and helps create a continuous body around the bag.

If you are new to circular knitting, check carefully that the cast-on edge is not twisted before joining.

Textured Pattern Stitch

The tote uses a textured pattern stitch rather than plain stockinette.

This gives the surface more visual interest while also contributing to the structured appearance of the bag.

The Ravelry pattern record also identifies slipped stitches among the techniques used.

Extra Materials You Will Need

This is not a yarn-and-needles-only project.

Berroco's official materials list also includes:

  • A 4 mm crochet hook
  • One pair of wooden handles with a 13-inch lower bar
  • Four 7/16-inch grommets
  • A piece of cardboard for the bottom insert

Check that you can obtain suitable handles and grommets before beginning the knitting.

Wooden Handles

The wooden handles are an important part of the original design.

They provide structure and keep the weight of the bag from being carried entirely by a knitted strap.

If you substitute another style of handle, compare its attachment points and width with the original construction before making permanent changes.

Decorative Grommets

Four metal grommets are used near the upper section of the tote.

These become attachment points for decorative twisted cords and tassels.

When installing hardware in knitted fabric, make sure it is secure and does not cut or damage the surrounding yarn.

Reinforcing the Bottom

One of the most practical details in this pattern is the reinforced base.

Berroco specifies a piece of cardboard approximately:

15 in long × 4½ in wide

as a bottom insert.

The insert helps keep the base flat when yarn and tools are placed inside.

Consider a More Durable Bottom Insert

If you plan to use the tote frequently, you may prefer to cut a removable insert from a suitable lightweight plastic or another moisture-resistant material with similar dimensions.

This would be your own modification rather than part of the original Berroco pattern.

Any substitute insert should have smooth edges so it does not catch the knitted fabric.

Do You Need to Line the Tote?

The original pattern does not require a full fabric lining in order to create the bag.

However, adding a lining can be a useful optional modification if you plan to carry small knitting tools.

A fabric lining can help prevent items such as stitch markers or needle tips from working through the knitted fabric.

Add Pockets If You Want More Organization

A handmade lining also gives you the opportunity to add internal pockets.

Useful pocket sizes might accommodate:

  • Scissors
  • Stitch markers
  • Tape measure
  • Cable needles
  • Crochet hooks
  • Pattern notes

Again, these are optional customizations and not part of the original Donna Yacino instructions.

Decorative Tassels and Twisted Cords

The original Berroco design includes tassels and twisted cords as finishing details.

They give the bag its distinctive decorative appearance and also make use of the installed grommets.

Follow the official pattern for the original finishing method rather than relying on reconstructed instructions from third-party sites.

Skills Used in This Project

This tote is a good project for practicing several skills in one useful object:

  • Knitting in the round
  • Maintaining a textured stitch pattern
  • Working slipped stitches
  • Checking gauge
  • Using a crochet hook for finishing
  • Attaching bag hardware
  • Making twisted cords
  • Making tassels
  • Adding structural reinforcement

Is the Knitting Tote Beginner Friendly?

Berroco classifies the project as Intermediate.

That makes sense because the knitting itself is only one part of the project.

You also need to work a pattern stitch, maintain gauge, handle circular construction and complete several finishing and hardware steps.

An adventurous beginner who is comfortable following detailed instructions may still enjoy it, but it is probably not the ideal first-ever knitting project.

A Useful Project for Practicing Bag Construction

Garments require careful body sizing, while a tote allows you to focus more on structure and finishing.

This makes the project a useful introduction to how knitted fabric can be combined with rigid components such as handles and base inserts.

Prevent the Bag from Stretching

Knitted fabric naturally has some elasticity.

To keep the tote looking its best:

  • Match the intended gauge
  • Avoid extremely loose fabric
  • Use the reinforced bottom
  • Attach the handles securely
  • Avoid routinely overloading the bag
  • Consider a fabric lining for frequent use

Use It as a Knitting Project Bag

The finished tote is particularly well suited to holding an active knitting project.

Depending on the size of your work, it can hold yarn, circular needles, pattern notes and everyday knitting notions together in one place.

The flat reinforced bottom also makes it more practical than an unstructured knitted sack.

Or Use It as an Everyday Tote

Nothing limits the finished bag to knitting supplies.

It can also function as a general-purpose handmade tote, especially if you add a lining and internal pockets.

Keep in mind that the amount of weight it can comfortably carry depends on your yarn, gauge, finishing and hardware.

Is the Berroco Knitting Tote Still Free?

Yes.

Berroco currently maintains an official page for Knitting Tote by Donna Yacino and labels it Free Pattern Download.

Ravelry also currently lists the same pattern as free.

Amazing Knitting does not reproduce Berroco's complete copyrighted knitting instructions. Use the authorized publisher page for the full pattern.

Get the Free Knitting Tote Pattern

Use the official Berroco page for the current free pattern:

Get the Free Knitting Tote Pattern →

Pattern Details on Ravelry

Ravelry is also useful for checking the pattern record and browsing projects made by other knitters:

View Knitting Tote on Ravelry →

More Free Knitting Projects

If you would like to continue with another free project from the Amazing Knitting archive, explore:

Explore More Knitted Bags

Before You Cast On

Read through the complete Berroco materials list before buying yarn.

This project requires more than needles and yarn, so having the handles, grommets, crochet hook and bottom insert ready will make the finishing process much easier.

Make a gauge swatch, aim for a firm structured fabric, and use the current official Berroco instructions for the complete stitch pattern and assembly details.

Pattern credit: Knitting Tote was designed by Donna Yacino and published by Berroco. The existing Amazing Knitting photograph is credited to Berroco Inc. Amazing Knitting provides an independent project guide and does not reproduce Berroco's complete copyrighted pattern instructions.

Discover More From the Archive

A fresh mix of knitting patterns and tutorials from the Amazing Knitting archive.

Finding patterns from the archive…