 |
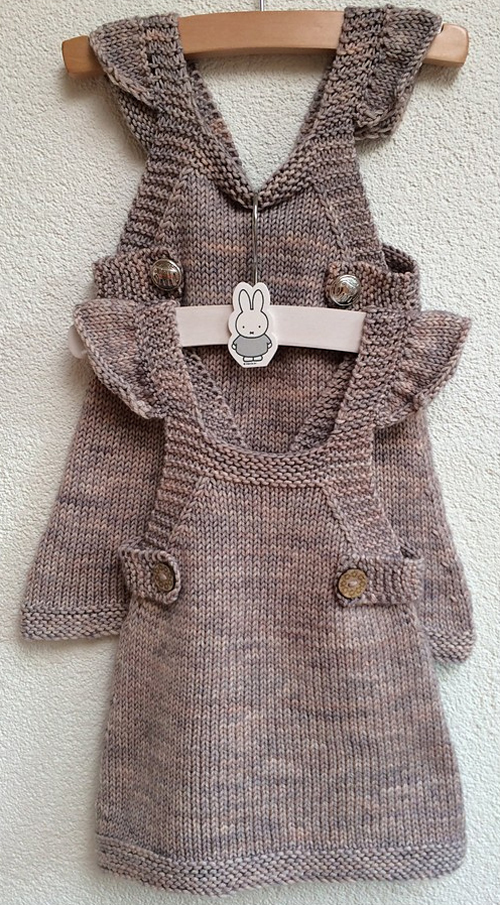
| The photo above © Karinita0607 |
What a beautiful dress knitting pattern! I found it on Ravelry... A super quick knit, you can finish it in one day. It is cute!
Full Post: Summer Into Fall

|
| The photo above © Karinita0607 |
What a beautiful dress knitting pattern! I found it on Ravelry... A super quick knit, you can finish it in one day. It is cute!
Full Post: Summer Into Fall
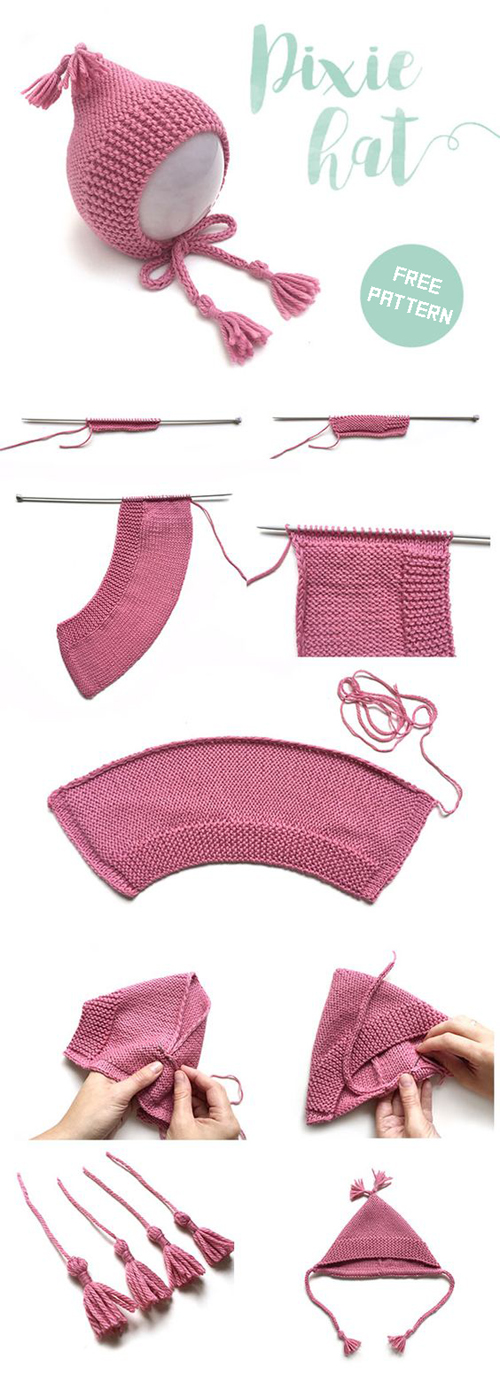
Pixie Baby Hat. Pattern, tutorial and photo © Marta Porcel / Creativa Atelier
This adorable Pixie Baby Hat by Marta Porcel of Creativa Atelier is a free baby bonnet knitting pattern with a charming pointed shape, adjustable cord and playful tassels.
The hat is worked flat on straight needles, making it especially appealing if you prefer not to knit small circumferences in the round. The knitted piece is folded and seamed at the back to create the distinctive pixie shape.
The original tutorial is written for approximately 1–3 months, but the designer also explains how the basic construction can be adjusted for larger sizes.
The most recognizable feature of this little bonnet is its pointed pixie silhouette.
Instead of shaping a conventional rounded crown, the flat knitted fabric is folded and joined at the back. This simple construction produces the distinctive point at the top of the hat.
Tassels add even more character and give the finished bonnet a playful, traditional handmade appearance.
One of the best features of this pattern is that you do not need to knit the bonnet in the round.
The main fabric is worked back and forth on 4 mm straight needles.
This makes the project particularly useful for knitters who enjoy baby hats but are not yet comfortable using double-pointed needles, Magic Loop or other small-circumference techniques.
Marta Porcel designed the tutorial specifically for a baby of approximately 1–3 months.
Rather than pretending that the free tutorial contains a complete multi-size grading system, it is important to note that the published stitch and row counts correspond to this original size.
The designer does, however, explain how the simple construction can be adapted if you want to make a larger bonnet.
Because the hat is based on a relatively simple flat construction, the designer suggests increasing both the initial number of stitches and the number of rows when making a larger size.
Taking the child's actual head measurements is the best approach whenever possible.
For gift knitting, the original tutorial also provides approximate head circumference references by age to help with planning.
The original sample uses Katia Merino Classic in color 26.
The yarn is listed at approximately:
100 grams = 240 meters
DK / Light weight
The yarn was chosen to coordinate with a matching baby cardigan from Creativa Atelier.
A smooth, soft DK-weight yarn is a sensible starting point when substituting for the original yarn.
Because this is a baby accessory, pay particular attention to softness and care requirements as well as yarn weight.
A washable wool, merino blend or another baby-friendly DK yarn can work well if it produces fabric with dimensions comparable to the designer's sample.
The original 1–3 month version uses:
The crochet hook is optional because the cord can be created using other methods if you prefer.
The bonnet is based largely on simple stockinette fabric.
The designer changes the direction of the stockinette at strategic points to create the sections that will later be folded during finishing.
This is a clever way to build useful construction lines directly into a simple rectangular piece of knitting.
Instead of relying on complicated crown decreases, the Pixie Hat gets its shape from the way the knitted fabric is folded and seamed.
After completing the main piece, the fabric is folded in half and the appropriate edges are joined at the back.
The result is the characteristic pointed bonnet shape without having to shape a traditional rounded crown.
Because the bonnet is knitted flat, one of the main finishing steps is joining the back edges.
The designer notes that you can use a normal seam or an invisible seaming technique.
Taking a little extra time over this seam will help the finished point look neat and keep the inside comfortable.
A cord runs through the lower section of the bonnet and allows the hat to be adjusted around the baby's head.
Marta's sample uses approximately 55 cm of I-cord.
She demonstrates a crochet-hook method for making the cord, but also notes that there are several alternatives, including knitting or making a cord by hand.
The original Pixie Hat is finished with four tassels.
Two decorate the ends of the cord and two are attached to the pointed area of the bonnet.
The designer also suggests replacing the tassels with pom-poms if you prefer a different look.
The simple construction gives you plenty of opportunities to personalize the finished bonnet.
You might choose a soft neutral for a traditional look, a bright color for a playful baby accessory, or coordinate the yarn with another handmade garment.
Tassels and cords can also be made in contrasting colors for an extra decorative touch.
Creativa Atelier also provides tutorials for a matching knitted baby cardigan and baby booties.
The Pixie Hat can therefore be made on its own as a quick accessory or combined with the coordinating pieces to create a complete handmade baby outfit.
This also makes the design especially attractive for baby-shower or newborn gift knitting.
Useful skills for this project include:
The construction is relatively approachable because the main bonnet is worked flat and relies heavily on basic knit and purl techniques.
You do not need to manage circular knitting or complicated crown shaping.
The finishing introduces useful skills such as seaming, picking up stitches and making a cord, making this a nice progression beyond a simple scarf or square.
Many baby hat patterns are knitted in the round, which can be intimidating if you have only worked on straight needles.
This Pixie Hat provides a different route: knit the main shape flat and create the three-dimensional bonnet during finishing.
That makes it an interesting choice for newer knitters who want to make their first baby hat without immediately learning Magic Loop or double-pointed needles.
The designer recommends blocking the knitted fabric before completing the seams.
This helps control the natural curling of stockinette stitch and makes the finishing process easier.
Always use a blocking method appropriate for the fiber in your chosen yarn rather than automatically applying heat or steam to every fiber.
Small baby accessories are excellent projects when you want to make a thoughtful handmade gift without committing to a full blanket or sweater.
The pointed silhouette makes this bonnet more distinctive than a basic beanie, while the tassels give it plenty of handmade charm.
Pair it with knitted booties or the matching cardigan for a more complete gift set.
Because this design includes an adjustable cord and decorative tassels, it should be used appropriately and under adult supervision.
Check all finishing details regularly and make sure tassels and other decorative pieces remain securely attached.
Remove hats and accessories with cords or ties before sleep and follow current infant safe-sleep recommendations.
The Pixie Baby Hat combines a memorable shape with surprisingly simple construction.
It is knitted flat, uses familiar stockinette fabric and requires no complicated rounded crown shaping, yet the finished bonnet has a distinctive pointed silhouette.
The free tutorial, adjustable construction and matching baby garments also make it a useful pattern to keep bookmarked for future baby gifts.
Knitted PIXIE Hat by Marta Porcel of Creativa Atelier is still available as a free step-by-step knitting tutorial from the designer's website.
Get the Free Pixie Baby Hat Pattern →
Pattern availability was checked when this article was updated. Pattern, tutorial and original images belong to Marta Porcel / Creativa Atelier. Amazing Knitting does not reproduce the designer's complete instructions; please use the official tutorial above.
 |
| Photos above © Creativa Atelier |
What a beautiful baby sweater (Free knitting pattern)! I found it on Pinterest... This Baby Sweater pattern is available in size newborn, 1-3 months, 3-6 months, 6-12 months, and 12-24 months. You will find the instructions to knit this baby Sweater in size 3 months on the text and images, but if you prefer to download the pattern to get the diagram, row by row instructions and print it to make notes without relying on the cell phone or internet connection, you are in luck because everything is ready for you! You can find all the downloadable and printable patterns by clicking on the button below.
Full Post: Baby Sweater
 |
| Photos above © milainemicoton |
Looking for a stylish boy sweater knitting pattern with practical cold-weather details? Boy Sweater by Lisa Chemery is a seamless top-down pullover for babies and children, featuring a cozy shawl collar, buttoned neck opening, raglan shaping, and textured stitch details.
The close-fitting design is intended to sit comfortably under a jacket, while the shawl collar provides extra warmth around the neck — especially useful for children who do not enjoy wearing scarves.
Pattern: Boy Sweater
Designer: Lisa Chemery
Craft: Knitting
Category: Baby & Child Pullover
Construction: Top-down and seamless
Yarn Weight: Worsted / DK
Needles: US 6 / 4.0 mm and US 8 / 5.0 mm
Main Gauge: 20 stitches × 30 rounds = 4 inches / 10 cm in stockinette
Yardage: Approximately 275–700 yards / 251–640 m
Sizes: 3 months to 8 years
Languages: English and French
Pattern Availability: Paid pattern
Designed by Lisa Chemery, Boy Sweater combines the practicality of a children's pullover with several details that give it a more polished look.
The most recognizable feature is the shawl collar, which wraps softly around the neck and is paired with a small buttoned opening.
Textured knitting and twisted-rib details add visual interest without turning the sweater into a heavily decorated garment, making the design suitable for both boys and girls.
The sweater is knitted seamlessly from the top down. The upper section begins flat, after which stitches are added for the neck placket and the body continues in the round.
The sleeves are also worked in the round, reducing the amount of garment seaming required at the end.
Top-down construction has another practical advantage: it allows knitters to see the garment taking shape from the neckline toward the hem.
The shawl collar is one of the defining features of this sweater. After the body is completed, stitches are picked up around the neckline and the collar is worked flat.
Short rows are used to create the characteristic shawl shape, and the lower edges of the collar are then attached to the sweater body.
Besides giving the sweater its classic appearance, the collar provides extra knitted fabric around the child's neck without requiring a separate scarf.
The current pattern includes a particularly useful range of sizes:
The designer provides finished garment measurements as well as intended chest measurements, so check the original pattern carefully when deciding which size to knit.
Boy Sweater is designed for approximately:
275–700 yards / 251–640 meters
The exact amount depends on size. The designer recommends a worsted-to-DK-weight merino or merino-blend yarn.
Suggested yarns listed with the pattern include Malabrigo Rios and several DK and worsted options.
The pattern uses two main needle sizes:
The published stockinette gauge after blocking is:
20 stitches × 30 rounds = 4 inches / 10 cm
The textured portion has a separate row gauge, so use the designer's current pattern instructions when swatching and selecting needle sizes.
This project involves more than basic stockinette knitting. Techniques used in the design include:
The combination makes Boy Sweater an interesting project for knitters who already understand the basics and want to develop their garment-knitting skills.
No. Boy Sweater by Lisa Chemery is currently a paid knitting pattern.
The pattern is sold through the designer's Ravelry listing. Amazing Knitting does not reproduce the designer's copyrighted instructions.
Visit the original listing below for the current price, complete sizing, materials, and purchase information.
View the Original Boy Sweater Pattern →
Pattern credit: Boy Sweater was designed by Lisa Chemery. Pattern pricing, availability, sizing, and technical information are controlled by the designer and may change over time.
If you love the cozy shawl-collar style but would prefer a free knitting pattern, Amazing Knitting has a similar baby and child project in our archive.
Double Breasted Jacket with Shawl Collar — Free Knitting Pattern
This is a different design — not a free copy of Boy Sweater — but it offers a similar cozy shawl-collar look for babies and children and is available as a free knitting pattern.
You can also browse our free baby sweater patterns for more no-cost options.
Explore more boy sweater knitting patterns, baby sweater knitting patterns, and children's sweater knitting patterns from the Amazing Knitting archive.
If you choose the original Boy Sweater, check Lisa Chemery's current Ravelry listing before purchasing yarn. Confirm your chosen size, yarn requirement, needle sizes, gauge, notions, and any current pattern updates before casting on.
 |
| The photo above © Michelle Kupfer |
Love the look of a patchwork blanket but not the idea of sewing dozens of separate squares together? 3 Color Patchwork Blanket by Michelle Kupfer creates a bold geometric baby blanket using three colors, while the entire blanket is actually knitted in one piece.
The clever construction uses intarsia colorwork to create the appearance of individual patchwork blocks without traditional patchwork assembly. Worked in chunky yarn, it is also a relatively compact baby blanket project with a modern, graphic look.
Pattern: 3 Color Patchwork Blanket
Designer: Michelle Kupfer
Craft: Knitting
Category: Baby Blanket
Construction: One piece, seamless, worked flat
Colorwork: Intarsia
Yarn Weight: Bulky / Chunky
Suggested Yarn: Berroco Vintage Chunky
Yardage: About 360–400 yards / 329–366 m
Needle Size: US 10½ / 6.5 mm circular needle
Gauge: 3.5 stitches and 4 rows = 1 inch in stockinette
Finished Size: About 22 × 27 inches / 56 × 68.5 cm
Pattern Availability: Paid pattern
Designed by Michelle Kupfer, the 3 Color Patchwork Blanket is a small unisex baby blanket built around a simple but effective idea: creating the visual appearance of patchwork without knitting and joining separate squares.
Instead, three yarn colors are worked across the blanket using intarsia colorwork. The changing blocks of color create the geometric patchwork effect while the blanket remains a single piece.
Traditional knitted patchwork blankets are often constructed from many individual squares that must eventually be arranged and joined.
This design takes a different approach. The blanket is worked flat as one continuous piece, so there is no final assembly of separate knitted blocks.
That makes the construction especially interesting for knitters who enjoy the appearance of patchwork but would rather avoid a large seaming project.
The patchwork effect is created with three colors worked using intarsia.
With intarsia, different sections of color are worked with separate yarn supplies rather than carrying every color continuously across the entire row.
One of the important skills is managing the yarn correctly where two colors meet so that the sections connect cleanly instead of leaving unwanted gaps.
If intarsia is new to you, practicing a small two-color swatch first can make the full blanket much easier to manage.
The finished blanket measures approximately:
22 × 27 inches / 56 × 68.5 cm
This is a compact baby-blanket size, making the project more manageable than a full-size throw while still giving plenty of room to experiment with geometric color placement.
The original design uses three colors of bulky-weight yarn. Ravelry lists approximately:
360–400 yards / 329–366 meters total
The suggested yarn is Berroco Vintage Chunky.
The designer's current pattern information recommends allowing enough yarn for each color rather than planning around an exact last few yards, since individual knitting tension can affect consumption.
The three-color format also gives you plenty of freedom when choosing a palette. You could combine three soft nursery colors, use neutrals, or create stronger contrast for a more graphic patchwork appearance.
The pattern specifies:
US 10½ / 6.5 mm circular knitting needles
A circular needle approximately 24–32 inches long is useful for holding the blanket stitches, even though the project itself is worked flat.
The published gauge is:
3.5 stitches and 4 rows = 1 inch in stockinette stitch
Check your gauge before starting if you want the finished blanket to match the designer's dimensions.
The project combines fundamental knitting with basic colorwork skills, including:
The blanket can therefore be an interesting introduction to intarsia for a knitter who is already comfortable with basic knit and purl stitches.
No. 3 Color Patchwork Blanket by Michelle Kupfer is currently a paid knitting pattern.
Amazing Knitting does not reproduce the designer's copyrighted row-by-row instructions or color-placement schematic.
Visit the original pattern listing for the current price, complete materials, color placement, and knitting instructions.
View the Original 3 Color Patchwork Blanket →
Pattern credit: 3 Color Patchwork Blanket was designed by Michelle Kupfer. Pattern pricing, availability, materials, and technical information are controlled by the designer and may change over time.
Prefer a free pattern? Amazing Knitting has another geometric block-style blanket you can explore without purchasing a pattern.
Garter Blocks Blanket — Free Pattern
This is a different design — not a free version of Michelle Kupfer's pattern — but it offers a similar geometric block effect. The blanket combines garter and stockinette blocks with cable divisions and uses super-bulky yarn for a substantial finished blanket.
You can also explore more baby blanket knitting patterns, patchwork-style blankets, and free blanket knitting patterns from the Amazing Knitting archive.
If you choose the original 3 Color Patchwork Blanket, check Michelle Kupfer's current pattern listing before purchasing yarn. Confirm the current yarn requirements, gauge, needle size, finished measurements, and pattern details before casting on.
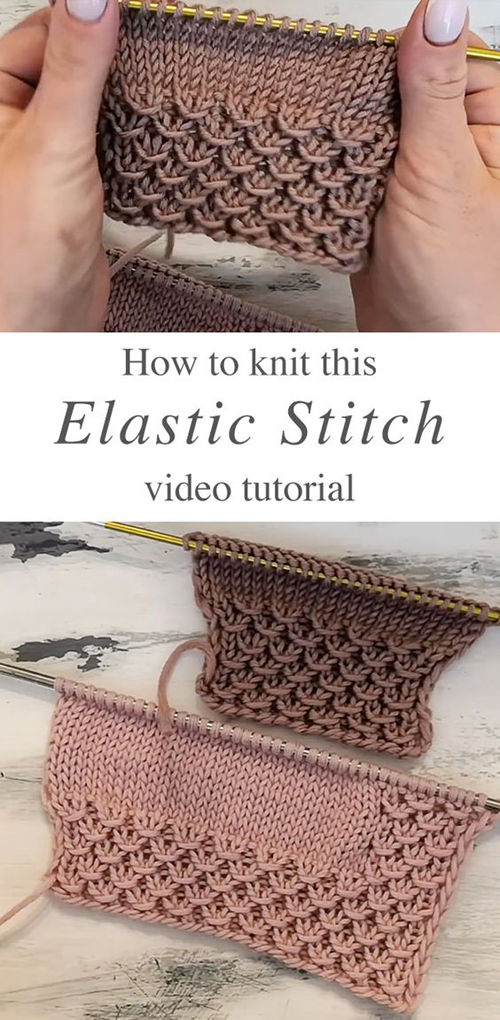 |
| Photos above © Вяжем дома с Татьяной |
What a beautiful knitting stitch (Free tutorial)! I found it on Pinterest... Learn how to work this great knit elastic stitch by watching this tutorial! Keep reading for tips on how to master the technique of knitting this tight and complex pattern.
Full Post: Knit Elastic Stitch
 |
| Photos above © Kelbourne Woolens |
What a beautiful knitting hat (Free pattern)! I found it on Ravelry... The October Hat is worked in the round from the bottom up. The hat begins with a provisional cast-on, and then a deep knit 2, purl 2 ribbing is worked. An intricate, modern cable panel pattern is worked for the body of the hat and integrated decreases shape the crown.
Download Pattern: October Hat
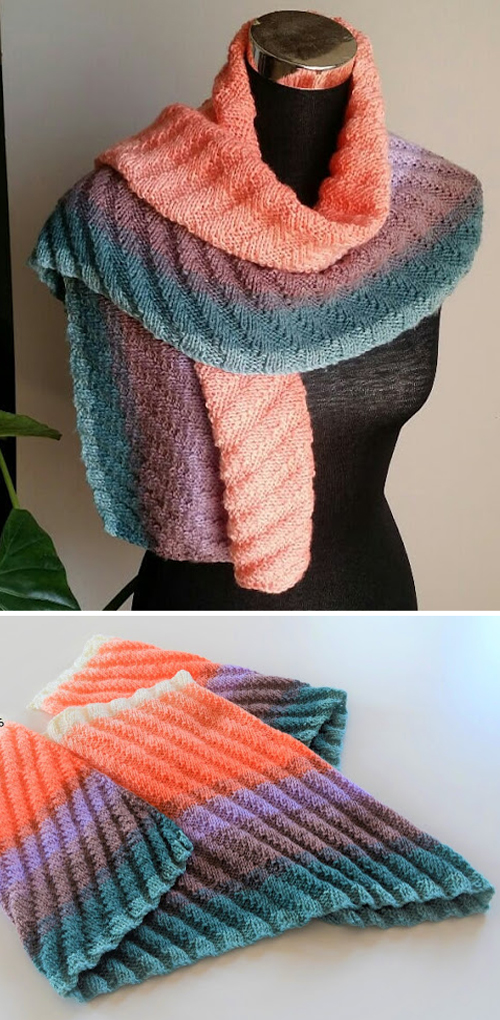 |
| Designed by © Wiam's Crafts |
What beautiful knitting shawl/wrap (Free pattern)! Triangular chevron-shaped shawl with a textured rib design that showcases ombre or color change cake yarn.
Full Post: Ribbed Shawlette
 |
| Designed by © Monique Zobel |
What a beautiful knit dress (Knitting pattern)! Dress with a knit off the shoulder top attached to a sewn fabric skirt. Instructions to create any size (little girl to adult).
Full Post: Strapless Maxi Dress
 |
| The photos above © Lara Simonson |
What beautiful bable sweater for baby (Knitting Pattern)! This sweater pattern is easy, pretty, fun to knit, and looks so professional!
Full Post: Cable Sweater
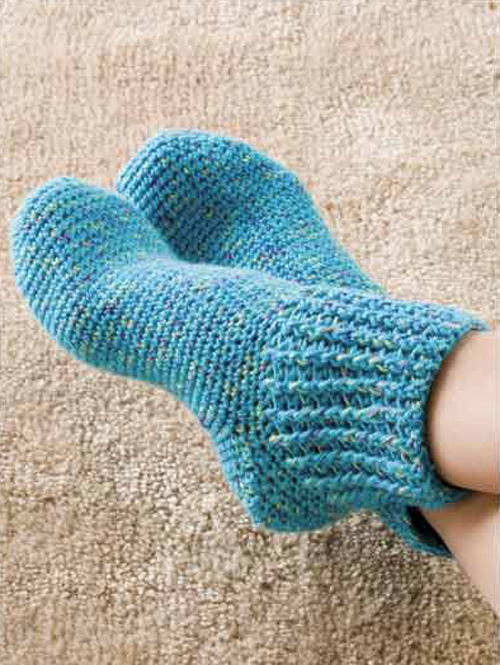 |
| Designed by © Kim Kotary |
 |
| Photos above © mycupcake |
Full Post: Modified Baby Skoodlet