Skip to content

...

Angels Among Us Blanket - Knitting Pattern

Angels Among Us Blanket - Knitting Pattern
Photos above © Betty Fay Wallace
What beautiful knitting baby blanket pattern! I found it on Pinterest...
Angels line up to softly cover the precious one. This beautiful blanket will be a very special keepsake to be treasured for generations to come.


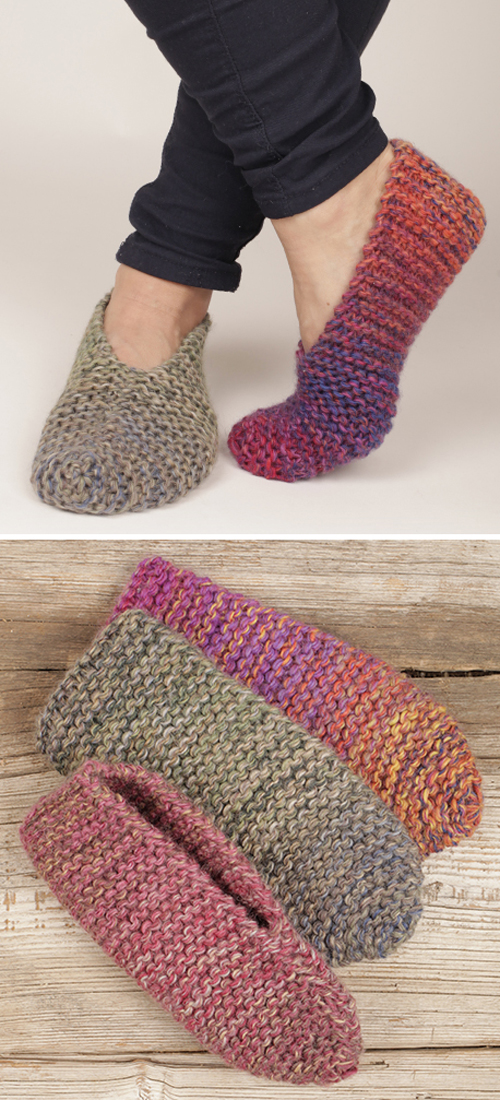
Homemade Simple & Warm Slippers - Free Pattern & Tutorial

Homemade Simple & Warm Slippers - Free Pattern & Tutorial
Photos above © Prjaga
What beautiful knitting slippers (fee pattern)! I found it on Pinterest...
There’s nothing better than coming in from the cold and popping your feet in some soft and warm slippers…especially when you’ve made them yourself. Enjoy!


Knit Batwing Swoncho - Free Pattern

Knit Batwing Swoncho - Free Pattern
Photos above © Svetlana Avrakh
What beautiful knitting poncho Free Pattern! I found it on Pinterest...
Toss aside the jacket in favor of this stylish knit swoncho with a stocking stitch pattern, batwing sleeves, and a rich center cable. Pattern features knit, knit 2 together, slip knit and yarn over techniques to keep you engaged. Patons Classic Wool Worsted, Cool Gray makes it versatile over jeans or a skirt, dressed up or dressed down. In any shade that suits your taste, it’s wooly and wonderful and a gorgeous project for yourself or as a gift.

Download Pattern: Batwing Swoncho

Flying Solo Cowl – Free Ombre Ribbed Cowl Knitting Pattern

Flying Solo free ombre ribbed cowl knitting pattern by Espace Tricot

Flying Solo. Photos © Espace Tricot

Flying Solo by Espace Tricot is a free unisex cowl knitting pattern with a clean ribbed texture and beautiful ombre color transitions.

The design uses two strands of fingering-weight yarn held together throughout. By changing only one strand at a time, the colors blend gradually from one shade into the next, creating the distinctive striped gradient effect.

Flying Solo Cowl Pattern Details

  • Designer: Espace Tricot
  • Published: November 2017
  • Craft: Knitting
  • Category: Cowl
  • Pattern availability: Free Ravelry download
  • Style: Unisex
  • Size: One size
  • Yarn: Two strands of fingering-weight yarn held together
  • Suggested yarn: ArtFil Solo
  • Total yardage: Approximately 600 yards (549 m)
  • Needles: US 7 (4.5 mm)
  • Gauge: 27 stitches × 27 rows = 4 inches (10 cm) in 1×1 rib with yarn held double
  • Main stitch: 1×1 ribbing
  • Construction: Bottom up
  • Construction style: One piece
  • Techniques: Worked flat first, then joined to work in the round
  • Languages: English and French

A Simple Ribbed Cowl With an Ombre Effect

Flying Solo has a minimalist shape, but the changing yarn colors give the finished cowl much more visual depth than a basic ribbed accessory.

The entire design is based around classic 1×1 ribbing, which creates a stretchy fabric that sits comfortably around the neck. The color changes then become the main decorative element.

This combination makes Flying Solo a great choice if you prefer simple stitch patterns but still want a finished project with a distinctive look.

How the Ombre Stripes Are Created

The cleverest feature of Flying Solo is the way Espace Tricot creates the color transitions.

Instead of working with a single strand of yarn, you hold two strands together throughout the project.

When it is time to introduce a new color, only one strand is changed. For example, two strands of Color A might be followed by one strand of Color A held together with one strand of Color B. Later, both strands can become Color B.

This gradual replacement of one strand at a time produces soft ombre transitions rather than abrupt color changes.

Three Colors, Many Different Looks

The original Flying Solo sample uses three colors of ArtFil Solo.

Espace Tricot chose a neutral palette for its sample, but the designer specifically notes that the cowl can also look striking in saturated, speckled, bright or jewel-toned hand-dyed colors.

Because the colors overlap as you change one strand at a time, three yarn colors can create several visually distinct blended sections.

Using Fingering Yarn Held Double

Flying Solo uses fingering-weight yarn held double. This means you knit with two strands at the same time as though they were a single working yarn.

Holding yarn double creates a thicker fabric while also making the gradual color blending possible.

It is important to remember that the pattern's listed gauge is measured with both strands held together, not with a single strand of fingering yarn.

The Original ArtFil Solo Yarn

The suggested yarn is ArtFil Solo, a fingering-weight single-ply yarn made from 100% merino wool.

Ravelry lists ArtFil Solo at approximately 366 metres per 100 grams.

Espace Tricot describes it as a soft yarn suitable for accessories and garments worn next to the skin, which makes it a natural choice for a cowl.

Choosing Substitute Yarn

You do not need to use the original ArtFil Solo to enjoy the color concept of Flying Solo.

Look for fingering-weight yarns that work well together when held double and that produce the required ribbed gauge on 4.5 mm needles.

Using yarns with similar fiber content and yardage can make the color changes easier to manage, especially if you want the sections to have a consistent texture.

Use Hand-Dyed Yarn for Dramatic Color Blending

Flying Solo is especially well suited to hand-dyed yarn because the held-double construction naturally mixes neighboring colors.

A tonal yarn can create subtle transitions, while speckled or highly saturated yarns can produce a much bolder effect.

You can also choose three related colors for a smooth gradient or use contrasting shades for more dramatic stripes.

Bottom-Up Construction

The cowl is worked from the bottom up.

However, it does not begin entirely in the round. The lower section has separate front and back flaps, which gives the finished cowl its characteristic longer shape at the front and back.

These two sections are knitted separately first and then joined before the upper portion of the cowl continues in the round.

Front and Back Flaps

The front and back flaps are an important part of the Flying Solo design.

They extend lower than the sides of the cowl, providing additional coverage over the upper chest and back without making the entire cowl equally long.

This shaping is particularly useful when the cowl is worn beneath a coat or jacket because the longer sections can help cover the area near the neckline.

From Flat Knitting to Knitting in the Round

Flying Solo uses both flat knitting and knitting in the round.

You begin by working the two lower flaps separately. Once they are complete, the pieces are joined and the remaining cowl is worked continuously in the round.

This construction creates the shaped lower edge without requiring the entire cowl to be seamed afterward.

One-Piece Construction

Although part of the project is initially worked back and forth, the pattern is classified as a one-piece construction.

After the lower sections are joined, the main body grows upward as one continuous ribbed tube.

This keeps finishing relatively limited while preserving the unusual dipped shape at the bottom.

Needles and Gauge

The pattern uses US 7 (4.5 mm) knitting needles.

The specified gauge is: 27 stitches and 27 rows = 4 inches (10 cm) in 1×1 ribbing with the yarn held double.

Ribbing is naturally elastic, so gauge affects both the finished dimensions and the way the cowl stretches around the neck.

Make your gauge swatch using two strands together just as you will for the actual project.

How Much Yarn Does Flying Solo Need?

The pattern lists approximately 600 yards (549 metres) of fingering-weight yarn in total.

Because the project uses two strands simultaneously and changes colors throughout, check the original pattern carefully for the recommended distribution of the three colors before beginning.

If you substitute yarn, having a little extra can also be useful when planning your own color transitions.

Skills Used in the Flying Solo Cowl

Useful techniques for this project include:

  • Knitting and purling
  • 1×1 ribbing
  • Working flat
  • Knitting in the round
  • Holding two strands of yarn together
  • Changing colors
  • Joining knitted sections
  • Following a bottom-up construction
  • Kitchener stitch / grafting

A Good Project for Learning to Hold Yarn Double

If you have never knitted with two strands held together, Flying Solo provides a practical reason to learn the technique.

The stitch pattern itself remains simple, so your attention can stay on keeping the two yarn strands together and managing the color changes.

Once you become comfortable treating two strands as one, the technique can also be useful for many other knitting projects.

Managing Two Strands of Yarn

When knitting with two strands, it helps to keep the working balls separate so they do not become unnecessarily tangled.

Check periodically that you have caught both strands when forming each stitch, particularly if the yarn colors are very similar.

When changing one color, take a moment to organize the yarn before continuing. This makes the ombre transitions easier to manage and keeps the knitting relaxing.

A Unisex Cowl

Flying Solo is designed as a unisex accessory.

The simple ribbed structure has no strongly gendered decorative elements, and the finished look changes dramatically depending on the colors you choose.

Neutral shades create a classic minimalist cowl, while brighter hand-dyed yarns can produce a much more expressive version.

Why Knit Flying Solo?

Flying Solo combines a very familiar stitch pattern with a clever color technique and practical shaping.

The 1×1 ribbing keeps the knitting straightforward, while holding two strands together and changing one strand at a time creates sophisticated-looking ombre stripes.

The separate front and back flaps also give the cowl more coverage than a simple straight tube, making the construction visually interesting as well as functional.

Get the Free Flying Solo Cowl Pattern

The complete Flying Solo by Espace Tricot is currently available as a free downloadable knitting pattern from the Espace Tricot Ravelry Store.

Get the Free Flying Solo Cowl Knitting Pattern

Pattern availability was checked when this article was updated. Availability on external websites may change over time.

Pembroke Scarf - Free Knitting Pattern

Pembroke Scarf - Free Knitting Pattern
Photos above © Elizabeth McCarten
What beautiful knitting scarf Free Pattern! I found it on Ravelry...
Simple can be beautiful, especially when sumptuous fibers are involved and a few tricks are thrown into the mix. This two-row scarf takes the only 100g of fingering-weight yarn. If you’re looking for something suitable for “social” knitting that uses up stash luxury fiber and at the same time yields a smashing addition to your wardrobe, this is the perfect project.

Download Pattern: Pembroke Scarf

Primavera Scarf – Two-Color Striped Scarf Knitting Pattern

Primavera Scarf two-color striped knitting pattern by Lidy Nooij

Primavera Scarf. Photo © Lidy Nooij

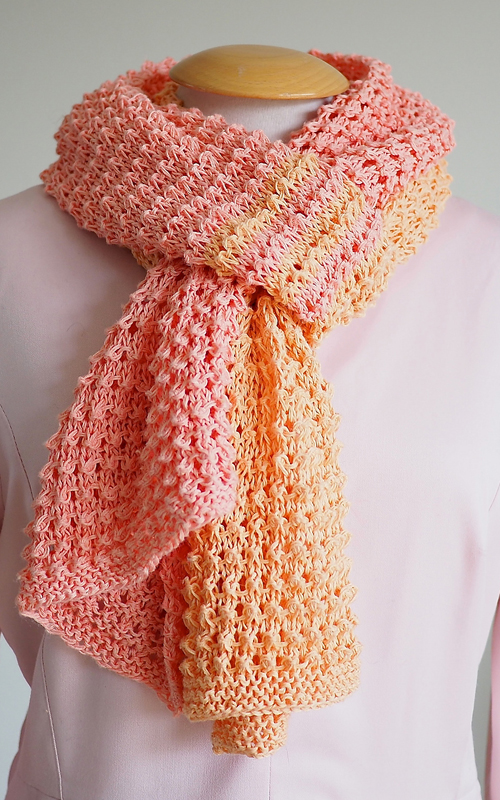
Primavera Scarf by Lidy Nooij is a colorful two-tone knitted scarf featuring simple textured sections and stripes worked with strands of yarn held together.

Originally published in 2018, the design combines pink and coral shades in a long rectangular scarf measuring approximately 32 × 160 cm (12.6 × 63 inches).

Important availability update: the original digital pattern is currently listed as discontinued and is no longer available online from its original source. We are keeping this page as a reference to the design and its documented specifications.

Primavera Scarf Pattern Details

  • Designer: Lidy Nooij
  • Published: March 2018
  • Craft: Knitting
  • Category: Scarf
  • Pattern status: Discontinued / no longer available online
  • Finished size: Approximately 32 × 160 cm (12.6 × 63 inches)
  • Yarn weight: Sport
  • Original yarn: Borgo de' Pazzi Olmeca
  • Yardage: Approximately 987–1148 yards (903–1050 m)
  • Needles: US 7 (4.5 mm) and US 8 (5 mm)
  • Gauge: 20 stitches × 32 rows = 4 inches (10 cm)
  • Colors: Two
  • Features: Stripes, texture and repeating stitch pattern
  • Original languages: English and Dutch

A Colorful Two-Tone Knitted Scarf

Primavera is built around the contrast between solid sections and striped sections.

The original version uses pink and coral, creating a warm spring-inspired palette that suits the name Primavera.

The simple rectangular shape lets the color and stitch texture become the main features of the finished scarf.

A Simple 4-Row Repeat

One of the appealing characteristics of the original design is its relatively short 4-row repeating sequence.

The scarf alternates textured solid-color sections with striped areas, creating visual variety without requiring complicated garment shaping.

Once the repeating structure is established, the project becomes a good example of how a simple sequence can create an effective all-over texture.

Two Strands Held Together

The striped sections of Primavera use two strands of sport-weight yarn held together.

Holding strands together changes both the appearance and thickness of the knitted fabric and helps distinguish the striped sections from the surrounding texture.

This construction is worth keeping in mind when choosing substitute yarn because simply replacing the original yarn with a single strand of a different weight may produce a different fabric.

The Original Yarn

Primavera was designed using Borgo de' Pazzi Olmeca, a sport-weight yarn made from a blend of bamboo-derived rayon and linen.

The documented original colors were:

  • Color A: Olmeca Pink, shade 124
  • Color B: Olmeca Coral, shade 123

The original project used two 100-gram balls of each color.

Yarn Amount

The documented total yarn requirement is approximately 987–1148 yards (903–1050 m).

If you are substituting yarn, compare meterage or yardage rather than relying only on the number of balls, since different yarns can contain very different lengths per skein.

Choosing Substitute Yarn

If you would like to create a scarf inspired by Primavera, look for a smooth sport-weight yarn with enough drape for a long scarf.

The original bamboo-and-linen blend naturally creates a fabric with different behavior from a highly elastic wool yarn, so fiber content can noticeably affect the finished result.

Two coordinating or closely related colors will preserve the characteristic two-tone appearance of the original design.

Needles and Gauge

The documented pattern specifications list two needle sizes: US 7 (4.5 mm) and US 8 (5 mm).

Gauge is approximately:

20 stitches × 32 rows = 4 inches (10 cm)

Matching gauge is useful if you want to reproduce the approximate dimensions and fabric density of the original scarf.

Finished Size

Primavera measures approximately:

32 cm wide × 160 cm long
(12.6 × 63 inches)

This creates a relatively wide, generously sized rectangular scarf that can be wrapped comfortably around the neck.

The designer also noted that the fabric has a tendency to stretch somewhat after finishing, so extra length is not necessarily needed while knitting.

Why Fiber Choice Matters

The original yarn contains bamboo-derived rayon and linen, both of which can contribute drape to the finished fabric.

If you substitute a springy wool yarn, the scarf may behave differently even when the stitch gauge is similar.

Making a generous swatch and washing it before measuring can help you understand how your chosen yarn will behave after finishing.

Color Ideas for a Primavera-Inspired Scarf

The original pink-and-coral combination gives Primavera its distinctive warm appearance, but the two-color structure offers plenty of room for experimentation.

You might pair two neighboring colors for a subtle effect or choose contrasting shades to make the striped sections stand out more strongly.

Because the scarf already contains texture, relatively simple solid or tonal yarns can help keep the stitch pattern visible.

Skills Associated With the Primavera Scarf

The documented design involves techniques such as:

  • Knitting and purling
  • Working flat in rows
  • Following a repeating stitch sequence
  • Changing colors
  • Working stripes
  • Holding strands of yarn together
  • Maintaining consistent gauge
  • Blocking and finishing a rectangular scarf

A Useful Lesson in Color and Texture

One reason Primavera remains an interesting design is the way it creates variety without complicated shaping.

The rectangular construction stays simple while changes in color, texture and yarn arrangement provide the visual interest.

It is a good example of how a scarf can become distinctive through repetition and color placement rather than complex garment construction.

About the Original Pattern Availability

The original Primavera Scarf digital pattern by Lidy Nooij is currently discontinued and is no longer available online from its original source.

For that reason, Amazing Knitting does not provide an unauthorized copy of the pattern or reproduce the designer's complete instructions here.

This page is retained as an informational reference to the original design, designer and documented project specifications.

Read Our Pattern Availability Policy →

Pattern availability was checked when this article was updated. If the designer republishes the original pattern through an authorized source in the future, this page can be updated with the new official link.

Knit Side Step Garter Stitch Slippers - Free Knitting Pattern

Knit Side Step Garter Stitch Slippers - Free Knitting Pattern
Photos above © DROPS Design
What beautiful knitting Slippers Free Pattern! I found it on Pinterest...
These slippers will be an easy and excellent handmade gift for any slippers-lover in your family.

Full Post: Side Step

4 Row Repeat Chevron Ridges Throw - Free Pattern

4 Row Repeat Chevron Ridges Throw - Free Pattern
Designed by © Rebecca J. Venton for Red Heart.
What beautiful knitting throw Free Pattern! I found it on Pinterest...
Open zigzag lace in a 4 row repeat makes this a cozy throw that keeps you warm without being too heavy. Knit with 2 strands of worsted held together makes this a quick project. 

Download Pattern: Chevron Ridges Throw

Ear Savers for Masks - Free Knitting Pattern

Ear Savers for Masks - Free Knitting Pattern
Designed by © Kimberly Nichols
What beautiful knitting ear savers Free Pattern! I found it on Pinterest...
This Knitted Ear Saver will help ease the discomfort for those who wear protective face masks for long periods. Fasten each mask strap to a button on the Knitted Ear Saver at the back of the head and give your ears a break! Uses 7 - 8 yards (6 - 7 m) of yarn. Any yarn weight, gauge, and button size will work. 

Download Pattern: Ear Savers for Masks

Safe at Home Blanket – Colorful House Knitting Pattern

Safe at Home Blanket knitting pattern by Margaret Holzmann featuring colorful knitted houses

Safe at Home Blanket by Margaret Holzmann of KnitWit Designs is a wonderfully imaginative knitted throw made from rows of colorful little houses. With roofs, windows, doors and contrasting backgrounds, the finished blanket looks almost like a cheerful knitted neighborhood.

The design combines simple garter stitch with color changes and intarsia, making it an interesting choice for knitters who want to move beyond basic blankets while still working with familiar knit stitches.

It is also an excellent stash-inspired project. The designer encourages knitters to follow the suggested palette or create their own combination from coordinating leftover yarns.

Design © Margaret Holzmann / KnitWit Designs.

Safe at Home Blanket Pattern Overview

  • Designer: Margaret Holzmann
  • Design: Safe at Home blanket
  • Craft: Knitting
  • Category: Blanket / Throw
  • Published: April 2020
  • Yarn weight: Aran
  • Suggested yarn: Malabrigo Yarn Worsted
  • Needles: US 7 / 4.5 mm
  • Finished size: Approximately 55 × 55 in (140 × 140 cm)
  • Yardage: Approximately 3,300–3,500 yd (3,018–3,200 m)
  • Gauge: 17 stitches and 34 rows = 4 in in garter stitch
  • Language: English

A Blanket Made From Colorful Knitted Houses

The feature that makes Safe at Home instantly recognizable is its collection of colorful houses. Instead of repeating one conventional all-over texture, the blanket turns individual areas of color into windows, doors, roofs and skies.

The house motif makes color selection part of the fun. You can create a coordinated palette or give every house its own personality by combining different colors from your yarn stash.

Because the basic fabric is garter stitch, much of the visual complexity comes from color placement and construction rather than from complicated textured stitch patterns.

How the Safe at Home Blanket Is Constructed

The knitted version is worked in garter-stitch strips. The completed strips are then joined together to build the main blanket.

After the central blanket is assembled, stitches are picked up and knitted around the completed edges to form the border.

This modular approach can make a large blanket feel more manageable: instead of handling the entire finished width from the beginning, you build the design in sections and assemble them as the project develops.

Intarsia and Color Changes

One of the principal techniques used in Safe at Home is intarsia. This allows separate blocks of color to appear within the same row without carrying every yarn across the entire width of the work.

If intarsia is new to you, keeping the different yarn sources organized can make the process much easier. Small balls or bobbins can help prevent the working yarns from becoming tangled while you create the different parts of each house.

Remember to manage the yarn correctly where two colors meet so the sections remain connected rather than developing holes at the color changes.

Yarn Requirements

The original pattern recommends approximately 270 yards of each of 12 colors, plus approximately 180 additional yards of the border color.

That makes Safe at Home particularly attractive for knitters with a substantial collection of compatible Aran-weight leftovers.

The original sample lists Malabrigo Yarn Worsted, but the important considerations when substituting yarn are achieving suitable gauge, creating a fabric you like and having enough yarn for the complete blanket.

Skills You'll Use

  • Garter stitch
  • Intarsia colorwork
  • Color striping
  • Changing colors cleanly
  • Working separate blanket sections
  • Joining knitted strips
  • Picking up and knitting stitches
  • Finishing and weaving in yarn ends

Tips for a Neater Finished Blanket

With a multicolor project like this, good yarn management can save a great deal of frustration. Arrange your colors before beginning each section and keep them in a consistent order whenever possible.

It is also worth paying attention to your tension at intarsia joins. Loose joins can leave visible gaps, while pulling the yarn too tightly can distort the surrounding garter-stitch fabric.

Finally, weave in ends carefully and progressively rather than leaving every strand until the very end. A blanket involving many colors can produce a considerable number of yarn tails.

Is Safe at Home a Free Knitting Pattern?

No. The exact Safe at Home blanket by Margaret Holzmann is currently a paid knitting pattern.

It may appear on older knitting websites or social posts alongside the word “free,” but we could not verify a current authorized free edition of this exact design. Amazing Knitting therefore does not label it as a free pattern or link to unofficial copies.

Pattern prices and availability can change, so check the designer's current page for the latest information.

View the Safe at Home Blanket at KnitWit Designs →

The designer's page provides information about the project and access to the current purchase options for the knitting pattern.

Why This Blanket Is Worth Knitting

Safe at Home is more than a conventional striped throw. Each house gives you another small colorwork milestone, while the repeating construction helps the overall project develop into a striking geometric composition.

It's especially appealing if you enjoy choosing colors, using yarn from your stash and watching many smaller knitted elements gradually become one substantial finished blanket.

Pattern Availability

Amazing Knitting links readers to legitimate designer or publisher sources whenever possible. Pattern prices, download locations and availability can change after an article is published.

Read Our Pattern Availability Policy →

Amazing Knitting is an independent pattern discovery and project-guide site. The Safe at Home design and pattern remain the intellectual property of Margaret Holzmann / KnitWit Designs. This guide does not reproduce the designer's row-by-row pattern instructions.

Gingersnap Cardigan – Free Baby Knitting Pattern


Gingersnap Cardigan free baby knitting pattern by Kristen Rettig

Gingersnap Cardigan designed and photographed © Kristen Rettig.

Gingersnap by Kristen Rettig is a cheerful striped baby cardigan knitting pattern designed to turn small amounts of leftover worsted-weight yarn into an adorable handmade sweater.

With bold blocks of color, simple shaping and endless possibilities for combining yarn scraps, Gingersnap is the kind of baby cardigan that can look completely different every time you knit it.

The original pattern is written primarily for the one-year size and uses approximately 360–400 yards (329–366 m) of worsted-weight yarn.

Good news: the original Gingersnap Cardigan is still available as a free knitting pattern from designer Kristen Rettig through her Ravelry store. You will find the verified free pattern link near the end of this guide.

Gingersnap Cardigan at a Glance

  • Pattern: Gingersnap
  • Designer: Kristen Rettig
  • First published: July 2015
  • Category: Baby cardigan
  • Main size: Approximately 1 year
  • Yarn weight: Worsted
  • Yardage: Approximately 360–400 yd (329–366 m)
  • Needles: US 5 / 3.75 mm and US 7 / 4.5 mm
  • Gauge: 19 sts × 28 rows = 4 in / 10 cm in stockinette
  • Construction: Worked flat and seamed
  • Color style: Stripes / color blocking
  • Pattern language: English
  • Current availability: Free Ravelry download

A Colorful Baby Cardigan Made for Yarn Scraps

One of the best things about Gingersnap is that it was designed with leftover yarn in mind.

Kristen Rettig originally made her sweaters using scraps of Rowan Pure Wool Superwash Worsted left over from other knitting projects.

That makes the cardigan especially appealing to knitters with small quantities of coordinating worsted-weight yarn waiting in their stash.

Three Colors or More

The written pattern is designed around three colors, but you do not have to limit yourself to three.

The designer encourages knitters to raid their yarn stash and experiment with three, four, five or even more colors.

This flexibility is part of the charm of Gingersnap. A carefully planned palette can create a polished color-block cardigan, while a collection of leftover yarns can produce a playful scrappy sweater.

Choosing Colors for Gingersnap

There is no single correct color combination for this cardigan.

You can use three closely related shades for a subtle effect or combine strongly contrasting colors for a bolder sweater.

Another approach is to choose one neutral shade and pair it with two brighter colors.

Before casting on, place your yarns next to each other and experiment with their order. Changing which shade appears next to another can make a surprisingly large difference to the finished cardigan.

Worsted-Weight Yarn

Gingersnap is designed for worsted-weight yarn.

Yarn options associated with the original pattern include:

  • Rowan Pure Wool Superwash Worsted
  • Rowan Handknit Cotton
  • Rowan Softknit Cotton

You do not need to find the exact original yarn. A suitable worsted-weight substitute can work as long as you can obtain the appropriate gauge and create a fabric you like.

Choosing Yarn for a Baby Sweater

Because Gingersnap is intended for a young child, softness and washability are important considerations.

The designer specifically suggests using a soft, machine-washable yarn. This makes sense for a baby or toddler cardigan that may need frequent washing.

Check the care instructions on every yarn you plan to combine. Using several yarns with very different washing requirements can make caring for the finished cardigan unnecessarily complicated.

A Great Stash-Busting Project

Gingersnap can be particularly useful when you have leftover worsted-weight yarn from larger projects.

Instead of buying several full skeins specifically for a small baby sweater, you may be able to combine suitable leftovers that already coordinate.

Make sure each yarn is similar enough in weight and behavior to produce consistent fabric throughout the cardigan.

How Much Yarn Do You Need?

Published pattern information lists approximately 360–400 yards (329–366 meters) in total.

Because the sweater is designed for multiple colors, the total yardage is divided among the shades used in the cardigan.

Your actual yarn usage can vary with gauge, yarn choice and any changes you make to the color arrangement.

Needle Sizes

The pattern lists two needle sizes:

  • US 5 / 3.75 mm
  • US 7 / 4.5 mm

Different needle sizes are useful for creating appropriate structure in areas such as borders and the main stockinette fabric.

As always, treat the listed needle sizes as a starting point and use the size that allows you to obtain the required gauge.

Gauge

The published gauge is 19 stitches and 28 rows = 4 inches / 10 cm in stockinette stitch.

Gauge matters in a fitted garment, even a small baby cardigan.

If your stitches are significantly larger than the designer's gauge, the cardigan will also become larger. If your gauge is tighter, the finished sweater can become too small.

Make a Swatch With Your Substitute Yarn

Swatching is especially helpful if you are combining several different leftover yarns.

Two yarns may both be labeled worsted weight but still behave differently when knitted.

A small swatch can help you check gauge, fabric softness, color combination and how well your selected yarns work together before you begin the cardigan.

The Original Gingersnap Size

The original free Gingersnap pattern is primarily sized for one year.

Kristen Rettig explains that she particularly likes this size because babies around that age are active, sitting up, moving around and able to show off a handmade sweater.

The pattern listing also includes a note related to making a smaller approximately six-month version.

Gingersnap for Bigger Kids Is a Different Pattern

It is important not to confuse the original free Gingersnap with Gingersnap for Bigger Kids.

The original pattern featured on this page is the free baby cardigan first published in 2015.

Kristen Rettig later developed a separate expanded pattern for bigger children with additional sizes.

That expanded version is a different pattern listing and should not be mistaken for the original free Gingersnap download linked below.

Worked Flat and Seamed

Gingersnap is a worked-flat and seamed cardigan.

This means the garment is not constructed entirely as one seamless piece in the round.

If you are new to garment knitting, this style of construction can be a useful introduction to creating individual sweater sections and assembling them into a finished cardigan.

Stockinette Makes the Colors the Star

Much of the visual impact comes from the color arrangement rather than complicated stitch patterns.

Smooth stockinette fabric provides a simple background that allows the different colored sections to stand out clearly.

This is particularly effective when using bright or strongly contrasting yarns.

Is Gingersnap Beginner Friendly?

Gingersnap can be an approachable project for a knitter who already understands the basic stitches and wants to try a small garment.

Compared with an adult sweater, a baby cardigan requires much less yarn and considerably less knitting.

However, you should be comfortable following garment shaping and finishing instructions rather than expecting the project to be as simple as a rectangular scarf or dishcloth.

Skills That Will Help

Useful skills for this cardigan include:

  • Casting on
  • Knit and purl stitches
  • Stockinette stitch
  • Changing yarn colors
  • Basic increases and decreases
  • Following garment shaping
  • Binding off
  • Seaming knitted pieces
  • Picking up stitches where instructed
  • Weaving in yarn ends
  • Finishing a knitted garment neatly

Changing Colors Neatly

Because color changes are such a visible part of Gingersnap, neat transitions help give the cardigan a polished appearance.

When beginning a new color, leave enough yarn tail to weave in securely later.

Avoid tying bulky knots in the knitted fabric unless the pattern specifically instructs you to do so.

Managing Lots of Yarn Ends

A scrappy version using many colors can create more yarn ends than a simple three-color cardigan.

Consider weaving in some ends as the project progresses rather than leaving every tail until the very end.

Take care not to pull woven ends so tightly that they distort the surrounding stockinette fabric.

Keep Your Color Changes Consistent

Before beginning, decide whether you will follow the designer's three-color arrangement or create your own palette.

If you modify the color sequence, make a simple written plan so you do not have to decide what comes next every time you reach a new section.

A quick sketch or list of color order can be surprisingly helpful.

Use Machine-Washable Yarn When Practical

A handmade baby cardigan is likely to encounter spills, food and everyday wear.

For that reason, easy-care yarn can make the finished sweater much more practical for parents.

Kristen Rettig specifically designed Gingersnap with soft, machine-washable yarns in mind.

A Cotton Version for Warmer Weather

The designer also suggests cotton yarn as an option for knitters who want a lighter sweater for warmer weather.

Rowan Handknit Cotton and Rowan Softknit Cotton are among the yarns associated with the original pattern.

When substituting cotton for wool, remember that the fibers can behave differently, so checking gauge and fabric drape before starting is worthwhile.

Blocking and Finishing

Careful finishing can transform a collection of knitted pieces into a polished little cardigan.

Follow the pattern's assembly instructions, keep seams neat and avoid pulling them excessively tight.

Gentle blocking can help the pieces settle into shape and make the stockinette fabric look more even.

Always use a blocking method appropriate for the yarn fibers you chose.

A Fun Handmade Baby Gift

Gingersnap is particularly well suited to gift knitting because every color combination can create a different personality.

Soft neutrals can make a classic cardigan, while bright contrasting shades create something playful and energetic.

You can even choose colors that match the recipient's wardrobe or use meaningful leftovers from other family knitting projects.

Why Gingersnap Remains Popular

Gingersnap has been available since 2015 and has been knitted by a large number of Ravelry users.

Its lasting appeal is easy to understand: the sweater is small, colorful, practical and adaptable to the yarn already in your stash.

Most importantly, the original baby version remains available as a free pattern from the designer.

Free Gingersnap Cardigan Knitting Pattern

Gingersnap by Kristen Rettig is currently available as a free knitting pattern.

The designer provides the original baby-cardigan pattern through Kristen Rettig's Ravelry Store, where the current listing identifies it as a free Ravelry download.

This is the exact Gingersnap pattern featured on this Amazing Knitting page: the striped worsted-weight baby cardigan first published by Kristen Rettig in 2015.

Please note that the later Gingersnap for Bigger Kids is a separate expanded pattern. The link below is specifically for the original free baby version.

Pattern availability can change over time, so Amazing Knitting checks older links and gives priority to a legitimate free source whenever the exact pattern remains officially available at no cost.

Get the Free Gingersnap Pattern

Visit Kristen Rettig's current pattern page to see the full pattern information and download the original Gingersnap baby cardigan for free.

Get the Free Gingersnap Knitting Pattern →

Gingersnap is designed by Kristen Rettig. Amazing Knitting does not reproduce the designer's copyrighted row-by-row instructions. The original baby version is currently offered as a free download by the designer. Pattern availability may change, so please check the linked source for the latest information.

Read Our Pattern Availability Policy →


Daybreak Tee – Free Easy Summer Top Knitting Pattern

Daybreak Tee free summer top knitting pattern by Destiny Meyer

The Daybreak Tee. Photos © Destiny Meyer

The Daybreak Tee by Destiny Meyer of Knifty Knittings is a free slightly cropped tee knitting pattern designed with a relaxed, flattering fit and a beautiful lace detail across the upper front.

Worked in soft DK-weight cotton yarn, the tee is knitted mainly in the round from the bottom up before the front and back are separated and worked flat. The pattern includes six sizes from XS through 2X and a detailed step-by-step video tutorial.

Daybreak Tee Pattern Details

  • Designer: Destiny Meyer / Knifty Knittings
  • Published: May 2019
  • Craft: Knitting
  • Category: Women's tee / summer top
  • Pattern availability: Free on the designer's website
  • Sizes: XS, S, M, L, XL and 2X
  • To fit bust: 28–50 inches (71–127 cm)
  • Fit: Approximately 1–3 inches of positive ease
  • Yarn: LB Collection Cotton Jeans
  • Yarn weight: DK
  • Yardage: 457–825 yards (418–755 m), depending on size
  • Needles: US 6 (4 mm) and US 7 (4.5 mm)
  • Gauge: 18 stitches × 25 rows = 4 inches (10 cm) in blocked stockinette stitch
  • Construction: Bottom up
  • Techniques: Worked in the round and flat
  • Features: Cropped fit, lace detail, short sleeves and ribbed edging
  • Tutorial: Step-by-step video included by the designer
  • Language: English

A Free Summer Tee Knitting Pattern

Daybreak Tee is a great example of how a relatively simple knitted top can become much more interesting with one carefully placed decorative feature.

Most of the garment uses straightforward stockinette stitch, while the lace section across the upper front adds an airy detail that gives the tee its distinctive appearance.

Combined with short sleeves and cotton yarn, the design works especially well as a lightweight knitted top for warmer weather.

Slightly Cropped With Positive Ease

Destiny Meyer designed Daybreak with a slightly cropped silhouette and approximately 1–3 inches of positive ease.

Positive ease means the finished garment circumference is slightly larger than the wearer's actual bust measurement, creating a relaxed rather than skin-tight fit.

The pattern provides both recommended bust measurements and finished garment measurements, making it easier to choose the amount of ease you prefer.

Six Sizes From XS to 2X

The free pattern includes six sizes: XS (S, M, L, XL, 2X).

They are designed to fit bust measurements of approximately:

  • XS: 28–30 inches (71–76 cm)
  • S: 32–34 inches (81.5–86.5 cm)
  • M: 36–38 inches (91.5–96.5 cm)
  • L: 40–42 inches (101.5–106.5 cm)
  • XL: 44–46 inches (112–117 cm)
  • 2X: 48–50 inches (122–127 cm)

The corresponding finished garment circumferences are approximately 31, 35, 39, 43, 47 and 51 inches.

Bottom-Up Construction

The Daybreak Tee begins at the lower edge and is knitted from the bottom up.

After the ribbed hem is complete, the main body is worked in stockinette stitch in the round. This creates the lower body without side seams.

When the work reaches the underarm area, the front and back stitches are separated and the two upper sections are worked flat.

How the Short Sleeves Are Made

One clever feature of Daybreak is that you do not knit two traditional sleeves separately and sew them into armholes.

Instead, additional stitches are cast on at each side when the front and back are separated.

These extra stitches become the short sleeves as the upper front and back are worked toward the shoulders.

This keeps the construction relatively simple and minimizes the amount of finishing required at the end.

Lace Detail Across the Front

The decorative lace appears on the upper front of the tee.

The pattern uses yarn overs and decreases to create two openwork sections around the center of the front.

Because the lower body and back remain relatively simple, the lace becomes a clear focal point without making the entire garment an intricate lace project.

Minimal Seaming

Although Daybreak combines knitting in the round with flat knitting, the finished garment requires relatively little sewing.

The shoulders are joined using a three-needle bind-off, and the remaining finishing includes small seams underneath the short sleeves.

If garment seaming is something you usually try to avoid, this construction provides a useful compromise between completely seamless knitting and a traditionally pieced sweater.

The Original Cotton Yarn

Destiny Meyer designed the tee using LB Collection Cotton Jeans, a DK-weight 100% cotton yarn.

The original yarn contains approximately 218 yards (200 m) per 100 g skein.

The designer used the Grey Fade colorway for the original sample and describes the yarn as soft and drapey, two useful characteristics for a knitted summer top.

How Much Yarn Does the Daybreak Tee Need?

The official pattern gives the following approximate yardage:

  • XS: 457 yards (418 m)
  • S: 532 yards (487 m)
  • M: 599 yards (548 m)
  • L: 672 yards (615 m)
  • XL: 748 yards (684 m)
  • 2X: 825 yards (755 m)

With the original Cotton Jeans yarn, the pattern calls for 3 (3, 3, 4, 4, 4) skeins.

Choosing a Substitute Yarn

If the original yarn is unavailable, look for a DK-weight yarn with good drape that can produce the required gauge.

Cotton or a cotton blend can be a natural choice for a warm-weather version, but the most important factors are gauge, fabric feel and drape.

Remember to compare total yardage rather than simply buying the same number of skeins, because skein sizes vary considerably between yarn brands.

Needles and Gauge

The pattern uses a US 6 (4 mm) circular needle for the ribbing and a US 7 (4.5 mm) circular needle for the main fabric.

The official blocked gauge is: 18 stitches and 25 rows = 4 inches (10 cm) in stockinette stitch using the larger needles.

The designer specifically recommends taking time to check gauge because it directly affects the finished fit.

Choosing Your Size

Before casting on, compare your actual bust measurement with both the recommended body measurements and the finished garment circumference.

The original design is intended to have approximately 1–3 inches of positive ease, but the amount you prefer can depend on how fitted or relaxed you want your tee to look.

A washed and blocked gauge swatch is particularly useful with cotton, because the behavior of the finished fabric matters just as much as the stitch count on the needles.

Adjusting the Length

The body is largely worked in stockinette before the front and back are divided, which gives you a natural opportunity to consider the overall length.

The pattern itself gives target measurements for each size, but you can work toward your preferred underarm length if you want the tee a little longer or shorter.

If you add length, remember that you will need additional yarn beyond the published yardage.

Skills Used in the Daybreak Tee

Useful techniques for this project include:

  • Knitting and purling
  • 1×1 ribbing
  • Stockinette stitch
  • Knitting in the round
  • Working flat
  • Cable cast-on
  • Yarn overs
  • K2tog and SSK decreases
  • Three-needle bind-off
  • Basic seaming
  • Blocking a finished garment

Is the Daybreak Tee Beginner Friendly?

Destiny Meyer describes Daybreak as a good project for an adventurous beginner.

The main body is straightforward, while the upper portion introduces several useful garment-making skills such as separating the front and back, adding sleeve stitches, working simple lace and joining shoulders.

You don't need to rely on the written instructions alone: the designer also provides a detailed video tutorial demonstrating the construction.

A 45-Minute Step-by-Step Video Tutorial

One of the strongest features of this free pattern is the accompanying approximately 45-minute video tutorial.

Destiny walks through the project step by step, making the tutorial particularly useful if this is one of your first knitted garments.

The video is linked from the original free pattern page, so you can use the written pattern and visual tutorial together.

Why Knit the Daybreak Tee?

Daybreak combines several appealing features in one approachable garment: DK cotton yarn, a slightly cropped silhouette, short sleeves, minimal seaming and just enough lace to make the upper front stand out.

It also offers a useful progression for knitters moving from scarves and shawls into garment knitting. The stockinette body provides plenty of straightforward knitting before you reach the more interesting construction and lace details at the top.

With six sizes from XS to 2X and a full video tutorial, the free version provides considerably more support than many simple summer top patterns.

Get the Free Daybreak Tee Knitting Pattern

The complete Daybreak Tee by Destiny Meyer is currently available free on the designer's official Knifty Knittings website, including the written instructions and step-by-step video tutorial.

Get the Free Daybreak Tee Knitting Pattern →

Pattern availability was checked when this article was updated. Availability and pattern details on external websites may change over time.

Discover More From the Archive

A fresh mix of knitting patterns and tutorials from the Amazing Knitting archive.

Finding patterns from the archive…