Skip to content

...

Showing posts sorted by relevance for query worsted scarf knitting pattern. Sort by date Show all posts

Scarves to Throws Month 6 - Knitting Pattern Guide

Scarves to Throws - Free Knitting Pattern
Designed by © Rachel

Scarves to Throws – Month 6 by Rachel Young is a lace scarf originally created for the Jimmy Beans Wool Scarves to Throws project.

First published in 2008, the design uses a repeating diamond-style lace pattern and worsted-weight yarn to create a lightweight scarf that opens beautifully after blocking.

This pattern was originally shared free online, but the exact original pattern is no longer available from its original source. This updated Amazing Knitting page therefore preserves the verified project information without reproducing or linking to an unauthorized copy of the instructions.

Pattern Availability Update

Scarves to Throws – Month 6 was originally distributed as a free knitting pattern through Jimmy Beans Wool. Ravelry now marks the original pattern as no longer available. Amazing Knitting does not provide archived or unofficial copies of the designer's instructions.

Scarves to Throws Month 6 at a Glance

Pattern: Scarves to Throws – Month 6

Designer: Rachel Young

Publisher: Jimmy Beans Wool

First Published: April 2008

Craft: Knitting

Category: Scarf

Finished Size: Approx. 5.5 × 65 in

Original Yarn: Lorna's Laces Shepherd Worsted Multi

Yarn Weight: Worsted / Aran

Needles: US 10 / 6 mm

Style: Lace scarf

Original Sample Color: Cedar

Current Availability: Original pattern no longer available

About Scarves to Throws

Scarves to Throws was an unusual knitting project from Jimmy Beans Wool.

Instead of treating each scarf as an unrelated project, the series was conceived around multiple scarves that could ultimately become part of a much larger knitted piece.

Different months introduced different stitch patterns, giving knitters an opportunity to explore a variety of textures while working with coordinating yarns.

About Month 6

Month 6 was designed by Rachel Young and published in April 2008.

It is a lace scarf worked in worsted-weight yarn. The repeating openwork creates a geometric, diamond-like appearance while keeping the project relatively quick to knit.

The designer described it as an easy and fast lace pattern, making it appealing to knitters who want the appearance of lace without committing to a very fine lace-weight project.

Finished Size

The published finished dimensions are approximately:

5.5 inches wide × 65 inches long

The designer noted that the lace stretches considerably during blocking, so the scarf can look significantly shorter while it is still being knitted.

The original sample required only about 15 pattern repeats to block to approximately 65 inches in length.

Original Yarn

The original design used:

Lorna's Laces Shepherd Worsted Multi

This is a 100% merino wool yarn with approximately 225 yards / 206 meters per 113 g skein.

The scarf pictured in the original pattern was knitted in the Cedar colorway.

Needles

The published needle size is:

US 10 / 6 mm

A relatively generous needle size for worsted-weight yarn helps produce the open fabric needed for the lace to expand during blocking.

As always, the published needle size should be treated as a starting point. Different knitters and substitute yarns can produce different fabrics on the same needle size.

A Lace Pattern Designed to Open Up

One of the most important things to understand about this scarf is that its appearance changes during finishing.

Lace can look compressed and much shorter while it is still on the needles. After appropriate blocking, the openings become more defined and the fabric can gain considerable length.

This is why judging the final scarf solely from its unblocked length can be misleading.

Why Worsted-Weight Lace?

Lace knitting does not require lace-weight yarn.

Using worsted-weight yarn makes the individual stitches easier to see and creates a more substantial scarf while still allowing yarn overs and decreases to form decorative openings.

For knitters beginning to explore lace, a project using larger needles and thicker yarn can also be easier to read than very fine lace.

Choosing a Substitute Yarn

If you want to create a similar scarf today, look for a smooth worsted-weight yarn with enough stitch definition to show the lace.

Wool and wool blends can work particularly well because appropriate blocking helps the lace settle into shape.

Variegated yarn can also suit this style nicely, reflecting the multicolor character of the original Lorna's Laces yarn.

Skills Used in This Style of Scarf

A lace scarf of this type typically calls on skills such as:

  • Casting on and binding off
  • Knitting and purling
  • Working yarn overs
  • Working decreases
  • Following a repeating lace pattern
  • Keeping an accurate stitch count
  • Recognizing pattern repeats
  • Blocking knitted lace

Keep Track of Pattern Repeats

Repeating lace patterns become easier once their visual rhythm begins to make sense.

Until that happens, use a row counter or checklist so you always know which row you have just completed.

It is also useful to count your stitches periodically. A missed yarn over or decrease can affect the alignment of the following repeats.

Blocking Is Part of the Project

Blocking is especially important for this design because the original designer specifically noted how much the scarf stretches after blocking.

Before deciding that your scarf is too short, finish a representative swatch and block it using a method appropriate for your chosen fiber.

That will give you a much better idea of how the final fabric behaves.

The Larger Scarves to Throws Idea

Month 6 was not the only design in the original series.

Jimmy Beans Wool published a collection of different monthly scarf designs using a variety of techniques, including lace, cables, drop stitches, entrelac and other textured patterns.

The broader project allowed the individual scarves to work as separate accessories or as components of a larger throw.

Joining Knitted Panels

Jimmy Beans Wool also published guidance about joining the completed Scarves to Throws pieces.

Their later tutorial discusses using a modified mattress-stitch method to sew the long knitted sections together.

This is useful inspiration even if you are creating your own modern version of the concept using different verified scarf or panel patterns.

Is Scarves to Throws Month 6 Still Free?

The pattern was originally free, but the original pattern is no longer available.

Ravelry maintains the historical pattern record for Scarves to Throws – Month 6 by Rachel Young, but currently states that the pattern is no longer available.

For that reason, Amazing Knitting does not provide an unofficial PDF, archived copy or transcription of the original instructions.

This page instead preserves the verified information about the project and helps knitters understand the yarn, construction concept and lace style.

View the Historical Pattern Record

Ravelry still maintains the pattern record, project photographs and basic specifications for the original design.

View Scarves to Throws Month 6 on Ravelry →

Looking for a Free Alternative?

Since the original Month 6 instructions are no longer available, the safest option is to choose a currently available free lace scarf rather than downloading an unofficial copy of the discontinued pattern.

Amazing Knitting already has an excellent verified free option: Lamina by Karen S. Lauger.

Lamina is a free lace scarf with a large leaf motif. Its updated Ravelry version includes both written instructions and charts, while the original pattern is also available free from Knitty.

See the Free Lamina Scarf Pattern →

More Free Scarf Knitting Patterns

You can also explore more currently available scarf projects from the Amazing Knitting archive.

Explore Free Scarf Knitting Patterns →

You can also browse lace scarf patterns, worsted-weight scarves, and free lace knitting patterns.

Before You Start

If your goal is to reproduce the exact original Month 6 scarf, be aware that the designer's pattern is currently unavailable. Avoid websites offering copied PDFs or transcribed instructions without permission.

For a new project, choose a currently available pattern, make a swatch with your chosen worsted-weight yarn and remember that lace dimensions can change considerably after blocking.

Pattern credit: Scarves to Throws – Month 6 was designed by Rachel Young and originally published through Jimmy Beans Wool in April 2008. The original pattern is currently listed as no longer available. Amazing Knitting does not reproduce the designer's copyrighted knitting instructions or provide unauthorized pattern copies.

Chestnut Street Scarf – Free Cable Scarf Knitting Pattern

Chestnut Street Scarf free cable scarf knitting pattern by Alexandra Davidoff

Chestnut Street Scarf. Designed by © Alexandra Davidoff for Lion Brand

Chestnut Street Scarf by Alexandra Davidoff for Lion Brand is a handsome free cable scarf knitting pattern featuring a bold central cable surrounded by smaller cable details.

Worked flat in rows with medium-weight yarn, this is a satisfying project for knitters who already know the basics and want to practice more intricate cable knitting. Lion Brand rates the pattern Level 3 – Intermediate.

Chestnut Street Scarf Pattern Details

  • Designer: Alexandra Davidoff
  • Publisher: Lion Brand Yarn
  • Pattern number: L60396
  • Craft: Knitting
  • Category: Cable scarf
  • Pattern availability: Free from Lion Brand
  • Skill level: Intermediate
  • Finished size: About 8 × 65 inches (20.5 × 165 cm)
  • Yarn: Lion Brand Fishermen's Wool
  • Yarn weight: #4 Medium / Worsted
  • Needles: US 8 (5 mm)
  • Gauge: 27 stitches + 22 rows = about 4 inches (10 cm) in cable patterns
  • Construction: Worked flat, back and forth in rows
  • Instructions: Written cable instructions and charts

A Classic Cable Scarf

The Chestnut Street Scarf gets its distinctive appearance from a combination of cable patterns rather than a single simple cable running from one end to the other.

A prominent central cable creates the main visual feature, while narrower cable details frame it on both sides. The result is a richly textured scarf with a traditional knitted look.

The cable arrangement is especially attractive in a solid or lightly heathered yarn where the shadows created by the crossed stitches remain easy to see.

A 32-Row Main Cable Pattern

After the opening cable ribbing section, the scarf moves into its main decorative cable pattern.

The central design develops over a 32-row repeat, giving the scarf a much more detailed appearance than a basic two- or four-row cable.

This makes Chestnut Street particularly appealing if you enjoy watching a cable motif gradually develop as you knit.

Written Instructions and Cable Charts

One of the useful features of the official Lion Brand pattern is that the cable designs can be followed using either written instructions or charts.

If you prefer working row by row from written directions, you can use that format. If you find it easier to visualize how the cables cross and interact, the charts provide another option.

This also makes the project useful for knitters who want to become more comfortable reading cable charts while still having written directions available for reference.

Worked Flat in Rows

Chestnut Street Scarf is worked back and forth in rows.

There is no knitting in the round and no garment shaping to manage. Instead, most of your attention can go toward keeping track of the different cable crossings.

The scarf begins with 55 stitches and develops its texture through a combination of knit, purl and cable stitches.

Finished Scarf Size

According to Lion Brand, the finished Chestnut Street Scarf measures approximately:

8 inches wide × 65 inches long
(20.5 × 165 cm)

This gives you a substantial adult scarf without making it excessively wide or bulky.

Designed as a Men's Scarf

Lion Brand currently categorizes Chestnut Street as a men's knitting pattern.

Its strong geometric cables, natural wool and classic rectangular shape certainly make it an excellent men's scarf, but the design itself is versatile enough to be worn by anyone who enjoys traditional cable knit accessories.

It could also make a beautiful handmade winter gift.

The Original Yarn: Fishermen's Wool

The original pattern was designed for Lion Brand Fishermen's Wool.

This yarn is a natural-looking wool yarn that works particularly well with cables because the stitch definition allows the twists and crossings to stand out clearly.

The original version uses one ball of Fishermen's Wool.

Choosing a Substitute Yarn

If you want to substitute another yarn, look for a #4 medium / worsted-weight yarn capable of producing the required gauge and good cable definition.

Smooth yarns usually make complex cables easier to see than highly textured or fuzzy yarns.

Because the scarf contains several cable patterns, making a swatch is useful not only for checking gauge but also for seeing whether your chosen yarn shows the cable details clearly.

Needles and Cable Needle

The pattern uses US 8 (5 mm) knitting needles.

You will also want a cable needle to hold stitches temporarily while making the different cable crossings.

Straight or circular needles can be used for a flat scarf as long as you are comfortable working back and forth with them.

Understanding the Gauge

Lion Brand gives a gauge of approximately 27 stitches and 22 rows = 4 inches (10 cm) in the cable patterns.

Notice that this is a cable-pattern gauge rather than a plain stockinette gauge.

Cables pull the knitted fabric inward, so measuring the actual cable fabric is more useful for this project than assuming a standard gauge based only on the yarn weight.

Skills Used in the Chestnut Street Scarf

Techniques used in this project include:

  • Knitting and purling
  • Working flat in rows
  • Using a cable needle
  • Crossing stitches to the right and left
  • Working several cable variations
  • Following a longer pattern repeat
  • Reading written cable instructions
  • Reading cable charts
  • Binding off
  • Blocking the finished scarf

Is Chestnut Street Scarf Beginner Friendly?

Lion Brand officially rates the pattern Level 3 – Intermediate.

The scarf construction itself is straightforward because there is no garment shaping or knitting in the round. The challenge comes from the number of cable crossings and keeping your place within the longer cable repeat.

If you have already knitted a simple cable project and want something more interesting, Chestnut Street can be a good next step.

Tips for Knitting the Cable Pattern

With a detailed cable design, keeping track of your row is often more important than knitting quickly.

A row counter, printed chart marker or simple note can help you remember exactly where you stopped.

It can also be helpful to learn how each cable section should look. Once the motif begins to develop, the knitted fabric itself can provide useful visual clues about where the next crossing belongs.

Don't Skip Blocking

Blocking can make a noticeable difference to a cable scarf.

Freshly knitted cables may pull the fabric inward and make the scarf appear narrower or more uneven than expected. Gentle blocking allows the stitches to settle and helps the cable details show more clearly.

Always follow the care instructions appropriate for the yarn you choose.

A Great Handmade Gift for Cable Lovers

Scarves are useful gift projects because sizing is much simpler than with sweaters, socks or fitted accessories.

Chestnut Street adds enough cable detail to make the finished scarf look special while retaining the practical rectangular construction of a classic winter scarf.

Choose a neutral shade for a traditional look or use a richer color to give the same cable pattern a more contemporary appearance.

Why Knit the Chestnut Street Scarf?

Chestnut Street is a strong choice when you want to move beyond basic scarf knitting and make the cables the centerpiece of the project.

The combination of a bold central motif, smaller framing cables and a substantial 32-row repeat produces an impressive result from a simple rectangular construction.

You also have the flexibility of following either the written instructions or charts, making the pattern useful for practicing cable chart reading at your own pace.

Get the Free Chestnut Street Scarf Knitting Pattern

The complete Chestnut Street Scarf by Alexandra Davidoff is currently available from Lion Brand as pattern L60396.

Get the Free Chestnut Street Scarf Knitting Pattern →

Pattern availability was checked when this article was updated. Availability and access requirements on external websites may change over time.

Reversible Cabled Brioche Stitch Scarf – Free Knitting Pattern

Reversible Cabled Brioche Stitch Scarf free knitting pattern by Saralyn Harvey

Reversible Cabled Brioche Stitch Scarf by Saralyn Harvey is a wonderfully plush scarf that combines the deep softness of brioche knitting with bold cable crossings.

Unlike many cable scarves that have a clearly defined right and wrong side, this design looks attractive from both sides, making it especially practical for an accessory that naturally twists and turns while being worn.

The complete pattern is still available free from the designer's original FireFlower Knits page.

Design and original pattern © Saralyn Harvey / FireFlower Knits.

Reversible Cabled Brioche Scarf Pattern Overview

  • Designer: Saralyn Harvey
  • Original source: FireFlower Knits
  • Pattern: Reversible Cabled Brioche Stitch Scarf
  • Craft: Knitting
  • Category: Scarf
  • Published: October 2007
  • Finished size: Approximately 5 × 56 in
  • Yarn weight: Worsted
  • Suggested yarn: Knit Picks Andean Silk
  • Yardage: Approximately 350–400 yd / 320–366 m
  • Needles: US 7 / 4.5 mm
  • Additional tool: Cable needle
  • Main techniques: Brioche stitch, yarn overs, slipped stitches and brioche cables
  • Skill level: Intermediate
  • Construction: Worked flat
  • Fabric: Thick, soft and reversible
  • Pattern availability: Free from the designer

Why This Scarf Is Truly Reversible

The special appeal of this scarf is that there is no unattractive back side.

Traditional cables usually look very different on the reverse of the fabric, but this design combines cabling with brioche structure so the scarf remains visually interesting from both directions.

That is especially useful for scarves because the fabric naturally flips, folds and twists while being worn.

What Is Brioche Stitch?

Brioche knitting creates a thick, elastic fabric by combining slipped stitches, yarn overs and worked-together stitches.

The result has more depth and loft than ordinary ribbing or stockinette, which is why brioche scarves often feel especially soft and warm.

In this pattern, the brioche structure becomes the foundation for the cable design.

Brioche Cables

The defining technical feature of the scarf is the brioche cable.

Instead of crossing ordinary knit stitches, groups that include brioche stitches and yarn overs are moved together using a cable needle.

This produces broad raised twists while preserving the soft, dimensional quality of the brioche fabric.

How Often Are the Cables Worked?

One helpful feature is that you do not cable on every row.

The designer notes that the cable crossings are separated by long sections of ordinary brioche knitting.

This gives the project a comfortable rhythm: once the brioche sequence becomes familiar, most rows can be worked relatively smoothly until the next cable crossing.

Original Finished Size

The original scarf measures approximately:

5 inches wide × 56 inches long.

The designer also notes that additional yarn can be used to make a longer version.

For example, the original source mentions that five skeins would allow a scarf around 70 inches long.

Can You Make the Scarf Wider?

Yes. The designer provides guidance for adding extra cable repeats.

Each additional cable section requires extra cast-on stitches and increases the finished width.

This allows you to adapt the project from a relatively narrow scarf to a wider wrap-style accessory if desired.

Yarn for the Reversible Cabled Brioche Scarf

The original pattern uses Knit Picks Andean Silk, a worsted-weight blend of alpaca, silk and merino.

The published requirement is approximately:

350–400 yards / 320–366 meters.

A soft yarn is particularly suitable for this project because brioche creates a thick fabric that sits directly against the neck.

Choosing a Yarn Substitute

If the original yarn is unavailable, choose a smooth worsted-weight yarn with good stitch definition.

Useful characteristics include:

  • Softness
  • Elasticity
  • Good cable definition
  • Enough loft for brioche texture
  • Comfort against the skin

Very fuzzy yarn can soften the appearance of the cables, while extremely stiff yarn may reduce the natural squishiness of the brioche fabric.

Needles

The original pattern recommends US 7 / 4.5 mm knitting needles.

Because brioche tension varies from knitter to knitter, use the listed size as a starting point rather than an absolute rule.

Your finished fabric should feel soft and full rather than excessively loose or stiff.

Why a Cable Needle Is Recommended

The designer specifically recommends using a cable needle for the brioche cable crossings.

Brioche stitches can be more difficult to control than standard cable stitches because yarn overs are part of the stitch structure.

Using a cable needle helps prevent those loops from slipping or becoming misaligned during the crossing.

A Row Counter Is Useful

Saralyn Harvey also recommends using a row counter.

The majority of the scarf is repetitive brioche, so it can be easy to lose track of when the next cable row should occur.

A row counter allows you to enjoy the repetitive sections without constantly recounting the fabric.

Skills You'll Use

  • Casting on
  • Knit stitches
  • Slipping stitches
  • Yarn overs
  • Working brioche stitch
  • Working stitches together
  • Using a cable needle
  • Crossing brioche cables
  • Tracking row repeats
  • Binding off in pattern
  • Weaving in ends

Is This a Beginner Pattern?

The designer classifies the scarf as an intermediate knitting project.

The basic cable concept is not unusually difficult, but brioche stitch behaves differently from ordinary knit-and-purl fabric.

It is therefore best suited to knitters who already understand basic brioche or are comfortable carefully learning a new stitch structure.

If this is your first brioche project, practice the basic brioche sequence on a small swatch before beginning the full scarf.

Tips for Brioche Knitting

Do not rush dropped stitches. Brioche fabric contains yarn overs and slipped stitches, so a dropped stitch can travel through the fabric differently from ordinary stockinette.

Use lifelines if needed. Running a lifeline through a stable row can make it easier to recover if you need to unravel several rows.

Watch your yarn-over placement. Missing one yarn over can change the stitch count and disrupt the next row.

Count regularly. Brioche mistakes are often easier to fix immediately than after several cable repeats.

Tips for Neater Brioche Cables

Keep the cable crossing relaxed. Tightening too much can make the crossing narrower than the surrounding fabric.

Make sure yarn overs stay with the correct stitches. This is especially important while moving stitches onto the cable needle.

Use a cable needle with enough grip. A very slippery cable needle can make brioche loops harder to control.

Check both sides. Because the scarf is reversible, inspect the front and back after each cable row to catch problems early.

Blocking the Finished Scarf

Brioche fabric can stretch considerably during blocking.

Block gently and avoid pulling the scarf aggressively unless you intentionally want to increase the length or width.

Always follow the care instructions for your chosen yarn.

Natural-fiber blends may relax noticeably after washing, so taking measurements before and during blocking can be useful.

Why This Scarf Is So Warm

Brioche creates a deeper fabric than standard stockinette because the stitch structure contains extra yarn and trapped air.

That added thickness helps make the finished scarf soft, cushioned and warm.

Using wool, alpaca or another insulating fiber can enhance that effect further.

Is the Reversible Cabled Brioche Stitch Scarf Free?

Yes. Reversible Cabled Brioche Stitch Scarf by Saralyn Harvey is currently available free from the designer's original FireFlower Knits website.

Amazing Knitting links directly to the original designer source rather than reproducing the complete row-by-row pattern.

View the Free Reversible Cabled Brioche Scarf Pattern →

Why This Scarf Is Worth Knitting

This design combines three qualities that are unusually useful in one scarf: reversibility, warmth and dramatic texture.

Brioche makes the fabric soft and thick, while the cable crossings add enough visual interest to turn a simple rectangular scarf into a distinctive accessory.

Because the scarf looks attractive from both sides, you also do not have to worry about arranging it so that one particular surface always faces outward.

For knitters ready to move beyond basic brioche, it is an excellent project for learning how cables can be incorporated into brioche fabric.

Pattern Availability

Amazing Knitting links readers to legitimate designer or publisher sources whenever possible. Pattern prices, download locations and availability can change after an article is published.

Read Our Pattern Availability Policy →

Amazing Knitting is an independent pattern discovery and project-guide site. The Reversible Cabled Brioche Stitch Scarf design and complete knitting instructions remain the intellectual property of Saralyn Harvey / FireFlower Knits. This guide does not reproduce the designer's complete row-by-row pattern instructions.

Triple Slip Rib Square - Free Loom Knitting Pattern

Triple Slip Rib Square - Free Pattern
Photos above © Bethany A Dailey

Triple Slip Rib Square by Bethany A Dailey is a textured loom-knitting square from the Knitting Board Stitchology series.

The design uses slipped stitches and ribbed texture to create long, alternating raised lines with a rustic woven appearance.

Best of all, the original pattern is still available free, making this an excellent small project for practicing textured loom knitting before using the stitch in a larger scarf, cowl or blanket.

✓ Free Loom Knitting Pattern

Triple Slip Rib Square: Stitchology 17 by Bethany A Dailey remains available as a free loom-knitting pattern. This is a loom knitting project, not a traditional two-needle knitting pattern.

Triple Slip Rib Square at a Glance

Pattern: Triple Slip Rib Square: Stitchology 17

Designer: Bethany A Dailey

Series: Stitchology

Publisher: Knitting Board Blog

Published: January 2016

Craft: Loom Knitting

Project: Afghan Block / Stitch Square

Finished Size: Approx. 8 × 8 in / 20 × 20 cm

Yarn Weight: Worsted

Yardage: Approx. 75 yd / 69 m

Original Sample Yarn: Berroco Vintage

Stitch Repeat: 8 rows

Availability: Free

Important: This Is a Loom Knitting Pattern

Before You Begin

Triple Slip Rib Square was specifically designed for loom knitting. The original instructions refer to loom pegs and loom-knitting techniques rather than conventional knitting needles.

This distinction matters because the words "knitting pattern" are often used for both loom knitting and needle knitting.

If you normally knit with two needles or circular needles, do not assume that conventional needle-knitting instructions can be substituted directly for the original loom pattern.

About the Stitchology Series

Triple Slip Rib is part of the Stitchology collection published through the Knitting Board Blog.

The series explores different stitch patterns that can be created on a knitting loom, often presenting them as small squares.

These squares allow loom knitters to learn a texture on a manageable project before adapting the idea to larger pieces.

What Does Triple Slip Rib Look Like?

The finished fabric features long alternating raised lines that create a strong vertical and horizontal rhythm.

Bethany A Dailey describes the appearance as resembling a rustic weave.

The slipped-stitch structure also creates a relatively thick and sturdy panel.

An 8-Row Repeat

One of the attractive features of Triple Slip Rib is that the texture is based on a relatively short:

8-row repeat

Once the sequence becomes familiar, the repetitive structure can make the stitch easier to remember than textures with very long row repeats.

Use the designer's original instructions for the exact peg-by-peg sequence.

Finished Square Size

The Stitchology sample is designed to produce an approximately:

8 × 8 inch square

approximately 20 × 20 cm

This makes it useful as a practice swatch, sampler square or building block for a larger afghan.

Original Yarn

The published sample uses Berroco Vintage, a worsted-weight yarn.

The original square requires approximately:

75 yards / 69 meters

You do not necessarily need to use the exact sample yarn, but a worsted-weight yarn with good stitch definition will help the slipped texture remain visible.

Choosing a Substitute Yarn

When choosing another worsted-weight yarn, consider:

  • Stitch definition
  • Fiber elasticity
  • Finished fabric thickness
  • Washability
  • Whether the yarn suits your final project

A smooth yarn will generally display the long slipped-stitch lines more clearly than a very fuzzy or highly textured yarn.

Solid Colors Work Especially Well

The Triple Slip Rib texture creates much of its visual interest through light and shadow.

A solid or gently tonal yarn allows those raised and recessed areas to remain easy to see.

Variegated yarn can also work, but strong color changes may compete with the stitch structure.

Original Loom Setup

The designer's sample was created using an Authentic Knitting Board Adjustable Hat Loom configured with rounded pieces and peg connectors for approximately a 3/8-inch gauge.

The designer also identifies the Sock Loom 2 and All-n-One Loom as possible loom options.

Check the current original instructions before setting up your loom, because peg spacing and configuration affect the finished dimensions.

Tools and Notions

In addition to the loom and yarn, the original project calls for basic loom-knitting tools such as:

  • Loom tool
  • Yarn needle
  • Scissors

Helpful optional tools include:

  • Peg markers
  • Row counter
  • Blocking pins

Why a Row Counter Helps

An eight-row repeat is not especially long, but keeping track of your position is important because the alternating slipped sections create the overall woven effect.

A simple row counter can prevent accidentally repeating or skipping part of the sequence.

Use Peg Markers While Learning

Peg markers can help identify repeating sections while you are becoming familiar with the pattern.

As the stitch becomes easier to recognize visually, you may find that you need fewer reminders.

Understanding Slipped Stitches

A slipped stitch is carried without being worked in the same way as its neighboring stitches.

Repeating this strategically allows elongated strands and raised areas to develop in the fabric.

In Triple Slip Rib, those effects contribute to the distinctive long dash-like texture.

A Thick and Sturdy Fabric

The designer specifically notes that Triple Slip Rib creates a fairly thick and sturdy panel.

That characteristic makes it useful for projects where you want more substance than a lightweight open stitch.

More Than an Afghan Square

Although Stitchology presents the pattern as an 8-inch square, the texture can inspire larger projects.

The designer suggests it would work particularly well for:

  • Cowls
  • Scarves
  • Blankets
  • Sampler afghans

Using Triple Slip Rib for a Scarf

The long linear texture can create a strong visual effect when repeated along the length of a scarf.

Before adapting the square, make a sample first so you can evaluate the fabric thickness, drape and reverse side.

Using It for a Cowl

A thick slipped-stitch texture can be particularly suitable for a warm cowl.

However, adapting a flat Stitchology square into a different construction may require changes to the setup and finishing.

Do not assume that the square instructions automatically become an in-the-round cowl pattern.

Using the Squares for a Blanket

The original 8-inch format naturally lends itself to sampler blankets.

You can create multiple loom-knit squares and join them later, or combine Triple Slip Rib with other Stitchology textures for a varied afghan.

Before making many squares, check your first finished and blocked square to make sure its dimensions work with the rest of your project.

Blocking the Square

Blocking can help even the edges and bring a sample closer to its intended dimensions.

Choose a blocking method suitable for the fiber content of your yarn.

Avoid stretching so aggressively that the raised slipped-stitch texture becomes flattened.

Is Triple Slip Rib Beginner Friendly?

It can be a good next project for someone who already understands the basic operation of a knitting loom.

The eight-row repeat is relatively manageable, and the designer describes it as a stitch that does not require excessive tricky finger work.

A complete first-time loom knitter may want to practice basic loom knitting and yarn handling before beginning the square.

Skills You Will Practice

  • Loom setup
  • Working across loom pegs
  • Slipped-stitch texture
  • Following an 8-row repeat
  • Maintaining even tension
  • Binding off
  • Finishing and blocking a square

Keep Your Tension Consistent

Slipped-stitch patterns can exaggerate differences in tension.

Avoid pulling the working yarn excessively tight across the slipped areas, because this can distort the square or make the fabric less flexible.

Consistent yarn handling becomes easier as you repeat the sequence.

Don't Confuse Loom and Needle Instructions

Important

Triple slip rib can also describe textures used in conventional needle knitting. The specific project featured here is Bethany A Dailey's Triple Slip Rib Square: Stitchology 17 and was designed for a knitting loom. Do not combine its specifications with unrelated needle-knitting patterns that happen to use a similar stitch name.

Is Triple Slip Rib Square Still Free?

Yes.

Triple Slip Rib Square: Stitchology 17 is currently documented as a free loom-knitting pattern from the Knitting Board Stitchology series.

Amazing Knitting provides this independent project guide rather than reproducing the designer's complete peg-by-peg instructions.

Get the Free Triple Slip Rib Square Pattern

Visit the original Knitting Board Stitchology resource for the complete loom-knitting instructions:

Get the Free Triple Slip Rib Square Pattern →

Pattern Record on Ravelry

Ravelry also maintains the pattern record with project specifications and designer information:

View Triple Slip Rib Square on Ravelry →

More Stitch Guides on Amazing Knitting

Explore More Knitting Techniques

Before You Begin

Make sure you are following the loom-knitting version of Triple Slip Rib, select an appropriate worsted-weight yarn, and configure your loom according to the designer's current instructions.

Use markers and a row counter if helpful while learning the eight-row sequence, and pay particular attention to maintaining relaxed, consistent tension across the slipped sections.

Once you are comfortable with the square, the same texture can become a useful starting point for larger loom-knitting projects.

Pattern credit: Triple Slip Rib Square: Stitchology 17 was designed by Bethany A Dailey and published through the Knitting Board Stitchology series. Amazing Knitting provides an independent editorial guide and does not reproduce the complete copyrighted pattern instructions. Preserve the existing photograph and its exact original credit from the current Amazing Knitting page.

Knitting Tote - Free Bag Knitting Pattern

Knitting Tote - Free Pattern
Photo above © Berroco Inc.

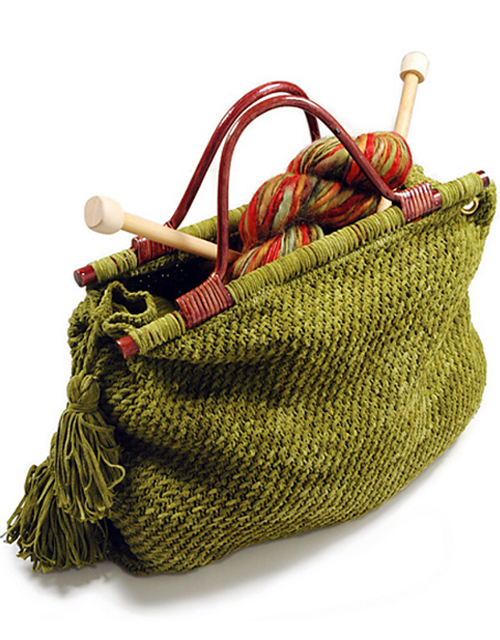
Knitting Tote by Donna Yacino for Berroco is a sturdy, structured knitted bag designed especially for carrying yarn, needles and works in progress.

The combination of textured knitting, wooden handles, decorative grommets and a reinforced bottom gives the tote a polished look while keeping it practical enough for everyday use.

Originally designed in Berroco Suede, this project is a great choice for knitters who want to make something functional rather than another garment or accessory.

Best of all, the complete Knitting Tote pattern is still officially available for free from Berroco.

✓ Free Pattern Availability

Berroco still publishes Knitting Tote by Donna Yacino as a free pattern download on its official website.

Knitting Tote at a Glance

Pattern: Knitting Tote

Designer: Donna Yacino

Publisher: Berroco

Project Type: Knitted tote bag

Skill Level: Intermediate

Suggested Yarn: Berroco Suede

Yarn Weight: Worsted

Approx. Yardage: 500 yd / 457 m

Needles: US 8 / 5 mm, 24-inch circular

Crochet Hook: 4 mm

Gauge: 24 sts × 30 rows = 4 in in pattern stitch

Finished Size: Approx. 15 in wide × 11 in high × 4½ in deep

Availability: Free official Berroco pattern

About the Berroco Knitting Tote

This tote was designed as a practical project bag with enough structure to hold knitting supplies while still looking like a finished handbag.

Berroco describes the design as sturdy and stylish, and the construction supports that goal with a firm knitted fabric, wooden handles and a reinforced base.

Unlike a soft drawstring project pouch, this tote is intended to keep its shape and stand more like a traditional bag.

Finished Size

The official finished measurements are approximately:

15 in wide × 11 in high × 4½ in deep

The height measurement does not include the handles.

This gives the bag enough room for yarn, tools and a medium-sized work in progress without making it excessively bulky.

Original Yarn: Berroco Suede

The original design uses Berroco Suede, a worsted-weight novelty yarn that gives the knitted fabric a distinctive suede-like appearance.

The official materials list calls for:

5 balls of Berroco Suede

The Ravelry record lists the project at approximately 500 yards / 457 meters.

What If Berroco Suede Is Hard to Find?

If you substitute yarn, focus on the finished fabric rather than trying to match only the original fiber appearance.

A tote needs more structure than a soft scarf or sweater.

Look for a yarn that can:

  • Match the published gauge
  • Create a reasonably firm fabric
  • Show the textured stitch clearly
  • Handle the weight of items placed inside the bag
  • Resist excessive stretching

Make a swatch before committing to the full tote, especially if your substitute is much more elastic than the original yarn.

Needles and Gauge

The official pattern specifies a 24-inch US 8 / 5 mm circular needle.

The published gauge is:

24 stitches × 30 rows = 4 inches in pattern stitch

Use the needle size required to obtain gauge rather than assuming that US 8 will produce the correct fabric for every yarn.

Why Gauge Matters for a Tote Bag

Gauge affects more than appearance in a bag project.

If your stitches are too loose, the tote may stretch when filled. If they are too tight, the fabric can become difficult to work and the finished dimensions may be smaller than expected.

A firm, consistent swatch is especially useful before starting a structural project like this.

Worked in the Round

The pattern is designed to be worked in the round using a circular needle.

Circular construction reduces the need for long side seams and helps create a continuous body around the bag.

If you are new to circular knitting, check carefully that the cast-on edge is not twisted before joining.

Textured Pattern Stitch

The tote uses a textured pattern stitch rather than plain stockinette.

This gives the surface more visual interest while also contributing to the structured appearance of the bag.

The Ravelry pattern record also identifies slipped stitches among the techniques used.

Extra Materials You Will Need

This is not a yarn-and-needles-only project.

Berroco's official materials list also includes:

  • A 4 mm crochet hook
  • One pair of wooden handles with a 13-inch lower bar
  • Four 7/16-inch grommets
  • A piece of cardboard for the bottom insert

Check that you can obtain suitable handles and grommets before beginning the knitting.

Wooden Handles

The wooden handles are an important part of the original design.

They provide structure and keep the weight of the bag from being carried entirely by a knitted strap.

If you substitute another style of handle, compare its attachment points and width with the original construction before making permanent changes.

Decorative Grommets

Four metal grommets are used near the upper section of the tote.

These become attachment points for decorative twisted cords and tassels.

When installing hardware in knitted fabric, make sure it is secure and does not cut or damage the surrounding yarn.

Reinforcing the Bottom

One of the most practical details in this pattern is the reinforced base.

Berroco specifies a piece of cardboard approximately:

15 in long × 4½ in wide

as a bottom insert.

The insert helps keep the base flat when yarn and tools are placed inside.

Consider a More Durable Bottom Insert

If you plan to use the tote frequently, you may prefer to cut a removable insert from a suitable lightweight plastic or another moisture-resistant material with similar dimensions.

This would be your own modification rather than part of the original Berroco pattern.

Any substitute insert should have smooth edges so it does not catch the knitted fabric.

Do You Need to Line the Tote?

The original pattern does not require a full fabric lining in order to create the bag.

However, adding a lining can be a useful optional modification if you plan to carry small knitting tools.

A fabric lining can help prevent items such as stitch markers or needle tips from working through the knitted fabric.

Add Pockets If You Want More Organization

A handmade lining also gives you the opportunity to add internal pockets.

Useful pocket sizes might accommodate:

  • Scissors
  • Stitch markers
  • Tape measure
  • Cable needles
  • Crochet hooks
  • Pattern notes

Again, these are optional customizations and not part of the original Donna Yacino instructions.

Decorative Tassels and Twisted Cords

The original Berroco design includes tassels and twisted cords as finishing details.

They give the bag its distinctive decorative appearance and also make use of the installed grommets.

Follow the official pattern for the original finishing method rather than relying on reconstructed instructions from third-party sites.

Skills Used in This Project

This tote is a good project for practicing several skills in one useful object:

  • Knitting in the round
  • Maintaining a textured stitch pattern
  • Working slipped stitches
  • Checking gauge
  • Using a crochet hook for finishing
  • Attaching bag hardware
  • Making twisted cords
  • Making tassels
  • Adding structural reinforcement

Is the Knitting Tote Beginner Friendly?

Berroco classifies the project as Intermediate.

That makes sense because the knitting itself is only one part of the project.

You also need to work a pattern stitch, maintain gauge, handle circular construction and complete several finishing and hardware steps.

An adventurous beginner who is comfortable following detailed instructions may still enjoy it, but it is probably not the ideal first-ever knitting project.

A Useful Project for Practicing Bag Construction

Garments require careful body sizing, while a tote allows you to focus more on structure and finishing.

This makes the project a useful introduction to how knitted fabric can be combined with rigid components such as handles and base inserts.

Prevent the Bag from Stretching

Knitted fabric naturally has some elasticity.

To keep the tote looking its best:

  • Match the intended gauge
  • Avoid extremely loose fabric
  • Use the reinforced bottom
  • Attach the handles securely
  • Avoid routinely overloading the bag
  • Consider a fabric lining for frequent use

Use It as a Knitting Project Bag

The finished tote is particularly well suited to holding an active knitting project.

Depending on the size of your work, it can hold yarn, circular needles, pattern notes and everyday knitting notions together in one place.

The flat reinforced bottom also makes it more practical than an unstructured knitted sack.

Or Use It as an Everyday Tote

Nothing limits the finished bag to knitting supplies.

It can also function as a general-purpose handmade tote, especially if you add a lining and internal pockets.

Keep in mind that the amount of weight it can comfortably carry depends on your yarn, gauge, finishing and hardware.

Is the Berroco Knitting Tote Still Free?

Yes.

Berroco currently maintains an official page for Knitting Tote by Donna Yacino and labels it Free Pattern Download.

Ravelry also currently lists the same pattern as free.

Amazing Knitting does not reproduce Berroco's complete copyrighted knitting instructions. Use the authorized publisher page for the full pattern.

Get the Free Knitting Tote Pattern

Use the official Berroco page for the current free pattern:

Get the Free Knitting Tote Pattern →

Pattern Details on Ravelry

Ravelry is also useful for checking the pattern record and browsing projects made by other knitters:

View Knitting Tote on Ravelry →

More Free Knitting Projects

If you would like to continue with another free project from the Amazing Knitting archive, explore:

Explore More Knitted Bags

Before You Cast On

Read through the complete Berroco materials list before buying yarn.

This project requires more than needles and yarn, so having the handles, grommets, crochet hook and bottom insert ready will make the finishing process much easier.

Make a gauge swatch, aim for a firm structured fabric, and use the current official Berroco instructions for the complete stitch pattern and assembly details.

Pattern credit: Knitting Tote was designed by Donna Yacino and published by Berroco. The existing Amazing Knitting photograph is credited to Berroco Inc. Amazing Knitting provides an independent project guide and does not reproduce Berroco's complete copyrighted pattern instructions.

Gingersnap Cardigan – Free Baby Knitting Pattern


Gingersnap Cardigan free baby knitting pattern by Kristen Rettig

Gingersnap Cardigan designed and photographed © Kristen Rettig.

Gingersnap by Kristen Rettig is a cheerful striped baby cardigan knitting pattern designed to turn small amounts of leftover worsted-weight yarn into an adorable handmade sweater.

With bold blocks of color, simple shaping and endless possibilities for combining yarn scraps, Gingersnap is the kind of baby cardigan that can look completely different every time you knit it.

The original pattern is written primarily for the one-year size and uses approximately 360–400 yards (329–366 m) of worsted-weight yarn.

Good news: the original Gingersnap Cardigan is still available as a free knitting pattern from designer Kristen Rettig through her Ravelry store. You will find the verified free pattern link near the end of this guide.

Gingersnap Cardigan at a Glance

  • Pattern: Gingersnap
  • Designer: Kristen Rettig
  • First published: July 2015
  • Category: Baby cardigan
  • Main size: Approximately 1 year
  • Yarn weight: Worsted
  • Yardage: Approximately 360–400 yd (329–366 m)
  • Needles: US 5 / 3.75 mm and US 7 / 4.5 mm
  • Gauge: 19 sts × 28 rows = 4 in / 10 cm in stockinette
  • Construction: Worked flat and seamed
  • Color style: Stripes / color blocking
  • Pattern language: English
  • Current availability: Free Ravelry download

A Colorful Baby Cardigan Made for Yarn Scraps

One of the best things about Gingersnap is that it was designed with leftover yarn in mind.

Kristen Rettig originally made her sweaters using scraps of Rowan Pure Wool Superwash Worsted left over from other knitting projects.

That makes the cardigan especially appealing to knitters with small quantities of coordinating worsted-weight yarn waiting in their stash.

Three Colors or More

The written pattern is designed around three colors, but you do not have to limit yourself to three.

The designer encourages knitters to raid their yarn stash and experiment with three, four, five or even more colors.

This flexibility is part of the charm of Gingersnap. A carefully planned palette can create a polished color-block cardigan, while a collection of leftover yarns can produce a playful scrappy sweater.

Choosing Colors for Gingersnap

There is no single correct color combination for this cardigan.

You can use three closely related shades for a subtle effect or combine strongly contrasting colors for a bolder sweater.

Another approach is to choose one neutral shade and pair it with two brighter colors.

Before casting on, place your yarns next to each other and experiment with their order. Changing which shade appears next to another can make a surprisingly large difference to the finished cardigan.

Worsted-Weight Yarn

Gingersnap is designed for worsted-weight yarn.

Yarn options associated with the original pattern include:

  • Rowan Pure Wool Superwash Worsted
  • Rowan Handknit Cotton
  • Rowan Softknit Cotton

You do not need to find the exact original yarn. A suitable worsted-weight substitute can work as long as you can obtain the appropriate gauge and create a fabric you like.

Choosing Yarn for a Baby Sweater

Because Gingersnap is intended for a young child, softness and washability are important considerations.

The designer specifically suggests using a soft, machine-washable yarn. This makes sense for a baby or toddler cardigan that may need frequent washing.

Check the care instructions on every yarn you plan to combine. Using several yarns with very different washing requirements can make caring for the finished cardigan unnecessarily complicated.

A Great Stash-Busting Project

Gingersnap can be particularly useful when you have leftover worsted-weight yarn from larger projects.

Instead of buying several full skeins specifically for a small baby sweater, you may be able to combine suitable leftovers that already coordinate.

Make sure each yarn is similar enough in weight and behavior to produce consistent fabric throughout the cardigan.

How Much Yarn Do You Need?

Published pattern information lists approximately 360–400 yards (329–366 meters) in total.

Because the sweater is designed for multiple colors, the total yardage is divided among the shades used in the cardigan.

Your actual yarn usage can vary with gauge, yarn choice and any changes you make to the color arrangement.

Needle Sizes

The pattern lists two needle sizes:

  • US 5 / 3.75 mm
  • US 7 / 4.5 mm

Different needle sizes are useful for creating appropriate structure in areas such as borders and the main stockinette fabric.

As always, treat the listed needle sizes as a starting point and use the size that allows you to obtain the required gauge.

Gauge

The published gauge is 19 stitches and 28 rows = 4 inches / 10 cm in stockinette stitch.

Gauge matters in a fitted garment, even a small baby cardigan.

If your stitches are significantly larger than the designer's gauge, the cardigan will also become larger. If your gauge is tighter, the finished sweater can become too small.

Make a Swatch With Your Substitute Yarn

Swatching is especially helpful if you are combining several different leftover yarns.

Two yarns may both be labeled worsted weight but still behave differently when knitted.

A small swatch can help you check gauge, fabric softness, color combination and how well your selected yarns work together before you begin the cardigan.

The Original Gingersnap Size

The original free Gingersnap pattern is primarily sized for one year.

Kristen Rettig explains that she particularly likes this size because babies around that age are active, sitting up, moving around and able to show off a handmade sweater.

The pattern listing also includes a note related to making a smaller approximately six-month version.

Gingersnap for Bigger Kids Is a Different Pattern

It is important not to confuse the original free Gingersnap with Gingersnap for Bigger Kids.

The original pattern featured on this page is the free baby cardigan first published in 2015.

Kristen Rettig later developed a separate expanded pattern for bigger children with additional sizes.

That expanded version is a different pattern listing and should not be mistaken for the original free Gingersnap download linked below.

Worked Flat and Seamed

Gingersnap is a worked-flat and seamed cardigan.

This means the garment is not constructed entirely as one seamless piece in the round.

If you are new to garment knitting, this style of construction can be a useful introduction to creating individual sweater sections and assembling them into a finished cardigan.

Stockinette Makes the Colors the Star

Much of the visual impact comes from the color arrangement rather than complicated stitch patterns.

Smooth stockinette fabric provides a simple background that allows the different colored sections to stand out clearly.

This is particularly effective when using bright or strongly contrasting yarns.

Is Gingersnap Beginner Friendly?

Gingersnap can be an approachable project for a knitter who already understands the basic stitches and wants to try a small garment.

Compared with an adult sweater, a baby cardigan requires much less yarn and considerably less knitting.

However, you should be comfortable following garment shaping and finishing instructions rather than expecting the project to be as simple as a rectangular scarf or dishcloth.

Skills That Will Help

Useful skills for this cardigan include:

  • Casting on
  • Knit and purl stitches
  • Stockinette stitch
  • Changing yarn colors
  • Basic increases and decreases
  • Following garment shaping
  • Binding off
  • Seaming knitted pieces
  • Picking up stitches where instructed
  • Weaving in yarn ends
  • Finishing a knitted garment neatly

Changing Colors Neatly

Because color changes are such a visible part of Gingersnap, neat transitions help give the cardigan a polished appearance.

When beginning a new color, leave enough yarn tail to weave in securely later.

Avoid tying bulky knots in the knitted fabric unless the pattern specifically instructs you to do so.

Managing Lots of Yarn Ends

A scrappy version using many colors can create more yarn ends than a simple three-color cardigan.

Consider weaving in some ends as the project progresses rather than leaving every tail until the very end.

Take care not to pull woven ends so tightly that they distort the surrounding stockinette fabric.

Keep Your Color Changes Consistent

Before beginning, decide whether you will follow the designer's three-color arrangement or create your own palette.

If you modify the color sequence, make a simple written plan so you do not have to decide what comes next every time you reach a new section.

A quick sketch or list of color order can be surprisingly helpful.

Use Machine-Washable Yarn When Practical

A handmade baby cardigan is likely to encounter spills, food and everyday wear.

For that reason, easy-care yarn can make the finished sweater much more practical for parents.

Kristen Rettig specifically designed Gingersnap with soft, machine-washable yarns in mind.

A Cotton Version for Warmer Weather

The designer also suggests cotton yarn as an option for knitters who want a lighter sweater for warmer weather.

Rowan Handknit Cotton and Rowan Softknit Cotton are among the yarns associated with the original pattern.

When substituting cotton for wool, remember that the fibers can behave differently, so checking gauge and fabric drape before starting is worthwhile.

Blocking and Finishing

Careful finishing can transform a collection of knitted pieces into a polished little cardigan.

Follow the pattern's assembly instructions, keep seams neat and avoid pulling them excessively tight.

Gentle blocking can help the pieces settle into shape and make the stockinette fabric look more even.

Always use a blocking method appropriate for the yarn fibers you chose.

A Fun Handmade Baby Gift

Gingersnap is particularly well suited to gift knitting because every color combination can create a different personality.

Soft neutrals can make a classic cardigan, while bright contrasting shades create something playful and energetic.

You can even choose colors that match the recipient's wardrobe or use meaningful leftovers from other family knitting projects.

Why Gingersnap Remains Popular

Gingersnap has been available since 2015 and has been knitted by a large number of Ravelry users.

Its lasting appeal is easy to understand: the sweater is small, colorful, practical and adaptable to the yarn already in your stash.

Most importantly, the original baby version remains available as a free pattern from the designer.

Free Gingersnap Cardigan Knitting Pattern

Gingersnap by Kristen Rettig is currently available as a free knitting pattern.

The designer provides the original baby-cardigan pattern through Kristen Rettig's Ravelry Store, where the current listing identifies it as a free Ravelry download.

This is the exact Gingersnap pattern featured on this Amazing Knitting page: the striped worsted-weight baby cardigan first published by Kristen Rettig in 2015.

Please note that the later Gingersnap for Bigger Kids is a separate expanded pattern. The link below is specifically for the original free baby version.

Pattern availability can change over time, so Amazing Knitting checks older links and gives priority to a legitimate free source whenever the exact pattern remains officially available at no cost.

Get the Free Gingersnap Pattern

Visit Kristen Rettig's current pattern page to see the full pattern information and download the original Gingersnap baby cardigan for free.

Get the Free Gingersnap Knitting Pattern →

Gingersnap is designed by Kristen Rettig. Amazing Knitting does not reproduce the designer's copyrighted row-by-row instructions. The original baby version is currently offered as a free download by the designer. Pattern availability may change, so please check the linked source for the latest information.

Read Our Pattern Availability Policy →


Boy Sweater - Knitting Pattern

Boy Sweater - Knitting Pattern
Photos above © milainemicoton

Looking for a stylish boy sweater knitting pattern with practical cold-weather details? Boy Sweater by Lisa Chemery is a seamless top-down pullover for babies and children, featuring a cozy shawl collar, buttoned neck opening, raglan shaping, and textured stitch details.

The close-fitting design is intended to sit comfortably under a jacket, while the shawl collar provides extra warmth around the neck — especially useful for children who do not enjoy wearing scarves.

Boy Sweater at a Glance

Pattern: Boy Sweater

Designer: Lisa Chemery

Craft: Knitting

Category: Baby & Child Pullover

Construction: Top-down and seamless

Yarn Weight: Worsted / DK

Needles: US 6 / 4.0 mm and US 8 / 5.0 mm

Main Gauge: 20 stitches × 30 rounds = 4 inches / 10 cm in stockinette

Yardage: Approximately 275–700 yards / 251–640 m

Sizes: 3 months to 8 years

Languages: English and French

Pattern Availability: Paid pattern

About the Boy Sweater

Designed by Lisa Chemery, Boy Sweater combines the practicality of a children's pullover with several details that give it a more polished look.

The most recognizable feature is the shawl collar, which wraps softly around the neck and is paired with a small buttoned opening.

Textured knitting and twisted-rib details add visual interest without turning the sweater into a heavily decorated garment, making the design suitable for both boys and girls.

Seamless Top-Down Construction

The sweater is knitted seamlessly from the top down. The upper section begins flat, after which stitches are added for the neck placket and the body continues in the round.

The sleeves are also worked in the round, reducing the amount of garment seaming required at the end.

Top-down construction has another practical advantage: it allows knitters to see the garment taking shape from the neckline toward the hem.

The Shawl Collar

The shawl collar is one of the defining features of this sweater. After the body is completed, stitches are picked up around the neckline and the collar is worked flat.

Short rows are used to create the characteristic shawl shape, and the lower edges of the collar are then attached to the sweater body.

Besides giving the sweater its classic appearance, the collar provides extra knitted fabric around the child's neck without requiring a separate scarf.

Baby and Child Sizes

The current pattern includes a particularly useful range of sizes:

  • 3 months
  • 6 months
  • 12 months
  • 18 months
  • 2 years
  • 4 years
  • 6 years
  • 8 years

The designer provides finished garment measurements as well as intended chest measurements, so check the original pattern carefully when deciding which size to knit.

Yarn Requirements

Boy Sweater is designed for approximately:

275–700 yards / 251–640 meters

The exact amount depends on size. The designer recommends a worsted-to-DK-weight merino or merino-blend yarn.

Suggested yarns listed with the pattern include Malabrigo Rios and several DK and worsted options.

Needles and Gauge

The pattern uses two main needle sizes:

  • US 6 / 4.0 mm
  • US 8 / 5.0 mm

The published stockinette gauge after blocking is:

20 stitches × 30 rounds = 4 inches / 10 cm

The textured portion has a separate row gauge, so use the designer's current pattern instructions when swatching and selecting needle sizes.

Knitting Skills Used

This project involves more than basic stockinette knitting. Techniques used in the design include:

  • Knitting and purling
  • Increasing and decreasing
  • Top-down raglan construction
  • Knitting in the round
  • Picking up stitches
  • Short rows
  • Twisted stitches
  • Textured stitch patterns
  • Buttonholes and finishing

The combination makes Boy Sweater an interesting project for knitters who already understand the basics and want to develop their garment-knitting skills.

Is the Boy Sweater Pattern Free?

No. Boy Sweater by Lisa Chemery is currently a paid knitting pattern.

The pattern is sold through the designer's Ravelry listing. Amazing Knitting does not reproduce the designer's copyrighted instructions.

Visit the original listing below for the current price, complete sizing, materials, and purchase information.

View the Original Boy Sweater Pattern →

Pattern credit: Boy Sweater was designed by Lisa Chemery. Pattern pricing, availability, sizing, and technical information are controlled by the designer and may change over time.

Prefer a Free Alternative?

If you love the cozy shawl-collar style but would prefer a free knitting pattern, Amazing Knitting has a similar baby and child project in our archive.

Double Breasted Jacket with Shawl Collar — Free Knitting Pattern

This is a different design — not a free copy of Boy Sweater — but it offers a similar cozy shawl-collar look for babies and children and is available as a free knitting pattern.

View the Free Shawl Collar Pattern →

You can also browse our free baby sweater patterns for more no-cost options.

More Baby and Child Sweaters

Explore more boy sweater knitting patterns, baby sweater knitting patterns, and children's sweater knitting patterns from the Amazing Knitting archive.

Before You Start

If you choose the original Boy Sweater, check Lisa Chemery's current Ravelry listing before purchasing yarn. Confirm your chosen size, yarn requirement, needle sizes, gauge, notions, and any current pattern updates before casting on.

Waffle Stitch Neck Warmer Scarf - Free Knitting Pattern

Waffle Stitch Neck Warmer Scarf - Free Pattern & Tutorial
Photos above © Studio Knit

Photos above © Studio Knit

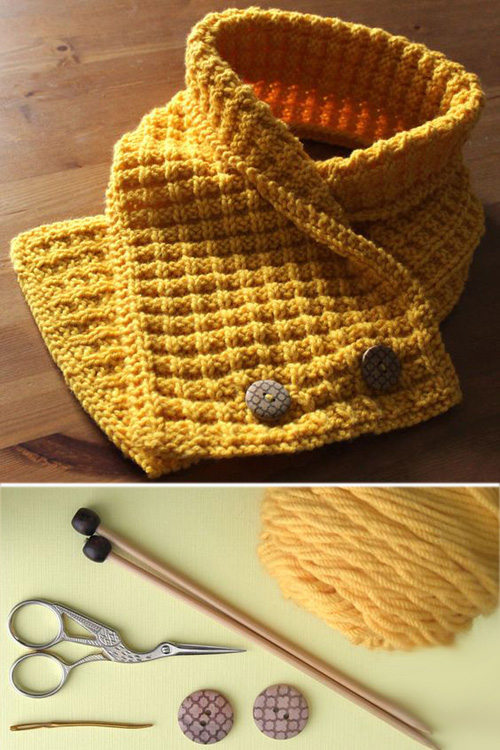
Waffle Neck Warmer Scarf by Kristen McDonnell of Studio Knit is a cozy textured scarf worked with simple knit and purl stitches. The waffle-like surface gives the fabric plenty of dimension, while buttons allow the scarf to wrap securely around the neck.

Good news for knitters who discovered this project through our older archive: the original pattern is still available free from Studio Knit.

✓ Free Pattern Still Available

We reviewed this archive page and confirmed that Kristen McDonnell's original Waffle Neck Warmer Scarf pattern is still published free on the official Studio Knit website.

Waffle Neck Warmer Scarf at a Glance

Designer: Kristen McDonnell / Studio Knit

Project: Neck warmer scarf

Skill Level: Experienced beginner

Yarn Weight: #4 Worsted Weight

Needles: US 7 (4.5 mm)

Gauge: 16 stitches × 26 rows = 4 inches in Waffle Stitch

Construction: Worked flat on straight needles

Sample Size: Approximately 8 × 38 inches

Availability: Free

Why This Is a Good Beginner Project

Although the finished fabric looks highly textured, the design is built from basic knit and purl stitches. That makes it a useful next project for knitters who have already learned the fundamentals and want to practice following a repeating stitch pattern.

The scarf is knitted flat rather than in the round, so there is no need to manage circular construction.

The Waffle Stitch Texture

The main attraction is the raised grid-like texture created by alternating knit and purl sections. Studio Knit's version uses a short repeating sequence that produces the characteristic waffle appearance.

Garter-stitch edging helps frame the textured center and gives the scarf a neat finished appearance.

Two Width Options

The original pattern gives knitters a choice between a wider and narrower scarf. The wider version is approximately 8 inches across, while a narrower version can be made at approximately 6 inches.

Length is also easy to customize: simply continue the waffle section until the scarf reaches the length you prefer.

Buttons Are Optional

The two buttons shown in the original project turn the scarf into a practical neck warmer by holding the overlapping ends in place.

Studio Knit also suggests other ways to secure the scarf, including a brooch or pin, so buttons are not essential if you prefer a simpler finish.

Knitting Tip

Textured knit-and-purl patterns look best when the stitches are worked at an even tension. If your fabric feels noticeably tighter or looser than expected, make a small gauge swatch before knitting the full scarf.

Get the Free Waffle Neck Warmer Scarf Pattern

The complete pattern and tutorial are published by Kristen McDonnell at Studio Knit. Use the official source below for the current instructions and tutorial.

Get the Free Pattern at Studio Knit →

More Textured Knitting Ideas

If you enjoy the texture of this scarf, explore these Amazing Knitting stitch guides and projects next:

Trinity / Raspberry Stitch Guide →

Herringbone Stitch Guide →

Diagonal Rib Stitch Guide →

Pattern credit: Waffle Neck Warmer Scarf was designed by Kristen McDonnell of Studio Knit. Amazing Knitting provides an independent project guide and directs knitters to the designer's authorized free pattern. Complete copyrighted instructions are not reproduced here.

Discover More From the Archive

A fresh mix of knitting patterns and tutorials from the Amazing Knitting archive.

Finding patterns from the archive…