Skip to content

...

A Simple Sweater - Knitting Pattern

A Simple Sweater - Knitting Pattern
Photos above © Julie Williams
What beautiful sweater knitting pattern! I found it on Ravelry...
This pattern is for a simple single-colored sweater and includes adaptations in order to make it with either different colored sleeves or striped sleeves.


Girl Elephant - Knitting Pattern

Girl Elephant - Knitting Pattern
The photo above © bunnyknitter
What beautiful elephant knitting pattern! I found it on Ravelry...
This pattern is written in English only. This extensive PDF file contains full instructions for knitting and finishing off a little elephant in a frondy frock. Once paid for it is available for you to instantly download.

Download Pattern: Girl Elephant 

Great Curves Knit Poncho - Free Knitting Pattern

Great Curves Knit Poncho - Free Knitting Pattern
Photos above © TristensKnits
What beautiful poncho (Free knitting pattern)! I found it on Pinterest...
This lusciously textured sweater features the beautiful diamond stitch and drapes with a relaxed, oversized look. Using Caron Simply Soft Tweeds gives this project a natural tweed finish that works with so many looks. This part poncho, the part sweater is definitely the one to grab or give as the winter months approach.

Download Pattern: Great Curves Knit Poncho

Cozy Cable Knit Hat – Free Bernat Knitting Pattern

Cozy Cable Knit Hat free Bernat knitting pattern

The Cozy Cable Knit Hat is a warm, textured hat from Bernat, featuring bold cables and a classic pompom finish.

Worked with chunky yarn and large needles, this is a satisfying cold-weather project for knitters who are ready to practice cable knitting while creating a practical winter accessory.

Best of all, the original pattern is still available as a free download from Yarnspirations.

Featured photo originally credited by Amazing Knitting to kubknits. Pattern: Bernat / Yarnspirations.

Cozy Cable Knit Hat Pattern Overview

  • Pattern: Cozy Cable Knit Hat
  • Brand: Bernat
  • Official source: Yarnspirations
  • Project: Cable knit hat
  • Skill level: Intermediate
  • Size: One size to fit the average adult
  • Yarn: Bernat Softee Chunky
  • Construction: Worked in the round
  • Techniques: Ribbing, cables and crown decreases
  • Finish: Pompom
  • Pattern availability: Free official download

About the Cozy Cable Knit Hat

This Bernat hat combines chunky yarn with a repeating cable texture for a classic winter look.

The cables create strong vertical definition around the hat, while the contrasting recessed sections help the raised stitches stand out.

A large pompom finishes the design and gives the hat its traditional cozy winter style.

Yarn

The original pattern calls for Bernat Softee Chunky, a substantial yarn that helps the cable texture remain clearly visible.

Chunkier yarn also means that the individual stitches are easy to see, which can be helpful when keeping track of cable crossings.

When substituting yarn, matching the original gauge is more important than simply choosing another yarn that looks similar.

Needles and Tools

According to the current official pattern information, you will need:

  • U.S. 10½ / 6.5 mm double-pointed knitting needles
  • U.S. 11 / 8 mm double-pointed knitting needles
  • A cable needle
  • A stitch marker
  • A yarn needle for finishing

Always check the official pattern before starting in case the publisher updates the materials or pattern information.

Size and Fit

The official pattern is written in a single size designed to fit the average adult.

Because hats depend on negative ease for a comfortable fit, achieving the pattern gauge is important.

If your stitches are significantly tighter or looser than the designer's gauge, the finished circumference can change noticeably.

Why Chunky Yarn Works Well for Cables

Cable knitting creates texture by crossing groups of stitches over one another. With a chunky yarn, those crossings become particularly prominent.

The larger stitches can also make it easier to understand how a cable is constructed because each individual stitch is more visible than it would be in a fine yarn.

This makes the project particularly appealing to knitters who already know the basics and want to become more comfortable with cable techniques.

Skill Level

Yarnspirations rates the Cozy Cable Knit Hat as an intermediate knitting project.

You should be comfortable with basic knitting before beginning. Helpful skills include:

  • Knitting and purling
  • Working in the round
  • Using double-pointed needles
  • Following a cable pattern or chart
  • Working cable crossings
  • Increasing and decreasing
  • Shaping the crown of a hat
  • Finishing and weaving in ends

Understanding the Cable Design

The hat uses repeating cable sections separated by textured background stitches.

Cable stitches are produced by temporarily changing the order in which groups of stitches are worked. Holding stitches toward the front or back creates the direction of each crossing.

Once the repeat becomes familiar, the fabric develops into a strong, three-dimensional cable pattern around the hat.

Working the Hat in the Round

This design is worked in the round, which avoids a back seam and creates a continuous cable pattern around the hat.

Take extra care when joining the cast-on stitches so that they are not twisted. A stitch marker makes it easier to identify the beginning of each round.

As the crown becomes smaller, double-pointed needles allow the decreasing circumference to continue comfortably.

Tips for Better Cable Knitting

Check each cable crossing before moving on. Cable mistakes are much easier to correct immediately than several rounds later.

Keep your tension consistent. The stitches immediately beside a cable can sometimes become loose when the stitches are rearranged.

Use stitch markers when helpful. They can make repeating sections easier to identify.

Do not skip the gauge swatch. Gauge affects both the finished fit and the amount of yarn required.

Adding the Pompom

The pompom gives this hat its finished winter look and balances the substantial cable texture below it.

The official pattern includes instructions for making and attaching the pompom, so follow the original directions when you reach the finishing stage.

Make sure the pompom is attached securely, especially if the hat will be worn frequently.

Why This Hat Is Worth Knitting

The Cozy Cable Knit Hat offers a good balance between a practical winter accessory and a project that develops knitting skills.

The chunky yarn makes the texture visually prominent, while the repeating cables give knitters useful practice with cable techniques without requiring a large project such as a sweater or blanket.

It can also make a beautiful handmade winter gift thanks to its classic, wearable style.

Get the Free Cozy Cable Knit Hat Pattern

The complete pattern is currently available directly from Yarnspirations. This is the official source and should be used instead of older third-party download links.

Get the Free Pattern from Yarnspirations →

Pattern Availability

Amazing Knitting links readers to legitimate designer or publisher sources whenever possible. Pattern prices, download locations and availability can change after an article is published.

Read Our Pattern Availability Policy →

Amazing Knitting is an independent pattern discovery and project-guide site. The Cozy Cable Knit Hat pattern, instructions and associated intellectual property belong to their respective designer and publisher. This article provides project information and directs knitters to the authorized pattern source rather than reproducing the complete pattern.

How To Make Rib Stitch Neater - Tutorial

How To Make Rib Stitch Neater - Tutorial
Photos above © Button and Blue

Does your knitting ribbing sometimes look loose, uneven, or less defined than you would like? One simple technique worth trying is twisted rib stitch.

Twisted rib is a variation of ordinary ribbing in which selected stitches are worked through the back loop. This small change twists the stitch and can create sharper, more clearly defined columns — especially around cuffs, sweater hems, neckbands, and hat brims.

Twisted Rib Stitch at a Glance

Technique: Twisted Rib Stitch

Craft: Knitting

Skill Level: Beginner / Easy

Based on: Knit and purl ribbing

Main Technique: Working stitches through the back loop

Best For: Cuffs, hems, neckbands and hat brims

Result: Firm, clearly defined rib columns

Why Does Regular Ribbing Sometimes Look Uneven?

Ribbing looks simple because it is built from basic knit and purl stitches, but achieving perfectly even rib columns can take practice.

One common trouble spot occurs when the working yarn moves between a knit stitch and a purl stitch. That transition can introduce a little extra yarn between stitches, making one side of a rib column appear looser than the other.

Differences between your knit and purl tension can make the effect even more noticeable, particularly in 1x1 and 2x2 ribbing.

What Is Twisted Rib Stitch?

Twisted rib is a variation of standard ribbing. Instead of working every stitch in the usual way, one or more stitches are worked through the back loop.

Working through the back loop changes the orientation of the stitch and creates the characteristic twisted appearance.

On the finished fabric, the knit columns can look narrower and more sharply defined than they do in ordinary ribbing.

How to Knit a Twisted Knit Stitch

The abbreviation ktbl means knit through the back loop.

  1. Keep the working yarn behind your knitting.
  2. Insert the right needle into the back of the next stitch on the left needle.
  3. Wrap the working yarn around the right needle.
  4. Pull the new loop through the stitch.
  5. Slide the old stitch off the left needle.

Unlike an ordinary knit stitch, working through the back loop twists the base of the stitch.

How to Purl Through the Back Loop

You may also encounter the abbreviation ptbl, meaning purl through the back loop.

  1. Bring the working yarn to the front.
  2. Approach the back loop of the next stitch with the right needle.
  3. Wrap the yarn as required for a purl stitch.
  4. Draw the new loop through.
  5. Slide the completed stitch from the left needle.

Purling through the back loop can feel awkward at first. Work slowly until the needle movement becomes comfortable.

Simple 1x1 Twisted Rib

A common way to experiment with twisted rib is to replace the knit stitches in ordinary 1x1 ribbing with knit-through-the-back-loop stitches.

Simple twisted rib repeat:

*K1 tbl, P1; repeat from * across.

This produces twisted knit columns separated by ordinary purl stitches. Depending on the project, pattern, and desired appearance, other twisted-rib variations may twist both knit and purl stitches.

Twisted Rib vs. Regular Rib

Both techniques create vertical ribbing, but the finished fabrics are not identical.

Regular ribbing generally produces a soft, highly elastic fabric. It is the familiar choice for sweater cuffs, hems, neckbands, socks, and hats.

Twisted ribbing tends to create tighter-looking, more defined stitch columns. Because twisting changes the structure of the stitches, however, the fabric can behave differently from ordinary ribbing.

For that reason, twisted rib is not automatically a replacement for every ribbed section. The best choice depends on the look, stretch, and structure you want for the project.

Where Can You Use Twisted Rib?

Twisted rib can be an attractive choice anywhere you want a neat, structured ribbed edge, including:

  • Sweater cuffs
  • Sweater hems
  • Cardigan bands
  • Hat brims
  • Sock cuffs
  • Neckbands
  • Mittens
  • Decorative knitted panels

More Ways to Make Ribbing Look Neater

Twisted stitches are not the only solution for uneven ribbing. If your regular rib stitch still looks loose or irregular, try these simple adjustments:

  • Watch the knit-to-purl transition. Avoid leaving excess slack when moving the yarn.
  • Keep your tension consistent. Uneven knit and purl tension can exaggerate irregular columns.
  • Try smaller needles. Many patterns already use a smaller needle for ribbed cuffs and hems.
  • Experiment with your yarn. Fiber, twist, and elasticity can affect stitch definition.
  • Make a swatch. Compare regular and twisted rib before committing to an entire garment.

Should You Always Use Twisted Rib?

Not necessarily.

Twisting stitches changes more than their appearance. It can also change the elasticity, density, and overall behavior of the fabric.

If a knitting pattern specifically calls for ordinary ribbing, consider making a small swatch before substituting twisted rib. This is particularly important for fitted cuffs, necklines, socks, and other areas where stretch matters.

Practice Before Using It in a Project

The easiest way to understand the difference is to make two small swatches using the same yarn and needles.

Knit one in ordinary 1x1 rib and the other in twisted 1x1 rib. Compare the stitch definition, width, stretch, and overall appearance.

This simple experiment will show you whether twisted rib gives you the result you want for your next project.

Original Tutorial Inspiration

This Amazing Knitting article was originally published after discovering a twisted-rib tutorial from Button and Blue. The original photographs on this page are credited to Button and Blue.

The original external tutorial may no longer be consistently available online, so this page has been expanded with an independent Amazing Knitting explanation of the technique rather than reproducing the original author's tutorial.

More Knitting Stitch Tutorials

Continue learning with more knitting stitch tutorials, rib stitch ideas, and knitting stitches from the Amazing Knitting archive.

That Nice Stitch - Free Pattern

That Nice Stitch - Free Pattern
Photos above © stitchnerd

Looking for a simple but eye-catching free cowl knitting pattern? That Nice Stitch by Susan Ashcroft is a clever accessory pattern that uses an easy slipped-stitch texture to create a fabric that looks interesting on both sides.

The design was created especially to show off variegated yarns, which can sometimes be difficult to match with the right knitting pattern. The result is a lightweight, textured cowl that can be adjusted in length and adapted to different yarn weights.

That Nice Stitch Pattern at a Glance

Pattern: That Nice Stitch

Designer: Susan Ashcroft

Published by: Stitchnerd Designs

Craft: Knitting

Category: Cowl

Technique: Slipped-stitch texture

Suggested Needle Size: US 6 / 4.0 mm

Gauge: 22 stitches = 4 inches

Yardage: Approximately 219–437 yards (200–400 m)

Size: Length is easy to adjust

Pattern Availability: Free

About That Nice Stitch

That Nice Stitch is a cowl pattern designed by Susan Ashcroft of Stitchnerd Designs. The pattern grew from a request from the designer's mother, who wanted a cowl made with the same attractive stitch texture Susan had used in another design.

The finished fabric has a subtle woven-looking texture created with slipped stitches. One of the most appealing features of the pattern is that both sides of the fabric look attractive, making it particularly well suited to a cowl that naturally twists and folds while being worn.

A Great Pattern for Variegated Yarn

Variegated yarns can be beautiful in the skein but sometimes difficult to pair with complicated stitch patterns. That Nice Stitch was designed specifically to make the most of those changing colors.

The slipped-stitch texture adds visual interest without competing too strongly with the color changes in the yarn. This makes the pattern an appealing option for hand-dyed, multicolored, and other variegated yarns.

Yarn and Yardage

The original version was made using sock-style yarn, with the designer suggesting yarns such as Malabrigo Sock and Malabrigo Arroyo.

The published yardage range is approximately:

219–437 yards (200–400 meters)

The exact amount you need will depend on your yarn choice and how long or wide you decide to make the cowl.

Needles and Gauge

The pattern lists US 6 / 4.0 mm needles and a published gauge of:

22 stitches = 4 inches

If you substitute a different yarn weight, your gauge and finished measurements will change. Check the designer's original notes before choosing yarn and needles.

Adjustable Length and Size

One of the useful features of this pattern is its flexibility. The length can be adjusted, so you can make a shorter single-loop cowl or a longer version that can be wrapped around the neck more than once.

The original sample was designed as a relatively slim double-loop accessory, but the pattern also includes guidance for adapting the project to different yarn weights and finished sizes.

Skills Used in This Pattern

That Nice Stitch uses a relatively simple textured knitting technique, but the complete cowl also introduces a few useful finishing skills.

  • Slipped stitches
  • Working a repeating texture pattern
  • Provisional cast-on
  • Grafting / Kitchener stitch

The stitch pattern itself is described by the designer as easy to knit. The finishing techniques help create a continuous-looking cowl with an attractive result on both sides.

Why This Pattern Has Stayed Popular

That Nice Stitch combines several qualities knitters often look for in an accessory: a memorable texture, simple repetitive knitting, flexible sizing, and the ability to showcase colorful yarn.

It is also a practical project when you have a special skein of variegated yarn and want the yarn itself to remain the focus of the finished piece.

Is That Nice Stitch Free?

Yes. That Nice Stitch by Susan Ashcroft is currently available as a free Ravelry download.

The pattern and knitting instructions remain the copyrighted work of Susan Ashcroft. Amazing Knitting does not reproduce the pattern instructions here.

Get the Free That Nice Stitch Pattern

Visit the designer's original Ravelry page to download the pattern and view the complete instructions, sizing guidance, yarn information, and any updates.

Get the Free That Nice Stitch Pattern →

Pattern credit: That Nice Stitch was designed by Susan Ashcroft and published through Stitchnerd Designs. Pattern availability and technical details are controlled by the designer and may change over time.

More Knitting Stitch and Cowl Inspiration

If you enjoy textured knitting, explore more knitting stitch patterns and free cowl knitting patterns from the Amazing Knitting archive.

Before You Start

Check the original pattern page before choosing your yarn so you can confirm the latest yarn suggestions, gauge, finishing instructions, and pattern updates.

Two Needle Socks - Knitting Pattern Guide

Two Needle Socks - Free Knitting Pattern
Photos above © Katerina Mushyn

Two Needle Socks by Katerina Mushyn is a simple flat-knit sock design created for knitters who prefer working back and forth on two straight needles rather than using double-pointed needles or circular needles.

The socks are worked flat and then seamed, making the construction approachable for knitters who are comfortable with ordinary straight needles.

Pattern Availability Update

The original Two Needle Socks pattern was previously available free through the Prjaga website. Ravelry now lists that original source as no longer available. We have updated this page so readers are not sent to an unavailable pattern source.

Two Needle Socks at a Glance

Pattern: Two Needle Socks

Designer: Katerina Mushyn

First Published: July 2019

Craft: Knitting

Category: Ankle Socks

Yarn Weight: DK / 8 ply

Needle Size: US 4 / 3.5 mm

Construction: Worked flat and seamed

Languages: English and Russian

Current Availability: Original source unavailable

About the Two Needle Socks

Many sock patterns are knitted in the round with double-pointed needles, magic loop, or a small circular needle. This design takes a different approach by allowing the sock to be knitted back and forth on two needles.

Once the knitting is complete, the flat piece is seamed to form the finished sock. This style of construction can be appealing to knitters who enjoy straight needles or who are not yet comfortable knitting small circumferences in the round.

Yarn and Needles

The original pattern lists Alize Lanagold, a DK-weight wool/acrylic yarn, and recommends:

US 4 / 3.5 mm knitting needles

If you substitute another DK yarn, choose one that will produce a comfortable sock fabric rather than relying only on the yarn label's recommended needle size.

Worked Flat Instead of in the Round

The main feature of this design is its two-needle construction. The sock is knitted in rows rather than continuously in the round and is then joined with a seam.

This can make flat-knit sock patterns useful for knitters who want to learn the basic shape of a sock without immediately learning double-pointed needles or magic loop.

Skills That Help

Useful knitting skills for this type of project include:

  • Casting on
  • Knit and purl stitches
  • Working back and forth in rows
  • Basic shaping
  • Binding off
  • Seaming knitted fabric
  • Weaving in yarn ends

Is the Original Free Pattern Still Available?

Unfortunately, the original free source linked to this pattern is no longer available.

Ravelry still keeps the pattern listing for reference, but identifies the former Prjaga website source as unavailable.

For that reason, Amazing Knitting does not provide or reproduce an archived copy of the designer's instructions. The pattern remains the work of Katerina Mushyn.

View the Original Pattern Record on Ravelry →

Looking for a Free Two-Needle Sock Pattern?

If you came here specifically because you want to knit socks on two straight needles, there is still a good free option.

Free Alternative: Easy Flat Knit Two Needle Socks

Designed by Hanna Gough, this sock pattern is also worked flat on two straight needles. It uses fingering-weight sock yarn and includes an integrated heel before the sock is seamed together.

A free web version is currently available from the designer.

Get the Free Two-Needle Sock Alternative →

More Flat-Knit Socks and Slippers

Explore more two-needle sock patterns, flat-knit socks, and free knitted slipper patterns from the Amazing Knitting archive.

Before You Start

If you already saved the original Katerina Mushyn pattern while it was available, use the designer's copy you obtained legitimately. If you do not already have it, choose a currently available pattern rather than downloading an unauthorized reproduction from another website.

Pattern credit: Two Needle Socks was designed by Katerina Mushyn. The project photos on this Amazing Knitting page are credited to Katerina Mushyn. This editorial guide does not reproduce the designer's copyrighted knitting instructions.

Better Dorm Boots - Free Knitting Pattern

Better Dorm Boots - Free Knitting Pattern
Photos above © AlliH & © Amethyst05

Looking for a cozy pair of free knitted slipper boots? Better Dorm Boots Slippers by Kris Basta of Kriskrafter are warm, practical house slippers worked flat and seamed at the end.

The design uses two strands of worsted-weight yarn held together to create a thick, cozy fabric, while the ribbed cuff gives the slippers their recognizable dorm-boot shape. They are a great choice for cold floors, relaxing at home, or making a practical handmade gift.

Better Dorm Boots at a Glance

Pattern: Better Dorm Boots Slippers

Designer: Kris Basta – Kriskrafter, LLC

Craft: Knitting

Category: Adult Slippers / Dorm Boots

Construction: Worked flat and seamed

Yarn: Two strands of worsted-weight yarn held together

Fabric Weight: Approximately bulky

Needle Size: US 9 / 5.5 mm

Gauge: 14 stitches = 4 inches in stockinette with yarn held double

Yardage: Approximately 184–240 yards / 168–219 m

Sizes: Women's Small, Medium/Large and XL

Pattern Availability: Free

About the Better Dorm Boots

Better Dorm Boots were designed by Kris Basta as a cozy variation on the traditional knitted dorm boot.

The designer had noticed knitters modifying another of her slipper designs by replacing its decorative cuff with simple ribbing. Better Dorm Boots turned that popular idea into its own dedicated pattern.

The result is a straightforward knitted slipper with a comfortable foot, shaped toe, and tall ribbed cuff.

Worked Flat and Seamed

One particularly useful feature is that the slippers are knitted flat.

You do not need to knit the entire slipper as a small circumference in the round. Instead, the pieces are shaped while working back and forth and the slipper is seamed during finishing.

This construction can be attractive to knitters who enjoy making socks and slippers but prefer straight or back-and-forth knitting.

Two Strands of Yarn Held Together

The original pattern uses two strands of worsted-weight yarn held together.

Combining the strands produces a much thicker fabric than a single strand of worsted yarn, resulting in a weight approximately comparable to bulky yarn.

This thicker fabric is especially appropriate for house slippers because it creates more warmth and substance around the foot.

Women's Sizes

The Better Dorm Boots pattern provides three women's size groups:

  • Small: approximately US women's 6–7.5
  • Medium/Large: approximately US women's 8–9
  • XL: approximately US women's 9.5–10.5

Check the designer's current pattern before casting on, particularly when making the slippers as a gift.

Yarn Requirements

Ravelry lists approximately:

184–240 yards / 168–219 meters

Because the pattern is worked with yarn held double, read the original materials information carefully before purchasing yarn.

Using contrasting colors for the sole, foot, or cuff can also give the same basic slipper design a completely different appearance.

Needles and Gauge

The original pattern specifies:

US 9 / 5.5 mm knitting needles

The published gauge is:

14 stitches = 4 inches in stockinette with yarn held double

Gauge matters for slippers because even a relatively small difference can noticeably change how the finished boot fits the foot.

Knitting Skills Used

The original pattern uses several familiar knitting techniques and decreases, including:

  • Knit and purl stitches
  • Ribbing
  • Stockinette stitch
  • Slip stitches
  • K2tog decreases
  • P2tog decreases
  • SSK decreases
  • Additional shaping decreases
  • Seaming and finishing

If one of the decrease techniques is new to you, practice it on a small swatch before beginning the slippers.

Why Dorm Boots Make a Useful Project

Slipper boots sit somewhere between knitted socks and traditional house slippers. The taller cuff adds warmth around the ankle while the knitted construction keeps them soft and flexible.

They're particularly useful during colder months and can make practical handmade gifts because the project requires much less knitting than a sweater or blanket.

More Better Dorm Boots Versions

Kris Basta also created several variations on the original design. These include a Lace Edition with decorative lace running up the center and a warmer Deluxe version featuring a fold-over cuff.

These are separate designs, so use the appropriate pattern if you want to make one of those variations rather than modifying the original instructions.

Is the Better Dorm Boots Pattern Free?

Yes. Better Dorm Boots Slippers by Kris Basta is currently available as a free knitting pattern.

Amazing Knitting does not reproduce the designer's complete copyrighted instructions. Use the original pattern page for the stitch counts, row-by-row instructions, shaping, and finishing details.

Get the Free Better Dorm Boots Pattern

Visit the designer's Ravelry listing for the current free pattern and complete project information.

Get the Free Better Dorm Boots Pattern →

Pattern credit: Better Dorm Boots Slippers was designed by Kris Basta – Kriskrafter, LLC. Pattern availability, sizing, materials, and technical information are controlled by the designer and may change over time.

More Free Knitted Slippers

Looking for another style? Explore more free knitted slipper patterns, adult knitted slippers, and knitted dorm boots from the Amazing Knitting archive.

Before You Start

Open the current designer pattern before purchasing yarn or casting on. Confirm your size, yarn requirements, gauge, needle size, and any pattern updates, then make sure your finished slippers are suitable for the surface where they will be worn.

The Hudson Hat – Earflap Knitting Pattern

The Hudson Hat earflap knitting pattern by Lindsay Baker

The Hudson Hat by Lindsay Baker is a classic earflap hat worked seamlessly in the round, with i-cord ties, optional stripes and sizes ranging from newborn through adult.

The design begins at the lower ties and grows upward through the earflaps and body before closing at the crown. Its simple worsted-weight construction makes it a practical cold-weather project with plenty of room for color customization.

The Hudson Hat pattern is currently available as a paid download from Lindsay Baker's Ravelry store.

Design and original pattern © Lindsay Baker.

The Hudson Hat Pattern Overview

  • Designer: Lindsay Baker
  • Pattern: The Hudson Hat!
  • Craft: Knitting
  • Category: Earflap hat
  • Published: November 2007
  • Construction: Bottom up and worked in the round
  • Finishing: Seamless
  • Style: Unisex
  • Sizes: 0–6 months, 6–18 months, Toddler, Child and Adult
  • Yarn weight: Worsted
  • Suggested yarns: Family Roots Cestari Fine Merino, Willow Merino and Mountain Meadow Wool
  • Yardage: Approximately 100–300 yd / 91–274 m
  • Needles: US 7 / 4.5 mm circular and DPNs; US 5 circular for smaller sections
  • Gauge: Approximately 5 stitches × 7 rows = 1 in in stockinette
  • Main techniques: Knitting in the round, i-cord, earflap shaping, decreases and tassel finishing
  • Skill level: Advanced beginner and up
  • Language: English
  • Pattern availability: Paid pattern

A Classic Seamless Earflap Hat

The Hudson Hat is designed as a practical cold-weather earflap hat with a simple silhouette and flexible styling.

The earflaps extend downward to provide extra coverage, while the i-cord ties allow the hat to be secured comfortably.

Because the hat is worked seamlessly in the round, there is no long vertical seam to sew at the end.

Worked From the I-Cord Ties Up

One of the most distinctive construction details is that the hat begins with the i-cord ties.

From there, the earflaps are built and then joined into the main body of the hat.

The knitting continues upward in the round toward the crown.

Why I-Cord Works Well for Earflap Hats

I-cord creates a narrow, rounded knitted cord that is stronger and more finished-looking than a simple chain of yarn.

On The Hudson Hat, the ties are integrated into the overall construction rather than being added as an afterthought.

They can also be finished with tassels for a classic winter-hat appearance.

Five Sizes From Baby to Adult

The current pattern includes:

  • 0–6 months
  • 6–18 months
  • Toddler
  • Child
  • Adult

This wide size range makes the same pattern useful for family knitting and gift projects.

Worsted-Weight Yarn

The Hudson Hat is designed for worsted-weight yarn.

The pattern currently lists several Family Roots wool and merino yarns as suggested options.

A smooth worsted-weight wool is a natural choice for this project because it provides warmth, elasticity and good stitch definition.

Yardage

The published yarn requirement ranges from approximately:

100–300 yards / 91–274 meters.

Smaller baby sizes naturally require less yarn, while adult sizes and multi-color versions may need more.

If you plan to add multiple stripes or large tassels, allow a little extra yarn for finishing.

Needles

The current pattern information lists:

  • US 7 / 4.5 mm circular needle
  • US 7 / 4.5 mm double-pointed needles
  • US 5 circular needle for smaller sections

Double-pointed needles become useful as the crown circumference decreases.

Gauge

The published stockinette gauge is approximately:

5 stitches × 7 rows = 1 inch.

Because this is a fitted hat, gauge affects the final circumference and overall comfort.

Check your gauge before starting, especially if you substitute a different worsted-weight yarn.

Stripe-Friendly Construction

The Hudson Hat works particularly well with stripes.

The designer notes that the construction is easy to customize with color changes, so you can use:

  • Two-color stripes
  • Scrap-yarn stripes
  • Gradient color sequences
  • A single solid color

This also makes the pattern useful for using special leftover yarns that are too small for a larger project.

A Good Scrap-Yarn Hat

Smaller sizes need relatively little yarn, making the Hudson Hat a practical way to use partial skeins.

You can combine coordinating worsted-weight colors for the body, earflaps, ties and tassels.

Try to keep the yarn weights and fiber behavior reasonably similar so the finished hat has consistent tension.

Tassel Finishing

The i-cord ties can be finished with tassels for a traditional earflap-hat look.

The current pattern includes a tassel tutorial with step-by-step photos.

Tassels are optional from a practical point of view, but they add a decorative finish and can help visually balance the long ties.

Skills You'll Use

  • Casting on
  • Working i-cord
  • Knitting in the round
  • Working with circular needles
  • Using double-pointed needles
  • Increasing and shaping earflaps
  • Joining sections in the round
  • Stockinette stitch
  • Changing colors for stripes
  • Crown decreases
  • Making tassels
  • Weaving in ends

Is The Hudson Hat Beginner Friendly?

The designer describes the pattern as suitable for an advanced beginner and up.

The individual techniques are not unusually difficult, but the project does combine several useful skills: i-cord, small-circumference knitting, shaping and joining sections into the round.

A knitter who already knows basic knit stitches and has some experience working in the round should find this a manageable next project.

Can You Knit It Without Earflaps?

Some knitters have adapted The Hudson Hat by omitting the earflaps and using a ribbed brim instead.

This creates a more conventional beanie while preserving the general shape and crown construction.

However, this is a project modification rather than the standard pattern construction, so follow the original instructions first if you are new to the design.

Tips for a Better Fit

Check gauge before casting on. Small differences in gauge can change hat circumference significantly.

Choose the size from head measurements when possible. Age labels are useful guides, but actual head size is more reliable.

Keep i-cord tension consistent. Very tight ties can become stiff, while very loose i-cord may look uneven.

Try the hat on before finishing the crown if possible. This helps confirm the body depth.

Is The Hudson Hat a Free Knitting Pattern?

No. The Hudson Hat by Lindsay Baker is currently a paid knitting pattern.

The current Ravelry listing prices the pattern at $4.50 USD.

Amazing Knitting previously featured the design as a pattern-discovery post, but prices and availability can change. We therefore identify its current paid status clearly.

View The Hudson Hat Pattern →

Why This Hat Is Worth Considering

The Hudson Hat has remained popular because it combines a practical winter shape with flexible sizing and easy color customization.

Its seamless construction keeps finishing relatively simple, while the earflaps, i-cord ties and tassels give the project enough detail to remain interesting.

The five-size range also makes it a useful family pattern rather than a single-age baby hat.

Pattern Availability

Amazing Knitting links readers to legitimate designer or publisher sources whenever possible. Pattern prices, download locations and availability can change after an article is published.

Read Our Pattern Availability Policy →

Amazing Knitting is an independent pattern discovery and project-guide site. The Hudson Hat design and complete knitting instructions remain the intellectual property of Lindsay Baker. This guide does not reproduce the designer's complete row-by-row pattern instructions.

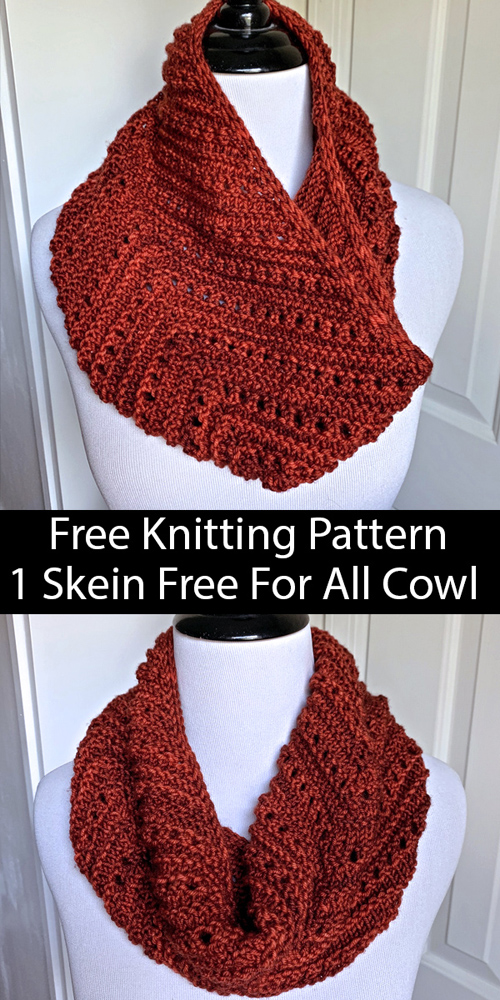
Free For All Cowl - Free Knitting Pattern

Free For All Cowl - Free Knitting Pattern
Photos above © advilhauer
What beautiful knitting cowl pattern! I found it on Ravelry.
Cowl knit flat in a zigzag eyelet pattern that looks great with variegated yarn. Uses one skein (200 - 225 yards) of Worsted/DK weight yarn. Length and width easily customizable. Written instructions. Designed by Jen Peck.

Download Pattern: Free For All Cowl 

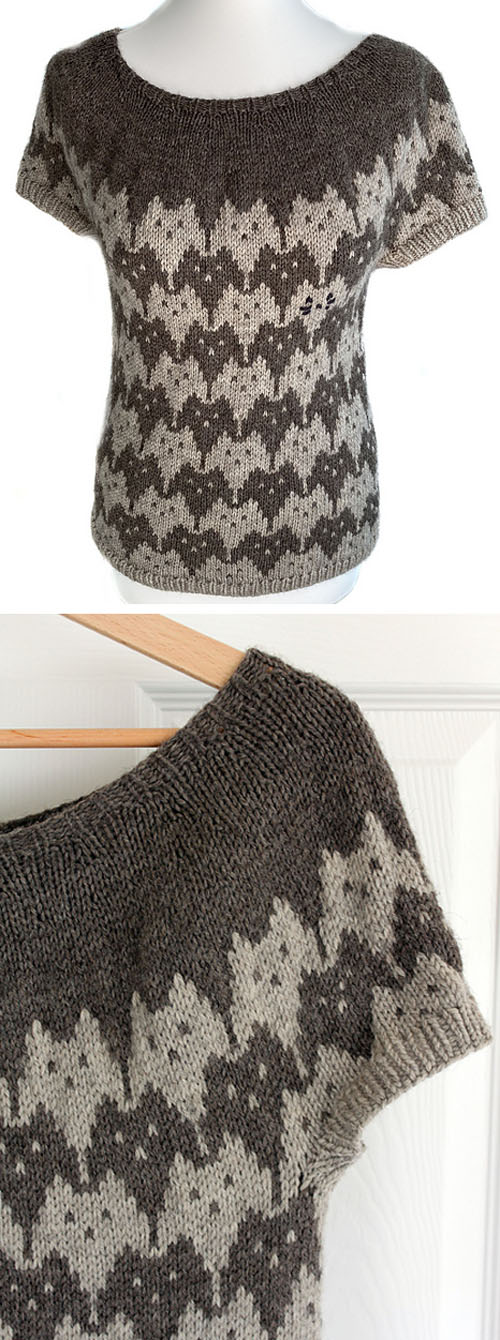
Cascading Kittens - Knitting Pattern

Cascading Kittens - Knitting Pattern
Photos above © Claire Slade
What beautiful sweater knitting pattern! I found it on Ravelry...
I love the happy little cats covering the Cascading Kittens sweater by Claire Slade. It’s a short-sleeved (though that can be adjusted), top-down, circular yoke sweater worked mostly in colorwork cats.

Full Post: Cascading Kittens

Tiny Parlor Cat - Free Pattern

Tiny Parlor Cat - Free Pattern
Photos above © Sara Elizabeth Kellner
What beautiful knitting tiny parlor cat! I found it on Ravelry.
It’s 3 inches long (excluding tail), worked in the round, and all in one piece. It also knits up very quickly!
The pattern specifies worsted weight yarn, but you can use whatever you have on hand - just adjust your needle size accordingly.

Download Pattern: Tiny Parlor Cat

Discover More From the Archive

A fresh mix of knitting patterns and tutorials from the Amazing Knitting archive.

Finding patterns from the archive…