Skip to content

...

Showing posts sorted by date for query slip stitch knitting. Sort by relevance Show all posts

9 Free Baby Sweater & Cardigan Knitting Patterns You'll Love

9 Free Baby Sweater & Cardigan Knitting Patterns You'll Love

Looking for a beautiful free baby sweater knitting pattern for your next project? This collection brings together nine lovely baby sweaters, cardigans and jackets, from simple beginner-friendly designs to lace, colorwork and textured knits.

Whether you're knitting a handmade baby-shower gift, a cozy newborn cardigan or a little sweater for a growing toddler, these patterns offer a wonderful variety of styles and construction methods.

Best of all, every pattern in this collection is currently available for free. Each project below links to our detailed Amazing Knitting guide, where you can check the yarn, needles, sizing, construction and current legitimate pattern source before casting on.

9 Free Baby Sweater & Cardigan Knitting Patterns

1. Growing Garden Cardigan

If you love cheerful colorwork, the Growing Garden Cardigan by Sandi Rosner is a wonderful place to begin.

Designed for Purl Soho, this top-down baby cardigan uses simple slip-stitch colorwork to create tiny rows of colorful textured dots. Because only one color is worked at a time, it can also be an approachable introduction to colorwork knitting.

The pattern uses DK-weight cotton yarn and includes four sizes from newborn through 18–24 months.

Best for: Easy colorwork, top-down construction and colorful baby gifts.

See the Growing Garden Cardigan Free Pattern Guide →

2. Checco's Dream Baby Cardigan

Checco's Dream by DROPS Design is a sweet textured baby cardigan with a wonderfully unusual construction.

The cardigan is worked back and forth using seed stitch and stockinette, with the sleeves incorporated into the construction rather than being made as completely separate pieces.

It is available in a particularly useful range of sizes, beginning at 1–3 months and extending through 3–4 years.

Best for: Classic baby style, textured knitting and a wide size range.

See the Checco's Dream Free Knitting Pattern Guide →

3. Leaf Love Baby Sweater

For something a little more decorative, try the Leaf Love Baby Sweater by Taiga Hilliard.

This top-down cardigan combines a classic baby sweater shape with an offset button front and a beautiful leaf lace panel. The lace provides enough detail to make the project interesting without covering the entire garment in a complicated stitch pattern.

The free pattern includes four baby sizes from 0–3 months through 12–18 months and is designed for worsted-weight yarn.

Best for: Leaf lace, elegant baby gifts and knitters ready for a little decorative detail.

See the Leaf Love Baby Sweater Free Pattern Guide →

4. Garter Ridge Baby Cardigan

The Garter Ridge Baby Cardigan by Sarah Hoadley proves that simple texture can make a baby sweater look special.

Designed with contrasting garter ridges and smooth stockinette sections, this cardigan has a timeless appearance that works equally well in traditional baby colors or modern neutrals.

The pattern includes sizes from 0–6 months through 2–3 years and uses approximately 336–504 yards of yarn, depending on size.

Best for: Simple texture, classic styling and practical everyday baby cardigans.

See the Garter Ridge Baby Cardigan Free Pattern Guide →

5. Fuss Free Baby Cardigan

Need a tiny cardigan without lots of complicated finishing? The Fuss Free Baby Cardigan by Louise Tilbrook is an excellent choice.

This little raglan cardigan was designed with simplicity in mind and is particularly appealing to knitters who are new to seamless garment knitting.

It uses DK-weight yarn, requires less than 100 grams for the original small sizes and leaves plenty of room for personalization with stripes, contrasting edges or other simple modifications.

Best for: First baby cardigans, stash yarn and knitters learning seamless construction.

See the Fuss Free Baby Cardigan Free Pattern Guide →

6. Harvest Cardigan

Harvest by Tin Can Knits is much more than a baby cardigan pattern. It is a family cardigan with sizes extending from babies all the way through adults.

Part of the designers' Simple Collection, Harvest was created to help knitters learn essential garment-making skills. Its seamless construction and clean styling make the baby sizes particularly appealing for anyone attempting a cardigan for the first time.

The pattern uses worsted-weight yarn and its exceptionally broad size range also makes it possible to knit coordinating cardigans for siblings or other family members.

Best for: First sweaters, family knitting and learning seamless cardigan construction.

See the Harvest Cardigan Free Pattern Guide →

7. Puerperium Cardigan

The Puerperium Cardigan by Kelly Brooker is a wonderfully simple little cardigan created specifically with a newborn baby's earliest weeks in mind.

Its clean, top-down seamless construction makes it a versatile blank canvas. You can keep it beautifully simple or personalize it through yarn choice, buttons, stripes or small embellishments.

Because it is such a compact newborn garment, it can also be an appealing project when you want to knit a thoughtful handmade gift without committing to a large sweater.

Best for: Newborn gifts, simple top-down knitting and personalization.

See the Puerperium Cardigan Free Pattern Guide →

8. French Macaroon Baby Sweater

Prefer a pullover instead of a cardigan? French Macaroon by Caro in the City is a charming garter-stitch baby and child sweater with a distinctive two-color design.

The sweater is worked flat in two main pieces, making it quite different from many of the seamless cardigans in this collection. A boat neckline and small button opening at the back add practical finishing details.

Six sizes are included, ranging from newborn through 4 years, making this a pattern you can return to as a child grows.

Best for: Garter stitch, color blocking and newer garment knitters.

See the French Macaroon Baby Sweater Free Pattern Guide →

9. Seed Stitch Baby Jacket

The Seed Stitch Baby Jacket is another lovely option when texture is more important to you than elaborate colorwork.

Seed stitch creates a beautifully textured knitted fabric using only knit and purl stitches, giving a simple baby jacket plenty of visual interest without requiring complicated cables or stranded colorwork.

It is a particularly nice choice for a solid-color yarn, where the small raised texture can become the main feature of the finished garment.

Best for: Textured knitting, classic baby style and knit-and-purl stitch practice.

See the Seed Stitch Baby Jacket Free Pattern Guide →

Which Free Baby Sweater Should You Knit First?

With nine different designs, the best pattern depends on what you want to practice and the style of garment you want to make.

For a straightforward first cardigan, start with Fuss Free Baby Cardigan or Harvest. Both are excellent choices for learning garment construction without making decorative stitches the main challenge.

If you want lace, Leaf Love Baby Sweater adds a beautiful botanical detail. For texture, look at Garter Ridge Baby Cardigan, Checco's Dream or the Seed Stitch Baby Jacket.

For color, the Growing Garden Cardigan offers a playful introduction to slip-stitch colorwork, while French Macaroon lets two contrasting yarn colors become the focus of a very simple shape.

Free Baby Cardigans for Different Skill Levels

Baby sweaters are excellent projects for developing garment-knitting skills because their smaller scale allows you to practice techniques that also appear in adult sweaters.

Depending on the pattern you choose, you can practice top-down construction, raglan shaping, working sleeves, button bands, lace, seed stitch, garter stitch, color changes and seamless knitting.

If you are relatively new to garments, choose a simpler design first and concentrate on achieving the correct gauge and understanding the construction. You can move on to lace or colorwork once the basic sweater-making process feels familiar.

Choosing Yarn for a Baby Sweater

Always check the individual pattern before buying yarn. These nine designs do not all use the same yarn weight, gauge or yardage.

For baby garments, consider softness and comfort as well as appearance. Washability can also be important for clothing that may need frequent cleaning.

If you substitute yarn, match the pattern's required gauge rather than relying only on the yarn-weight label. A gauge swatch can prevent a beautifully knitted cardigan from ending up much larger or smaller than intended.

A Handmade Baby Gift

A knitted baby cardigan or sweater can make a memorable handmade gift for a newborn, baby shower or first birthday.

Several patterns in this collection require relatively modest amounts of yarn, making them useful for special skeins or leftovers from larger projects. Others include multiple sizes, so a favorite design can be knitted again as the child grows.

Before starting, open the individual Amazing Knitting guide and then follow the link to the designer's current original pattern. Check the latest sizing, yarn requirements, gauge, needle sizes and any pattern updates before casting on.

More Free Knitting Patterns

If baby sweaters aren't the only thing on your knitting list, explore our collection of 7 Free Baby Blanket Knitting Patterns for Beautiful Handmade Gifts.

Together, a tiny cardigan and a coordinating knitted blanket can make an especially lovely handmade baby gift set.

Pattern availability was checked when this collection was prepared. Amazing Knitting does not reproduce the designers' copyrighted row-by-row instructions or charts. Each project links to an Amazing Knitting guide that identifies and directs readers to the legitimate pattern source. Pattern availability may change over time.

How to Knit a 3-Color Pattern: Easy Step-by-Step Tutorial

How to Knit a 3-Color Pattern: Easy Step-by-Step Tutorial
Photos above © Susan's Knitting World

If you’re looking for a fresh project that adds a vibrant pop of color to your knitting basket, you have to check out this stunning 3-color knitting pattern. Using a clever combination of white, yellow, and gray, this tutorial demonstrates how to create a sophisticated, textured fabric that looks far more complex than it actually is. It’s a fantastic way to play with your favorite yarn scraps or create a high-contrast masterpiece for a new baby blanket or a cozy sweater.

The beauty of this easy knitting pattern tutorial lies in its rhythmic simplicity and fast-paced progress. Designed with a stitch multiple of 8 + 3 and worked on 3.5 mm needles, the pattern uses a slip-stitch technique that allows you to achieve beautiful geometric transitions without the stress of carrying multiple strands at once. Whether you are knitting for a little one or crafting a stylish accessory for an adult, the alternating rows create a professional finish that is both durable and eye-catching.

I highly recommend giving this a try—it’s an incredibly enjoyable project that builds quickly and keeps you engaged with every color change. From the crisp garter stitch base to the final alternating repeat, the steps are clear and rewarding. Click the link below to follow the full tutorial and start your next favorite knitting project today!

Full Tutorial: How to Knit a 3-Color Pattern

Growing Garden Cardigan – Free Baby Knitting Pattern

Growing Garden Cardigan free baby knitting pattern by Sandi Rosner

Growing Garden Cardigan. Photo © Purl Soho

Growing Garden Cardigan is a free baby and toddler knitting pattern designed by Sandi Rosner for Purl Soho. This cheerful top-down cardigan combines a simple background color with little rows of colorful textured dots that look like tiny flowers scattered across the fabric.

The clever part is the colorwork: simple slip stitches mean you work with only one color per row. That makes this little cardigan an inviting project for knitters who want to try colorwork without juggling multiple yarn colors at the same time.

Growing Garden Cardigan Pattern Details

  • Designer: Sandi Rosner
  • Publisher: Purl Soho
  • Craft: Knitting
  • Category: Baby and toddler cardigan
  • Pattern availability: Free
  • Sizes: Newborn, 6–12 months, 12–18 months, 18–24 months
  • Yarn weight: DK / Light Worsted
  • Suggested yarn: Purl Soho Cotton Chirp DK and Cotton Chirp DK Minis
  • Needles: 4 mm (US 6)
  • Gauge: 22 stitches and 40 rows = 4 inches in Dotted Stripe Pattern
  • Construction: Top down
  • Techniques: Slip-stitch colorwork, knitting flat and in the round
  • Language: English

Easy Slip-Stitch Colorwork

The Growing Garden Cardigan gets its playful appearance from Purl Soho's Dotted Stripe Pattern. Small contrast-color bumps appear in staggered rows against the main background color, creating the cardigan's garden-inspired look.

Instead of traditional stranded colorwork with two yarns worked across the same row, this design uses slip stitches so that you only need to work with one color at a time. Purl Soho specifically recommends the project as a gentle introduction to colorwork knitting.

Sizes from Newborn to 24 Months

The free pattern includes four sizes: Newborn, 6–12 months, 12–18 months and 18–24 months.

Finished chest circumferences are approximately 17 (19½, 21, 23½) inches, with about 1–2 inches of positive ease built into the sizing.

This range makes the pattern suitable for everything from a tiny newborn cardigan to a colorful sweater for an active toddler.

Yarn and Needles

The original cardigan uses Purl Soho Cotton Chirp DK for the main color and Cotton Chirp DK Minis for the contrasting colored dots.

Both are 100% Peruvian Pima cotton yarns in the DK / Light Worsted range. The main color requires approximately 230 (300, 380, 445) yards, depending on size, plus smaller quantities of four contrast colors.

The pattern uses 4 mm (US 6) circular needles and double-pointed needles, or the needle size required to achieve the specified gauge.

How the Growing Garden Cardigan Is Constructed

The cardigan is worked from the top down. You begin at the collar and work the yoke and body flat in one piece.

At the armholes, the sleeve stitches are placed on hold while the body continues down to the lower edge. The held sleeve stitches are then returned to the needles and the sleeves are worked in the round down to the cuffs.

Garter-stitch details at the collar, hem, cuffs and button bands provide a simple textured frame around the colorful dotted stripes.

A Great Way to Play with Color

The small amounts of contrast yarn required for the dotted stripes make this design particularly fun for experimenting with color combinations. You can keep the background neutral and choose bright accents, or use a colorful main shade with softer contrasting dots.

Because each contrast color appears in relatively small amounts, the design may also be useful for compatible DK-weight leftovers, provided you can maintain the pattern gauge and choose yarns suitable for the finished garment.

What You'll Need

  • DK / Light Worsted yarn for the main color
  • Four small quantities of contrasting DK yarn
  • 4 mm (US 6) circular knitting needles
  • 4 mm (US 6) double-pointed needles or your preferred method for small circumferences
  • Stitch holders or scrap yarn
  • A stitch marker
  • 4 or 5 small buttons, depending on size

Get the Free Growing Garden Cardigan Pattern

The complete Growing Garden Cardigan by Sandi Rosner is available free from the original publisher, Purl Soho. Their pattern page includes the full instructions, sizing, materials, photos and additional knitting guidance.

Get the Free Growing Garden Cardigan Pattern at Purl Soho

Pattern availability was checked when this article was updated. Availability on external websites may change over time.

Better Dorm Boots - Free Knitting Pattern

Better Dorm Boots - Free Knitting Pattern
Photos above © AlliH & © Amethyst05

Looking for a cozy pair of free knitted slipper boots? Better Dorm Boots Slippers by Kris Basta of Kriskrafter are warm, practical house slippers worked flat and seamed at the end.

The design uses two strands of worsted-weight yarn held together to create a thick, cozy fabric, while the ribbed cuff gives the slippers their recognizable dorm-boot shape. They are a great choice for cold floors, relaxing at home, or making a practical handmade gift.

Better Dorm Boots at a Glance

Pattern: Better Dorm Boots Slippers

Designer: Kris Basta – Kriskrafter, LLC

Craft: Knitting

Category: Adult Slippers / Dorm Boots

Construction: Worked flat and seamed

Yarn: Two strands of worsted-weight yarn held together

Fabric Weight: Approximately bulky

Needle Size: US 9 / 5.5 mm

Gauge: 14 stitches = 4 inches in stockinette with yarn held double

Yardage: Approximately 184–240 yards / 168–219 m

Sizes: Women's Small, Medium/Large and XL

Pattern Availability: Free

About the Better Dorm Boots

Better Dorm Boots were designed by Kris Basta as a cozy variation on the traditional knitted dorm boot.

The designer had noticed knitters modifying another of her slipper designs by replacing its decorative cuff with simple ribbing. Better Dorm Boots turned that popular idea into its own dedicated pattern.

The result is a straightforward knitted slipper with a comfortable foot, shaped toe, and tall ribbed cuff.

Worked Flat and Seamed

One particularly useful feature is that the slippers are knitted flat.

You do not need to knit the entire slipper as a small circumference in the round. Instead, the pieces are shaped while working back and forth and the slipper is seamed during finishing.

This construction can be attractive to knitters who enjoy making socks and slippers but prefer straight or back-and-forth knitting.

Two Strands of Yarn Held Together

The original pattern uses two strands of worsted-weight yarn held together.

Combining the strands produces a much thicker fabric than a single strand of worsted yarn, resulting in a weight approximately comparable to bulky yarn.

This thicker fabric is especially appropriate for house slippers because it creates more warmth and substance around the foot.

Women's Sizes

The Better Dorm Boots pattern provides three women's size groups:

  • Small: approximately US women's 6–7.5
  • Medium/Large: approximately US women's 8–9
  • XL: approximately US women's 9.5–10.5

Check the designer's current pattern before casting on, particularly when making the slippers as a gift.

Yarn Requirements

Ravelry lists approximately:

184–240 yards / 168–219 meters

Because the pattern is worked with yarn held double, read the original materials information carefully before purchasing yarn.

Using contrasting colors for the sole, foot, or cuff can also give the same basic slipper design a completely different appearance.

Needles and Gauge

The original pattern specifies:

US 9 / 5.5 mm knitting needles

The published gauge is:

14 stitches = 4 inches in stockinette with yarn held double

Gauge matters for slippers because even a relatively small difference can noticeably change how the finished boot fits the foot.

Knitting Skills Used

The original pattern uses several familiar knitting techniques and decreases, including:

  • Knit and purl stitches
  • Ribbing
  • Stockinette stitch
  • Slip stitches
  • K2tog decreases
  • P2tog decreases
  • SSK decreases
  • Additional shaping decreases
  • Seaming and finishing

If one of the decrease techniques is new to you, practice it on a small swatch before beginning the slippers.

Why Dorm Boots Make a Useful Project

Slipper boots sit somewhere between knitted socks and traditional house slippers. The taller cuff adds warmth around the ankle while the knitted construction keeps them soft and flexible.

They're particularly useful during colder months and can make practical handmade gifts because the project requires much less knitting than a sweater or blanket.

More Better Dorm Boots Versions

Kris Basta also created several variations on the original design. These include a Lace Edition with decorative lace running up the center and a warmer Deluxe version featuring a fold-over cuff.

These are separate designs, so use the appropriate pattern if you want to make one of those variations rather than modifying the original instructions.

Is the Better Dorm Boots Pattern Free?

Yes. Better Dorm Boots Slippers by Kris Basta is currently available as a free knitting pattern.

Amazing Knitting does not reproduce the designer's complete copyrighted instructions. Use the original pattern page for the stitch counts, row-by-row instructions, shaping, and finishing details.

Get the Free Better Dorm Boots Pattern

Visit the designer's Ravelry listing for the current free pattern and complete project information.

Get the Free Better Dorm Boots Pattern →

Pattern credit: Better Dorm Boots Slippers was designed by Kris Basta – Kriskrafter, LLC. Pattern availability, sizing, materials, and technical information are controlled by the designer and may change over time.

More Free Knitted Slippers

Looking for another style? Explore more free knitted slipper patterns, adult knitted slippers, and knitted dorm boots from the Amazing Knitting archive.

Before You Start

Open the current designer pattern before purchasing yarn or casting on. Confirm your size, yarn requirements, gauge, needle size, and any pattern updates, then make sure your finished slippers are suitable for the surface where they will be worn.

Knit Batwing Swoncho - Free Pattern

Knit Batwing Swoncho - Free Pattern
Photos above © Svetlana Avrakh
What beautiful knitting poncho Free Pattern! I found it on Pinterest...
Toss aside the jacket in favor of this stylish knit swoncho with a stocking stitch pattern, batwing sleeves, and a rich center cable. Pattern features knit, knit 2 together, slip knit and yarn over techniques to keep you engaged. Patons Classic Wool Worsted, Cool Gray makes it versatile over jeans or a skirt, dressed up or dressed down. In any shade that suits your taste, it’s wooly and wonderful and a gorgeous project for yourself or as a gift.

Download Pattern: Batwing Swoncho

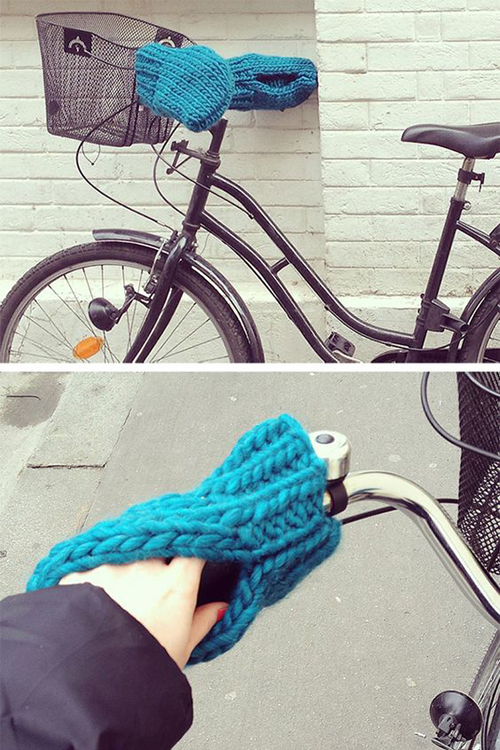
Bike Mittens – Free Knitted Handlebar Mittens Pattern

Bike Mittens free knitted bicycle handlebar mittens pattern by Charlotte L

Bike Mittens by Charlotte L / Charlov. Photo © Charlotte L.

Bike Mittens by Charlotte L are a clever cold-weather knitting project designed to keep your hands warmer while cycling. Instead of wearing these mittens on your hands, the finished pieces fit over the bicycle handlebars, creating cozy covers that you can slip your hands into while riding.

The design is surprisingly simple. Each mitten is essentially built from straightforward ribbing and stockinette, then seamed to create openings for the handlebar and your hand.

The original tutorial is written in French, but Charlotte provides helpful photographs of the construction, and the project uses basic knitting techniques. The original tutorial is still available free on the designer's website.

Bike Mittens at a Glance

  • Designer: Charlotte L / Charlov
  • Original name: Moufles de vélo
  • Published: March 2015
  • Craft: Knitting
  • Project: Bicycle handlebar mittens / hand warmers
  • Construction: Worked flat and seamed
  • Main stitches: 1×1 ribbing and stockinette
  • Yarn: Very thick / super-bulky yarn
  • Original yarn: We Are Knitters yarn in teal
  • Needles: Large needles are used in the original tutorial
  • Language: French
  • Availability: Free tutorial

What Are Bike Mittens?

Bike mittens are knitted covers that stay on the bicycle rather than ordinary mittens that stay on your hands.

Each cover fits around one side of the handlebars and leaves an opening where the cyclist can insert a hand.

Once your hands are inside, you can continue holding the handlebar and operating the controls while the knitted fabric provides an extra layer between your hands and cold air.

Why Knit Mittens for Your Bicycle?

Cold wind can make winter cycling uncomfortable even when the temperature itself does not seem extreme.

Hands are particularly exposed because they remain forward on the handlebars throughout the ride.

Handlebar mittens provide a simple knitted barrier around this exposed area and can be used together with whatever hand protection is appropriate for your weather and riding conditions.

A Clever Gift for a Cyclist

Charlotte originally created the mittens for her friend Claire, who traveled frequently by bicycle and was moving somewhere colder.

That practical origin makes this an unusual handmade gift idea for someone who commutes or regularly travels by bicycle during cooler weather.

Unlike another scarf or hat, it is a project specifically connected to the recipient's cycling routine.

Simple Flat Construction

Despite their unusual purpose, these bicycle mittens do not require complicated three-dimensional mitten shaping.

The pieces are knitted flat, beginning with ribbing and continuing in stockinette.

After knitting, strategic seaming transforms the flat fabric into the handlebar cover.

This makes the project approachable for knitters who are comfortable knitting flat but do not want to work traditional mittens in the round.

1×1 Ribbing at the Opening

The design begins with 1×1 ribbing.

Alternating knit and purl stitches creates an elastic section that can flex more easily than plain stockinette.

Ribbing is particularly useful around openings because it can help the knitted fabric sit more neatly while still allowing some stretch.

Stockinette Makes Up the Main Fabric

After the ribbed section, the project continues in stockinette stitch.

This keeps the knitting straightforward and allows the very thick yarn to do much of the visual work.

Because the original yarn and needles are so large, the stitches create a substantial fabric suitable for this type of cold-weather accessory.

Super-Bulky Yarn Makes It a Quick Knit

Charlotte designed the mittens using very thick yarn.

The original project used a teal yarn from We Are Knitters, and the designer notes that another suitably thick yarn can be substituted.

Thick yarn has two obvious advantages for this project: it creates a substantial fabric and allows the pieces to grow quickly on large needles.

Choosing Substitute Yarn

You do not need the exact original yarn to make a useful pair of Bike Mittens.

If substituting, look for a yarn that produces a thick, stable fabric suitable for the intended handlebar fit.

Consider:

  • Yarn thickness
  • Warmth
  • Durability
  • Stitch definition
  • Resistance to frequent handling
  • How easily the finished item can be cleaned

Remember that a bicycle accessory may encounter more dirt and moisture than a scarf worn indoors.

Can You Hold Thinner Yarn Double?

If you do not have yarn as thick as the original, combining strands may be an option.

Charlotte suggested this possibility when a reader asked about using thinner yarn.

However, the important consideration is the resulting fabric rather than simply the number of strands. Your finished knitting still needs to have suitable thickness and dimensions for your bicycle.

Large Knitting Needles

The original tutorial uses very large needles to match the thick yarn.

Charlotte begins the ribbing with approximately 12–13 mm needles and then uses 15 mm needles for the stockinette section.

If you substitute yarn, choose needles that create an appropriate fabric rather than assuming that the original needle sizes will work with every yarn.

Check Your Bicycle Before You Start

One particularly useful lesson from the designer's comments is that bicycle handlebars are not all identical.

Charlotte told a reader that she had taken measurements directly from a bicycle when making the original mittens.

That is a sensible approach if your yarn, gauge or handlebar setup differs from the original.

Check the space around your grips, brake levers and other controls before deciding whether any adjustment is needed.

How the Openings Work

The finished mitten needs openings for two different purposes.

One opening allows the cover to fit around the handlebar. The other allows your hand to enter the mitten so you can hold the grip and access the brake.

Charlotte specifically confirmed this arrangement when a reader asked whether the design still allowed access to the brakes.

Do Not Block Access to Your Brakes

This is the most important practical consideration when fitting any handmade cover around bicycle controls.

After installing the finished mittens, make sure your hands can enter and leave easily and that you can operate the brakes and any essential controls without obstruction.

Test the fit carefully before using the covers during normal riding.

Make Two Matching Pieces

The project requires two matching knitted pieces—one for each side of the handlebars.

Because the construction is straightforward, completing the first mitten also gives you a useful opportunity to check the fit before finishing the second.

If an adjustment is necessary, make notes so the second piece can be made consistently.

Seaming Creates the Final Shape

Once the flat pieces are knitted, the final shape is created through seaming.

The original tutorial includes photographs showing where Charlotte closes the fabric and where the openings remain.

Those photographs are especially useful because the instructions are in French and the construction is easier to understand visually once you see how the flat piece becomes a handlebar mitten.

Is This Pattern Beginner Friendly?

The knitting itself is quite approachable.

If you already know how to:

  • Cast on
  • Knit
  • Purl
  • Work 1×1 ribbing
  • Work stockinette flat
  • Bind off
  • Sew a knitted seam

then the main knitting techniques should feel familiar.

The less conventional part is understanding the final seaming and fitting the finished covers safely around your particular handlebars.

The Original Pattern Is in French

Charlotte's original Moufles de vélo tutorial is written in French.

The page includes construction photographs, which can make the project easier to understand even if French is not your first language.

Modern browsers can also translate webpages automatically, but always compare translated knitting terminology with the photographs and original text when something seems unclear.

Why We Link to the Original Tutorial

Amazing Knitting does not reproduce Charlotte's complete row-by-row instructions.

Instead, this guide explains the design, construction, materials and practical considerations so that you can decide whether the project is right for you.

The complete knitting instructions and Charlotte's original construction photographs remain on her own website.

Tips Before Knitting Your Bike Mittens

  • Measure your own bicycle rather than assuming every handlebar is identical.
  • Choose thick yarn that creates a substantial fabric.
  • Check the first finished piece on the bicycle before completing the second.
  • Keep both mittens consistent by recording any adjustments.
  • Pay particular attention to the openings during seaming.
  • Make sure the finished covers do not interfere with brakes or controls.

Care and Weather Considerations

Knitted Bike Mittens are textile accessories, so their performance will depend heavily on the yarn you choose and the conditions in which they are used.

A fiber that feels wonderfully warm when dry may behave differently when repeatedly exposed to rain, snow or road spray.

Check the care instructions for your yarn and allow wet knitted items to dry thoroughly before storing them.

Free Bike Mittens Knitting Tutorial

The good news is that Charlotte's original Moufles de vélo / Bike Mittens tutorial is still publicly available on the Charlov website.

It includes the designer's materials, knitting directions, seaming instructions and photographs showing how the finished covers are constructed.

Get the Free Bike Mittens Tutorial from Charlov →

Bike Mittens / Moufles de vélo are designed by Charlotte L / Charlov. Amazing Knitting does not reproduce the designer's complete copyrighted tutorial. Please visit the original Charlov page for the full instructions and construction photographs.

Read Our Pattern Availability Policy →

Knit Ribbed Garter Stitch Slippers - Free Knitting Pattern

 Knit Ribbed Garter Stitch Slippers - Free Knitting Pattern
Photos above © DROPS Design & © inapina
What beautiful knitting slippers pattern! I found it on Pinterest.
This Knit Ribbed Garter Stitch slipper is super chunky and soft to lounge around the house. The pattern comes with instructions for how to knit the garter stitch with ribs in three different sizes, stretchy to slip in.

Full Post: Ribbed Confetti

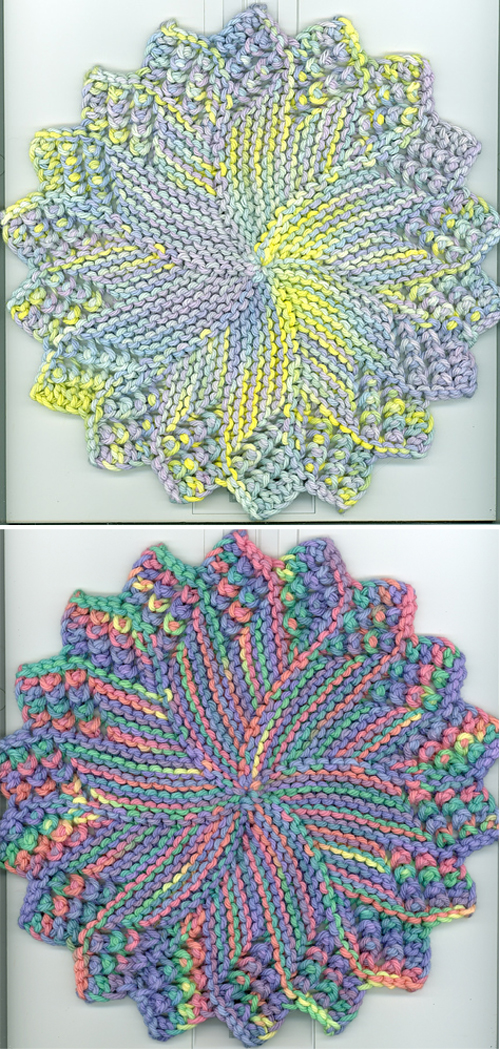
Sunburst Dishcloth - Free Pattern

Sunburst Dishcloth - Free Pattern
Photos above ©  Sara H. Baldwin
What beautiful knitting dishcloth pattern! I found it on Ravelry.
Sara H. Baldwin: "This is a variation of Amy Carpenter’s Round Dishcloth. I tightened up the gauge to make it more durable and reduced the number of stitches to 18 to make it smaller. I also added a slip stitch edge and some extra yarn overs for decoration."

Download Pattern: Sunburst Dishcloth

Copycat Cowl Free Knitting Pattern by Verna Glass

Copycat Cowl free knitting pattern by Verna Glass
Photos © Verna Glass

Looking for an easy cowl knitting pattern with beautiful texture and a relaxed, cozy fit? The Copycat Cowl by Verna Glass is a lovely free knitting pattern worked in the round with simple knit and purl stitches and gentle increases that create a softly draped shape.

This cozy neck warmer is a practical cold-weather project and a good choice for knitters who enjoy straightforward circular knitting without complicated stitch patterns.

Copycat Cowl Pattern at a Glance

Designer: Verna Glass

Pattern: Copycat Cowl

Craft: Knitting

Category: Cowl / Neckwear

Yarn Weight: Worsted

Yardage: Approximately 219 yards (200 m)

Needles: US 8 (5 mm) and US 7 (4.5 mm)

Construction: Worked in the round, top down

Size: One size

Pattern Language: English

Why We Like the Copycat Cowl

The Copycat Cowl combines simple knitting with a polished finished look. Bands of knit and purl texture create subtle horizontal detail, while gentle increases toward the lower portion help the fabric sit comfortably around the neck and shoulders.

Because it uses worsted-weight yarn and uncomplicated stitches, it can be a satisfying project when you want to knit a useful cold-weather accessory without committing to a large garment.

Yarn and Needle Notes

The original pattern calls for approximately 219 yards (200 m) of worsted-weight yarn. For a cowl worn directly around the neck, consider choosing a soft yarn with comfortable drape.

The pattern lists US 8 (5 mm) and US 7 (4.5 mm) needles.

Before You Start

The designer includes a useful note for the Chinese Waitress Cast On: the slip knot is not counted as a stitch and is dropped before joining the work in the round.

The pattern page also notes that knitters should use the updated Version 2 of the pattern.

Get the Free Copycat Cowl Pattern

The Copycat Cowl was designed by Verna Glass. Amazing Knitting does not reproduce the designer's instructions. Visit the original pattern page below to access the current free version.

Pattern and photos © Verna Glass. Linked to the original designer's pattern page.

How to knit the Slip Stitch Rib - Free Pattern & Tutorial

How to knit the Slip Stitch Rib - Free Pattern & Tutorial
Photos above © Sowoolly
What beautiful stitch knitting pattern! I found it on Pinterest...
An elegant variant of the well-known Rib stitch, the Slip Stitch Rib is perfect for scarves, cowls, bags, blankets, and many other projects...

Full Post: Slip Stitch Rib

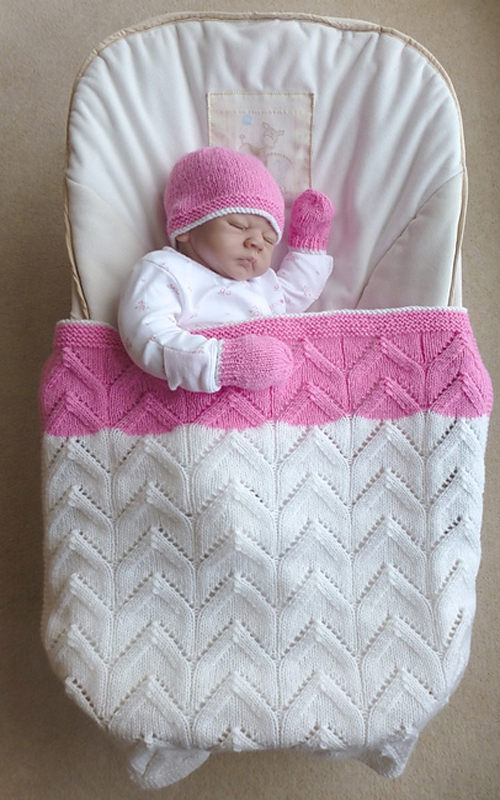
Arches Baby Blanket Free Knitting Pattern

Arches Baby Blanket free knitting pattern by LJM Designs

Arches Baby Blanket designed by © LJM Designs

Arches Baby Blanket by LJM Designs is a free lace baby blanket knitting pattern featuring an elegant repeating zigzag design. Even better, the pattern also includes instructions for a matching baby hat and mittens, making it a lovely handmade gift set for a new baby.

The blanket is knitted flat in one piece using DK-weight yarn. Its repeating lace motif creates the distinctive arches while the simple border gives the finished blanket a neat frame.

Arches Baby Blanket Pattern Details

  • Designer: LJM Designs
  • Craft: Knitting
  • Category: Baby blanket
  • Pattern availability: Free download
  • Yarn weight: DK
  • Blanket needles: 4 mm (US 6)
  • Hat and mitten needles: 3.25 mm (US 3) and 4 mm (US 6)
  • Gauge: 22 stitches and 30 rows = 4 inches
  • Suggested yardage: 793–820 yards (725–750 m)
  • Blanket size: Approximately 85 × 73 cm after blocking
  • Construction: Worked flat in one piece
  • Language: English

A Beautiful Zigzag Lace Baby Blanket

The defining feature of the Arches Baby Blanket is its repeating lace pattern. The combination of increases and decreases produces graceful zigzag arches across the fabric, giving the blanket plenty of texture without requiring separate knitted panels.

The lace motif uses a 16-stitch and 16-row repeat. Once you become familiar with the repetition, the developing arches make it easier to see how the design is progressing.

Yarn and Needles

The pattern is designed for DK-weight yarn. Several DK yarns are suitable for the original specifications, giving you plenty of flexibility when choosing a soft, washable yarn for a baby project.

The blanket uses 4 mm (US 6) needles. The complete set requires approximately 725–750 m (793–820 yards) of DK yarn.

Blanket, Hat and Mittens in One Free Pattern

One of the nicest features of this pattern is that the download is not limited to the blanket. LJM Designs also includes instructions for a simple matching baby hat and mittens.

The hat and mittens are sized for an average baby up to approximately three months old and can be worked either flat or in the round.

Can You Change the Blanket Size?

Yes. The designer notes that the Arches Baby Blanket can be adapted by adding or subtracting stitches and pattern repeats. This makes the design useful if you want a different finished size.

Changing the dimensions or yarn weight will also change the amount of yarn required, so plan additional yardage if you decide to make a larger blanket.

Skills Used in the Pattern

In addition to basic knit and purl stitches, the lace design uses common increases and decreases such as yarn overs, knit-two-together and slip-slip-knit. The instructions are written line by line.

Blocking is an important finishing step for this project because it helps open the lace and show the repeating arches more clearly.

Get the Free Arches Baby Blanket Pattern

The complete Arches Baby Blanket pattern by LJM Designs, including the matching baby hat and mittens, is currently available as a free download from the designer's pattern store.

Get the Free Arches Baby Blanket Pattern

Pattern availability was checked when this article was updated. Availability on external websites may change over time.

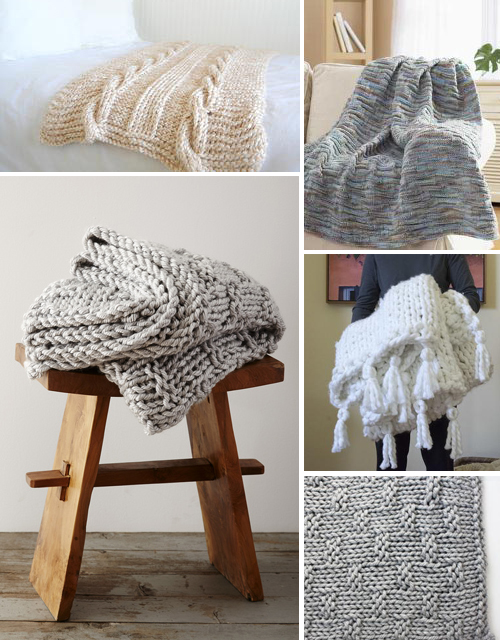
Extra Chunky Gratitude Blanket - Free Knitting Pattern

Extra Chunky Gratitude Blanket
Free knitting patterns for chunky blankets

Extra Chunky Gratitude Blanket is a wonderfully thick and cozy knit designed for cold winter days.

Worked with jumbo yarn and extra-large needles, this blanket combines simple knit and purl stitches to create a bold woven texture. The original pattern is still available free online.

✓ Free Pattern Available

This original Spinrite/Bernat chunky blanket pattern is still available free online through FaveCrafts.

Pattern at a Glance

Pattern: Extra Chunky Gratitude Blanket

Original Source: Spinrite / Bernat

Project: Knitted Throw

Finished Size: Approx. 45 × 57 in (114.5 × 144.5 cm)

Yarn Weight: Jumbo #7

Original Yarn: Bernat Mega Bulky

Needles: US 35 / 19 mm circular needle

Gauge: 5 sts × 7 rows = 4 in (10 cm)

Availability: Free online pattern

Big Yarn, Bold Texture

The main attraction of this blanket is its oversized texture. Jumbo yarn makes the knit and purl pattern highly visible while also creating a thick, warm fabric.

The original design uses Bernat Mega Bulky with a large 19 mm circular needle. The circular needle is used to comfortably hold the width of the blanket while the project itself is worked flat.

Before Choosing a Substitute Yarn

Bernat Mega Bulky is an unusually thick yarn, so don't substitute another yarn based only on the word “bulky.”

Look for a true Jumbo #7 yarn and make a gauge swatch if you want to stay close to the original 45 × 57 inch finished size.

Get the Free Pattern

FaveCrafts currently provides the complete Extra Chunky Gratitude Blanket pattern online, including materials, gauge and knitting instructions.

Get the Free Extra Chunky Blanket Pattern →

More Free Blanket Patterns

Pattern credit: Extra Chunky Gratitude Blanket was originally published by Spinrite/Bernat. Amazing Knitting provides this independent project guide and links to the authorized pattern source rather than reproducing the complete knitting instructions.

How to Start Knitting - 5 Easy Steps for Beginners

How to Knit: Get Started Knitting
Photo above © Faithful Provisions - Kelly Hancock

Want to learn how to knit but don't know where to begin? You only need a few basic skills to get started.

Follow these five beginner steps in order, and use the linked tutorials whenever you need a closer look at a technique.

What You Need to Start Knitting

You don't need a large collection of supplies for your first practice piece. Start with:

  • A pair of knitting needles
  • A ball of yarn
  • Scissors
  • A yarn needle for finishing

For your first practice swatch, choose a yarn that is easy to see and comfortable to handle rather than a very fuzzy or highly textured yarn.

1. Make a Slip Knot

A slip knot is a simple way to place your first loop of yarn onto the knitting needle.

Once you can make one comfortably, you're ready to cast on the rest of your stitches.

Learn How to Make a Slip Knot →

2. Cast On Your Stitches

Casting on creates the first set of stitches on your needle and forms the starting edge of your knitting.

There are many cast-on methods, so don't worry about learning them all at once. Begin with one simple method and practice until it feels comfortable.

Learn How to Cast On →

3. Learn the Knit Stitch

The knit stitch is the most important basic knitting stitch to learn.

If you knit every row of a flat piece, you create garter stitch — one of the easiest fabrics for a beginner to practice.

Learn the Knit Stitch →

4. Learn the Purl Stitch

Purl is the second fundamental knitting stitch.

Once you understand both knit and purl stitches, you can begin creating many familiar stitch patterns, including stockinette, ribbing, seed stitch and more.

Learn the Purl Stitch →

5. Bind Off

When your knitting reaches the desired length, binding off secures the final row and allows you to remove the finished piece from the needles.

Try not to bind off too tightly, as this can make the finished edge noticeably narrower than the rest of your knitting.

Learn How to Bind Off →

Your first practice project: Cast on a small number of stitches, knit every row until you have a small square, then bind off. Don't worry about perfect tension yet — the goal is simply to become comfortable making stitches.

Ready for Your First Knitting Project?

Once you can cast on, make the knit stitch and bind off, you already have enough skills to try a simple garter-stitch project.

After that, learn the purl stitch and gradually explore ribbing, stockinette and other easy stitch patterns.

More Beginner Knitting Help

Editorial note: This is an original Amazing Knitting beginner guide. The external links above lead to additional educational tutorials for individual knitting techniques.

Sampler Block Throw - Free Knitting Pattern

Sampler Block Throw - Free Pattern
Design by © Cathy Payson

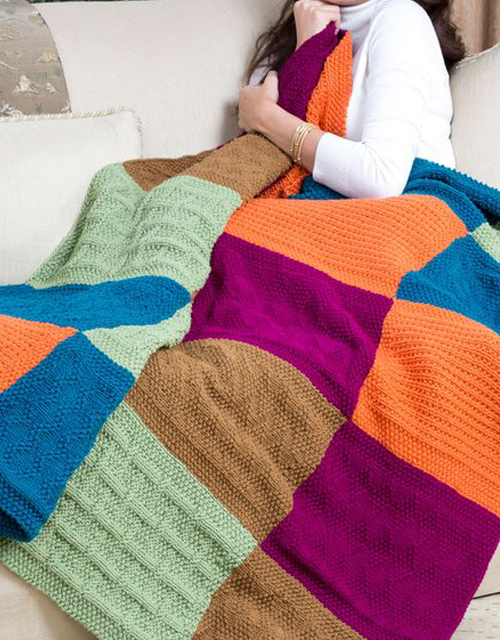
Sampler Block Throw by Cathy Payson is a colorful knitted blanket that lets you practice several different stitch patterns while creating one cozy finished project.

The original Red Heart pattern is still available as a free official download from Yarnspirations.

✓ Free Pattern Available

The original Red Heart Sampler Block Throw pattern is currently available as a free download from Yarnspirations. Some of the original yarn shades may have been discontinued, but the knitting pattern itself remains available.

Pattern at a Glance

Pattern: Sampler Block Throw

Designer: Cathy Payson

Brand: Red Heart / Yarnspirations

Craft: Knitting

Skill Level: Easy

Finished Size: 50 × 60 in (127 × 152.5 cm)

Yarn Weight: Aran

Availability: Free official download

A Blanket That Lets You Practice New Stitches

The fun of a sampler blanket is that you do not spend the entire project repeating one stitch pattern.

Sampler Block Throw combines several textured designs, including Moss Diamonds, Broken Rib, Zigzag Moss, Square Lattice and Vertical Zigzag.

The blocks are arranged into panels and then joined to create the finished throw. This also makes the project convenient to work on in smaller sections instead of carrying an entire blanket on your needles.

Written Instructions and Charts

Another useful feature of the original pattern is that the stitch patterns are provided in both written and charted form.

This makes the project a nice opportunity to practice reading knitting charts while still having written instructions available for reference.

Choosing Yarn

The original design uses Red Heart With Love yarn. Some original shades associated with the pattern may no longer be available, but that does not prevent you from knitting the throw.

Choose a compatible yarn and make a gauge swatch before beginning, especially if you want to reproduce the original 50 × 60 inch finished size.

Get the Free Sampler Block Throw Pattern

Yarnspirations currently provides the complete original Red Heart pattern as a free download with no sign-up required.

Get the Free Sampler Block Throw Pattern →

More Free Knitted Blankets

Pattern credit: Sampler Block Throw was designed by Cathy Payson for Red Heart. Amazing Knitting provides this independent project guide and links to the authorized free pattern rather than reproducing the complete knitting instructions.

5 Easy Ways to Make Neater Knitting Edges

Five Genius Knitting Edges You'll Definitely Want to Get to Know Better
Photo above © bluprint

Neat knitting edges can make a simple project look much more polished. The best selvedge depends on whether the edge will stay visible, be seamed later, or be used for picking up stitches.

Here are five useful knitting edges to try, with links to detailed tutorials for each technique.

1. Basic Slip-Stitch Selvedge

A slipped-stitch selvedge creates a clean, chain-like line along the side of the fabric. It is a useful choice when the edge will remain visible, such as on scarves, shawls and open-front pieces.

The basic idea is to slip an edge stitch instead of working it on every row, producing a smoother and more defined side edge.

Learn the Basic Slip-Stitch Selvedge →

2. German Slip-Stitch Selvedge

The German slip-stitch selvedge creates a similarly tidy edge, but the slipped stitch is worked at the end of the row rather than at the beginning.

This small change produces a distinctive edge and is worth trying if you want an alternative to the more familiar slipped-first-stitch method.

Learn the German Slip-Stitch Selvedge →

3. Garter Stitch Selvedge

A garter stitch selvedge is one of the simplest ways to create a stable edge.

It works especially well beside textured stitch patterns such as garter stitch, seed stitch and moss stitch, and it can also provide a useful edge when stitches will later be picked up.

Learn the Garter Stitch Selvedge →

4. Chain Selvedge

The chain selvedge creates a decorative row of elongated stitches along the side of the knitting.

It is especially attractive on scarves, shawls and other projects where the edge remains visible. It can also be useful when picking up stitches for a border.

It is not always the best choice for a seam, however, because the larger edge stitches can create a looser join.

Learn the Chain Selvedge at Interweave →

5. Reverse Garter Stitch Selvedge

Reverse garter stitch is a simple variation of the regular garter selvedge.

Instead of knitting the edge stitches, the edge is formed with purl stitches. The result behaves in a similar way while giving the edge a slightly different texture.

This is a useful option when a purl-textured edge blends more naturally with the stitch pattern in the rest of your project.

Learn the Reverse Garter Selvedge →

Which edge should you choose? Use a decorative chain or slipped-stitch edge when the side will remain visible. For edges that will be seamed or used to pick up stitches, consider a firmer selvedge that makes the next construction step easier.

More Knitting Tips

Editorial note: This Amazing Knitting guide introduces several common selvedge techniques and links to external educational tutorials for further instruction. Different knitting traditions may use slightly different variations of the same edge.

Triple Slip Rib Square - Free Loom Knitting Pattern

Triple Slip Rib Square - Free Pattern
Photos above © Bethany A Dailey

Triple Slip Rib Square by Bethany A Dailey is a textured loom-knitting square from the Knitting Board Stitchology series.

The design uses slipped stitches and ribbed texture to create long, alternating raised lines with a rustic woven appearance.

Best of all, the original pattern is still available free, making this an excellent small project for practicing textured loom knitting before using the stitch in a larger scarf, cowl or blanket.

✓ Free Loom Knitting Pattern

Triple Slip Rib Square: Stitchology 17 by Bethany A Dailey remains available as a free loom-knitting pattern. This is a loom knitting project, not a traditional two-needle knitting pattern.

Triple Slip Rib Square at a Glance

Pattern: Triple Slip Rib Square: Stitchology 17

Designer: Bethany A Dailey

Series: Stitchology

Publisher: Knitting Board Blog

Published: January 2016

Craft: Loom Knitting

Project: Afghan Block / Stitch Square

Finished Size: Approx. 8 × 8 in / 20 × 20 cm

Yarn Weight: Worsted

Yardage: Approx. 75 yd / 69 m

Original Sample Yarn: Berroco Vintage

Stitch Repeat: 8 rows

Availability: Free

Important: This Is a Loom Knitting Pattern

Before You Begin

Triple Slip Rib Square was specifically designed for loom knitting. The original instructions refer to loom pegs and loom-knitting techniques rather than conventional knitting needles.

This distinction matters because the words "knitting pattern" are often used for both loom knitting and needle knitting.

If you normally knit with two needles or circular needles, do not assume that conventional needle-knitting instructions can be substituted directly for the original loom pattern.

About the Stitchology Series

Triple Slip Rib is part of the Stitchology collection published through the Knitting Board Blog.

The series explores different stitch patterns that can be created on a knitting loom, often presenting them as small squares.

These squares allow loom knitters to learn a texture on a manageable project before adapting the idea to larger pieces.

What Does Triple Slip Rib Look Like?

The finished fabric features long alternating raised lines that create a strong vertical and horizontal rhythm.

Bethany A Dailey describes the appearance as resembling a rustic weave.

The slipped-stitch structure also creates a relatively thick and sturdy panel.

An 8-Row Repeat

One of the attractive features of Triple Slip Rib is that the texture is based on a relatively short:

8-row repeat

Once the sequence becomes familiar, the repetitive structure can make the stitch easier to remember than textures with very long row repeats.

Use the designer's original instructions for the exact peg-by-peg sequence.

Finished Square Size

The Stitchology sample is designed to produce an approximately:

8 × 8 inch square

approximately 20 × 20 cm

This makes it useful as a practice swatch, sampler square or building block for a larger afghan.

Original Yarn

The published sample uses Berroco Vintage, a worsted-weight yarn.

The original square requires approximately:

75 yards / 69 meters

You do not necessarily need to use the exact sample yarn, but a worsted-weight yarn with good stitch definition will help the slipped texture remain visible.

Choosing a Substitute Yarn

When choosing another worsted-weight yarn, consider:

  • Stitch definition
  • Fiber elasticity
  • Finished fabric thickness
  • Washability
  • Whether the yarn suits your final project

A smooth yarn will generally display the long slipped-stitch lines more clearly than a very fuzzy or highly textured yarn.

Solid Colors Work Especially Well

The Triple Slip Rib texture creates much of its visual interest through light and shadow.

A solid or gently tonal yarn allows those raised and recessed areas to remain easy to see.

Variegated yarn can also work, but strong color changes may compete with the stitch structure.

Original Loom Setup

The designer's sample was created using an Authentic Knitting Board Adjustable Hat Loom configured with rounded pieces and peg connectors for approximately a 3/8-inch gauge.

The designer also identifies the Sock Loom 2 and All-n-One Loom as possible loom options.

Check the current original instructions before setting up your loom, because peg spacing and configuration affect the finished dimensions.

Tools and Notions

In addition to the loom and yarn, the original project calls for basic loom-knitting tools such as:

  • Loom tool
  • Yarn needle
  • Scissors

Helpful optional tools include:

  • Peg markers
  • Row counter
  • Blocking pins

Why a Row Counter Helps

An eight-row repeat is not especially long, but keeping track of your position is important because the alternating slipped sections create the overall woven effect.

A simple row counter can prevent accidentally repeating or skipping part of the sequence.

Use Peg Markers While Learning

Peg markers can help identify repeating sections while you are becoming familiar with the pattern.

As the stitch becomes easier to recognize visually, you may find that you need fewer reminders.

Understanding Slipped Stitches

A slipped stitch is carried without being worked in the same way as its neighboring stitches.

Repeating this strategically allows elongated strands and raised areas to develop in the fabric.

In Triple Slip Rib, those effects contribute to the distinctive long dash-like texture.

A Thick and Sturdy Fabric

The designer specifically notes that Triple Slip Rib creates a fairly thick and sturdy panel.

That characteristic makes it useful for projects where you want more substance than a lightweight open stitch.

More Than an Afghan Square

Although Stitchology presents the pattern as an 8-inch square, the texture can inspire larger projects.

The designer suggests it would work particularly well for:

  • Cowls
  • Scarves
  • Blankets
  • Sampler afghans

Using Triple Slip Rib for a Scarf

The long linear texture can create a strong visual effect when repeated along the length of a scarf.

Before adapting the square, make a sample first so you can evaluate the fabric thickness, drape and reverse side.

Using It for a Cowl

A thick slipped-stitch texture can be particularly suitable for a warm cowl.

However, adapting a flat Stitchology square into a different construction may require changes to the setup and finishing.

Do not assume that the square instructions automatically become an in-the-round cowl pattern.

Using the Squares for a Blanket

The original 8-inch format naturally lends itself to sampler blankets.

You can create multiple loom-knit squares and join them later, or combine Triple Slip Rib with other Stitchology textures for a varied afghan.

Before making many squares, check your first finished and blocked square to make sure its dimensions work with the rest of your project.

Blocking the Square

Blocking can help even the edges and bring a sample closer to its intended dimensions.

Choose a blocking method suitable for the fiber content of your yarn.

Avoid stretching so aggressively that the raised slipped-stitch texture becomes flattened.

Is Triple Slip Rib Beginner Friendly?

It can be a good next project for someone who already understands the basic operation of a knitting loom.

The eight-row repeat is relatively manageable, and the designer describes it as a stitch that does not require excessive tricky finger work.

A complete first-time loom knitter may want to practice basic loom knitting and yarn handling before beginning the square.

Skills You Will Practice

  • Loom setup
  • Working across loom pegs
  • Slipped-stitch texture
  • Following an 8-row repeat
  • Maintaining even tension
  • Binding off
  • Finishing and blocking a square

Keep Your Tension Consistent

Slipped-stitch patterns can exaggerate differences in tension.

Avoid pulling the working yarn excessively tight across the slipped areas, because this can distort the square or make the fabric less flexible.

Consistent yarn handling becomes easier as you repeat the sequence.

Don't Confuse Loom and Needle Instructions

Important

Triple slip rib can also describe textures used in conventional needle knitting. The specific project featured here is Bethany A Dailey's Triple Slip Rib Square: Stitchology 17 and was designed for a knitting loom. Do not combine its specifications with unrelated needle-knitting patterns that happen to use a similar stitch name.

Is Triple Slip Rib Square Still Free?

Yes.

Triple Slip Rib Square: Stitchology 17 is currently documented as a free loom-knitting pattern from the Knitting Board Stitchology series.

Amazing Knitting provides this independent project guide rather than reproducing the designer's complete peg-by-peg instructions.

Get the Free Triple Slip Rib Square Pattern

Visit the original Knitting Board Stitchology resource for the complete loom-knitting instructions:

Get the Free Triple Slip Rib Square Pattern →

Pattern Record on Ravelry

Ravelry also maintains the pattern record with project specifications and designer information:

View Triple Slip Rib Square on Ravelry →

More Stitch Guides on Amazing Knitting

Explore More Knitting Techniques

Before You Begin

Make sure you are following the loom-knitting version of Triple Slip Rib, select an appropriate worsted-weight yarn, and configure your loom according to the designer's current instructions.

Use markers and a row counter if helpful while learning the eight-row sequence, and pay particular attention to maintaining relaxed, consistent tension across the slipped sections.

Once you are comfortable with the square, the same texture can become a useful starting point for larger loom-knitting projects.

Pattern credit: Triple Slip Rib Square: Stitchology 17 was designed by Bethany A Dailey and published through the Knitting Board Stitchology series. Amazing Knitting provides an independent editorial guide and does not reproduce the complete copyrighted pattern instructions. Preserve the existing photograph and its exact original credit from the current Amazing Knitting page.

Mini Modern Mocs - Children's Knitted Slippers Pattern Guide

Mini Modern Mocs - Knitting Pattern
Photo above © Bekah Knits

Mini Modern Mocs by Bekah Knits are cozy knitted moccasin-style slippers designed for children.

The design combines a fold-down cuff, a thick double-knit sole and a simple crocheted border to create slippers that look more structured than ordinary knitted socks.

If this design brought you to Amazing Knitting, this guide will help you understand the original pattern, choose the correct size and yarn, and find the designer's current official listing.

The original Mini Modern Mocs pattern is still available, but it is currently sold as a paid pattern.

Pattern Availability

Mini Modern Mocs by Bekah Knits is currently available as a paid knitting pattern. The individual pattern is listed at $6.99 USD on Ravelry. It is also included in the designer's Modern Mocs collection.

Mini Modern Mocs at a Glance

Pattern: Mini Modern Mocs

Designer: Bekah Knits

Published: November 2018

Category: Children's Slippers

Sizes: XS, S, M, L

Approx. Ages: 2–4, 4–6, 6–9, 9–12 years

Yarn Weight: Aran / thick Aran

Needles: US 6 / 4 mm

Crochet Hook: 5 mm / H

Main Gauge: 5 sts × 6 rows = 1 in in stockinette

Availability: Paid pattern

About Mini Modern Mocs

Mini Modern Mocs are part of Bekah Knits' wider Modern Mocs family.

The collection includes versions for babies, children and adults, all built around the same general idea: knitted moccasin-style slippers with a structured sole and comfortable cuff.

This particular version is sized for older toddlers and children.

Children's Sizes

The pattern includes four sizes:

  • XS: approximately 2–4 years
  • S: approximately 4–6 years
  • M: approximately 6–9 years
  • L: approximately 9–12 years

The listed foot lengths are approximately:

  • 6 in
  • 7.25 in
  • 8 in
  • 8.75 in

Measuring the child's foot is more reliable than choosing only by age, because children's foot size can vary considerably.

Yarn

The original pattern was designed around Knit Picks Simply Wool in a thickness that behaves more like a thick Aran-weight yarn.

The designer specifically warns against substituting with anything thinner than Aran weight because the slippers need a dense, substantial fabric.

Approximate Yardage

Total yardage varies by size and color placement.

The pattern uses two colors, with published requirements ranging roughly from:

  • Main color: 85–160 yd
  • Contrast color: 50–95 yd

Always check the current official pattern before purchasing yarn because exact requirements depend on the size you are making.

Needles and Hook

The pattern uses:

  • US 6 / 4 mm circular needle
  • US 6 / 4 mm DPNs
  • US 6 / 4 mm straight needles as an optional tool
  • 5 mm / H crochet hook

The designer recommends the Magic Loop method for much of the construction.

Gauge Is Especially Important

The published stockinette gauge is:

5 stitches × 6 rows = 1 inch

The designer stresses that gauge is extremely important because stitch and row counts are exact throughout the slipper construction.

On footwear, even a small gauge difference can noticeably change the final fit.

The Double-Knit Sole

One of the most distinctive features of Mini Modern Mocs is the thick double-knit sole.

The designer clarifies that this uses a double knit stitch technique, not conventional double knitting with two separate layers of colorwork.

The result is a dense, cushioned sole that gives the slippers a more substantial feel.

Crocheted Border Around the Sole

A simple crochet chain border is worked around the sole.

This detail adds both structure and visual definition.

No previous crochet experience is required because the pattern includes instructions for the border.

Fold-Down Cuff

The cuff can be folded down for a relaxed moccasin look.

This small design feature gives the slippers much of their recognizable style and helps distinguish them from ordinary knitted booties.

Construction Skills

The pattern uses several techniques that make it more appropriate for an intermediate knitter than a complete beginner.

  • Working in the round
  • Magic Loop
  • Picking up stitches
  • German Short Rows
  • Double-knit stitch
  • Crochet edging
  • Working small circumferences

German Short Rows

German Short Rows are used to create shaping without working every stitch in every row.

The pattern includes instructions for this technique, so you do not need to already be an expert.

However, practicing the method on a small swatch before beginning the slipper can make the main project easier to follow.

Magic Loop

The designer recommends Magic Loop, which allows small circumferences to be knitted using one long circular needle.

This method is often easier than managing several DPNs for knitters who already feel comfortable using circular needles.

Can You Use DPNs Instead?

The materials list also includes double-pointed needles.

Follow the construction notes in the official pattern and use the method that works best for you while maintaining the intended gauge.

Why Dense Fabric Matters

Slippers experience more abrasion and pressure than scarves or hats.

A fabric that is too loose may stretch excessively and provide less structure underfoot.

This is why the designer recommends a substantial Aran-type yarn and warns against going too thin when substituting.

Optional Fabric Paint for the Soles

The pattern materials mention fabric paint as an optional addition for the soles.

This can be used to add grip, but any product used on children's slippers should be appropriate for fabric and fully cured according to the manufacturer's instructions.

Slipper Safety

Safety Note

Knitted slippers can be slippery on smooth floors. Consider adding a suitable non-slip treatment to the sole and supervise younger children, especially on stairs or polished flooring.

Is Mini Modern Mocs Beginner Friendly?

It is not the simplest first knitting project.

The individual techniques are manageable, but the pattern combines several skills: shaping, small-circumference knitting, stitch pickup, short rows, double-knit sole work and a crochet border.

An adventurous knitter who has already completed hats, socks or simple slippers should find the project much more approachable.

Why Fit Matters More Than Age

The age ranges are only approximate.

Always measure the intended wearer's foot from heel to longest toe before selecting a size.

Slippers that are too long may slide around, while slippers that are too small can distort the sole and feel uncomfortable.

Make a Gauge Swatch First

This is one project where skipping the swatch is particularly risky.

A small difference in stitches per inch affects the finished foot length and width much more noticeably than it would in a scarf.

Wash and dry the swatch as you intend to care for the finished slippers.

About the Modern Mocs Collection

Mini Modern Mocs are one part of a three-pattern family collection.

The collection also includes:

  • Baby Modern Mocs
  • Mini Modern Mocs
  • Modern Mocs for adults

The complete collection is sold separately and may be useful if you want to make matching slippers for several age groups.

Is Mini Modern Mocs Still Available?

Yes.

The original Bekah Knits pattern remains available through Ravelry.

However, it is currently a paid pattern, not a free download.

The individual Mini Modern Mocs pattern is currently listed at $6.99 USD.

View the Official Mini Modern Mocs Pattern

Visit the current Ravelry listing for the designer's complete pattern, sizing and purchase options:

View Mini Modern Mocs Pattern →

Looking for a Free Alternative?

If you like small knitted footwear but prefer a project that is currently free, Amazing Knitting already has several verified options:

Before You Begin

Measure the child's foot, choose the appropriate size, and make a gauge swatch before casting on.

Select a dense Aran-weight yarn rather than a lightweight substitute, and make sure you are comfortable with working small circumferences.

Use the official Bekah Knits pattern for the complete step-by-step instructions, particularly for the short-row shaping, double-knit sole and crochet edging.

Pattern credit: Mini Modern Mocs was designed by Bekah Knits and published in 2018. Amazing Knitting provides an independent editorial project guide and does not reproduce the designer's complete copyrighted instructions. Preserve the original photo and its existing credit from the previous Amazing Knitting page.

Discover More From the Archive

A fresh mix of knitting patterns and tutorials from the Amazing Knitting archive.

Finding patterns from the archive…