Skip to content

...

Showing posts sorted by date for query rib stitch. Sort by relevance Show all posts

How To Make Rib Stitch Neater - Tutorial

How To Make Rib Stitch Neater - Tutorial
Photos above © Button and Blue

Does your knitting ribbing sometimes look loose, uneven, or less defined than you would like? One simple technique worth trying is twisted rib stitch.

Twisted rib is a variation of ordinary ribbing in which selected stitches are worked through the back loop. This small change twists the stitch and can create sharper, more clearly defined columns — especially around cuffs, sweater hems, neckbands, and hat brims.

Twisted Rib Stitch at a Glance

Technique: Twisted Rib Stitch

Craft: Knitting

Skill Level: Beginner / Easy

Based on: Knit and purl ribbing

Main Technique: Working stitches through the back loop

Best For: Cuffs, hems, neckbands and hat brims

Result: Firm, clearly defined rib columns

Why Does Regular Ribbing Sometimes Look Uneven?

Ribbing looks simple because it is built from basic knit and purl stitches, but achieving perfectly even rib columns can take practice.

One common trouble spot occurs when the working yarn moves between a knit stitch and a purl stitch. That transition can introduce a little extra yarn between stitches, making one side of a rib column appear looser than the other.

Differences between your knit and purl tension can make the effect even more noticeable, particularly in 1x1 and 2x2 ribbing.

What Is Twisted Rib Stitch?

Twisted rib is a variation of standard ribbing. Instead of working every stitch in the usual way, one or more stitches are worked through the back loop.

Working through the back loop changes the orientation of the stitch and creates the characteristic twisted appearance.

On the finished fabric, the knit columns can look narrower and more sharply defined than they do in ordinary ribbing.

How to Knit a Twisted Knit Stitch

The abbreviation ktbl means knit through the back loop.

  1. Keep the working yarn behind your knitting.
  2. Insert the right needle into the back of the next stitch on the left needle.
  3. Wrap the working yarn around the right needle.
  4. Pull the new loop through the stitch.
  5. Slide the old stitch off the left needle.

Unlike an ordinary knit stitch, working through the back loop twists the base of the stitch.

How to Purl Through the Back Loop

You may also encounter the abbreviation ptbl, meaning purl through the back loop.

  1. Bring the working yarn to the front.
  2. Approach the back loop of the next stitch with the right needle.
  3. Wrap the yarn as required for a purl stitch.
  4. Draw the new loop through.
  5. Slide the completed stitch from the left needle.

Purling through the back loop can feel awkward at first. Work slowly until the needle movement becomes comfortable.

Simple 1x1 Twisted Rib

A common way to experiment with twisted rib is to replace the knit stitches in ordinary 1x1 ribbing with knit-through-the-back-loop stitches.

Simple twisted rib repeat:

*K1 tbl, P1; repeat from * across.

This produces twisted knit columns separated by ordinary purl stitches. Depending on the project, pattern, and desired appearance, other twisted-rib variations may twist both knit and purl stitches.

Twisted Rib vs. Regular Rib

Both techniques create vertical ribbing, but the finished fabrics are not identical.

Regular ribbing generally produces a soft, highly elastic fabric. It is the familiar choice for sweater cuffs, hems, neckbands, socks, and hats.

Twisted ribbing tends to create tighter-looking, more defined stitch columns. Because twisting changes the structure of the stitches, however, the fabric can behave differently from ordinary ribbing.

For that reason, twisted rib is not automatically a replacement for every ribbed section. The best choice depends on the look, stretch, and structure you want for the project.

Where Can You Use Twisted Rib?

Twisted rib can be an attractive choice anywhere you want a neat, structured ribbed edge, including:

  • Sweater cuffs
  • Sweater hems
  • Cardigan bands
  • Hat brims
  • Sock cuffs
  • Neckbands
  • Mittens
  • Decorative knitted panels

More Ways to Make Ribbing Look Neater

Twisted stitches are not the only solution for uneven ribbing. If your regular rib stitch still looks loose or irregular, try these simple adjustments:

  • Watch the knit-to-purl transition. Avoid leaving excess slack when moving the yarn.
  • Keep your tension consistent. Uneven knit and purl tension can exaggerate irregular columns.
  • Try smaller needles. Many patterns already use a smaller needle for ribbed cuffs and hems.
  • Experiment with your yarn. Fiber, twist, and elasticity can affect stitch definition.
  • Make a swatch. Compare regular and twisted rib before committing to an entire garment.

Should You Always Use Twisted Rib?

Not necessarily.

Twisting stitches changes more than their appearance. It can also change the elasticity, density, and overall behavior of the fabric.

If a knitting pattern specifically calls for ordinary ribbing, consider making a small swatch before substituting twisted rib. This is particularly important for fitted cuffs, necklines, socks, and other areas where stretch matters.

Practice Before Using It in a Project

The easiest way to understand the difference is to make two small swatches using the same yarn and needles.

Knit one in ordinary 1x1 rib and the other in twisted 1x1 rib. Compare the stitch definition, width, stretch, and overall appearance.

This simple experiment will show you whether twisted rib gives you the result you want for your next project.

Original Tutorial Inspiration

This Amazing Knitting article was originally published after discovering a twisted-rib tutorial from Button and Blue. The original photographs on this page are credited to Button and Blue.

The original external tutorial may no longer be consistently available online, so this page has been expanded with an independent Amazing Knitting explanation of the technique rather than reproducing the original author's tutorial.

More Knitting Stitch Tutorials

Continue learning with more knitting stitch tutorials, rib stitch ideas, and knitting stitches from the Amazing Knitting archive.

Boy Sweater - Knitting Pattern

Boy Sweater - Knitting Pattern
Photos above © milainemicoton

Looking for a stylish boy sweater knitting pattern with practical cold-weather details? Boy Sweater by Lisa Chemery is a seamless top-down pullover for babies and children, featuring a cozy shawl collar, buttoned neck opening, raglan shaping, and textured stitch details.

The close-fitting design is intended to sit comfortably under a jacket, while the shawl collar provides extra warmth around the neck — especially useful for children who do not enjoy wearing scarves.

Boy Sweater at a Glance

Pattern: Boy Sweater

Designer: Lisa Chemery

Craft: Knitting

Category: Baby & Child Pullover

Construction: Top-down and seamless

Yarn Weight: Worsted / DK

Needles: US 6 / 4.0 mm and US 8 / 5.0 mm

Main Gauge: 20 stitches × 30 rounds = 4 inches / 10 cm in stockinette

Yardage: Approximately 275–700 yards / 251–640 m

Sizes: 3 months to 8 years

Languages: English and French

Pattern Availability: Paid pattern

About the Boy Sweater

Designed by Lisa Chemery, Boy Sweater combines the practicality of a children's pullover with several details that give it a more polished look.

The most recognizable feature is the shawl collar, which wraps softly around the neck and is paired with a small buttoned opening.

Textured knitting and twisted-rib details add visual interest without turning the sweater into a heavily decorated garment, making the design suitable for both boys and girls.

Seamless Top-Down Construction

The sweater is knitted seamlessly from the top down. The upper section begins flat, after which stitches are added for the neck placket and the body continues in the round.

The sleeves are also worked in the round, reducing the amount of garment seaming required at the end.

Top-down construction has another practical advantage: it allows knitters to see the garment taking shape from the neckline toward the hem.

The Shawl Collar

The shawl collar is one of the defining features of this sweater. After the body is completed, stitches are picked up around the neckline and the collar is worked flat.

Short rows are used to create the characteristic shawl shape, and the lower edges of the collar are then attached to the sweater body.

Besides giving the sweater its classic appearance, the collar provides extra knitted fabric around the child's neck without requiring a separate scarf.

Baby and Child Sizes

The current pattern includes a particularly useful range of sizes:

  • 3 months
  • 6 months
  • 12 months
  • 18 months
  • 2 years
  • 4 years
  • 6 years
  • 8 years

The designer provides finished garment measurements as well as intended chest measurements, so check the original pattern carefully when deciding which size to knit.

Yarn Requirements

Boy Sweater is designed for approximately:

275–700 yards / 251–640 meters

The exact amount depends on size. The designer recommends a worsted-to-DK-weight merino or merino-blend yarn.

Suggested yarns listed with the pattern include Malabrigo Rios and several DK and worsted options.

Needles and Gauge

The pattern uses two main needle sizes:

  • US 6 / 4.0 mm
  • US 8 / 5.0 mm

The published stockinette gauge after blocking is:

20 stitches × 30 rounds = 4 inches / 10 cm

The textured portion has a separate row gauge, so use the designer's current pattern instructions when swatching and selecting needle sizes.

Knitting Skills Used

This project involves more than basic stockinette knitting. Techniques used in the design include:

  • Knitting and purling
  • Increasing and decreasing
  • Top-down raglan construction
  • Knitting in the round
  • Picking up stitches
  • Short rows
  • Twisted stitches
  • Textured stitch patterns
  • Buttonholes and finishing

The combination makes Boy Sweater an interesting project for knitters who already understand the basics and want to develop their garment-knitting skills.

Is the Boy Sweater Pattern Free?

No. Boy Sweater by Lisa Chemery is currently a paid knitting pattern.

The pattern is sold through the designer's Ravelry listing. Amazing Knitting does not reproduce the designer's copyrighted instructions.

Visit the original listing below for the current price, complete sizing, materials, and purchase information.

View the Original Boy Sweater Pattern →

Pattern credit: Boy Sweater was designed by Lisa Chemery. Pattern pricing, availability, sizing, and technical information are controlled by the designer and may change over time.

Prefer a Free Alternative?

If you love the cozy shawl-collar style but would prefer a free knitting pattern, Amazing Knitting has a similar baby and child project in our archive.

Double Breasted Jacket with Shawl Collar — Free Knitting Pattern

This is a different design — not a free copy of Boy Sweater — but it offers a similar cozy shawl-collar look for babies and children and is available as a free knitting pattern.

View the Free Shawl Collar Pattern →

You can also browse our free baby sweater patterns for more no-cost options.

More Baby and Child Sweaters

Explore more boy sweater knitting patterns, baby sweater knitting patterns, and children's sweater knitting patterns from the Amazing Knitting archive.

Before You Start

If you choose the original Boy Sweater, check Lisa Chemery's current Ravelry listing before purchasing yarn. Confirm your chosen size, yarn requirement, needle sizes, gauge, notions, and any current pattern updates before casting on.

Wainscot Scarf - Free Pattern

Wainscot Scarf - Free Pattern
The photo above © Ewe Ewe Yarns

What a beautiful knitting scarf(free knitting pattern)! Every row the same! Easy unisex scarf using a simple stitch pattern that you work in a one-row repeat of a garter rib variation. 7" wide x 68” long, Great for beginners or tv knitting. 

Download Pattern: Wainscot 

Easy 2 Row Repeat Graham Hat - Free Pattern

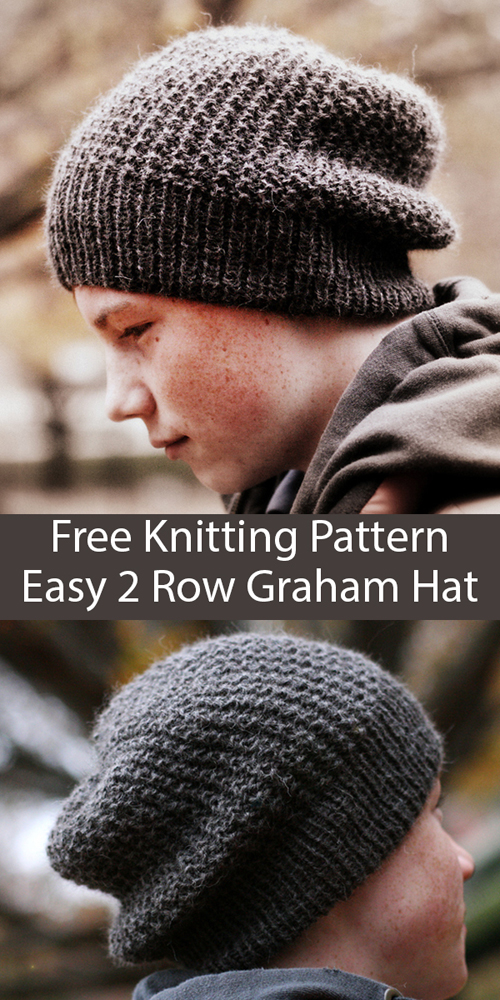
Easy 2 Row Repeat Graham Hat - Free Pattern
Photos above © NIK 2011

What beautiful  knitting hat (Free pattern)! I found it on Ravelry...

This is a simple slouch hat made for my son, and using a Broken Rib stitch. The hat is completely reversible and the crown decreases are worked seamlessly within the pattern.

Download Pattern: Graham Hat

Getting Warmer - Free Knitting Pattern

Getting Warmer - Free Knitting Pattern
Photos above © Espace Tricot
What beautiful knitting cowl (Free Pattern)! I found it on Ravelry...
Simple and stylish, GETTING WARMER is a light and cozy cowl worked from the bottom up, transitioning from easy 2×2 rib to garter stitch in the round with regular decreases. It can be pulled down over one or both shoulders and the neck will remain snug and close without gaping. Knit with three skeins of Woolfolk LUFT, a luscious and ultra-soft blend of merino and cotton.

Download Pattern: Getting Warmer 

Knit Brioche Stitch - Tutorial

Knit Brioche Stitch - Tutorial
The photo above © debrosse_nyc
What beautiful knitting stitch (free pattern)! I found it on Pinterest...
Brioche stitches go by lots of different names, such as Double Brioche, Waffle Brioche, and Syncopated Brioche. Fisherman's Rib is a similar stitch pattern that is sometimes called Brioche but isn't technically because it doesn't include slipped stitches and yarn overs (instead stitches are worked in the row below to give the distinctive, puffy look of Brioche).
It's a stitch pattern that intimidates some people, but it's pretty easy to work straight once you get the hang of it.

Full Post: Brioche Stitch 

How to knit the Slip Stitch Rib - Free Pattern & Tutorial

How to knit the Slip Stitch Rib - Free Pattern & Tutorial
Photos above © Sowoolly
What beautiful stitch knitting pattern! I found it on Pinterest...
An elegant variant of the well-known Rib stitch, the Slip Stitch Rib is perfect for scarves, cowls, bags, blankets, and many other projects...

Full Post: Slip Stitch Rib

Diagonal Rib Knit Stitch - Free Pattern

Diagonal Rib Knit Stitch - Free Pattern
Photos above © Studio Knit
What beautiful knitting stitch! I found it on Pinterest...
Looks like cables and perfect for beginning knitters. This simple Diagonal Rib knit stitch pattern is achieved with just an easy repeat of knits and purls. Get Free Knitting Pattern, Chart, Photos, and Video Tutorial.

Full Post: Diagonal Rib Stitch

Triple Slip Rib Square - Free Pattern

Triple Slip Rib Square - Free Pattern
Photos above © Bethany A Dailey
What amazing knitting stitch! I found it on Pinterest.
It’s time to work up a stitch on our looms that doesn’t take too much thinking or tricky finger-work to accomplish.  This stitch pattern is just the ticket!  It is a simple 8 row repeat, and once you get the hang of them, they can be worked entirely from memory.  The long alternating dashes resemble a nice rustic weave and result in a relatively thick and sturdy panel.  It would be a perfect stitch for a cowl or scarf or even an entire blanket!

Discover More From the Archive

A fresh mix of knitting patterns and tutorials from the Amazing Knitting archive.

Finding patterns from the archive…