Skip to content

...

Telemark Pullover - Free Knitting Pattern

Photos above © sarahka & © pseeds 

Looking for a classic free baby sweater knitting pattern? The Telemark Pullover by designer Erika Flory is a charming top-down baby sweater with simple construction and beautiful garter-stitch details.

The pattern features a garter stitch collar, front placket, and edging, giving this little pullover a timeless handmade look without making the design overly complicated. The original Telemark Pullover pattern is available as a free download from the designer on Ravelry.

Telemark Pullover Pattern at a Glance

Pattern: Telemark Pullover

Designer: Erika Flory

Craft: Knitting

Category: Baby Pullover / Sweater

Construction: Top-down pullover

Yarn Weight: Sport weight

Gauge: 20 stitches and 28 rows = 4 inches in stockinette stitch

Needle Size: US 5 / 3.75 mm

Yardage: Approximately 309–412 yards (283–377 m)

Free Sizes: 6, 12, and 18 months

Languages: English, German, and Italian

About the Telemark Pullover

The Telemark Pullover is a lovely choice for knitters who enjoy practical baby garments with classic details. It is worked from the top down, which makes it especially appealing for a small sweater project.

One of the prettiest features of the design is the use of garter stitch around the collar, front placket, and edging. These simple textured details give the sweater definition while keeping the overall look clean and traditional.

Because this is a baby pullover, it can also be a manageable project for knitters who want to practice garment construction on a smaller scale before moving on to larger sweaters.

Sizes Included in the Free Pattern

The original free Telemark Pullover pattern includes instructions for:

  • 6 months
  • 12 months
  • 18 months

The finished chest measurements listed by the designer are approximately 19, 20, and 21 inches for the three sizes when worked to the stated gauge.

Yarn and Gauge

The original pattern was designed for sport-weight yarn. The published gauge is:

20 stitches × 28 rows = 4 inches in stockinette stitch

The listed yardage is approximately 309–412 yards (283–377 meters), depending on the size you choose.

Checking your gauge before starting a garment is important because even a small difference in stitch size can noticeably change the finished measurements of a baby sweater.

Needles

The pattern lists US size 5 / 3.75 mm needles. The original pattern information also specifies circular needles for the body and double-pointed needles for working the sleeves in the round.

As always, use the needle size that allows you to obtain the pattern gauge rather than relying only on the suggested needle size.

Why We Like This Baby Sweater Pattern

Telemark has several qualities that make it an appealing baby knitting project: a simple pullover silhouette, top-down construction, subtle textured edging, and useful infant sizing.

The design is classic enough to work in many yarn colors, from soft neutrals and pastels to brighter shades. It would make a beautiful handmade baby gift or a practical addition to a little one's wardrobe.

Is the Telemark Pullover Pattern Free?

Yes. The original Telemark Pullover by Erika Flory is currently offered as a free Ravelry download in sizes 6, 12, and 18 months.

There is also a separate updated pattern called Telemark Pullover 2.0. That version includes a larger size range, from 3 months through 10 years, and is a separate paid pattern.

Get the Free Telemark Pullover Pattern

Amazing Knitting does not reproduce the designer's knitting instructions. Please visit the original pattern page to download the pattern and view the designer's complete instructions.

Get the Free Telemark Pullover Pattern →

Pattern credit: Telemark Pullover was designed by Erika Flory. Pattern availability, pricing, and pattern details are controlled by the designer and may change over time.

Before You Start

Before purchasing yarn, check the designer's original pattern page for the latest pattern information, downloads, updates, and any notes that may have been added since publication.

Lace Slippers - Free Knitting Pattern

Lace Slippers - Free Knitting Pattern
Photos above © Katerina Mushyn
What beautiful knitting lace slippers free pattern! I found it on Pinterest...
Slippers worked flat in one piece and seamed with a lace top. Video tutorials included with the pattern but it's in Russian. Designed by Katerina Mushyn. DK weight yarn. Available in English and Russian.

Full Post: Lace Slippers 

Easy Socks Two Needle – Free Flat Knit Sock Pattern


Easy Socks Two Needle free flat knitting pattern by Katerina Mushyn

Easy Socks Two Needle by Katerina Mushyn. Photos © Katerina Mushyn.

Easy Socks Two Needle by Katerina Mushyn is a clever free sock knitting pattern for anyone who wants to make cozy socks without double-pointed needles or knitting in the round.

Instead, each sock is worked flat on two straight needles as one simple piece, combining garter stitch with stretchy ribbing. The knitted piece is then folded and seamed to create the finished sock.

The original pattern includes adult shoe sizes 36 through 44 and is designed to be easy to resize. It uses Aran-weight yarn and 5 mm needles, making it a relatively quick sock project.

Best of all, Katerina Mushyn's original instructions are still available free on the Prjaga website, including an English version and accompanying video tutorial.

Easy Socks Two Needle at a Glance

  • Pattern: Easy Socks Two Needle
  • Designer: Katerina Mushyn
  • Published: November 2019
  • Category: Socks / cozy house socks
  • Construction: Worked flat on two needles
  • Shape: One-piece construction, then seamed
  • Yarn weight: Aran
  • Suggested yarn: Alize Superlana Midi
  • Yardage: Approximately 148–153 yd (135–140 m)
  • Needles: US 8 / 5 mm
  • Sizes: EU shoe sizes 36–44
  • Main stitches: Garter stitch and ribbing
  • Worked in the round: No
  • Double-pointed needles required: No
  • Languages: English and Russian
  • Video tutorial: Yes
  • Current availability: Free on the original Prjaga page

Socks You Can Knit on Two Straight Needles

Traditional sock knitting often involves double-pointed needles, magic loop or small circular needles.

Easy Socks Two Needle takes a completely different approach.

The sock begins as a flat piece of knitting. You work back and forth in rows using ordinary straight needles and create the shape through the arrangement of garter stitch and ribbing.

Once the knitting is finished, the piece is folded and sewn into its final sock shape.

A Beginner-Friendly Alternative to Knitting Socks in the Round

Many knitters like the idea of handmade socks but feel uncomfortable using several double-pointed needles at once.

This pattern removes that obstacle completely.

If you can knit flat pieces and sew a simple seam, you can explore sock construction without first learning circular sock knitting.

It can therefore be an interesting first sock project for a confident beginner.

One-Piece Flat Construction

One of the most interesting features of Katerina Mushyn's design is its one-piece construction.

You do not knit a separate sole, heel, toe and cuff and then assemble all of those pieces individually.

Instead, the shape develops in one flat knitted piece. After the knitting is complete, seaming transforms that piece into the recognizable sock.

This clever construction is also demonstrated in the designer's video tutorial.

Garter Stitch and Ribbing

The pattern combines two familiar knitting textures: garter stitch and ribbing.

Garter stitch creates a flexible fabric with distinctive horizontal ridges, while the ribbed section provides extra stretch.

The contrast between these textures also gives the socks their characteristic appearance.

Why Ribbing Works Well for Socks

Ribbing naturally contracts when relaxed and stretches when worn.

This elasticity is especially useful in socks because the knitted fabric needs to accommodate the foot while remaining comfortably in place.

The vertical ribbed texture also adds visual interest without requiring cables, lace or colorwork.

Aran-Weight Yarn Makes These a Quick Knit

Easy Socks Two Needle uses Aran-weight yarn, which is considerably thicker than traditional fingering-weight sock yarn.

Thicker yarn means fewer stitches are needed to build the fabric, so the project can progress relatively quickly.

The resulting socks are especially well suited to cozy indoor wear, lounging or wearing as warm house socks.

Original Yarn: Alize Superlana Midi

The original pattern uses Alize Superlana Midi.

This yarn is a blend of approximately 75% acrylic and 25% wool and has about 170 meters per 100 grams.

The combination provides warmth from the wool while retaining some of the practical characteristics of acrylic.

How Much Yarn Do You Need?

Published pattern information lists approximately 135–140 meters (148–153 yards).

That makes the socks a relatively small project compared with a sweater, blanket or shawl.

If substituting another yarn, compare yardage as well as ball weight. Two 100-gram yarns can contain very different lengths of yarn.

Choosing a Substitute Yarn

You do not have to use the exact original yarn.

Look for a suitable Aran-weight yarn that creates a comfortable, resilient fabric at approximately the required gauge.

For house socks, useful yarn qualities include:

  • Warmth
  • Comfort against the skin
  • Good elasticity
  • Reasonable durability
  • Easy washing
  • Clear stitch definition for the ribbing

Think About Durability

Socks experience more friction than many other knitted items.

If you plan to wear these frequently around the house, choose a yarn that can tolerate regular use rather than an extremely delicate fiber.

Keep in mind that these are knitted house socks rather than hard-soled slippers, so the knitted fabric itself will be in contact with the floor.

Needle Size

The original pattern specifies US 8 / 5 mm knitting needles.

Because the socks are worked flat, ordinary straight knitting needles can be used.

This is one of the pattern's biggest advantages for knitters who do not own or enjoy using double-pointed needles.

Gauge

Ravelry records the published gauge as approximately 17 stitches and 30 rows = 4 inches / 10 cm.

The current Prjaga English instructions display a different tension figure from the Russian section, so it is sensible to treat fit and the designer's sizing guidance as particularly important when substituting yarn.

Because socks need to fit the foot, making a small swatch before starting is worthwhile.

Sizes 36 Through 44

The pattern is designed to accommodate a useful range of adult shoe sizes:

EU 36, 37, 38, 39, 40, 41, 42, 43 and 44.

Katerina Mushyn also describes the construction as easy to resize and demonstrates the process in the accompanying video.

This makes the pattern much more versatile than a flat-knit sock written for only one foot size.

Measure the Foot Before Starting

Shoe-size numbers are useful, but actual foot measurements provide more information when adjusting a handmade sock.

If you are knitting for someone else, measure the intended wearer's foot when possible.

Pay particular attention to foot length and circumference so you can compare the developing fabric with the fit you need.

Worked Back and Forth in Rows

Every part of the knitting is worked flat rather than in a continuous spiral.

At the end of each row, turn the work just as you would when knitting a scarf or dishcloth.

This familiar movement makes the pattern approachable for knitters whose experience is mostly with flat projects.

No Double-Pointed Needles Required

You do not need double-pointed needles to make this design.

You also do not need to learn magic loop or manage a small circular needle.

That is the key difference between Easy Socks Two Needle and many conventional sock patterns.

The Seam Creates the Final Sock Shape

Because the sock begins as a flat piece, finishing is an important part of the construction.

The designer demonstrates how the knitted piece is folded and sewn in the accompanying video.

Take your time with this stage. A neat, flexible seam will make the finished sock more comfortable and polished.

Do Not Make the Seam Too Tight

A sock needs to stretch as it is pulled over the foot.

If the finishing seam is much tighter than the knitted fabric, it can restrict that stretch or create an uncomfortable ridge.

Keep your seaming tension secure but relaxed.

Is This Pattern Good for Beginners?

Easy Socks Two Needle is especially appealing to beginners because the actual knitting uses familiar flat-knitting techniques.

You should be comfortable with knit stitches, simple ribbing and basic finishing.

The unusual part is understanding how the flat rectangle-like structure becomes a sock, which is why the designer's video tutorial is particularly useful.

Skills That Will Help

  • Casting on
  • Knit stitch
  • Purl stitch
  • Garter stitch
  • Working ribbing
  • Working flat on straight needles
  • Binding off
  • Folding knitted fabric accurately
  • Seaming
  • Weaving in yarn ends

Video Tutorial Included

Katerina Mushyn provides a video tutorial alongside the written pattern.

This is particularly helpful for the finishing stage because you can see how the flat knitted piece is transformed into the finished sock.

Visual learners may find it useful to keep the video available while working through the first sock.

English and Russian Instructions

The original Prjaga page contains both Russian and English instructions.

If you open the source page and initially see Russian text, simply continue down the page to the heading Easy Socks Two Needle Knitting Pattern, where the English version begins.

Make the First Sock a Learning Project

If this construction method is new to you, treat the first sock as an opportunity to understand how the pieces fold together.

Once you have completed one sock, the second should be considerably easier because you already understand both the knitting sequence and the finishing method.

Keep Notes for the Second Sock

If you make any adjustments for foot length or fit, write them down.

Recording the number of rows or any sizing changes will help you make the second sock match the first.

Even small differences can be noticeable when the socks are worn as a pair.

A Useful Quick-Gift Pattern

Thick yarn, simple stitches and flat construction make these socks a practical candidate for quick gift knitting.

They can be especially appealing as cozy winter house socks, holiday gifts or a small project between larger knitting commitments.

Try a Solid or Heathered Yarn

A solid color makes the contrast between the garter ridges and vertical ribbing easy to see.

Heathered yarn can add subtle color variation while preserving the definition of the stitch textures.

You can also experiment with contrasting sections once you understand the construction, provided your yarns have similar weight and behavior.

House Socks vs. Slippers

You may have previously seen this design described online as ribbed slipper socks.

The designer's original English title, however, is Easy Socks Two Needle, and the pattern database categorizes the design as a mid-calf sock.

They certainly work well as cozy indoor socks, but using the designer's actual pattern name makes it much easier to locate and verify the original instructions.

Why This Two-Needle Construction Is Worth Trying

Sock knitting often appears more intimidating than it needs to be because many patterns immediately introduce knitting in the round, heel turns and multiple needles.

Katerina Mushyn's design shows another possibility: create the entire sock as flat knitting and let clever folding and seaming provide the final shape.

It is a useful technique to explore even if you eventually decide to learn traditional circular sock knitting.

Free Easy Socks Two Needle Knitting Pattern

Easy Socks Two Needle by Katerina Mushyn is currently available as a free knitting pattern.

The original pattern is published on the Prjaga knitting website and includes both Russian and English written instructions together with a video tutorial.

This is the exact Katerina Mushyn design featured on this Amazing Knitting page: the Aran-weight ribbed socks worked flat on two needles, available in adult shoe sizes 36–44.

Amazing Knitting gives priority to the original legitimate free source whenever the exact pattern remains available there.

Get the Free Easy Socks Two Needle Pattern

Visit the original Prjaga page for Katerina Mushyn's complete free instructions. The page begins in Russian; scroll down to Easy Socks Two Needle Knitting Pattern for the English version.

Get the Free Easy Socks Two Needle Pattern →

Easy Socks Two Needle is designed by Katerina Mushyn. Amazing Knitting does not reproduce the designer's copyrighted row-by-row instructions. The original pattern is currently available free on its published source page. Availability may change, so please check the linked source for the latest information.

Read Our Pattern Availability Policy →

Preemie Crossover Cardigan – Free Premature Baby Knitting Pattern


Preemie Crossover Cardigan free knitting pattern by Jacqueline Gibb for premature babies

Preemie Crossover Cardigan by Jacqueline Gibb. Project photo © jakeis13.

Preemie Crossover Cardigan by Jacqueline Gibb is a tiny wrap-style baby cardigan knitting pattern designed especially for premature babies weighing approximately 3–5 lb.

Worked primarily in simple garter stitch with DK-weight yarn, the cardigan has a clever crossover front, integrated sleeves and two-button fastening.

It is also a wonderfully economical little project, requiring only around 85–90 yards (78–82 m) of DK yarn.

Good news: the original Preemie Crossover Cardigan is still available as a free knitting pattern directly from designer Jacqueline Gibb through her Jacknitss Ravelry Downloads. You will find the verified free pattern link near the end of this guide.

Preemie Crossover Cardigan at a Glance

  • Pattern: Preemie Crossover Cardigan
  • Designer: Jacqueline Gibb
  • Published: April 2018
  • Category: Premature baby cardigan
  • Style: Crossover / wrap cardigan
  • Size: Preemie, approximately 3–5 lb
  • Chest: Approximately 11 in
  • Underarm to underarm: Approximately 5.5 in
  • Length: Approximately 5 in
  • Yarn weight: DK
  • Yardage: Approximately 85–90 yd (78–82 m)
  • Needles: US 6 / 4 mm
  • Gauge: 5 stitches and 6 rows = 1 in in garter stitch
  • Main texture: Garter stitch
  • Fastening: Two buttons
  • Language: English
  • Current availability: Free Ravelry download

A Tiny Cardigan Designed for Preemie Babies

This pattern was created specifically for very small premature babies rather than simply being a standard newborn cardigan worked on smaller needles.

The designer states that it is intended to fit a premature baby weighing approximately 3 to 5 pounds.

The finished garment measures about 5.5 inches from underarm to underarm and approximately 5 inches in length.

Those tiny measurements make it very different from many ordinary newborn knitting patterns.

Simple Crossover Front

The cardigan uses a practical crossover or wrap-style front.

Instead of two straight front edges meeting in the middle, the fronts overlap diagonally across the baby's body.

Two buttons secure the garment and help keep the crossover shape in place.

The diagonal front also gives this very simple garter-stitch cardigan its distinctive appearance.

Worked Mainly in Garter Stitch

Most of the cardigan is worked in garter stitch, one of the simplest and most useful knitting textures.

When knitting flat, garter stitch is created primarily by knitting every row.

The resulting fabric has soft horizontal ridges and naturally lies flat, making it particularly useful for small garments where you do not want edges constantly curling inward.

A Clever One-Piece Style of Construction

One of the interesting features of Preemie Crossover Cardigan is the way the garment develops as you knit.

The two front sections are shaped first, with stitches added for the sleeves. The fronts are then joined so the knitting can continue down the back.

This construction reduces the number of separate garment pieces that need to be knitted and assembled later.

Some finishing is still required at the underarm and side seams.

DK-Weight Yarn

The pattern is designed for DK-weight yarn.

Jacqueline Gibb originally lists The Women's Institute Premium Acrylic as the suggested yarn.

You do not need to use that exact yarn. A suitable DK yarn can be substituted if it gives you an appropriate fabric and finished size.

Only a Small Amount of Yarn Is Needed

Because the cardigan is designed for a very small premature baby, it requires relatively little yarn.

Published pattern information lists approximately 85–90 yards (78–82 meters).

That makes this a potentially useful project for a suitable quantity of leftover DK yarn, provided the fiber is soft, washable and appropriate for a premature baby's delicate skin.

Choosing Yarn for a Preemie Cardigan

Yarn choice deserves extra attention when knitting clothing for a premature baby.

Look for a yarn that feels very soft against the skin and is practical to wash.

Avoid unnecessarily rough, scratchy or heavily textured fibers. A smooth yarn also makes the simple garter-stitch construction look clean and even.

If you are knitting for a hospital, neonatal unit or charity, always check that organization's current yarn and garment requirements before starting. Individual organizations may have specific rules regarding fibers, colors, buttons, sizing or other garment details.

Needle Size

The main pattern uses US 6 / 4 mm knitting needles.

The designer also notes that the cardigan can be worked using 3.75 mm needles to obtain a slightly smaller finished size.

However, changing needle size also changes the fabric, so consider the softness and flexibility of the finished knitting rather than focusing only on making the garment smaller.

Gauge and Finished Size

Published pattern information lists a gauge of approximately 5 stitches and 6 rows per inch in garter stitch.

Jacqueline Gibb notes that exact gauge is not the central focus of this design because much of the pattern shaping is based on row counts rather than measurements.

Even so, your personal knitting tension will affect the final size.

For such a tiny garment, even a small difference in gauge can represent a meaningful difference in finished dimensions.

Is This a Beginner-Friendly Pattern?

The cardigan uses straightforward stitches, but it is more interesting than a basic rectangular garter-stitch project.

A confident beginner who is comfortable with basic shaping may find it an approachable first baby garment.

The pattern introduces useful techniques such as decreases, yarn overs, casting on additional stitches for sleeves and joining sections of the garment.

Skills You Will Need

Helpful skills for this project include:

  • Casting on
  • Knit stitch
  • Garter stitch
  • Knitting two stitches together
  • Working decreases through the back loops
  • Yarn overs
  • Casting on additional stitches during a row
  • Holding stitches temporarily
  • Binding off
  • Simple seaming
  • Sewing on buttons securely

The Eyelet Detail

A small eyelet detail adds visual interest to the otherwise simple garter-stitch fabric.

Eyelets are created by combining yarn overs with decreases so the stitch count remains controlled while small decorative openings appear in the fabric.

This subtle detail helps give the tiny cardigan a more finished appearance without making the knitting overly complicated.

Shaping the Crossover Front

The diagonal crossover edges are created gradually through decreases.

Because the two front pieces mirror each other, the decreases are worked differently on the left and right sides.

Pay close attention to which decrease is required for each front so the shaping remains balanced.

Integrated Sleeves

Rather than knitting two completely separate sleeves and attaching them later, stitches are cast on as part of the cardigan construction to form the sleeves.

This is an efficient approach for such a small garment and helps reduce the amount of assembly required at the end.

The underarm and side areas are then seamed during finishing.

Keep Track of Your Rows

Row counting is especially important in this pattern because the designer uses row counts to control much of the shaping.

A row counter, notebook or simple tally sheet can help you keep the two fronts symmetrical and ensure that the shaping happens in the correct places.

This is particularly useful if you put the project down between knitting sessions.

Check the Two Fronts Before Joining

Before moving on to the back section, compare the two crossover fronts.

Make sure the sleeve placement, shaping and overall dimensions appear balanced.

Catching an error at this stage is much easier than discovering it after the back has been completed.

Two-Button Fastening

The finished cardigan uses two buttons.

When sewing buttons onto any garment intended for a baby, attach them extremely securely.

If you are making the cardigan for a hospital, neonatal unit or charity, check its current requirements first because some organizations may prefer different fastening methods or may restrict buttons on donated garments.

A Very Quick Baby Knitting Project

With only around 85–90 yards of DK yarn and very small finished dimensions, this cardigan can be considerably quicker to knit than a standard baby sweater.

Garter stitch also allows much of the project to develop at a steady, comfortable rhythm.

The shaping provides enough variety to keep the knitting interesting without requiring complicated cable or colorwork techniques.

A Useful Small-Stash Project

The low yardage makes Preemie Crossover Cardigan a possible project for small amounts of DK yarn remaining from larger projects.

Before using leftover yarn, make sure you know the fiber content and care requirements and that the yarn is suitable for delicate baby garments.

If you are unsure how much yarn remains, weighing the yarn can help you estimate whether you have enough to complete the cardigan.

Knitting Preemie Clothes for Donation

Small premature-baby garments are often knitted with donation in mind, but requirements vary considerably between hospitals and charities.

Before knitting a batch of cardigans, contact the intended organization or check its current published guidelines.

Confirm the accepted sizes, yarn fibers, colors, fastening methods and any finishing requirements.

Following the recipient organization's specifications helps ensure that your handmade garment can actually be used.

Why the Crossover Shape Works So Well

The wrap front gives this tiny cardigan much of its charm.

It creates a clear visual feature even though the garment is primarily knitted in simple garter stitch.

The combination of diagonal fronts, small eyelets and integrated sleeves turns a basic knitted fabric into a distinctive miniature cardigan.

Free Preemie Crossover Cardigan Pattern

Preemie Crossover Cardigan by Jacqueline Gibb is currently available as a free knitting pattern.

The designer provides the original pattern through Jacknitss Ravelry Downloads, and the current listing identifies it as a free download.

This is the exact pattern featured on this Amazing Knitting page: the Jacqueline Gibb crossover cardigan designed for premature babies approximately 3–5 lb.

Pattern availability can change over time, so Amazing Knitting checks older links and prioritizes a legitimate free source whenever the exact pattern is still officially available at no cost.

Get the Free Preemie Crossover Cardigan Pattern

Visit Jacqueline Gibb's current pattern page to see the complete details and download the original free PDF.

Get the Free Preemie Crossover Cardigan Pattern →

Preemie Crossover Cardigan is designed by Jacqueline Gibb (Jacknitss). Amazing Knitting does not reproduce the designer's copyrighted row-by-row instructions. The original pattern is currently offered as a free download by the designer. Availability may change, so please check the linked pattern page for the latest information.

Read Our Pattern Availability Policy →

Teeny-tiny Knit Mitts - Free Pattern

Teeny-tiny Knit Mitts - Free Pattern
The photo above © susieQ75
What beautiful knitting mitts free pattern! I found it on Ravelry...
Enjoy this free pattern for thumb-less baby mittens from We Knit Together. It is a great way to use up DK yarn scraps! Very quick knit that will keep your baby’s hands nice and toasty. Great pattern for a baby shower gift.

Download Pattern: Teeny-tiny Knit Mitts

Astrophil Blanket - Free Knitting Pattern

Astrophil Blanket - Free Knitting Pattern
Photos above © Chicory Sticks
What beautiful knitting blanket free pattern! I found it on Ravelry...
Astrophil is a free baby blanket pattern suitable for beginning knitters which uses a traditional Aran cable motif.

Download Pattern: Astrophil Blanket 

Reindeer Jumper for Babies - Free Pattern

Reindeer Jumper for Babies - Free Pattern
The photo above © Jane Reay
What beautiful knitting jumper free pattern! I found it on Ravelry...
Babies get a scaled-down version of a Scandinavian style jumper with reindeer at the yoke and a button fastening for easy dressing. It is knitted in the flat, on one long needle at the yoke, but in rows. However, with a very minor change ( given in the pattern ) it can be knitted on a circular needle.
Instructions are given for ages 6 months to 2 years. There are two color charts.
Red noses are embroidered on to give the jumper a fun festive feel.

Download Pattern: Reindeer Jumper for Babies 

When In Scotland Shawl - Free Knitting Pattern

When In Scotland Shawl - Free Knitting Pattern
Photos above © tbears99
What beautiful knitting shawl free pattern! I found it on Ravelry.
Inspired by the shawl Claire wears in the Rent episode, this triangle-shaped shawl is knit in garter stitch. Easily customizable it can be knit in any number of colors and stripes, to any size, with any weight of yarn. 

Download Pattern: When In Scotland Shawl 

Celtic Myths Fingering - Free Knitting Pattern

 Celtic Myths Fingering - Free Knitting Pattern
The photo above © Manicmaiden
What beautiful knitting shawl free pattern! I found it on Ravelry.
Half circle shawl with a beautiful Celtic cable border, worked top-down, with the border knit on. Size 150 x 50cm (60 x 20 inch) after blocking. Designed by Asita Krebs. Fingering weight yarn. Available in English, French, German, and Korean.

Download Pattern: Celtic Myths Fingering 

Bike Mittens – Free Knitted Handlebar Mittens Pattern

Bike Mittens free knitted bicycle handlebar mittens pattern by Charlotte L

Bike Mittens by Charlotte L / Charlov. Photo © Charlotte L.

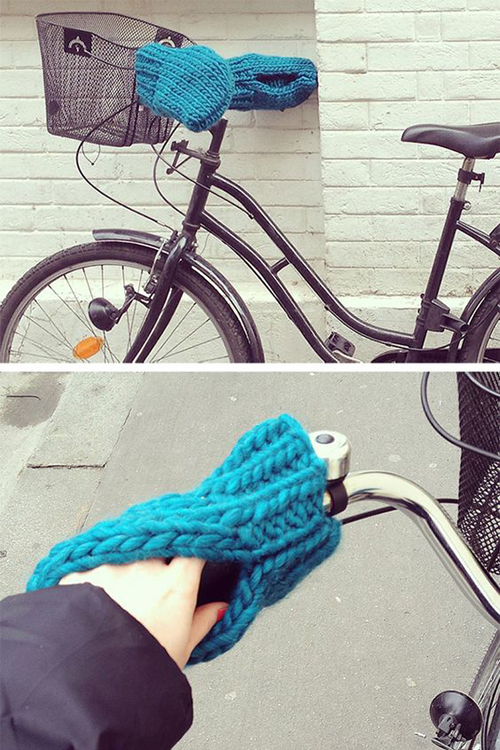
Bike Mittens by Charlotte L are a clever cold-weather knitting project designed to keep your hands warmer while cycling. Instead of wearing these mittens on your hands, the finished pieces fit over the bicycle handlebars, creating cozy covers that you can slip your hands into while riding.

The design is surprisingly simple. Each mitten is essentially built from straightforward ribbing and stockinette, then seamed to create openings for the handlebar and your hand.

The original tutorial is written in French, but Charlotte provides helpful photographs of the construction, and the project uses basic knitting techniques. The original tutorial is still available free on the designer's website.

Bike Mittens at a Glance

  • Designer: Charlotte L / Charlov
  • Original name: Moufles de vélo
  • Published: March 2015
  • Craft: Knitting
  • Project: Bicycle handlebar mittens / hand warmers
  • Construction: Worked flat and seamed
  • Main stitches: 1×1 ribbing and stockinette
  • Yarn: Very thick / super-bulky yarn
  • Original yarn: We Are Knitters yarn in teal
  • Needles: Large needles are used in the original tutorial
  • Language: French
  • Availability: Free tutorial

What Are Bike Mittens?

Bike mittens are knitted covers that stay on the bicycle rather than ordinary mittens that stay on your hands.

Each cover fits around one side of the handlebars and leaves an opening where the cyclist can insert a hand.

Once your hands are inside, you can continue holding the handlebar and operating the controls while the knitted fabric provides an extra layer between your hands and cold air.

Why Knit Mittens for Your Bicycle?

Cold wind can make winter cycling uncomfortable even when the temperature itself does not seem extreme.

Hands are particularly exposed because they remain forward on the handlebars throughout the ride.

Handlebar mittens provide a simple knitted barrier around this exposed area and can be used together with whatever hand protection is appropriate for your weather and riding conditions.

A Clever Gift for a Cyclist

Charlotte originally created the mittens for her friend Claire, who traveled frequently by bicycle and was moving somewhere colder.

That practical origin makes this an unusual handmade gift idea for someone who commutes or regularly travels by bicycle during cooler weather.

Unlike another scarf or hat, it is a project specifically connected to the recipient's cycling routine.

Simple Flat Construction

Despite their unusual purpose, these bicycle mittens do not require complicated three-dimensional mitten shaping.

The pieces are knitted flat, beginning with ribbing and continuing in stockinette.

After knitting, strategic seaming transforms the flat fabric into the handlebar cover.

This makes the project approachable for knitters who are comfortable knitting flat but do not want to work traditional mittens in the round.

1×1 Ribbing at the Opening

The design begins with 1×1 ribbing.

Alternating knit and purl stitches creates an elastic section that can flex more easily than plain stockinette.

Ribbing is particularly useful around openings because it can help the knitted fabric sit more neatly while still allowing some stretch.

Stockinette Makes Up the Main Fabric

After the ribbed section, the project continues in stockinette stitch.

This keeps the knitting straightforward and allows the very thick yarn to do much of the visual work.

Because the original yarn and needles are so large, the stitches create a substantial fabric suitable for this type of cold-weather accessory.

Super-Bulky Yarn Makes It a Quick Knit

Charlotte designed the mittens using very thick yarn.

The original project used a teal yarn from We Are Knitters, and the designer notes that another suitably thick yarn can be substituted.

Thick yarn has two obvious advantages for this project: it creates a substantial fabric and allows the pieces to grow quickly on large needles.

Choosing Substitute Yarn

You do not need the exact original yarn to make a useful pair of Bike Mittens.

If substituting, look for a yarn that produces a thick, stable fabric suitable for the intended handlebar fit.

Consider:

  • Yarn thickness
  • Warmth
  • Durability
  • Stitch definition
  • Resistance to frequent handling
  • How easily the finished item can be cleaned

Remember that a bicycle accessory may encounter more dirt and moisture than a scarf worn indoors.

Can You Hold Thinner Yarn Double?

If you do not have yarn as thick as the original, combining strands may be an option.

Charlotte suggested this possibility when a reader asked about using thinner yarn.

However, the important consideration is the resulting fabric rather than simply the number of strands. Your finished knitting still needs to have suitable thickness and dimensions for your bicycle.

Large Knitting Needles

The original tutorial uses very large needles to match the thick yarn.

Charlotte begins the ribbing with approximately 12–13 mm needles and then uses 15 mm needles for the stockinette section.

If you substitute yarn, choose needles that create an appropriate fabric rather than assuming that the original needle sizes will work with every yarn.

Check Your Bicycle Before You Start

One particularly useful lesson from the designer's comments is that bicycle handlebars are not all identical.

Charlotte told a reader that she had taken measurements directly from a bicycle when making the original mittens.

That is a sensible approach if your yarn, gauge or handlebar setup differs from the original.

Check the space around your grips, brake levers and other controls before deciding whether any adjustment is needed.

How the Openings Work

The finished mitten needs openings for two different purposes.

One opening allows the cover to fit around the handlebar. The other allows your hand to enter the mitten so you can hold the grip and access the brake.

Charlotte specifically confirmed this arrangement when a reader asked whether the design still allowed access to the brakes.

Do Not Block Access to Your Brakes

This is the most important practical consideration when fitting any handmade cover around bicycle controls.

After installing the finished mittens, make sure your hands can enter and leave easily and that you can operate the brakes and any essential controls without obstruction.

Test the fit carefully before using the covers during normal riding.

Make Two Matching Pieces

The project requires two matching knitted pieces—one for each side of the handlebars.

Because the construction is straightforward, completing the first mitten also gives you a useful opportunity to check the fit before finishing the second.

If an adjustment is necessary, make notes so the second piece can be made consistently.

Seaming Creates the Final Shape

Once the flat pieces are knitted, the final shape is created through seaming.

The original tutorial includes photographs showing where Charlotte closes the fabric and where the openings remain.

Those photographs are especially useful because the instructions are in French and the construction is easier to understand visually once you see how the flat piece becomes a handlebar mitten.

Is This Pattern Beginner Friendly?

The knitting itself is quite approachable.

If you already know how to:

  • Cast on
  • Knit
  • Purl
  • Work 1×1 ribbing
  • Work stockinette flat
  • Bind off
  • Sew a knitted seam

then the main knitting techniques should feel familiar.

The less conventional part is understanding the final seaming and fitting the finished covers safely around your particular handlebars.

The Original Pattern Is in French

Charlotte's original Moufles de vélo tutorial is written in French.

The page includes construction photographs, which can make the project easier to understand even if French is not your first language.

Modern browsers can also translate webpages automatically, but always compare translated knitting terminology with the photographs and original text when something seems unclear.

Why We Link to the Original Tutorial

Amazing Knitting does not reproduce Charlotte's complete row-by-row instructions.

Instead, this guide explains the design, construction, materials and practical considerations so that you can decide whether the project is right for you.

The complete knitting instructions and Charlotte's original construction photographs remain on her own website.

Tips Before Knitting Your Bike Mittens

  • Measure your own bicycle rather than assuming every handlebar is identical.
  • Choose thick yarn that creates a substantial fabric.
  • Check the first finished piece on the bicycle before completing the second.
  • Keep both mittens consistent by recording any adjustments.
  • Pay particular attention to the openings during seaming.
  • Make sure the finished covers do not interfere with brakes or controls.

Care and Weather Considerations

Knitted Bike Mittens are textile accessories, so their performance will depend heavily on the yarn you choose and the conditions in which they are used.

A fiber that feels wonderfully warm when dry may behave differently when repeatedly exposed to rain, snow or road spray.

Check the care instructions for your yarn and allow wet knitted items to dry thoroughly before storing them.

Free Bike Mittens Knitting Tutorial

The good news is that Charlotte's original Moufles de vélo / Bike Mittens tutorial is still publicly available on the Charlov website.

It includes the designer's materials, knitting directions, seaming instructions and photographs showing how the finished covers are constructed.

Get the Free Bike Mittens Tutorial from Charlov →

Bike Mittens / Moufles de vélo are designed by Charlotte L / Charlov. Amazing Knitting does not reproduce the designer's complete copyrighted tutorial. Please visit the original Charlov page for the full instructions and construction photographs.

Read Our Pattern Availability Policy →

Free Slippers Tutorial

Free Slippers Tutorial
Photos above © Gülümseten Marifetler 
Today we share a free slippers tutorial for you. Slippers that you see on the photos right now are knitted. There is a possibility to make these slippers using crocheting techniques, however, we are going to leave this for another time. As for today, we are going to look in detail at the tutorial embedded in the article below. This seemingly hard project could be easily completed if the instructions are followed carefully, with good attention to the details. The slippers can be a great addition to your handmade wearable list.

Full Post: Knit Slippers

Waffle Hat - Free Knitting Pattern

Waffle Hat - Free Knitting Pattern
The photo above © tricoemaistrico
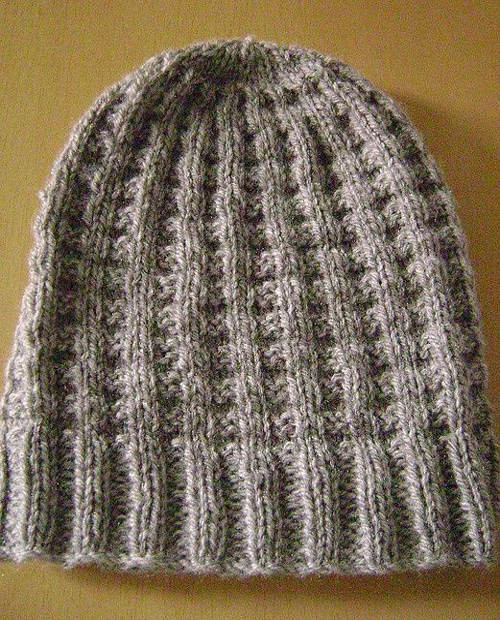
What beautiful knitting hat free pattern! I found it on Pinterest.
Gail Bable: "I’m an avid sock knitter and one of my favorite patterns is the “waffle sock”. I loved it so much I decided to come up with a “waffle hat” to send to Ship Support. This a charity providing hand-knit items to our men and women serving in our armed forces."

Full Post: Waffle Hat 

Discover More From the Archive

A fresh mix of knitting patterns and tutorials from the Amazing Knitting archive.

Finding patterns from the archive…