Skip to content

...

Baby Honeycomb Pattern - Tutorial

Baby Honeycomb Pattern - Tutorial
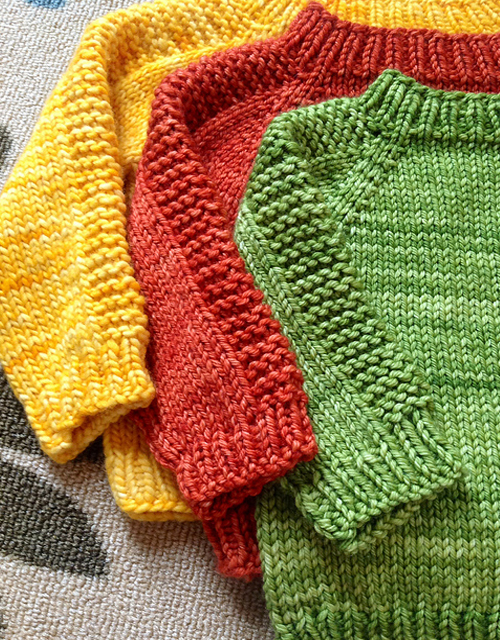
Photos above ©  Knitting Knife Crochet Paradise

Baby Honeycomb Stitch is a beautifully textured knitting pattern that creates a repeating surface inspired by small honeycomb cells.

It is especially attractive for baby blankets, cardigans, scarves and other projects where you want more depth and interest than plain stockinette or garter stitch.

This guide will help you understand the look of the stitch, how to practice it successfully, where it works best, and what to watch for before using it in a larger project.

The original Amazing Knitting post was inspired by a video tutorial from Knitting Knife Crochet Paradise. Rather than reproducing another creator's full instructions here, this updated page focuses on helping you understand and use the honeycomb texture with confidence.

About This Tutorial

This page is an Amazing Knitting educational guide to the Baby Honeycomb texture. It does not reproduce the complete instructions from the original video source.

Baby Honeycomb Stitch at a Glance

Type: Textured knitting stitch

Appearance: Repeating honeycomb / cell-like texture

Best For: Baby blankets, sweaters, cardigans, scarves and accessories

Fabric Character: Raised and dimensional

Recommended First Step: Practice on a swatch

Page Type: Educational stitch guide

What Does a Honeycomb Knitting Pattern Look Like?

Honeycomb knitting patterns use repeating stitches to create raised sections that resemble the cells of a honeycomb.

Depending on the exact technique, the shapes may appear as small hexagons, diamonds or softly rounded cells.

What makes the texture attractive is the combination of recessed and raised areas. Light catches the surface differently across the fabric, giving even a single-color yarn much more visual depth.

Why It Works So Well for Baby Knits

Textured stitches are especially popular in baby knitting because they can make a simple project feel special without relying on complicated colorwork.

A honeycomb texture can be used to add interest to:

  • Baby blankets
  • Cardigans
  • Pullovers
  • Hats
  • Scarves
  • Blanket borders
  • Decorative panels

Even a narrow section of honeycomb texture can become the focal point of an otherwise simple garment.

Start with a Swatch

Before using any textured stitch in a large project, make a generous practice swatch.

This is particularly useful with honeycomb patterns because the texture can change the width and elasticity of the fabric compared with plain stockinette.

A swatch lets you check:

  • Whether you like the texture in your chosen yarn
  • How much the fabric contracts
  • Whether the stitch definition is clear
  • How the fabric behaves after washing
  • Whether your needle size gives the drape you want

Choose Yarn with Good Stitch Definition

Honeycomb textures tend to look best when the individual stitches remain easy to see.

Very fuzzy yarn can soften the raised structure and make the honeycomb effect less obvious.

Smooth yarns often show the pattern particularly well, although the best choice depends on the project you plan to make.

Solid Colors Can Show the Texture Beautifully

You do not need complicated color changes to make this stitch interesting.

A single solid or lightly heathered shade often allows the raised honeycomb structure to stand out more clearly than a highly variegated yarn.

Soft cream, gray, pastel blue, blush, sage and warm neutral shades can all work beautifully for baby projects.

Watch Your Tension

Textured stitches can expose differences in tension more clearly than basic garter stitch.

Try to keep your working yarn relaxed and consistent throughout the repeat.

If some honeycomb cells look noticeably tighter or larger than others, check whether you are pulling certain stitches more firmly than the rest.

Do Not Judge the Texture Too Early

Many dimensional knitting stitches look slightly uneven during the first few rows.

Give the pattern enough vertical repeats to develop before deciding whether the stitch is working correctly.

The honeycomb effect often becomes much easier to recognize after several complete repeats.

Use a Light-Colored Practice Yarn

If you are learning the technique for the first time, a medium or light solid color makes it easier to see where each stitch belongs.

Very dark yarn can make the structure harder to read, particularly when you are trying to identify mistakes.

Count Your Stitches Regularly

Textured patterns often depend on maintaining an exact stitch repeat.

If you accidentally add or lose a stitch, the honeycomb cells can begin to shift out of alignment.

Count the stitches at the end of a repeat section rather than waiting until the fabric looks obviously wrong.

Use Stitch Markers for Wide Projects

If you adapt the stitch for a wide baby blanket, markers can help divide the row into smaller repeat sections.

That makes it easier to identify exactly where a mistake occurred instead of recounting an entire blanket-width row.

Honeycomb as an All-Over Pattern

One way to use the texture is across an entire project.

An all-over honeycomb baby blanket can look rich and detailed even when knitted in only one color.

If you choose this approach, consider adding a simpler border so the textured center remains the main visual feature.

Honeycomb as a Decorative Panel

You can also use the texture more selectively.

A central honeycomb panel surrounded by stockinette or garter stitch can add interest without making the whole project heavily textured.

This approach works particularly well on sweaters and cardigans.

Using Honeycomb in a Baby Blanket

If you want to design a simple blanket around a honeycomb stitch, begin by deciding the finished width and making a swatch.

Measure how many stitches your swatch produces per inch or centimeter, then use that measurement to estimate the number of repeats needed for your blanket.

Add border stitches separately if you want a garter, seed-stitch or ribbed frame.

Remember That Texture Changes Gauge

Do not assume the gauge from stockinette will be the same in the honeycomb pattern.

Raised and crossed structures can pull the fabric inward, sometimes producing a narrower piece than expected.

Measure the actual textured swatch rather than using the yarn-label gauge alone.

Blocking the Honeycomb Texture

Blocking can help even out the fabric after knitting, but avoid stretching the piece so aggressively that you flatten the texture.

The goal is to relax the stitches and straighten the edges while preserving the raised honeycomb structure.

Always use a blocking method appropriate for the fiber in your yarn.

Choosing Yarn for Baby Projects

If you plan to use the honeycomb stitch for a baby item, consider the practical qualities of the yarn as well as its appearance.

  • Soft against sensitive skin
  • Easy to wash
  • Durable enough for repeated use
  • Good stitch definition
  • Comfortable drape
  • Suitable care instructions for the recipient

Simple Borders Pair Well with Honeycomb

Because the center texture already provides plenty of visual detail, simple borders often work best.

Garter stitch, seed stitch or a basic rib can frame the honeycomb without competing with it.

Common Problems to Watch For

If your honeycomb fabric does not look as expected, check these common causes:

  • A missed stitch in the repeat
  • Uneven tension
  • Beginning the next repeat in the wrong place
  • Working the wrong-side row incorrectly
  • Losing track of the row number
  • Using yarn that hides too much stitch definition

Keep Track of Rows

A row counter or simple paper checklist can be extremely helpful.

Textured stitch patterns usually become easy once the rhythm is familiar, but losing your place halfway through a repeat is one of the easiest ways to distort the pattern.

Is Baby Honeycomb a Specific Garment Pattern?

No. The original Amazing Knitting page is best understood as a stitch tutorial, not as a complete baby sweater or blanket pattern with fixed sizing and yardage.

That is actually useful because the stitch can be adapted to many different knitting projects.

Looking for a Complete Baby Project?

If you like textured knitting but would rather follow a complete published baby pattern with established sizing and yarn requirements, these free patterns already verified in the Amazing Knitting archive are good places to continue:

Explore More Knitting Stitches

If stitch patterns are what brought you here, continue exploring Amazing Knitting:

Before You Use This Stitch in a Project

Knit a swatch first and allow several complete repeats to develop.

Measure the fabric in the actual honeycomb texture rather than relying on stockinette gauge, and wash or block the swatch the same way you plan to treat the finished project.

Once you are happy with the stitch definition, drape and dimensions, you can confidently adapt the texture to a blanket, scarf, cardigan panel or another project of your choice.

Source note: The original 2019 Amazing Knitting post credited its reference image and video inspiration to Knitting Knife Crochet Paradise. This updated Amazing Knitting article is an independent educational guide and does not reproduce another creator's complete video instructions.

Alaska Knitted Ankle Socks - Free Pattern

Alaska Knitted Ankle Socks - Free Pattern
 Photo above ©  DROPS Design

Alaskan Cables by DROPS Design is a cozy pair of short knitted socks with a compact cable pattern, ribbed texture and a warm, substantial feel.

These are not delicate fingering-weight socks. They are knitted in DROPS Alaska, a heavier wool yarn, which makes them a satisfying choice if you want warm ankle socks that knit up faster than many traditional sock-yarn projects.

The pattern includes three adult sizes and combines classic sock construction with decorative cables, making it an appealing next step for knitters who already understand basic sock knitting.

Best of all, the original DROPS 125-15 pattern is still available for free from DROPS Design.

✓ Free Pattern Availability

The original Alaskan Cables / DROPS 125-15 knitting pattern is currently available free from DROPS Design. Use the official pattern page linked below for the complete written instructions and cable charts.

Alaskan Cables Socks at a Glance

Official Pattern: Alaskan Cables

DROPS Number: 125-15

Designer: DROPS Design

First Published: July 2010

Category: Short / ankle socks

Sizes: EU 35/37, 38/40, 41/43

US Sizes: Approx. 5/6½, 7½/9, 9½/10½

Foot Length: 22, 24, 27 cm

Leg Length: Approx. 4 cm / 1½ in

Yarn: DROPS Alaska

Yarn Weight: Aran / DROPS Yarn Group C

Yarn Amount: 100 g for each size

Needles: 4.5 mm / US 7 double-pointed needles

Gauge: 18 sts × 23 rows = 10 cm / 4 in in stockinette

Construction: Worked in the round, top-down

Availability: Free from DROPS Design

About the Alaskan Cables Socks

These compact socks combine practical warmth with a decorative cable motif.

Rather than using fine sock yarn and tiny needles, the design uses DROPS Alaska and 4.5 mm needles, producing a thicker fabric and a much more substantial finished sock.

That makes this pattern particularly attractive for lounging, cold-weather wear or use inside roomy boots.

Three Adult Sizes

The official DROPS pattern includes:

  • EU 35/37 — foot length approximately 22 cm
  • EU 38/40 — foot length approximately 24 cm
  • EU 41/43 — foot length approximately 27 cm

The leg section is deliberately short at approximately 4 cm / 1½ inches.

This short cuff is what gives the design its ankle-sock appearance.

Warm Aran-Weight Socks

Alaskan Cables differs from many standard sock patterns because it uses DROPS Alaska, an Aran-weight wool yarn.

Heavier yarn creates a thicker, warmer sock and also means fewer stitches are required than in a typical fingering-weight sock.

For many knitters, that makes the project feel noticeably quicker.

Original Yarn: DROPS Alaska

DROPS Alaska is a classic 100% wool yarn from Garnstudio.

The published pattern calls for:

100 grams for all three sizes

The original sample used color 04, gray.

You can certainly choose another shade or substitute a compatible yarn, but the finished fabric should remain firm enough for socks while still being comfortable.

Gauge

The official gauge is:

18 stitches × 23 rows = 4 × 4 inches / 10 × 10 cm

This is measured in stockinette stitch.

The suggested needle size is:

4.5 mm / US 7 double-pointed needles

As always, use the needle size that gives you the correct gauge rather than relying only on the number printed in the pattern.

Cables Give the Socks Their Character

The defining feature of the design is the cable panel.

DROPS provides charts for the decorative pattern, and the cables create a strong vertical texture across the short upper section of the sock.

Combined with ribbing, the result looks more detailed than a basic stockinette ankle sock without requiring elaborate all-over cabling.

Read the Cable Charts Before You Begin

The official pattern uses cable diagrams, so it is worth spending a few minutes reading the chart symbols before casting on.

The diagrams include standard knit and purl stitches as well as cable crossings and decreases.

Keep the DROPS chart legend visible while working until the sequence becomes familiar.

Worked in the Round

The socks are worked in the round from the cuff downward.

The official pattern uses double-pointed needles.

If you prefer another small-circumference method, such as magic loop, you may be able to adapt the project, but the original instructions are written for double-pointed needles.

Heel Construction

After the short patterned leg, the pattern transitions into traditional heel shaping.

DROPS includes specific heel-decrease instructions for all three sizes.

Follow those stitch counts carefully, especially if you have not worked this style of heel before.

A Good Project for Learning Cabled Socks

If you already understand basic sock construction but have never added cables, this pattern can be a useful introduction.

The short leg keeps the decorative section relatively compact, while the heavier yarn makes individual stitches easy to see.

That can make cable crossings easier to understand than on very fine sock yarn.

Choosing a Substitute Yarn

If you do not use DROPS Alaska, choose a yarn that can comfortably achieve the published 18-stitch gauge.

Pay attention to:

  • Gauge
  • Fiber content
  • Durability
  • Elasticity
  • Thickness
  • Washability

A yarn can match the same nominal weight and still produce a very different sock fabric, so a swatch is useful before making the full pair.

These Are Not Traditional Thin Sock-Yarn Socks

Fit and Use Note

Because this pattern uses Aran-weight wool, the finished socks are substantially thicker than socks knitted with conventional fingering sock yarn. They may be better suited to lounging, slippers or roomy boots than to close-fitting everyday shoes.

Measure the Foot Rather Than Guessing the Size

Whenever possible, use actual foot length rather than relying only on a shoe-size number.

DROPS provides finished foot lengths of 22, 24 and 27 cm, which makes selecting the closest size easier.

This is particularly helpful if you are knitting the socks as a gift.

Why Ribbing Works Well Here

Ribbing helps the short upper section adapt comfortably around the foot and ankle.

It also complements the raised cable structure, creating a design that feels cohesive rather than overly busy.

Blocking and Finishing

Once both socks are complete, gently block them according to the care instructions for your yarn.

Avoid aggressively stretching the ribbing or cables, since the texture is part of what gives these socks their shape.

Weave all ends securely, particularly because socks experience more friction than many other knitted accessories.

Skills Used in Alaskan Cables

  • Knitting in the round
  • Double-pointed needles
  • Ribbing
  • Stockinette stitch
  • Cable crossings
  • Reading cable charts
  • Heel shaping
  • Picking up stitches
  • Decreasing
  • Toe shaping

Is the Alaska Ankle Socks Pattern Still Free?

Yes.

The exact original pattern behind this Amazing Knitting page is Alaskan Cables / DROPS 125-15, and DROPS Design still provides it free on its official website.

Amazing Knitting does not reproduce DROPS Design's complete knitting instructions or charts. Use the official source for the full pattern.

Get the Free Alaskan Cables Sock Pattern

Visit DROPS Design for the official pattern, charts and complete instructions:

Get the Free Alaskan Cables Pattern →

You can also view the Ravelry record for project examples and pattern information:

View DROPS 125-15 on Ravelry →

More Free Socks and Slippers

If you enjoy warm footwear projects, continue exploring these patterns already restored in the Amazing Knitting archive:

Or browse:

Before You Start

Choose your size using the published foot measurements, then make sure your yarn produces approximately 18 stitches per 10 cm / 4 inches in stockinette.

Read the two cable charts before beginning and keep a cable needle handy.

Most importantly, remember that these are intentionally thick, woolly ankle socks. If you want a fast, warm pair with more texture than a plain sock, Alaskan Cables is an excellent project to try.

Pattern credit: Alaskan Cables is DROPS Design pattern 125-15, first published in 2010. The existing photograph on this Amazing Knitting page is credited to DROPS Design. Amazing Knitting provides an independent project guide and does not reproduce DROPS Design's complete copyrighted knitting instructions or charts.

French Macaroon Baby Sweater - Free Knitting Pattern

French Macaroon Baby Sweater - Free Knitting Pattern
Photos above © The Noble Thread

French Macaroon by Caro in the City is a charming little baby and child sweater that proves a simple knitting pattern can still have plenty of personality.

The sweater uses easy garter stitch, playful color blocking and a classic boat neckline. Its straightforward flat construction also makes it an appealing project for newer knitters who are ready to make their first small garment.

With six sizes from newborn through 4 years, this is not just a tiny baby pattern you will immediately outgrow. You can return to the same design several times as a child grows — or knit a colorful set for siblings.

Best of all, French Macaroon is still available as a free pattern. This guide will help you understand the construction, yarn, sizing and useful techniques before you download the original pattern.

✓ Free Pattern Availability

French Macaroon is currently available as a free Ravelry download. Use the official pattern record linked below for the designer's complete instructions and current download.

French Macaroon at a Glance

Pattern: French Macaroon

Designer: Caro in the City

Original Source: The Noble Thread

First Published: September 2017

Category: Baby / Child Pullover

Sizes: Newborn, 3 months, 6–9 months, 12–18 months, 2–3 years, 4 years

Yarn Weight: DK

Suggested Yarn: Cascade Yarns Ultra Pima

Yardage: Approx. 300–600 yd / 274–549 m

Needles: US 5 / 3.75 mm

Gauge: 22 stitches × 44 rows = 4 in / 10 cm in garter stitch

Main Stitch: Garter stitch

Neckline: Boat neck with one-button back opening

Construction: Worked flat in two main sides

Availability: Free Ravelry download

About the French Macaroon Sweater

French Macaroon is a simple garter-stitch pullover with a distinctive two-color look.

Its uncomplicated silhouette allows the color combination to become part of the design, making it a particularly fun project if you enjoy choosing yarn colors.

The boat neckline gives the sweater a clean modern appearance, while the small button opening at the back helps make dressing easier.

Six Sizes from Newborn to 4 Years

One of the strongest features of this free pattern is its useful size range.

  • Newborn
  • 3 months
  • 6–9 months
  • 12–18 months
  • 2–3 years
  • 4 years

This gives the pattern much more longevity than a design written for only one newborn size.

If you enjoy knitting the first sweater, you can revisit the same construction later in a larger size and a completely different color combination.

Simple Garter Stitch

The sweater is primarily knitted in garter stitch, making it approachable for knitters who have mastered the basic knit stitch but are still building confidence with garment construction.

Garter stitch also creates a soft, textured fabric that works especially well with the simple shape of this little pullover.

Worked Flat

You do not need to knit the sweater body in the round.

Each side is worked as one piece, and the garment is assembled afterward. This can be reassuring for knitters who prefer straight back-and-forth knitting.

The shoulders are joined with a three-needle bind-off, followed by simple side seaming.

What Is a Three-Needle Bind-Off?

A three-needle bind-off joins two sets of live stitches while binding them off at the same time.

It creates a neat, stable join and is particularly useful at sweater shoulders.

If this technique is new to you, practice it on a small swatch first. Once understood, it is a useful skill that appears in many other knitting patterns.

The Boat Neck

French Macaroon uses a simple boat-style neckline rather than a deep traditional crew neck.

A one-button opening at the back provides additional room when dressing the baby or child.

This little construction detail is both decorative and practical.

Important Finishing Detail

Pay particular attention to the button-placket area during finishing. The designer includes a note concerning securing the free flap on the inside of the sweater.

Follow the current original pattern for the exact finishing method rather than relying on photographs alone.

Choosing Two Colors

The French Macaroon design is especially attractive when two colors create a clear contrast.

You could try:

  • A soft neutral with a bright accent
  • Two pastel shades
  • Two strong contrasting colors
  • Two tones from the same color family
  • A neutral body with a colorful upper section

Because the sweater itself is so simple, changing the color combination can make two versions of the same pattern look surprisingly different.

Suggested Yarn

The pattern record suggests Cascade Yarns Ultra Pima, a DK-weight cotton yarn.

However, the exact original yarn is less important than producing the correct gauge and a fabric suitable for a baby or child's garment.

How Much Yarn?

Published yardage ranges from approximately:

300–600 yards / 274–549 meters

The amount naturally increases with size.

If you are using two colors, consult the original pattern before buying yarn so you know how the total amount is divided between them for your chosen size.

Gauge

The published gauge is:

22 stitches × 44 rows = 4 inches / 10 cm in garter stitch

The listed needle size is:

US 5 / 3.75 mm

Use the needle size that gives you the required gauge rather than assuming every knitter will obtain the same fabric with 3.75 mm needles.

Gauge Matters on Baby Sweaters

A small difference in gauge can become significant in a small garment.

If your stitches are substantially larger than the designer's gauge, the sweater may fit more like the next size up. If they are smaller, the finished garment can become unexpectedly tight.

Make a garter-stitch swatch with your chosen yarn before beginning, particularly when substituting yarn.

Choosing a Baby-Friendly Yarn

When substituting yarn, consider how the finished sweater will actually be used.

Useful qualities include:

  • Softness
  • Comfort against sensitive skin
  • Easy washing
  • Good stitch definition
  • Appropriate drape
  • Colorfastness

Easy-care yarn can be particularly welcome when the sweater is intended as a frequently worn baby gift.

A Good First Garment Project

French Macaroon is an interesting step between basic rectangular projects and more complicated sweater construction.

The knitting itself remains repetitive and approachable, while the project introduces several garment-making concepts:

  • Following garment measurements
  • Changing colors
  • Creating a neckline
  • Joining shoulders
  • Seaming sides
  • Adding a button
  • Finishing a wearable neatly

Those skills can prepare you for more advanced baby and adult sweater patterns later.

Keep Your Edges Neat

Because the garment is assembled after knitting, clean edges will make the final seaming easier.

Try to maintain consistent tension at the beginning and end of each row.

Avoid pulling the first stitch excessively tight, as this can make the edge harder to seam evenly.

Check Measurements as You Knit

With garter stitch it can be tempting to count rows and continue without measuring.

Instead, periodically compare your work with the measurements in the pattern.

Yarn, washing and individual knitting tension can all influence how the fabric behaves.

Secure the Button Carefully

Because this is a baby and child garment, attach the back button very securely.

Check it periodically during use and replace it if it ever becomes loose.

Good finishing is especially important when small decorative components are used on children's clothing.

A Matching Free Hat Exists Too

If you want to turn French Macaroon into a coordinated gift set, Tiny Tot by Kristen Rettig was designed as a matching hat for the sweater.

Tiny Tot is also currently available as a free pattern and includes sizes from newborn through child.

View the Free Tiny Tot Matching Hat →

Is French Macaroon Still Free?

Yes.

The French Macaroon pattern is currently listed as a free Ravelry download.

Amazing Knitting does not reproduce the designer's complete copyrighted instructions. Use the current Ravelry pattern page for the original instructions, exact stitch counts and finishing details.

Get the Free French Macaroon Pattern

Visit the current pattern record for the free download:

Get the Free French Macaroon Pattern →

More Free Baby Sweater Patterns

If you like simple baby garments, continue with these free patterns already verified in the Amazing Knitting archive:

Or browse more:

Before You Start

Choose your size first, then check the current original pattern for the required yarn quantities and measurements.

Make a garter-stitch gauge swatch, especially if you are substituting yarn, and decide on your two colors before casting on.

Pay attention to the shoulder join and back button-placket finishing. Those small finishing details are what turn two simple pieces of garter stitch into a polished little sweater.

And if you enjoy the first one, the six-size range makes French Macaroon an excellent pattern to revisit in new colors as the child grows.

Pattern credit: French Macaroon was designed by Caro in the City and originally published through The Noble Thread in 2017. The existing photographs on this Amazing Knitting page are credited to The Noble Thread. Amazing Knitting provides an independent project guide and does not reproduce the designer's complete copyrighted knitting instructions.

Flax Sweater - Free Pattern

Flax Sweater - Free Pattern
Photo above © Angeldogknitter

Looking for a versatile free sweater knitting pattern for babies, children, and adults? The Flax Sweater by Tin Can Knits is a modern top-down pullover designed to help knitters build confidence while learning seamless sweater construction.

Flax is part of the popular Simple Collection, a series of free patterns and tutorials created to teach essential knitting skills. With sizes ranging from babies to adults, it is a practical pattern that can be used again and again for different family members.

Flax Sweater Pattern at a Glance

Pattern: Flax Sweater

Designer: Tin Can Knits

Craft: Knitting

Category: Pullover / Sweater

Construction: Top-down and seamless

Yarn Weight: Worsted / Aran

Gauge: 18 stitches and 22 rows = 4 inches in stockinette stitch in the round

Needle Sizes: US 6 / 4.0 mm and US 8 / 5.0 mm

Yardage: Approximately 220–2100 yards (201–1920 m)

Sizes: 0–6 months through 6XL

Pattern Availability: Free

About the Flax Sweater

The Flax Sweater is one of those patterns that works especially well as a first garment project. It is designed with clean lines, simple shaping, and a seamless construction method that helps knitters understand how a sweater comes together without adding unnecessary complexity.

The sweater is worked from the top down, which means you begin at the neckline and continue through the yoke, body, and sleeves. This construction style is popular because it allows you to see the garment take shape as you knit.

Flax is also designed as part of a teaching collection, so it is supported by tutorials from Tin Can Knits that explain many of the techniques used throughout the project.

Sizes from Baby to Adult

One of the biggest advantages of the Flax pattern is its wide size range. The current worsted-weight version includes 19 sizes, beginning with babies and continuing through larger adult sizes.

Available sizes include:

  • 0–6 months
  • 6–12 months
  • 1–2 years
  • 2–4 years
  • 4–6 years
  • 6–8 years
  • 8–10 years
  • Adult sizes XS through 6XL

Because the pattern covers such a broad range, it can be a useful staple if you enjoy knitting sweaters for different members of the family.

Yarn and Gauge

The Flax worsted pattern is written for worsted / aran-weight yarn. The published gauge is:

18 stitches × 22 rows = 4 inches in stockinette stitch in the round

The listed yarn requirement ranges from approximately 220 to 2100 yards (201 to 1920 meters), depending on the size you choose.

Since Flax is available in both child and adult sizes, yarn requirements vary significantly. Always check the original pattern for the exact yardage needed for your selected size before purchasing yarn.

Needles

The pattern lists two main needle sizes:

  • US 6 / 4.0 mm
  • US 8 / 5.0 mm

The larger needles are used to achieve the main stockinette gauge, while the smaller size is used for specific sections of the sweater. Follow the original pattern instructions for the exact needle setup and construction details.

Why Flax Is Popular with Newer Sweater Knitters

Flax was created as part of Tin Can Knits' learn-to-knit series, which makes it especially useful for knitters who want to move from smaller projects into garment knitting.

The design introduces several important sweater-making skills in a relatively straightforward project, including top-down construction, knitting in the round, shaping, and finishing a seamless pullover.

At the same time, the finished sweater has a simple modern look that works well for babies, children, teenagers, and adults.

Other Versions of the Flax Sweater

Tin Can Knits now offers Flax in more than one yarn-weight version. In addition to Flax worsted, there are also lighter-weight versions including Flax DK and Flax Light.

These are separate pattern versions with different gauges, needle sizes, and yarn requirements, so be sure you are following the version that matches the yarn weight you want to use.

Is the Flax Sweater Pattern Free?

Yes. The Flax worsted sweater pattern by Tin Can Knits is currently available as a free knitting pattern.

The pattern can be accessed through the official Tin Can Knits website and is also available through Ravelry.

Get the Free Flax Sweater Pattern

Amazing Knitting does not reproduce the designer's knitting instructions. Please visit the official Tin Can Knits pattern page for the complete pattern, current sizing, tutorials, updates, and download options.

Get the Free Flax Sweater Pattern →

Pattern credit: Flax was created by Tin Can Knits as part of The Simple Collection. Pattern availability, sizing, and technical details are controlled by the designers and may change over time.

More Free Sweater Knitting Patterns

If you enjoy knitting simple sweaters, explore more free sweater knitting patterns and baby sweater knitting patterns from the Amazing Knitting archive.

Before You Start

Check the official pattern page before choosing yarn or needles so you can confirm the latest sizing, gauge, materials, and pattern notes for the version you plan to knit.

Easy Knit Blanket Sweater - Free Pattern

Easy Knit Blanket Sweater - Free Pattern
Photo above © (Jessica) Mama in a stitch

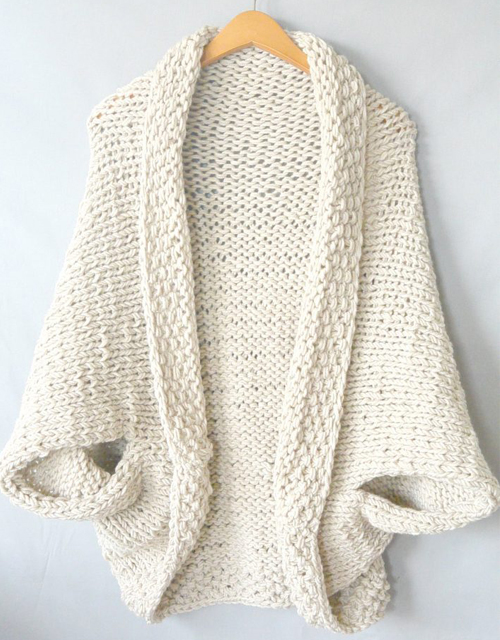
Easy Knit Blanket Sweater by Jessica Reeves Potasz of Mama In A Stitch is a wonderfully simple idea: knit a large, cozy rectangle, fold and seam it strategically, and turn it into an oversized cocoon-style cardigan.

There is no complicated traditional sweater construction here. The main fabric uses stockinette stitch with seed-stitch edging, making this an approachable wearable project for knitters who are comfortable with basic knit and purl stitches.

The finished sweater is intentionally oversized, soft and blanket-like rather than fitted — perfect if you love relaxed layering pieces.

Best of all, the complete pattern is still available for free from Mama In A Stitch. Below you'll find the key project details, construction notes, yarn-substitution advice and a link to Jessica's current free pattern.

✓ Free Pattern Availability

Easy Knit Blanket Sweater is currently available as a free knitting pattern on the designer's Mama In A Stitch website. An optional printable version may also be offered, but you can read the pattern for free on the official website.

Easy Knit Blanket Sweater at a Glance

Pattern: Easy Knit Blanket Sweater

Designer: Jessica Reeves Potasz

Source: Mama In A Stitch

First Published: October 2016

Category: Cardigan / Cocoon Sweater

Construction: Rectangle, worked flat, then folded and seamed

Main Stitch: Stockinette stitch

Edging: Seed stitch

Original Yarn: Lion Brand Woolspun (discontinued)

Original Yardage: Approx. 1,016 yards / 929 m

Needles: US 19 / 15 mm, 29-inch circular needle

Finished Measurement: Approx. 40.5 × 34 in

Style: Very oversized, loose and blanket-like

Availability: Free on Mama In A Stitch

About the Easy Knit Blanket Sweater

Jessica Reeves Potasz created the knitted Easy Knit Blanket Sweater after receiving requests for a knit version of her crocheted blanket sweater.

The concept is deliberately uncomplicated. Instead of shaping several separate sweater pieces, you create one large piece of knitted fabric and transform it into a wearable cocoon through folding and seaming.

The result looks much more involved than the actual construction.

It Really Is Almost a Knitted Blanket

The name “Blanket Sweater” is especially appropriate here.

The project is essentially a large knitted rectangle. Once the knitting is complete, the fabric is folded and seamed to create the cardigan shape and arm openings.

That makes it an interesting bridge between knitting a blanket and knitting your first wearable.

If traditional sweater shaping feels intimidating, this construction removes much of that complexity.

Beginner-Friendly Construction

You do not need to shape a neckline, calculate a raglan yoke or knit separate fronts, back and sleeves.

The important skills are much more familiar:

  • Knitting
  • Purling
  • Stockinette stitch
  • Seed stitch
  • Working flat
  • Basic seaming
  • Weaving in ends

For a newer knitter who wants to make something wearable, that simplicity is one of the biggest attractions of the design.

Stockinette Body with Seed-Stitch Edging

Most of the sweater is worked in stockinette stitch, creating the smooth, classic knitted surface you see across the oversized body.

Seed stitch is used at the edges to add texture and provide a visual frame around the simpler stockinette section.

This combination keeps the knitting repetitive enough to be relaxing without making the finished piece look completely plain.

The Sweater Is Intentionally Oversized

This is important to understand before beginning: Easy Knit Blanket Sweater is not designed as a fitted cardigan.

Jessica describes it as a heavy, blanket-like cocoon with a loose, drapey appearance.

The oversized dimensions are therefore part of the design rather than an indication that your sweater is turning out too large.

Finished Measurements

The published dimensions are approximately:

40.5 inches × 34 inches

Treat these measurements as especially useful information when deciding whether the original proportions will give you the amount of coverage and drape you want.

Fit Note

This is an intentionally oversized cocoon-style garment rather than a conventionally sized fitted sweater. Compare the published dimensions with a loose cardigan or wrap you already enjoy wearing before making major size modifications.

Original Yarn

The original sample used Lion Brand Woolspun.

The designer notes that the original Woolspun yarn has since been discontinued.

That does not mean the pattern is unavailable. The pattern itself remains free; only the original yarn needs to be substituted.

How Much Yarn?

The original project called for approximately:

1,016 yards / 929 meters

The original instructions used eight skeins of Woolspun at the specified skein yardage.

If you substitute another yarn, calculate by total yardage rather than assuming you will also need eight skeins. Skein sizes vary enormously between yarn brands.

Important Yarn Substitution Note

The Original Yarn Is Discontinued

Don't let that stop you from making the sweater. The pattern is still available, and this simple construction is well suited to yarn substitution. Focus on achieving a fabric and gauge similar to the designer's sample rather than searching indefinitely for discontinued Woolspun.

When choosing a substitute, consider:

  • Gauge
  • Finished fabric thickness
  • Drape
  • Total yardage
  • Fiber weight
  • How much the fabric stretches when worn

A very stiff substitute can dramatically change the character of this garment, because the original design depends on a loose, comfortable, blanket-like fabric.

Large Needles Make This an Interesting Quick-Knit Style

The original pattern calls for:

US 19 / 15 mm circular knitting needles

The designer specifies a 29-inch circular needle.

Although the sweater is worked flat rather than in the round, a circular needle is useful for comfortably holding the large piece of fabric.

Why Gauge Still Matters

A rectangle may seem more forgiving than a fitted sweater, but gauge still controls the dimensions of your finished garment.

Changing yarn thickness or needle size without checking the resulting fabric can make an already oversized design substantially larger or smaller.

This matters even more when substituting for a discontinued yarn.

Make a Swatch with Your Substitute Yarn

Before purchasing a large quantity of substitute yarn, make a generous stockinette swatch.

Check more than stitch count. Hold the swatch up and allow it to hang naturally.

Ask yourself:

  • Does it drape comfortably?
  • Is it too stiff?
  • Is it becoming excessively heavy?
  • Do you like the openness of the stitches?
  • Will the fabric feel comfortable as an oversized cardigan?

Those questions are especially useful for a garment whose appeal comes from its relaxed drape.

From Rectangle to Cardigan

The transformation happens after the main rectangle is complete.

The fabric is folded according to the designer's assembly instructions and partially seamed to create openings for the arms.

This simple finishing step turns what looked like a blanket on the needles into a cocoon-style cardigan.

Follow Jessica's original assembly photographs and instructions rather than guessing where to seam, because seam placement affects both the arm openings and how the cardigan hangs.

Two Buttons Help Hold the Sweater in Place

Jessica added two buttons near the upper portion of the garment.

They are both decorative and practical, helping the oversized sweater remain comfortably positioned when worn.

Because the knitted fabric is very open, the designer notes that the buttons can pass through the stitches without separately knitted buttonholes.

Choosing Buttons

Large buttons suit the scale of this oversized design particularly well.

Before permanently attaching them, temporarily position the buttons and try on the finished sweater.

This lets you check whether their placement gives you the amount of closure and drape you prefer.

Be Patient with Stockinette Curl

Stockinette naturally wants to curl at unsupported edges.

The textured edging and final construction help control the shape, but do not be alarmed if the unfinished rectangle does not lie perfectly flat while you are knitting it.

Watch the Weight of the Fabric

This is a substantial garment.

As the rectangle grows, its own weight can stretch the stitches and affect how the fabric looks compared with when it is resting on a table.

When checking length, allow the fabric to relax naturally rather than aggressively stretching it.

Why This Can Be a Good First Wearable

Many first sweater projects introduce several new skills at once: shaping, sleeve construction, neckline shaping, multiple sizes and seaming several separate pieces.

Easy Knit Blanket Sweater takes a different route.

The knitter can concentrate on making a large, consistent piece of fabric and learning simple assembly at the end.

That makes the project especially appealing if you can knit a rectangle confidently but have not yet attempted a traditional cardigan.

Is the Easy Knit Blanket Sweater Pattern Still Free?

Yes.

Jessica Reeves Potasz currently provides the complete Easy Knit Blanket Sweater pattern free on Mama In A Stitch.

You may also encounter an optional paid printable version. That does not change the availability of the free web pattern.

Amazing Knitting does not reproduce Jessica's complete copyrighted instructions. Use the official Mama In A Stitch article for the stitch counts, row-by-row instructions and assembly details.

Get the Free Easy Knit Blanket Sweater Pattern

Visit Jessica's original Mama In A Stitch tutorial for the complete free pattern, photographs and assembly instructions:

Get the Free Easy Knit Blanket Sweater Pattern →

You can also view the Ravelry record for project examples and additional pattern information:

View Easy Knit Blanket Sweater on Ravelry →

More Free Sweater and Cardigan Patterns

Looking for another approachable cardigan? Explore these free patterns already verified in the Amazing Knitting archive:

Or browse:

Before You Start

Remember that the original Woolspun yarn has been discontinued, but the pattern has not. There is no need to abandon this project simply because you cannot find the original yarn.

Choose a suitable substitute, make a swatch, and pay particular attention to drape and finished dimensions.

Then use the official Mama In A Stitch pattern for the exact stitch counts and assembly instructions.

If you are comfortable knitting a large rectangle, this project offers a clever way to turn those basic skills into a cozy wearable.

Pattern credit: Easy Knit Blanket Sweater was designed by Jessica Reeves Potasz of Mama In A Stitch. The existing photograph on this Amazing Knitting page is credited to Jessica / Mama In A Stitch. Amazing Knitting provides an independent project guide and does not reproduce the designer's complete copyrighted knitting instructions.

Fuss Free Baby Cardigan - Free Pattern

Fuss Free Baby Cardigan - Free Pattern
Photos above © grandmasuzibobs

Fuss Free Baby Cardigan by Louise Tilbrook is exactly what its name promises: a simple, practical little cardigan designed to make baby garment knitting feel approachable.

Worked from the top down with raglan shaping and no traditional garment seaming, it is an especially appealing first cardigan for knitters who want to move beyond scarves and blankets.

It is also a wonderful stash project. The cardigan uses less than 100 grams of DK yarn, comes in two small baby sizes, and can easily be personalized with stripes, contrasting borders or longer sleeves.

Best of all, Louise Tilbrook still offers the pattern for free, so you can use this guide to prepare your project and then get the current pattern from the designer.

✓ Free Pattern Availability

Fuss Free Baby Cardigan is currently available as a free pattern from designer Louise Tilbrook. Use the designer's current Free Patterns page or the Ravelry record linked below for access and up-to-date pattern information.

Fuss Free Baby Cardigan at a Glance

Pattern: Fuss Free Baby Cardigan

Designer: Louise Tilbrook

First Published: October 2013

Category: Baby Cardigan

Sizes: 0–3 months and 3–6 months

Finished Chest: 19.5 in and 21 in

Yarn Weight: DK / 8 ply

Yarn Required: Less than 100 g of DK yarn

Construction: Top-down raglan

Sleeves: Short sleeves in the original design

Style: Unisex and customizable

Availability: Free

About the Fuss Free Baby Cardigan

Louise Tilbrook designed Fuss Free Baby Cardigan as a straightforward introduction to seamless garment knitting.

Rather than knitting separate fronts, back and sleeves and then sewing them together, the cardigan begins at the neckline and grows downward using raglan shaping.

This makes the construction easy to understand as you work because you can actually see the cardigan taking shape on your needles.

Two Baby Sizes

The pattern includes:

  • 0–3 months: approximately 19.5 in finished chest
  • 3–6 months: approximately 21 in finished chest

Because babies vary considerably in size, finished garment measurements are often more useful than relying only on an age label.

A Great First Baby Cardigan

One of the strongest reasons to choose this pattern is its approachable construction.

If you have knitted scarves, hats or blankets and want to try your first sweater-style project, a tiny top-down baby cardigan lets you learn garment construction without committing to an adult-sized sweater.

You will see how the neckline, raglan sections, body and sleeves relate to each other while working on a relatively quick project.

Top-Down Raglan Construction

Fuss Free Baby Cardigan is worked from the top down with raglan shaping.

Raglan increases gradually create enough fabric for the fronts, back and sleeves.

Once the yoke reaches the appropriate size, the sleeve stitches are separated from the body and the cardigan continues downward.

This approach eliminates the traditional process of knitting several garment pieces separately and assembling them afterward.

Short Sleeves by Design

The original cardigan deliberately has short sleeves.

Louise Tilbrook describes it as a useful layering piece that can be worn over a baby vest or onesie.

The designer also notes that longer sleeves can be added if desired, making the pattern a useful starting point for customization.

Less Than 100 Grams of DK Yarn

This is an excellent stash-busting baby project.

The designer specifies less than 100 grams of DK-weight yarn for the cardigan.

The sample in the larger 3–6 month size used approximately 60–70 grams.

Actual usage will vary with your yarn, tension and any modifications, particularly if you add longer sleeves.

Original Yarn

The Ravelry pattern record associates the design with Debbie Bliss Rialto DK.

It is a DK-weight 100% merino yarn, but there is no need to use the exact original yarn.

This little cardigan is particularly suitable for experimenting with good-quality DK yarn already in your stash.

Choosing Yarn for a Baby Cardigan

For a baby garment, think beyond color when choosing yarn.

Look for a yarn that offers:

  • Softness against sensitive skin
  • Practical washing instructions
  • Good stitch definition
  • A comfortable finished fabric
  • Enough durability for repeated wear

If the cardigan is intended as a gift, easy-care yarn can be especially useful for new parents.

Perfect for Stash Busting

The small amount of yarn required makes Fuss Free Baby Cardigan a good way to use DK leftovers.

You can use one main color or introduce a contrasting shade at the borders.

Stripes are another natural choice because top-down construction makes it easy to see how the colors are developing as you knit.

Make It Your Own

The designer specifically describes the cardigan as allowing plenty of customization for baby girls and boys.

Simple possibilities include:

  • Using contrasting borders
  • Adding stripes
  • Choosing different button colors
  • Extending the sleeves
  • Using self-striping DK yarn

If you alter the sleeves or body length, remember to allow additional yarn.

Why Top-Down Knitting Is Useful

Top-down construction has several practical advantages.

You can see the proportions of the garment develop while knitting, and length adjustments are generally easier to visualize than when working separate pieces from the bottom upward.

It is also a useful technique to learn because many modern cardigan and sweater patterns use similar construction.

Keeping Track of Raglan Increases

Raglan shaping is simple once you understand the rhythm, but missing an increase can affect the stitch counts for the body or sleeves.

The original pattern helps knitters keep track by providing stitch counts for the rows in a table.

Check your counts periodically rather than waiting until the sleeve separation to discover a discrepancy.

Use Stitch Markers

Stitch markers are particularly helpful for top-down raglan projects.

They visually divide the fronts, sleeves and back so that you can quickly recognize where shaping occurs.

If one section suddenly contains an unexpected number of stitches, finding the mistake is much easier when the garment is clearly divided by markers.

A Useful Project for Learning Seamless Knitting

Louise Tilbrook specifically designed this cardigan with knitters new to seamless knitting in mind.

Working a small garment is a practical way to understand the technique before applying it to a much larger adult sweater.

Once you have completed the cardigan, concepts such as raglan increases, sleeve separation and top-down construction will feel much more familiar.

Buttons and Baby Garments

If you add buttons, attach them very securely and inspect them regularly.

Small detachable items can present a hazard around babies, so finishing deserves the same care as the knitting itself.

Skills Used in Fuss Free Baby Cardigan

  • Knitting and purling
  • Garter stitch
  • Stockinette stitch
  • Top-down knitting
  • Raglan increases
  • Using stitch markers
  • Separating body and sleeve stitches
  • Working a cardigan flat
  • Finishing button bands
  • Weaving in ends

Is Fuss Free Baby Cardigan Still Free?

Yes.

Louise Tilbrook continues to include Fuss Free Baby Cardi in the Free Patterns section of her official website, and Ravelry also currently lists Fuss Free Baby Cardigan as a free pattern.

Amazing Knitting does not reproduce Louise Tilbrook's complete copyrighted knitting instructions. Please use the designer's current pattern source for the instructions.

Get the Free Fuss Free Baby Cardigan Pattern

Start with Louise Tilbrook's official Free Patterns page:

Get the Free Pattern from Louise Tilbrook →

You can also use the Ravelry record for project examples and current pattern information:

View Fuss Free Baby Cardigan on Ravelry →

More Free Baby Cardigans on Amazing Knitting

If you enjoy simple baby garments, these already-verified free patterns in the Amazing Knitting archive are also excellent choices:

Or browse more:

Before You Start

Open the current free pattern from Louise Tilbrook and choose a soft DK yarn appropriate for a baby garment.

Keep stitch markers in place while working the raglan shaping and check the designer's stitch-count table regularly, particularly before separating the sleeves from the body.

If you are using stash yarn, weigh what you have before beginning. The original cardigan requires less than 100 grams, but stripes, longer sleeves or a longer body will change the amount needed.

Most importantly, enjoy the construction. This tiny cardigan is a useful introduction to techniques you can later carry into much larger top-down sweaters.

Pattern credit: Fuss Free Baby Cardigan was designed by Louise Tilbrook and first published in 2013. The existing project photographs on this Amazing Knitting page are credited to grandmasuzibobs. Amazing Knitting provides an independent project guide and does not reproduce the designer's complete copyrighted knitting instructions.

Treasured Heirloom Baby Blanket - Free Pattern

Treasured Heirloom Baby Blanket - Free Pattern
Designed by © Lion Brand

Treasured Heirloom Baby Blanket by Lion Brand is a lovely corner-to-corner knitted blanket that combines relaxing garter stitch with delicate eyelet lace.

The diagonal construction gives this small baby blanket much more visual interest than a basic square, while the repeating garter and lace sections keep the knitting approachable.

Best of all, the original pattern is still available for free from Lion Brand, making this a beautiful choice for a baby gift or handmade keepsake.

✓ Free Pattern Availability

Treasured Heirloom Baby Blanket is currently available as a free knitting pattern from Lion Brand. Use the official Lion Brand page linked below for the complete pattern and current download access.

Treasured Heirloom Baby Blanket at a Glance

Pattern: Treasured Heirloom Baby Blanket

Designer / Publisher: Lion Brand Yarn

Lion Brand Pattern Number: 90485

Category: Baby Blanket / Afghan

Skill Level: Easy (Beginner+)

Original Yarn: LB Collection Cashmere

Yarn Weight: Light / DK

Needles: US 8 / 5 mm circular needle for the 90485 version

Gauge: 17 stitches + 22 rows = 4 in / 10 cm in garter stitch

Finished Size: Approx. 27 × 27 in / 68.5 × 68.5 cm

Construction: One piece, corner to corner

Texture: Garter stitch and diagonal eyelet lace

Availability: Free from Lion Brand

About the Treasured Heirloom Baby Blanket

The Treasured Heirloom Baby Blanket is a classic Lion Brand design that combines a simple diagonal construction with alternating sections of garter stitch and open lace.

Instead of casting on enough stitches for one full side of the blanket, the project begins at a corner and grows diagonally.

Once the blanket reaches its widest point, the shaping reverses and the fabric gradually decreases toward the opposite corner.

Finished Size

The published finished measurement is approximately:

27 × 27 inches / 68.5 × 68.5 cm

This makes it a relatively compact baby blanket that works well for gifting, stroller use or as a handmade nursery keepsake.

Corner-to-Corner Construction

One of the most appealing features of this design is its corner-to-corner construction.

The blanket is worked in one piece, beginning at one corner and increasing to create the first half of the square.

The second half decreases back toward the opposite corner.

This diagonal structure creates strong visual lines even before the lace sections are added.

Garter Stitch and Eyelet Lace

The design alternates comfortable garter-stitch sections with decorative eyelet lace.

This combination is particularly effective in a baby blanket because the garter sections provide texture and structure while the lace keeps the overall fabric visually light.

It also gives the knitter a pleasant rhythm: simple knitting is broken up by sections that require a little more attention.

Skill Level

Lion Brand classifies Treasured Heirloom Baby Blanket as:

Level 2 — Easy (Beginner+)

It is therefore a good next project for a knitter who is comfortable with basic knit stitches and wants to begin exploring simple lace, increases and decreases.

Original Yarn

Lion Brand pattern 90485 was designed using LB Collection Cashmere.

This is the version historically known as the Treasured Heirloom Baby Blanket.

The luxurious cashmere yarn helps explain the “heirloom” name, but you do not need to use the original yarn to enjoy the design.

An Interesting Pattern History

Treasured Heirloom Baby Blanket belongs to a family of Lion Brand versions built from the same basic pattern.

The design has also appeared under the name Diagonal Eyelet Baby Blanket and later as Diagonal Eyelet Baby Afghan.

The basic instructions, gauge and finished dimensions are the same, while Lion Brand changed the suggested yarn and needle size for different versions.

This is useful information if you encounter another Lion Brand version of the blanket while searching online.

Needles

For the Treasured Heirloom version (pattern 90485), the published needle is:

US 8 / 5 mm circular needle, approximately 29 in / 73.5 cm long

A circular needle is useful for holding the growing number of stitches, even though the blanket itself is worked back and forth rather than joined in the round.

Gauge

Lion Brand gives the following gauge:

17 stitches + 22 rows = 4 inches / 10 cm in garter stitch

Gauge is not only about matching a number. It affects the finished size, drape and amount of yarn your blanket will require.

Choosing a Substitute Yarn

The original cashmere creates a very soft and luxurious blanket, but many knitters will prefer a more practical yarn for everyday baby use.

When substituting, consider:

  • Softness against sensitive skin
  • Washability
  • Good stitch definition for the eyelet sections
  • Enough drape for a comfortable blanket
  • The published gauge
  • Care instructions suitable for the recipient

A washable DK or similar yarn that achieves the required gauge can be a practical choice for a frequently used baby blanket.

Do Not Choose Yarn by Weight Label Alone

An interesting detail about this Lion Brand design is that different published versions have recommended different yarns.

For that reason, matching the 17-stitch garter gauge and the fabric you want is more useful than relying only on the yarn-weight name printed on a label.

Make a swatch before committing to the entire blanket if finished size is important to you.

Why the Diagonal Layout Works So Well

Knitting a square diagonally creates natural visual movement from one corner to another.

In Treasured Heirloom, the eyelet panels emphasize those diagonal lines and make a relatively simple square blanket look much more elaborate.

This is one reason the design can look impressive without requiring extremely complicated knitting.

Keeping the Lace Sections Accurate

The eyelet sections depend on increases and decreases being correctly positioned.

If you miss a yarn over or decrease, the problem may affect both the appearance of the lace and your stitch count.

Check your work at the end of each lace section instead of waiting until much later in the blanket.

Use Lifelines If You Are New to Lace

If this is one of your first lace projects, a lifeline can make the experience much less stressful.

Insert a contrasting thread through a known-correct row before a lace section. If something goes seriously wrong, you have a safe point to return to.

Watch the Center Transition

A corner-to-corner blanket has an important transition where the increasing half becomes the decreasing half.

Mark this point carefully in your pattern or row notes so that you do not continue increasing beyond the intended size.

Keep Simple Project Notes

The repeating sections make this an excellent project to pick up and put down, but only if you know where you stopped.

Record whether you are in a garter or lace section and note your current row before putting the project away.

A simple row counter or paper checklist is enough.

Blocking the Finished Blanket

Blocking can make a noticeable difference to this design because it helps the eyelets open and allows the diagonal square to settle into an even shape.

Use a blocking method appropriate for your chosen yarn and arrange the four sides evenly without overstretching the lace.

Baby Blanket Safety and Practicality

For a baby project, yarn choice and finishing deserve as much attention as appearance.

Secure all yarn ends carefully and avoid adding loose decorative elements that could detach.

Always follow current safe-sleep guidance when deciding how and when a handmade blanket is used around an infant.

Skills Used in Treasured Heirloom Baby Blanket

  • Garter stitch
  • Working flat on circular needles
  • Increasing
  • Decreasing
  • Yarn overs
  • Simple eyelet lace
  • Corner-to-corner construction
  • Maintaining stitch counts
  • Blocking

Is Treasured Heirloom Baby Blanket Still Free?

Yes.

Lion Brand currently maintains an official page for the Treasured Heirloom Baby Blanket Pattern (Knit), pattern number 90485, with free pattern access.

Amazing Knitting does not reproduce Lion Brand's complete copyrighted knitting instructions. Use the official Lion Brand page for the current pattern.

Get the Free Treasured Heirloom Baby Blanket Pattern

Visit Lion Brand for the official pattern:

Get the Free Treasured Heirloom Baby Blanket Pattern →

More Free Baby Blankets on Amazing Knitting

If you like this combination of texture and lace, we have already verified several other free baby blanket patterns in the Amazing Knitting archive.

Or explore:

Before You Start

Download or open the current Lion Brand pattern first, then make a small garter-stitch swatch if you are substituting yarn.

Pay attention to the transition from increasing to decreasing and check your stitch count after the lace sections.

Once you understand the corner-to-corner rhythm, this becomes a satisfying combination of relaxing garter stitch and just enough lace to keep the project interesting.

Pattern credit: Treasured Heirloom Baby Blanket is a Lion Brand Yarn design, pattern 90485. The existing image on this Amazing Knitting page is credited to Lion Brand. Amazing Knitting provides an independent project guide and does not reproduce Lion Brand's complete copyrighted knitting instructions.

Mitered Corner Blanket - Free Pattern

Mitered Corner Blanket - Free Pattern
Photo above © purlsoho

Mitered Corner Blanket by Purl Soho is a striking modular blanket built from 192 small mitered squares that flow through a carefully planned sequence of colors.

Although the finished blanket looks complex, its construction is wonderfully logical: each new square grows directly from neighboring squares by picking up stitches along their edges.

That means all 192 squares become one continuous blanket without sewing the individual squares together. The original Purl Soho pattern remains available online for free.

✓ Free Pattern Availability

Mitered Corner Blanket is currently available as a free knitting pattern directly from Purl Soho. Use the official pattern page linked below for the complete knitting instructions, schematic and current pattern information.

Mitered Corner Blanket at a Glance

Pattern: Mitered Corner Blanket

Designer: Jake Canton for Purl Soho

Published: January 2019

Category: Blanket / Throw

Original Yarn: Purl Soho Linen Quill

Yarn Weight: Fingering, held double

Needles: US 6 / 4 mm

Gauge: 22 stitches × 44 rows = 4 in / 10 cm in garter stitch, yarn held double

Sizes: Small Throw and Large Throw

Finished Size: 36 × 48 in or 48 × 64 in

Number of Squares: 192

Construction: Modular mitered squares joined as you knit

Seaming: No square assembly required

Availability: Free official Purl Soho pattern

About the Mitered Corner Blanket

Mitered Corner Blanket was designed for Purl Soho by Jake Canton and first published in January 2019.

The blanket is built from a grid of 192 small squares. Color changes across the grid create gradual transitions that make the finished project look almost like a textile painting.

What makes the construction especially clever is that these are not 192 separately knitted squares waiting to be sewn together at the end.

Instead, the blanket grows continuously as stitches for each new square are picked up from previously completed squares.

Two Finished Sizes

Purl Soho provides two sizes:

  • Small Throw: approximately 36 × 48 inches / 91 × 122 cm
  • Large Throw: approximately 48 × 64 inches / 122 × 163 cm

Both versions use the same 192-square layout.

The difference is the size of each individual square.

Square Size

Each finished square should measure approximately:

  • Small Throw: 3 × 3 inches
  • Large Throw: 4 × 4 inches

This is why gauge matters even though the project is a blanket. Small differences multiplied across many squares can noticeably change the final dimensions.

192 Squares — But No Sewing Them Together

Seeing “192 squares” might make you imagine an enormous pile of motifs that must eventually be assembled.

Fortunately, that is not how this blanket is constructed.

After the initial square, stitches for subsequent squares are picked up along the edges of existing squares as directed in the pattern.

The blanket therefore grows as one connected piece.

For knitters who enjoy modular blankets but dislike sewing dozens or hundreds of pieces together, this is one of the most appealing features of the design.

How a Mitered Square Gets Its Shape

A knitted mitered square begins as a row of stitches and becomes progressively smaller through centered decreases.

Those decreases pull the fabric toward the center diagonal, creating the characteristic square shape and visible directional lines.

Once you understand the rhythm of one square, the basic process becomes highly repetitive.

Amazing Knitting does not reproduce Purl Soho's complete square instructions here. Use the official free pattern for the exact stitch counts and decrease sequence.

Original Yarn: Linen Quill

The original blanket uses Purl Soho Linen Quill.

Linen Quill is a fingering-weight yarn containing:

  • 50% fine highland wool
  • 35% alpaca
  • 15% linen

Each 100-gram skein contains approximately 439 yards / 401 meters.

Important: The Yarn Is Held Double

Important Yarn Note

Although Linen Quill is a fingering-weight yarn, the Mitered Corner Blanket is knitted with two strands held together throughout the project. Keep this in mind when choosing a substitute yarn or calculating yardage.

Holding two strands together is also important to the original color design because combining different shades creates intermediate colors between the main palette tones.

Color Mixing Is Part of the Design

This blanket is more than a collection of solid-colored squares.

By holding two strands together, Purl Soho can combine two different colors in a single square.

Those combinations create gradual visual transitions as the blanket moves from one color family into another.

This is what gives the original blanket its watercolor-like appearance.

Original Color Palettes

Purl Soho has presented the blanket in several coordinated palettes, including:

  • Warm
  • Cool
  • Dawn
  • Mountain

You can follow one of the published palettes or use the construction as inspiration for your own color arrangement.

Choosing Your Own Colors

If you want to create a custom palette, think about how adjacent colors will interact when two strands are held together.

A useful approach is to arrange your skeins from one color family into another before beginning.

Photograph the arrangement or label each color so that you can reproduce your plan later.

With 192 squares, relying on memory alone can become confusing.

Needles

The published needle size is:

US 6 / 4 mm

Purl Soho notes that either circular or straight needles can be used.

Use whichever style feels comfortable, but choose the actual needle size according to the gauge you obtain with your yarn.

Gauge

The published gauge is:

22 stitches × 44 rows = 4 × 4 inches / 10 × 10 cm

This is measured in garter stitch with the yarn held double.

Knit Garter and Purl Garter

An interesting feature of the original blanket is that some squares are worked with knit garter stitch while others use purl garter stitch.

Purl Soho specifically recommends making sure that your gauge is correct in both.

If your knit and purl tension differs significantly, you may need to adjust your needle size or technique to keep the squares consistent.

Why Consistent Square Size Matters

A single square that is slightly larger may not seem important.

Across a grid of 192 squares, however, repeated gauge differences can affect the overall shape of the blanket.

Measure some of your early squares before progressing too far.

For the Small Throw, aim for approximately 3 inches square; for the Large Throw, approximately 4 inches square.

Picking Up Stitches Neatly

Picking up stitches is one of the key skills in this project.

Because each new square grows directly from its neighbors, consistent pickup technique helps keep the joins neat and the grid even.

Avoid picking up stitches at random intervals just to reach the required number. Follow the edge structure and the designer's instructions so the new square sits naturally against the existing fabric.

A Good Modular Knitting Project

One advantage of this construction is psychological as well as practical.

Instead of thinking about knitting an entire 48- or 64-inch blanket, you can focus on completing one small square at a time.

Each finished square becomes a visible unit of progress.

That can make a large long-term blanket project feel much more manageable.

Managing Yarn Ends

A project involving many colors naturally creates yarn ends.

Do not wait until the very last square to think about finishing them.

Weaving in ends periodically can prevent the back of the blanket from becoming overwhelming near the end of the project.

Leave tails long enough to secure them properly according to your yarn and finishing method.

Choosing a Substitute Yarn

You do not have to use Linen Quill, but substitution requires some planning because the original pattern holds fingering-weight yarn double.

Consider:

  • The published gauge
  • The size of each finished square
  • How two strands behave together
  • Color-mixing possibilities
  • Drape and weight of the finished blanket
  • Total yardage
  • Washing and care requirements

Make at least one complete mitered square with your substitute yarn before committing to enough yarn for the full blanket.

Blocking the Finished Blanket

Blocking can help even out the grid and settle small differences between neighboring squares.

Follow the care instructions for your chosen yarn and arrange the blanket so that the outer edges are straight without aggressively stretching individual squares.

Skills Used in Mitered Corner Blanket

  • Garter stitch
  • Centered decreases
  • Picking up stitches
  • Working modular squares
  • Holding two yarn strands together
  • Changing and combining colors
  • Maintaining consistent gauge
  • Weaving in ends
  • Blocking a large knitted blanket

Is Mitered Corner Blanket Still Free?

Yes.

Purl Soho continues to provide the complete Mitered Corner Blanket pattern for free on its official website.

This is the best source to use because it contains the designer's instructions, color information, schematic and current pattern notes.

Amazing Knitting does not reproduce Purl Soho's complete copyrighted knitting instructions.

Get the Free Mitered Corner Blanket Pattern

Visit Purl Soho for the complete official free pattern:

Get the Free Mitered Corner Blanket Pattern →

You can also view the Ravelry record for project examples and pattern specifications:

View Mitered Corner Blanket on Ravelry →

More Free Blanket Knitting Patterns

If you enjoy geometric or textured blankets, these already-verified Amazing Knitting patterns are also worth exploring:

Or browse:

Before You Start

Make one complete test square before beginning the full 192-square blanket. Check both your gauge and the finished square dimensions.

Remember that the original fingering-weight Linen Quill is held double throughout, and organize your colors before beginning if you plan to reproduce the gradual color transitions.

Finally, keep the official Purl Soho pattern open while working so that you can follow the correct square sequence and color schematic rather than relying on copied versions elsewhere.

Pattern credit: Mitered Corner Blanket was designed for Purl Soho by Jake Canton and first published in 2019. The existing photograph on this Amazing Knitting page is credited to Purl Soho. Amazing Knitting provides an independent project guide and does not reproduce Purl Soho's complete copyrighted knitting instructions.

Discover More From the Archive

A fresh mix of knitting patterns and tutorials from the Amazing Knitting archive.

Finding patterns from the archive…