![]() |
| Photos above © Sara Elizabeth Kellner |
...
Tiny Parlor Cat - Free Pattern
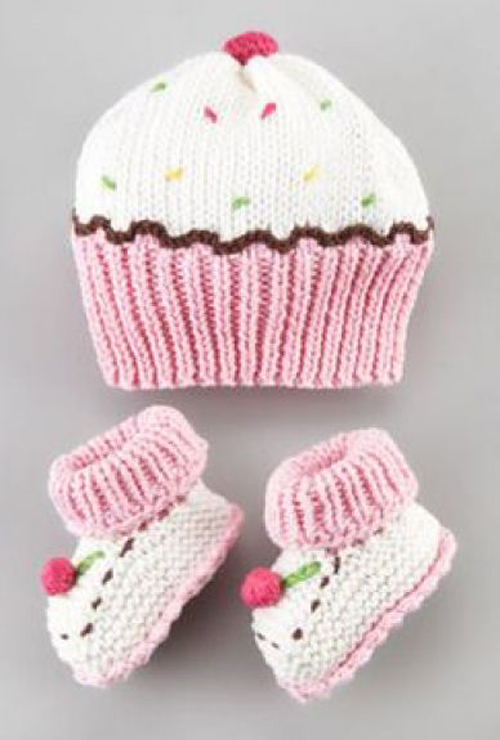
Cupcake Hat & Bootie Set
![]() |
| The photo above © Art Walk |
Beautiful Knitting Stitch Pattern For Cardigan - Tutorial
![]() |
| Photos above © knit with me |
Full Post: Beautiful Knitting Stitch
Garden View Shawlette - Free Pattern
| Photo above © marico |
Gradient Wurm Hat – Free Textured Beanie Knitting Pattern
Gradient Wurm is a colorful interpretation of the popular Wurm hat by katushika, using gradient yarn to emphasize the design's distinctive raised ridges.
The original Wurm pattern is a seamless unisex beanie worked in the round. Its simple alternating textured sections make it especially effective with slow color-changing or gradient yarns, where each ridge can highlight a new part of the color transition.
The exact hat pattern remains available as a free Ravelry download.
Original Wurm design © katushika. Gradient project photo © EspaceTricot.
Gradient Wurm Hat Overview
- Original pattern: wurm
- Designer: katushika
- Gradient project: EspaceTricot
- Craft: Knitting
- Category: Beanie / toque
- Published: May 2009
- Construction: One piece, worked in the round
- Finishing: Seamless
- Style: Unisex
- Sizes: Small, Medium and Large
- Head circumference: Approximately 53–55, 55–57 and 57–59 cm
- Suggested yarn: Lana Grossa Cool Wool Merino 2000
- Yarn weight: Sport
- Needles: US 4 / 3.5 mm and US 6 / 4.0 mm
- Gauge: 24 stitches × 34 rows = 4 in / 10 cm in stockinette stitch
- Main techniques: Knitting in the round, stockinette stitch, purl ridges and crown decreases
- Pattern availability: Free Ravelry download
What Is Gradient Wurm?
Gradient Wurm is not a separate knitting pattern. It is a project variation of the original Wurm hat designed by katushika.
The version shown here was knitted by EspaceTricot using gradient yarn, which allows the changing colors to move naturally through the horizontal textured ridges.
That combination works particularly well because the structure of Wurm is simple enough to let the yarn become a major part of the visual design.
The Original Wurm Hat
Wurm is a relaxed textured beanie designed for both women and men.
The hat is worked in the round as one seamless piece and features repeated horizontal ridges that create its recognizable slouchy texture.
The original designer describes it as a practical hat that works with many different hairstyles and provides extra warmth around the ears.
Why Gradient Yarn Works So Well
Slow color-changing yarn is especially effective in this pattern because the hat contains broad horizontal bands.
As the yarn gradually changes shade, each ridge can develop a slightly different color, making the simple texture look much more complex.
A long gradient generally creates the smoothest transition, but self-striping or hand-dyed yarn can also produce interesting results.
Choosing Gradient Yarn
For a look similar to the featured Gradient Wurm, choose a yarn with gradual rather than abrupt color changes.
Useful options include:
- Long-gradient yarn
- Hand-dyed gradient yarn
- Ombre yarn
- Self-striping sport-weight yarn
- Two coordinating yarns used strategically
Strong contrast between colors will emphasize the ridges, while a subtle gradient creates a softer blended effect.
Sport-Weight Yarn
The original Wurm pattern recommends sport-weight yarn.
The suggested yarn is Lana Grossa Cool Wool Merino 2000, a 100% merino wool yarn.
A similar sport-weight substitute can be used as long as it produces the required gauge and a fabric with enough elasticity for a comfortable hat.
Needles
The pattern uses two needle sizes:
- US 4 / 3.5 mm
- US 6 / 4.0 mm
The smaller needles are used where a firmer fabric is required, while the larger size creates the main body of the hat.
Use the needle size that allows you to obtain the published gauge rather than relying only on the number printed on the pattern.
Gauge
The official gauge is:
24 stitches × 34 rows = 4 in / 10 cm in stockinette stitch.
Gauge matters for a hat because it determines both the circumference and the overall fit.
A hat that is too loose may slip, while excessively tight gauge can reduce stretch and make the brim uncomfortable.
Three Adult Sizes
The Wurm pattern includes three sizes:
- Small: fits approximately 53–55 cm head circumference
- Medium: fits approximately 55–57 cm
- Large: fits approximately 57–59 cm
Measure around the widest part of the head before choosing a size.
Worked in the Round
Wurm is knitted entirely in the round.
This means there is no vertical seam running up the finished hat.
The seamless construction also makes the repeating ridges look continuous all the way around the head.
The Textured Ridges
The signature feature of Wurm is the sequence of horizontal raised ridges.
These are created through simple changes in the knitted fabric rather than traditional cables or complex lace.
Because the texture is repetitive, it also provides an easy framework for showing off gradient yarn.
An Important Note About the Hem
The designer specifically notes that the lower hem is plain stockinette stitch rather than ribbing.
Some finished project photos can make the edge look ribbed, but that appearance comes from the folded construction rather than a conventional knit-and-purl rib.
Following the original pattern structure will produce the intended result.
Skills You'll Use
- Casting on
- Knitting in the round
- Stockinette stitch
- Purling in the round
- Creating textured horizontal ridges
- Using a provisional technique for the hem
- Decreasing for crown shaping
- Working a seamless hat
- Weaving in ends
Is Wurm Beginner Friendly?
Wurm can be a good next-step project for a knitter who already understands basic knit and purl stitches and is ready to work in the round.
There are no complicated cables or lace motifs to manage.
The main skills beyond basic knitting are the folded hem construction, maintaining the textured ridge sequence and shaping the crown.
Tips for Knitting With Gradient Yarn
Check the color sequence before casting on. Decide whether you want to begin with the lightest or darkest end of the gradient.
Do not cut the yarn unnecessarily. Keeping the strand continuous preserves the natural color transition.
Consider the crown colors. If you want a particular shade at the top of the hat, estimate how much yarn the body will use before beginning.
Swatch the yarn. Some gradient yarns look very different once knitted compared with how they appear in the ball.
Can You Use Solid Yarn?
Yes. The original Wurm pattern was not created exclusively for gradient yarn.
A solid color emphasizes the texture of the raised ridges, while gradient yarn adds an additional color effect.
Speckled, tonal and lightly variegated yarns can also work well.
Unisex Hat Design
One reason Wurm has remained popular is its simple unisex shape.
The hat does not rely on decorative details tied to one particular style, so changing the yarn color can dramatically alter the finished look.
Neutral shades create a classic everyday hat, while bright gradients produce a more playful version.
Is the Wurm Hat Pattern Free?
Yes. The original Wurm hat by katushika is currently available as a free knitting pattern.
The exact pattern is offered as a free download through its original Ravelry pattern page.
Gradient Wurm uses this same pattern; the gradient effect comes from yarn choice rather than from a separate set of knitting instructions.
Get the Free Wurm Hat Pattern →
See the Featured Gradient Wurm Project
The photo featured in this article comes from EspaceTricot's Gradient Wurm project, which demonstrates how effectively the original hat works with gradient yarn.
View the Gradient Wurm Project →
Why This Hat Is Worth Knitting
Wurm combines a straightforward construction with a distinctive textured appearance.
Its repetitive ridges make the knitting easy to follow once established, while the seamless construction keeps finishing to a minimum.
Using gradient yarn transforms the same simple structure into a much more colorful project without adding any additional knitting techniques.
That makes Gradient Wurm particularly appealing for knitters who want to let a special skein of yarn do most of the visual work.
Pattern Availability
Amazing Knitting links readers to legitimate designer or publisher sources whenever possible. Pattern prices, download locations and availability can change after an article is published.
Read Our Pattern Availability Policy →
Amazing Knitting is an independent pattern discovery and project-guide site. The original Wurm design and knitting pattern remain the intellectual property of katushika. The featured Gradient Wurm project photo is credited to EspaceTricot. This guide does not reproduce the designer's complete row-by-row pattern instructions.
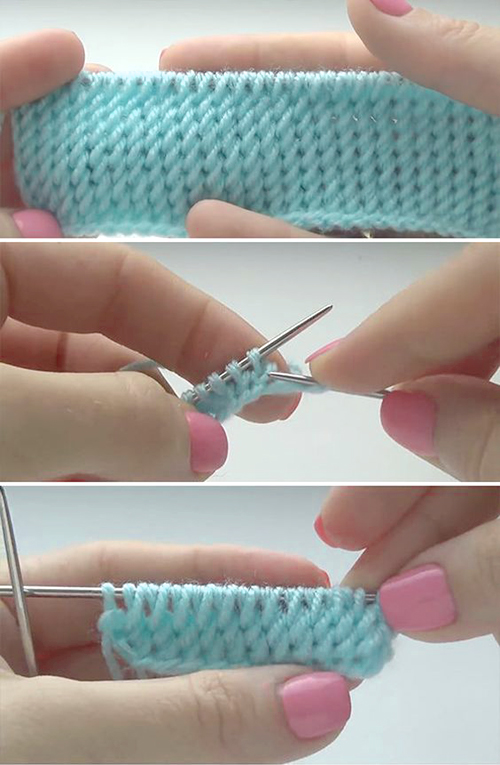
Beautiful Knitting Borders - Tutorial
![]() |
| Photos above © Вяжем дома с Татьяной |
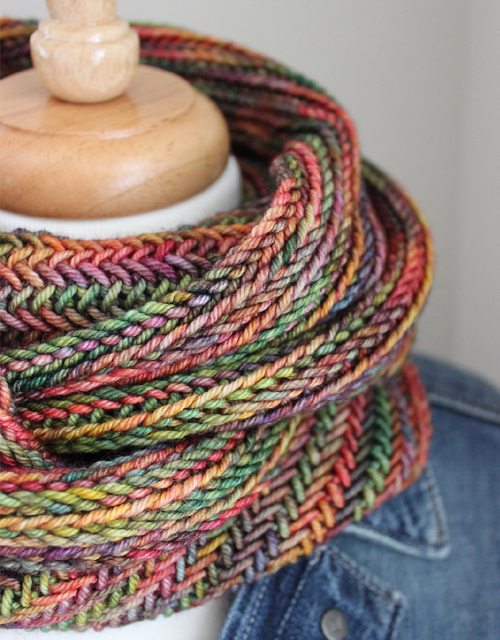
Big Herringbone Cowl - Free Pattern
![]() |
| Photo above © bleuknits |
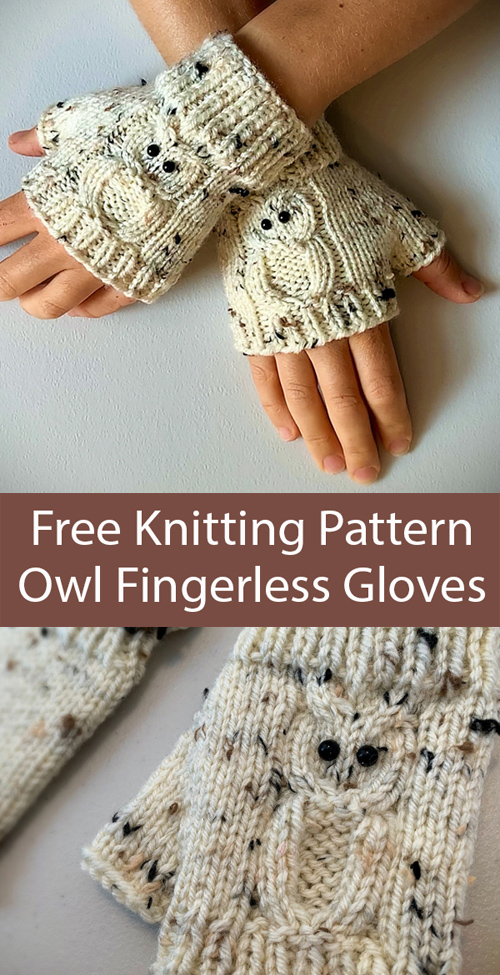
Owl Fingerless Gloves - Free Knitting Pattern
![]() |
| Designed by © Janis Frank |
What beautiful fingerless gloves knitting pattern! I found it on Pinterest... Fingerless mitts with a cute owl cable knit in the round. Designed by Janis Frank. Aran weight yarn. Web-version is free.
Full Post: Owl Fingerless Gloves
Itty Bitty Bear Cubs – Free Preemie Baby Hat Knitting Pattern
Photos © ThornwoodKnits & © Carolyn Ingram
Itty Bitty Bear Cubs by Carolyn Ingram is an adorable free preemie baby hat knitting pattern featuring tiny bear ears and a simple rolled brim.
Originally designed for the designer's premature twin grandsons during their stay in the NICU, these little bear hats come in two preemie sizes. They use sport-weight yarn and require only a small amount of yarn, making them a sweet little project for a new baby or charity knitting.
Itty Bitty Bear Cubs Pattern Details
- Designer: Carolyn Ingram
- Published: March 2015
- Craft: Knitting
- Category: Preemie baby hat / beanie
- Pattern availability: Free download
- Sizes: Small Preemie and Large Preemie
- Yarn weight: Sport
- Suggested yarn: Malabrigo Arroyo
- Yardage: Approximately 45–60 yards (41–55 m)
- Needles: 3.25 mm (US 3) and 3.5 mm (US 4)
- Gauge: 26.5 stitches × 33 rows = 4 inches
- Construction: Bottom up, worked in the round
- Features: Rolled brim and knitted bear ears
- Language: English
A Tiny Bear Hat Designed for Preemies
There is a particularly sweet story behind the Itty Bitty Bear Cubs pattern. Carolyn Ingram originally created these tiny hats after her daughter asked for something for her twin sons to wear during their stay in the NICU.
The result is a simple little knitted beanie transformed into a bear-cub hat with the addition of two small ears.
Because the original sizes were designed specifically for premature babies, this pattern can also be useful for knitters looking for small projects for appropriate neonatal charity programs. Always check the current requirements of the hospital or organization before donating handmade baby items.
Two Preemie Hat Sizes
The original free pattern includes two preemie sizes:
- Small Preemie: approximately 9-inch finished circumference and 4 inches high, designed for an approximately 11-inch head.
- Large Preemie: approximately 10.5-inch finished circumference and 4.75 inches high, designed for an approximately 12.5-inch head.
The designer also provides notes with the pattern for making larger versions for newborn and 0–3 month babies.
Sport-Weight Yarn and Small Yardage
The original Itty Bitty Bear Cubs hats use Malabrigo Arroyo, a sport-weight merino yarn.
Each hat requires approximately 45–60 yards (41–55 m), so this can be a useful small-yardage project if you already have a suitable amount of sport-weight yarn.
If the hat is intended for a baby, consider softness and practical care requirements when choosing a substitute yarn.
Needles and Gauge
The pattern calls for 3.25 mm (US 3) and 3.5 mm (US 4) needles.
The specified gauge is approximately 26.5 stitches and 33 rows = 4 inches (10 cm).
Because the original hats are designed for very small babies, getting close to the intended gauge is especially important when you want the finished dimensions to match one of the preemie sizes.
How Are the Bear Cub Hats Constructed?
The hat is worked in the round from the bottom up, beginning with a simple rolled edge and continuing toward the crown.
Crown decreases shape the top of the hat. The little bear ears are then created separately from stitches picked up on the finished hat, giving the otherwise simple beanie its unmistakable bear-cub appearance.
The pattern was written for double-pointed needles, although knitters comfortable with other methods of small-circumference knitting may prefer their usual technique.
Skills Used in This Pattern
Although these hats are small, they provide an opportunity to practice several useful knitting techniques, including:
- Knitting in the round
- Stockinette stitch
- Basic decreases
- Picking up stitches
- Working small circumferences
- Simple finishing and seaming for the ears
If you already know basic knitting and want to become more comfortable with knitting in the round, a tiny hat can be a much smaller commitment than starting with a full-size garment.
Can You Make the Bear Hat in Larger Baby Sizes?
Yes. Although the two primary sizes are designed for preemies, Carolyn Ingram also includes notes for adapting the idea for newborn and 0–3 month sizes.
The designer has also made larger versions using heavier yarn and larger needles as her grandsons grew.
Follow the designer's current sizing notes rather than simply adding stitches at random, particularly when knitting for a very young baby.
A Great Little Stash-Buster
With only 45–60 yards required for the original preemie sizes, Itty Bitty Bear Cubs can be a charming way to use a small quantity of suitable leftover yarn.
Neutral browns and creams create the classic teddy-bear look, but the simple design can work in many colors. A soft blue, pink, gray, yellow or another baby-friendly shade can give the same little hat a completely different personality.
Get the Free Itty Bitty Bear Cubs Pattern
The complete Itty Bitty Bear Cubs by Carolyn Ingram is currently available as a free downloadable knitting pattern.
Get the Free Itty Bitty Bear Cubs Knitting Pattern
Pattern availability was checked when this article was updated. Availability on external websites may change over time.
Chestnut Street Scarf – Free Cable Scarf Knitting Pattern
Chestnut Street Scarf. Designed by © Alexandra Davidoff for Lion Brand
Chestnut Street Scarf by Alexandra Davidoff for Lion Brand is a handsome free cable scarf knitting pattern featuring a bold central cable surrounded by smaller cable details.
Worked flat in rows with medium-weight yarn, this is a satisfying project for knitters who already know the basics and want to practice more intricate cable knitting. Lion Brand rates the pattern Level 3 – Intermediate.
Chestnut Street Scarf Pattern Details
- Designer: Alexandra Davidoff
- Publisher: Lion Brand Yarn
- Pattern number: L60396
- Craft: Knitting
- Category: Cable scarf
- Pattern availability: Free from Lion Brand
- Skill level: Intermediate
- Finished size: About 8 × 65 inches (20.5 × 165 cm)
- Yarn: Lion Brand Fishermen's Wool
- Yarn weight: #4 Medium / Worsted
- Needles: US 8 (5 mm)
- Gauge: 27 stitches + 22 rows = about 4 inches (10 cm) in cable patterns
- Construction: Worked flat, back and forth in rows
- Instructions: Written cable instructions and charts
A Classic Cable Scarf
The Chestnut Street Scarf gets its distinctive appearance from a combination of cable patterns rather than a single simple cable running from one end to the other.
A prominent central cable creates the main visual feature, while narrower cable details frame it on both sides. The result is a richly textured scarf with a traditional knitted look.
The cable arrangement is especially attractive in a solid or lightly heathered yarn where the shadows created by the crossed stitches remain easy to see.
A 32-Row Main Cable Pattern
After the opening cable ribbing section, the scarf moves into its main decorative cable pattern.
The central design develops over a 32-row repeat, giving the scarf a much more detailed appearance than a basic two- or four-row cable.
This makes Chestnut Street particularly appealing if you enjoy watching a cable motif gradually develop as you knit.
Written Instructions and Cable Charts
One of the useful features of the official Lion Brand pattern is that the cable designs can be followed using either written instructions or charts.
If you prefer working row by row from written directions, you can use that format. If you find it easier to visualize how the cables cross and interact, the charts provide another option.
This also makes the project useful for knitters who want to become more comfortable reading cable charts while still having written directions available for reference.
Worked Flat in Rows
Chestnut Street Scarf is worked back and forth in rows.
There is no knitting in the round and no garment shaping to manage. Instead, most of your attention can go toward keeping track of the different cable crossings.
The scarf begins with 55 stitches and develops its texture through a combination of knit, purl and cable stitches.
Finished Scarf Size
According to Lion Brand, the finished Chestnut Street Scarf measures approximately:
8 inches wide × 65 inches long
(20.5 × 165 cm)
This gives you a substantial adult scarf without making it excessively wide or bulky.
Designed as a Men's Scarf
Lion Brand currently categorizes Chestnut Street as a men's knitting pattern.
Its strong geometric cables, natural wool and classic rectangular shape certainly make it an excellent men's scarf, but the design itself is versatile enough to be worn by anyone who enjoys traditional cable knit accessories.
It could also make a beautiful handmade winter gift.
The Original Yarn: Fishermen's Wool
The original pattern was designed for Lion Brand Fishermen's Wool.
This yarn is a natural-looking wool yarn that works particularly well with cables because the stitch definition allows the twists and crossings to stand out clearly.
The original version uses one ball of Fishermen's Wool.
Choosing a Substitute Yarn
If you want to substitute another yarn, look for a #4 medium / worsted-weight yarn capable of producing the required gauge and good cable definition.
Smooth yarns usually make complex cables easier to see than highly textured or fuzzy yarns.
Because the scarf contains several cable patterns, making a swatch is useful not only for checking gauge but also for seeing whether your chosen yarn shows the cable details clearly.
Needles and Cable Needle
The pattern uses US 8 (5 mm) knitting needles.
You will also want a cable needle to hold stitches temporarily while making the different cable crossings.
Straight or circular needles can be used for a flat scarf as long as you are comfortable working back and forth with them.
Understanding the Gauge
Lion Brand gives a gauge of approximately 27 stitches and 22 rows = 4 inches (10 cm) in the cable patterns.
Notice that this is a cable-pattern gauge rather than a plain stockinette gauge.
Cables pull the knitted fabric inward, so measuring the actual cable fabric is more useful for this project than assuming a standard gauge based only on the yarn weight.
Skills Used in the Chestnut Street Scarf
Techniques used in this project include:
- Knitting and purling
- Working flat in rows
- Using a cable needle
- Crossing stitches to the right and left
- Working several cable variations
- Following a longer pattern repeat
- Reading written cable instructions
- Reading cable charts
- Binding off
- Blocking the finished scarf
Is Chestnut Street Scarf Beginner Friendly?
Lion Brand officially rates the pattern Level 3 – Intermediate.
The scarf construction itself is straightforward because there is no garment shaping or knitting in the round. The challenge comes from the number of cable crossings and keeping your place within the longer cable repeat.
If you have already knitted a simple cable project and want something more interesting, Chestnut Street can be a good next step.
Tips for Knitting the Cable Pattern
With a detailed cable design, keeping track of your row is often more important than knitting quickly.
A row counter, printed chart marker or simple note can help you remember exactly where you stopped.
It can also be helpful to learn how each cable section should look. Once the motif begins to develop, the knitted fabric itself can provide useful visual clues about where the next crossing belongs.
Don't Skip Blocking
Blocking can make a noticeable difference to a cable scarf.
Freshly knitted cables may pull the fabric inward and make the scarf appear narrower or more uneven than expected. Gentle blocking allows the stitches to settle and helps the cable details show more clearly.
Always follow the care instructions appropriate for the yarn you choose.
A Great Handmade Gift for Cable Lovers
Scarves are useful gift projects because sizing is much simpler than with sweaters, socks or fitted accessories.
Chestnut Street adds enough cable detail to make the finished scarf look special while retaining the practical rectangular construction of a classic winter scarf.
Choose a neutral shade for a traditional look or use a richer color to give the same cable pattern a more contemporary appearance.
Why Knit the Chestnut Street Scarf?
Chestnut Street is a strong choice when you want to move beyond basic scarf knitting and make the cables the centerpiece of the project.
The combination of a bold central motif, smaller framing cables and a substantial 32-row repeat produces an impressive result from a simple rectangular construction.
You also have the flexibility of following either the written instructions or charts, making the pattern useful for practicing cable chart reading at your own pace.
Get the Free Chestnut Street Scarf Knitting Pattern
The complete Chestnut Street Scarf by Alexandra Davidoff is currently available from Lion Brand as pattern L60396.
Get the Free Chestnut Street Scarf Knitting Pattern →
Pattern availability was checked when this article was updated. Availability and access requirements on external websites may change over time.
Knitted Pattern Anyone Should Learn - Tutorial
![]() |
| Photos above © Елена Шатохина |
Knit Adult Ribbed Slippers - Free Knitting Pattern + Video
![]() |
| Photos above © Prjaga |
What beautiful knitting adult slippers (Free knit pattern)! I found it on Pinterest... These Adult Ribbed Slippers will for sure keep your feet nice and toasty. Knitted Slippers to lounge around the house in coziness for Women. When it comes to knitting socks, there are countless awesome patterns around, as well as countless stunning sock yarns to choose from! Slippers and Socks might seem a little intimidating to beginners, but in reality, they’re quite easy to do once you’ve got some practice.
Full Post: Knit Adult Ribbed Slippers
Discover More From the Archive
A fresh mix of knitting patterns and tutorials from the Amazing Knitting archive.