![]() |
| Photos above © Annie's |
...
Gansey Block Knit Afghan - Knitting Pattern
Oydis Sweater – A-Line Cable Pullover Knitting Pattern
Oydis Sweater. Photo © Eivind Røhne
Oydis Sweater by Norwegian knitwear designer Linda Marveng is a striking A-line pullover featuring a dramatic Shadow Diamond Cable, a flattering curved hem and elegant I-cord finishing.
The pattern is available in six sizes from XS through 2XL. The body is worked flat while the sleeves are knitted in the round, combining traditional sweater construction with distinctive cable and finishing details.
Oydis Sweater Pattern Details
- Designer: Linda Marveng
- Published: March 2016
- Craft: Knitting
- Category: Women's pullover / sweater
- Pattern availability: Paid digital pattern
- Sizes: XS, S, M, L, XL and 2XL
- Finished bust: 33–49.5 inches (84–126 cm)
- Finished hip: 38.5–55 inches (98–140 cm)
- Needles: US 6 (4 mm)
- Gauge: 20 stitches × 30 rows = 4 inches (10 cm) in stockinette stitch
- Construction: Body worked flat; sleeves worked in the round
- Shape: A-line with positive ease
- Neckline: Round / crew neck
- Features: Shadow Diamond Cable, curved hem, I-cord edging and garter-stitch details
A Striking Shadow Diamond Cable Sweater
The focal point of Oydis is the large Shadow Diamond Cable.
Rather than covering the entire sweater with small cable repeats, Linda Marveng uses a dominant central cable motif to give the design a strong architectural appearance.
The cable is balanced by areas of simpler fabric, allowing its shape and texture to remain the visual focus of the sweater.
A-Line Shape With a Curved Hem
Oydis has a gentle A-line silhouette, with more room around the hips than the bust.
The lower edge is curved rather than perfectly straight. This shaping gives the sweater a distinctive drape and helps emphasize its longer silhouette.
The finished hip measurements range from approximately 38.5 to 55 inches, depending on size.
Six Sizes From XS to 2XL
The pattern includes six sizes: XS (S, M, L, XL, 2XL).
Finished bust measurements are approximately 33 (35.5, 37.75, 41.75, 45.75, 49.5) inches.
Finished hip measurements are approximately 38.5 (41, 43.25, 47.25, 51.25, 55) inches.
The finished sweater length ranges from approximately 29.25 to 31 inches.
Body Worked Flat
Unlike many modern sweaters that are constructed entirely in the round, the body of Oydis is worked flat.
Garter stitches form edging along the sides, while the central cable provides the main decorative feature.
This construction ultimately requires assembly, so knitters should be comfortable with finishing and seaming as well as cable knitting.
Sleeves Worked in the Round
The sleeves use a different construction from the body and are worked in the round.
Linda Marveng's original method begins the sleeve with an I-cord and then picks up stitches from that cord.
The designer also provides an alternative approach: use a provisional cast-on and later finish with an I-cord bind-off similar to the body.
I-Cord Finishing
I-cord is an important design element in Oydis rather than simply a hidden finishing technique.
The neat rounded bands frame the lower edge and complement the clean lines of the sweater.
Together with the garter-stitch side details and neckline, the I-cord gives the garment a polished finish around the more dramatic cable motif.
Round Garter-Stitch Neckline
The sweater has a simple round neckline finished with a narrow garter-stitch band.
Keeping the neckline relatively understated prevents it from competing with the large Shadow Diamond Cable on the body.
Two Yarns Held Together
The original Oydis sample combines one strand of fine merino tweed with one strand of alpaca lace yarn throughout the project.
Linda Marveng chose this combination to produce a fabric with strong stitch definition and a subtle halo.
This is particularly effective for the large cable motif because the tweed contributes texture while the alpaca softens the overall fabric.
Original Yarn Combination
The original sweater combines:
- Du Store Alpakka Dreamline Soul – a lace-weight alpaca blend
- Pickles Merino Tweed – a fine merino tweed yarn
One strand of each yarn is held together throughout the sweater.
Depending on size, the pattern lists approximately 1,215–2,481 yards (1,111–2,269 m) for each of the two yarns used together.
Can You Use a Single DK Yarn?
Yes. The designer also suggests that a suitable DK / 8-ply yarn can be used as a single strand instead of combining the original two yarns.
If you make this substitution, matching gauge and producing good cable definition are more important than matching the original fiber blend exactly.
Swatching is particularly worthwhile because a yarn that looks beautiful in stockinette may behave quite differently in the large Shadow Diamond Cable.
Needles and Gauge
The pattern uses US 6 (4 mm) needles, including circular needles and double-pointed needles for different parts of the construction.
The main gauge is 20 stitches × 30 rows = 4 inches (10 cm) in stockinette stitch.
The pattern also gives gauge information for the Shadow Diamond Cable and garter stitch, which is useful because the sweater combines several different textures.
Skills Used in the Oydis Sweater
Oydis combines several garment-knitting and finishing techniques, including:
- Knitting and purling
- Cable knitting
- Reading charts
- Working flat
- Knitting in the round
- Holding two yarns together
- I-cord and I-cord edging
- Provisional cast-on
- Short rows
- Set-in sleeve construction
- Three-needle bind-off
- Seaming and garment finishing
Is Oydis an Easy Sweater?
Oydis is better suited to a knitter who already has some experience with sweater construction and cables.
The project combines flat and circular knitting, a prominent cable, I-cord finishing, short rows, set-in sleeves and seaming.
It can therefore be an interesting project if you are ready to move beyond basic seamless pullovers and want to practice more traditional garment construction.
The Matching Oydis Cowl
Linda Marveng also designed a matching Oydis Cowl using the same Shadow Diamond Cable concept.
The cowl can be worn with the sweater to create the appearance of a dramatic cable collar, or the sweater can be worn by itself with its simple round neckline.
The Oydis Cowl is a separate pattern and is not included with the sweater pattern.
The Norse Goddess Collection
Oydis belongs to Linda Marveng's Norse Goddess Collection.
The sweater takes its name from Oydis, associated in the design story with good luck, while the strong cable motif and natural-toned original yarns give the garment a distinctly Nordic character.
Why Knit the Oydis Sweater?
Oydis is an appealing project if you want a sweater where one strong cable motif does most of the visual work.
The combination of a Shadow Diamond Cable, curved A-line hem, I-cord bands and textured yarn gives the finished pullover a recognizable look without covering every part of the garment in complicated stitchwork.
The six-size range and the option of substituting a single DK yarn also provide useful flexibility when planning your version.
Get the Oydis Sweater Knitting Pattern
The complete Oydis Sweater by Linda Marveng is currently available as a paid digital knitting pattern from the designer's Ravelry store.
Get the Oydis Sweater Knitting Pattern →
This pattern is not currently free. Pattern availability and pricing on external websites may change over time.
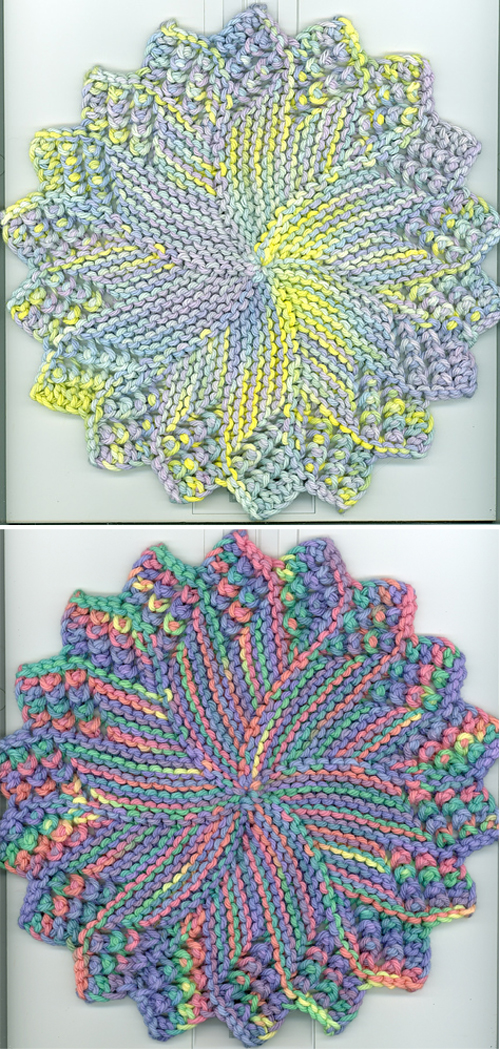
Easy as Pie Dishcloth Free Knitting Pattern
The Easy as Pie Dishcloth by Emily E. Williams is a clever free knitting pattern for a small round dishcloth worked with short-row shaping.
The circular design creates a practical textured cloth while giving knitters a compact project for practicing short rows. With only a small amount of worsted-weight yarn required, it is also a useful project for leftover cotton yarn.
Easy as Pie Dishcloth Pattern at a Glance
Designer: Emily E. Williams
Pattern: Easy as Pie Dishcloth
Craft: Knitting
Category: Dishcloth / Washcloth
Yarn Weight: Worsted
Yardage: Approximately 40 yards (37 m)
Needles: US 6 (4 mm)
Gauge: 20 stitches = 4 in in garter stitch
Finished Size: Approximately 6 in (15 cm) diameter
Construction: Worked flat with short rows
Techniques: Garter stitch, short rows, grafting or seaming
Language: English
Pattern Availability: Free
About the Easy as Pie Dishcloth
Unlike a traditional square dishcloth, Easy as Pie is shaped into a circle. The wedge-shaped sections are created with short rows and joined together to form the finished round cloth.
The garter-stitch texture makes the fabric practical for kitchen use, while the circular construction gives the project a distinctive look. It is a small project, but the shaping makes it more interesting than a basic rectangular dishcloth.
Yarn and Needle Notes
The pattern calls for approximately 40 yards (37 m) of worsted-weight yarn. For a working dishcloth, cotton or a cotton-rich yarn is a practical choice because it is absorbent and easy to wash.
The recommended needle size is US 6 (4 mm). The listed gauge is 20 stitches = 4 inches in garter stitch.
Finished Size
The finished dishcloth measures approximately 6 inches (15 cm) in diameter.
Because this is a household item rather than a fitted garment, achieving a pleasant, useful fabric is generally more important than matching the measurements with extreme precision.
Short-Row Construction
The round shape is created by working a sequence of short-row wedges. These sections gradually build the circle while keeping the knitting itself flat.
The final edges are then joined using the finishing method described in the designer's instructions. This makes the project a useful way to practice short-row shaping and finishing techniques on a small scale.
Get the Free Easy as Pie Dishcloth Pattern
The Easy as Pie Dishcloth was designed by Emily E. Williams. The complete pattern is currently available as a free download from the designer's Ravelry listing.
Amazing Knitting does not reproduce the designer's complete knitting instructions. Use the button below to visit the original pattern page for the current authorized version.
Pattern design © Emily E. Williams. Pattern availability is controlled by the designer and may change over time.
Driftwood Sweater – Free Knitting Pattern
Driftwood by Isabell Kraemer is a relaxed, seamless pullover worked from the top down. Its casual shape, simple stockinette fabric and distinctive neckline make it an appealing sweater project for everyday wear.
The sweater shown here was knitted by Atelier de Soyun, who described Driftwood as an easy, comfortable and highly wearable project. Although the featured version is worked in a solid color, the original design also works beautifully with stripes.
Best of all, the original Driftwood knitting pattern is still available as a free download from designer Isabell Kraemer.
Pattern: Driftwood by Isabell Kraemer. Featured project/photo: Atelier de Soyun.
Driftwood Sweater Pattern Overview
- Pattern: Driftwood
- Designer: Isabell Kraemer
- Published: June 2012
- Category: Adult pullover
- Construction: Seamless, top down
- Sleeve construction: Contiguous set-in sleeves
- Yarn weight: Worsted
- Suggested yarn: Lang Yarns Georgia
- Needles: 4 mm and 4.5 mm
- Gauge: 19 stitches and 26.5 rows = 10 cm / 4 inches
- Sizes: XS, S, M, L, XL
- Yardage: Approximately 1083–1509 yards / 990–1380 m
- Pattern availability: Free
About the Driftwood Sweater
Driftwood is designed as a casual everyday pullover with a comfortable amount of positive ease.
One of its most interesting features is the neckline. The partial front opening and button detail give the sweater more character than a basic crew-neck pullover while keeping the overall design relaxed and wearable.
The original design also lends itself naturally to stripes, although a solid color—like the featured Atelier de Soyun project—creates a clean, minimal appearance.
Seamless Top-Down Construction
Driftwood is worked seamlessly from the top down.
Instead of knitting separate front, back and sleeve pieces and sewing them together at the end, the garment develops from the neckline downward.
The pattern features the contiguous set-in sleeve method developed by Susie Myers. This construction creates the appearance of set-in sleeves while allowing the sweater to be worked seamlessly from the top.
Sizes and Finished Bust
The original pattern is available in five sizes: XS, S, M, L and XL.
Approximate finished bust measurements are:
- XS: 33 in / 84 cm
- S: 35 in / 90 cm
- M: 39 in / 100 cm
- L: 43 in / 109 cm
- XL: 46 in / 118 cm
The sweater is intended to be worn with approximately 1–2 inches of positive ease, so consider both your actual bust measurement and the amount of ease you prefer when choosing a size.
Yarn
The original Driftwood pattern suggests Lang Yarns Georgia, a worsted-weight yarn.
The documented yarn requirement is approximately 990–1380 meters / 1083–1509 yards, depending on size.
If you substitute another yarn, choose one capable of producing the required gauge and a fabric suitable for an everyday pullover.
Solid Color or Stripes?
Driftwood is especially versatile because the basic sweater shape works in both striped and solid-color versions.
Stripes emphasize the casual character of the original design, while a single color draws more attention to the neckline and overall sweater silhouette.
The featured Atelier de Soyun version demonstrates how different the same pattern can look when knitted entirely in one color.
Needles
The published pattern information lists:
- US 6 / 4 mm needles
- US 7 / 4.5 mm needles
Needle size is always a starting point. Use the size that allows you to obtain the designer's required gauge.
Gauge
The original gauge is:
19 stitches and 26.5 rows = 4 inches / 10 cm in stockinette stitch.
Checking gauge is particularly important for a sweater because even a small difference across several inches can substantially change the finished bust measurement.
The Henley-Style Neckline
One of Driftwood's recognizable details is its partially opening neckline with button fastening.
This breaks up the simplicity of the stockinette body and gives the sweater a casual, slightly nautical character that works particularly well with the striped version.
The neckline also introduces useful garment-knitting skills beyond those found in a very basic pullover.
Useful Skills for Driftwood
Knitters preparing to make this sweater will benefit from being comfortable with:
- Casting on and binding off
- Knitting and purling
- Stockinette stitch
- Working in the round
- Top-down garment construction
- Increasing and decreasing
- Working buttonholes
- Working sleeves in a small circumference
- Following garment sizing instructions
- Weaving in ends and finishing
Why Top-Down Sweaters Are Useful
Top-down sweater construction has several practical advantages. The garment develops from the neckline downward, making its overall shape easier to visualize as you knit.
Because Driftwood is seamless, there is also much less finishing than with a traditional sweater made from separately knitted pieces.
For knitters moving from accessories into garments, a straightforward stockinette sweater can also provide useful experience with sizing, gauge, sleeves and garment shaping.
Tips Before You Cast On
Make a gauge swatch. A sweater is a significant investment of both yarn and knitting time, so checking gauge before beginning is worthwhile.
Choose your size using the finished measurements. Remember that Driftwood is designed with positive ease.
Decide on stripes before buying yarn. Yarn requirements for a multi-color version need to be divided between the chosen colors.
Read through the neckline and sleeve construction first. These are the areas that may be less familiar if this is one of your first seamless sweaters.
Why Driftwood Is Worth Knitting
Driftwood combines several interesting garment techniques with a sweater that remains practical enough for everyday wear.
The seamless top-down construction minimizes finishing, while the contiguous sleeves and distinctive neckline make the project more interesting than a basic stockinette pullover.
Its ability to work equally well in stripes or a solid color also gives knitters plenty of freedom to personalize the finished sweater.
Get the Free Driftwood Knitting Pattern
The complete Driftwood pattern is currently available as a free download from designer Isabell Kraemer's Ravelry store.
Get the Free Driftwood Pattern →
Pattern Availability
Amazing Knitting links readers to legitimate designer or publisher sources whenever possible. Pattern prices, download locations and availability can change after an article is published.
Read Our Pattern Availability Policy →
Amazing Knitting is an independent pattern discovery and project-guide site. Driftwood and its original knitting instructions remain the intellectual property of Isabell Kraemer. The featured project is credited to Atelier de Soyun. This guide does not reproduce the complete pattern instructions.
Knit Ribbed Garter Stitch Slippers - Free Knitting Pattern
![]() |
| Photos above © DROPS Design & © inapina |
Bandkerchief - Free Pattern
![]() |
| Photos above © Pia Thadani |
Elegant Lace Scarf - Free Pattern
![]() |
| Photos above © Craftown |
Full Post: Elegant Lace Scarf
Knit Baby Turban Hat - Free Pattern
![]() |
| The photo above © Pickles |
Knitted Dogwood Blossoms – Free Flower Knitting Pattern
Knitted Dogwood Blossoms by Linda Thach is a charming flower knitting project inspired by the distinctive shape of real dogwood blossoms. Each flower is created from individually knitted pieces that are assembled together to form a decorative bloom approximately 5 inches across.
The project uses worsted-weight yarn and 5 mm needles, making it a relatively quick way to practice shaping, increases, decreases and simple finishing techniques without committing to a large garment.
These knitted flowers can be used as brooches, hat or scarf embellishments, gift decorations, bouquet elements or seasonal home décor.
Design and original pattern © Linda Thach / Purl Avenue.
Knitted Dogwood Blossoms Pattern Overview
- Designer: Linda Thach
- Pattern: Knitted Dogwood Blossoms
- Original source: Purl Avenue
- Craft: Knitting
- Category: Ornamental flower / embellishment
- Published: May 2014
- Finished size: Approximately 5 in / 12.7 cm across
- Yarn weight: Worsted
- Suggested yarn: Knit Picks Brava Worsted
- Needles: US 8 / 5 mm DPNs
- Construction: Individual knitted pieces assembled into a flower
- Main techniques: Knitting flat, shaping, increases, decreases, I-cord and seaming
- Language: English
A Knitted Flower Inspired by Dogwood Blossoms
Dogwood flowers have a recognizable open shape with broad petals surrounding a compact center. Linda Thach's knitted version translates that shape into yarn using individually formed petals and a small central detail.
The result is more dimensional than a simple flat flower applique, while still remaining lightweight enough to attach to clothing, accessories or decorative projects.
How the Flower Is Constructed
The flower is not knitted as one continuous circular piece. Instead, the individual components are made separately and then assembled.
This construction gives the petals more definition and allows you to position them carefully during finishing.
The project also includes a small I-cord element used as part of the flower's center construction.
Why This Is a Good Small Knitting Project
Knitted Dogwood Blossoms are useful when you want to practice shaping without making a large garment.
The project introduces several techniques in a very small format:
- Increasing stitches to widen a petal
- Working stockinette fabric
- Decreasing stitches to shape the petal tip
- Making a short I-cord
- Using yarn tails for assembly
- Arranging knitted pieces into a finished decorative shape
Yarn for Knitted Dogwood Blossoms
The original pattern recommends Knit Picks Brava Worsted, a worsted-weight yarn.
Because this is a small decorative project, it can also be a practical way to use leftover worsted-weight yarn from larger projects.
A smooth yarn with good stitch definition is especially helpful because it allows the shaping of each petal to remain clearly visible.
Choosing Colors
Traditional dogwood-inspired colors such as white, cream, pale pink and green can create a botanical look, but the pattern can easily be adapted to other color combinations.
You can make several blossoms in coordinating shades for a decorative bouquet, or use a contrasting center to emphasize the structure of each flower.
Needles and Materials
- Worsted-weight yarn
- Two US 8 / 5 mm double-pointed needles
- Yarn or tapestry needle
- Scissors
- Optional pin or brooch backing for wearable flowers
Although double-pointed needles are listed, the flower components themselves are small, so the project does not require managing a large number of stitches.
Finished Size
The original Knitted Dogwood Blossoms pattern produces a flower approximately 5 inches / 12.7 cm across.
The final dimensions can vary slightly depending on yarn choice, needle size and individual tension.
If you want a smaller flower, Linda Thach later published a separate Small Knitted Dogwood Blossoms version measuring about 3.5 inches / 8.9 cm.
Skills You'll Use
- Casting on
- Knit stitches
- Purl stitches
- Stockinette stitch
- Increasing stitches
- Decreasing stitches
- Working small flat pieces
- Making I-cord
- Using a tapestry needle
- Assembling knitted components
- Weaving in ends
Is This Beginner Friendly?
Knitted Dogwood Blossoms can be a good project for an advanced beginner who already knows the basic knit and purl stitches.
The individual pieces are small, so mistakes are inexpensive to fix, and the project provides useful practice with increases and decreases.
The finishing stage requires a little patience because the separate pieces must be positioned and joined neatly, but it is also a good introduction to assembling knitted decorative items.
Ideas for Using Knitted Dogwood Blossoms
These flowers can be used in many ways beyond simply displaying them on their own.
- Brooches: attach a pin backing for a removable accessory.
- Hats: add one flower to a plain knitted hat.
- Scarves: use a blossom as a decorative accent.
- Gift wrapping: replace a traditional bow with a reusable knitted flower.
- Bouquets: combine several blossoms with knitted or wrapped stems.
- Home décor: attach flowers to wreaths, cushions or seasonal displays.
- Hair accessories: securely attach a flower to an appropriate clip or band.
Tips for Neater Petals
Keep your tension consistent. Uneven tension can make one petal noticeably larger than the others.
Compare the petals before assembly. Lay all the pieces beside each other before joining them and check that their overall proportions match.
Do not pull assembly yarn too tightly. The center should be secure without causing the petals to bunch excessively.
Shape the flower before weaving in every end. Leaving some tails available during assembly makes it easier to adjust the final positioning.
Making a Bouquet
Because each blossom is relatively small and uses little yarn, it is practical to make several flowers for a knitted bouquet.
You can vary the colors slightly while keeping the center consistent, or make all of the blossoms in one shade for a more realistic botanical arrangement.
If creating stems, make sure any internal wire or structural material is fully covered and securely finished, particularly if the decoration will be handled frequently.
Original and Small Versions
Linda Thach later created a smaller version of the design called Small Knitted Dogwood Blossoms.
The original flower measures approximately 5 inches across, while the smaller version measures about 3.5 inches / 8.9 cm.
This gives knitters two useful scales depending on whether the finished flower will be used as a larger decorative piece or a smaller embellishment.
Is Knitted Dogwood Blossoms a Free Knitting Pattern?
The original Knitted Dogwood Blossoms pattern was published by Linda Thach on Purl Avenue and is listed through its original Purl Avenue source.
Amazing Knitting directs readers to the designer's original website whenever possible rather than reproducing or linking to copied instructions.
View Knitted Dogwood Blossoms at Purl Avenue →
Want a Smaller Dogwood Flower?
Linda Thach also offers the later Small Knitted Dogwood Blossoms pattern, which creates a flower approximately 3.5 inches / 8.9 cm across.
That version is currently available free on Purl Avenue and includes a video tutorial.
View the Free Small Dogwood Blossoms Pattern →
Why This Flower Is Worth Knitting
Knitted Dogwood Blossoms are a good example of how a small amount of yarn can be transformed into a detailed decorative project.
They are quick compared with garments or blankets, easy to customize with different colors and useful for practicing shaping and finishing techniques.
The finished flowers are also versatile enough to be reused across many different projects, from accessories and gifts to seasonal decorations.
Pattern Availability
Amazing Knitting links readers to legitimate designer or publisher sources whenever possible. Pattern prices, download locations and availability can change after an article is published.
Read Our Pattern Availability Policy →
Amazing Knitting is an independent pattern discovery and project-guide site. The Knitted Dogwood Blossoms design and original pattern remain the intellectual property of Linda Thach / Purl Avenue. This guide does not reproduce the designer's complete row-by-row knitting instructions.
Sunburst Dishcloth - Free Pattern
![]() |
| Photos above © Sara H. Baldwin |
Woven Cable Headband – Free Knitting Pattern
The Woven Cable Headband by Priscillia Uloho is a beautifully textured ear warmer that turns classic cable knitting into an eye-catching woven design.
Worked flat with Aran-weight yarn and then seamed, this free knitting pattern is a manageable way to practice cable techniques without committing to a large project.
The original pattern is still available free from the designer's website, making this an excellent small project for knitters ready to move beyond basic knit-and-purl textures.
Design and featured photos: Priscillia Uloho / Erica and Eleanor.
Woven Cable Headband Pattern Overview
- Pattern: Woven Cable Headband
- Designer: Priscillia Uloho
- Original publication: August 2019
- Project: Headband / ear warmer
- Size: Adult
- Skill level: Intermediate
- Yarn weight: Aran
- Suggested yarn: Paintbox Yarns Simply Aran
- Yarn required: Approximately 50g / 100 yards
- Needles: 5 mm straight knitting needles
- Construction: Worked flat and seamed
- Main technique: Cable knitting
- Pattern availability: Free from the designer
About the Woven Cable Headband
The standout feature of this headband is the interlocking cable motif running across the fabric.
Instead of a single cable traveling vertically through the project, several cable sections interact to produce the appearance of knitted strands weaving over and under one another.
The result looks intricate, but the project remains relatively compact and is worked back and forth on ordinary straight knitting needles.
Finished Size
The designer describes the pattern as an adult-size headband. The finished headband is approximately:
- Width: 4 inches / about 10 cm
- Length: 18 inches / about 46 cm after 14 repeats
Because head circumference and knitting tension vary, check the length against the intended wearer before finishing and seaming the ends.
Yarn for the Woven Cable Headband
The original design uses approximately 50g of Aran-weight yarn. The designer used Paintbox Yarns Simply Aran.
Ravelry lists the project at approximately 100 yards / 91 meters, making this a relatively small-yarn project.
A smooth yarn with good stitch definition is particularly useful here because it helps the woven cable structure remain clearly visible.
Needles and Materials
For the original pattern, the designer specifies:
- 5 mm straight knitting needles
- A cable needle
- A tapestry needle for seaming and weaving in ends
- Craft scissors
- Approximately 50g of Aran-weight yarn
Always check the original pattern before casting on in case the designer updates any of the pattern information.
Gauge
The pattern information lists a gauge of approximately 18 stitches and 24 rows = 4 inches / 10 cm in stockinette stitch.
Gauge matters for a headband because the finished circumference determines whether it sits comfortably around the head.
If your knitting is substantially tighter or looser than the designer's, adjustments may be needed before seaming.
How the Headband Is Constructed
One of the appealing features of this design is its straightforward construction.
The headband is knitted flat, back and forth, rather than worked in the round.
Once the required length has been reached, the cast-on and bound-off ends are joined to form the finished headband.
This makes the project particularly convenient for knitters who enjoy cables but prefer working with straight needles.
Understanding the Woven Cable Effect
The woven appearance comes from alternating cable crossings.
Some groups of stitches are held toward the front of the work while others are held toward the back. Changing the direction of these crossings creates the interlaced appearance.
The surrounding stitch texture provides contrast, helping the raised cable sections stand out from the background.
Skill Level
The pattern is classified as Intermediate.
Useful skills for this project include:
- Casting on
- Knitting and purling
- Working back and forth in rows
- Following a repeating stitch pattern
- Using a cable needle
- Working left- and right-crossing cables
- Binding off
- Mattress stitch or another neat seaming method
- Weaving in yarn ends
A Good Project for Practicing Cables
Large cable projects such as sweaters and blankets can involve many hours of knitting. A headband provides a much smaller canvas on which to practice the same basic technique.
The repeating woven motif gives you frequent opportunities to work cable crossings, helping the movement of the stitches become more familiar as the project progresses.
And because the headband is knitted flat, you can concentrate on the cable pattern without simultaneously learning circular knitting.
Tips for a Neater Cable Headband
Keep the cable crossings consistent. Check whether stitches need to be held at the front or back before making each crossing.
Watch your tension around the cables. The stitches immediately beside a crossing can become loose if the working yarn is not kept reasonably consistent.
Count your repeats. Keeping a simple tally makes it easier to reproduce the intended length.
Check the fit before seaming. Wrap the unfinished strip gently around the intended wearer's head before joining the ends.
Finishing the Headband
After the knitting is complete, the two ends are joined to turn the flat strip into a wearable headband.
The designer recommends seaming the ends and then weaving in the remaining yarn tails.
A neat seam is worthwhile because it helps the headband sit comfortably and keeps the cable design as visually continuous as possible.
Why the Woven Cable Headband Is Worth Knitting
This pattern packs an impressive amount of texture into a relatively small project.
It is particularly appealing if you want to practice cables, use a modest amount of Aran yarn, or create a handmade cold-weather accessory without starting a full hat or garment.
The finished headband also makes a practical handmade gift because the interwoven cable texture gives a simple accessory a distinctive knitted look.
Get the Free Woven Cable Headband Pattern
The complete pattern is currently available free from Priscillia Uloho on the Erica and Eleanor website.
Use the original designer source below for the complete stitch instructions, cable sequence and finishing directions.
Get the Free Woven Cable Headband Pattern →
Pattern Availability
Amazing Knitting links readers to legitimate designer or publisher sources whenever possible. Pattern prices, download locations and availability can change after an article is published.
Read Our Pattern Availability Policy →
Amazing Knitting is an independent pattern discovery and project-guide site. The Woven Cable Headband design and original knitting instructions belong to Priscillia Uloho. This guide provides project information and directs knitters to the designer's authorized pattern page rather than reproducing the complete pattern.
Winterstorm Hat – Nordic Snowflake Colorwork Knitting Pattern
Vinterstormlua / Winterstorm Hat by MaBe. Project photo © stevienixed.
Vinterstormlua / Winterstorm Hat by MaBe is a striking Nordic-style knitted beanie featuring a large snowflake motif worked in two-color stranded knitting.
The crisp geometric colorwork makes this hat look much more elaborate than an ordinary winter beanie, while the limited two-color palette keeps the overall design clean and traditional.
Worked from the bottom up in DK-weight yarn, Winterstorm Hat is an appealing project for knitters who want to practice stranded colorwork on a relatively small project.
Pattern availability: We checked for a currently available legitimate free version of this exact pattern but could not verify one. The original Winterstorm Hat pattern is currently available as a paid PDF through MaBe's Ravelry store.
Winterstorm Hat at a Glance
- Original name: Vinterstormlua / Winterstorm Hat
- Designer: MaBe (Marit Berg)
- Published: July 2016
- Category: Beanie / toque
- Construction: Bottom-up
- Technique: Stranded colorwork
- Design feature: Two-color snowflake motif
- Yarn weight: DK
- Suggested yarns: Sandnes Garn Smart or DROPS Lima
- Needles: US 4 / 3.5 mm and US 6 / 4 mm
- Adult sizes: Small and Medium
- Pattern format: Charted colorwork
- Languages: English and Norwegian
- Current availability: Paid PDF pattern
A Classic Nordic Snowflake Hat
The defining feature of Winterstorm Hat is the bold snowflake design that wraps around the crown.
The motif uses only two colors, but the contrast between them creates a dramatic winter pattern with a distinctly Scandinavian feel.
Choosing colors with strong contrast will help the snowflake remain clearly visible from a distance.
Two-Color Stranded Knitting
Winterstorm Hat uses stranded colorwork, a technique in which two yarn colors are used across the same round.
The color that is not currently being knitted travels behind the work as a float until it is needed again.
This technique is responsible for the crisp geometric motifs seen in many traditional Nordic and Fair Isle-inspired knitting designs.
A Great Project for Learning Colorwork
A hat can be an excellent way to practice stranded knitting before committing to a larger colorwork sweater.
You still get the experience of reading a chart, changing colors and managing floats, but the project is considerably smaller than a full-size garment.
If this is your first stranded project, work slowly through the first few rounds until you become comfortable following the chart.
Choosing Colors for Winterstorm Hat
Strong contrast is one of the most important considerations when selecting yarn colors for this design.
Traditional combinations such as white with navy, charcoal, red or forest green can create a classic winter appearance.
You can also reverse the usual arrangement by using a light motif against a dark background or a dark motif against a pale background.
Check Your Color Contrast Before Knitting
Two colors can look different when they are placed next to each other in knitted fabric.
Before casting on, place the yarns together and check that there is enough light-and-dark contrast between them.
One useful trick is to take a photo of the yarns and view it in grayscale. If the colors appear almost identical in value, the snowflake motif may not stand out as clearly as you would like.
DK-Weight Yarn
The pattern is designed for DK-weight yarn.
The designer lists both Sandnes Garn Smart and DROPS Lima as suggested yarn options.
Sandnes Garn Smart is a wool yarn, while DROPS Lima combines wool and alpaca. A suitable DK substitute can also work if it produces the required fabric and fits the pattern gauge.
Choosing a Substitute Yarn
For stranded colorwork, look for yarn with good stitch definition so the edges of the snowflake remain crisp.
Wool and wool-rich yarns are popular choices because the fibers tend to work well together in stranded knitting and can create a warm, cohesive fabric.
Whatever yarn you choose, make a swatch if accurate sizing is important.
Needle Sizes
The adult pattern lists:
- US 4 / 3.5 mm
- US 6 / 4 mm
Using different needle sizes allows the ribbed or lower section and the main colorwork fabric to maintain appropriate structure.
Treat the listed sizes as recommendations. Your own tension determines which needles will produce the correct finished fabric.
Adult Sizes
The published pattern includes Adult Small and Adult Medium.
The designer also notes that the hat can be adapted for younger wearers by changing the yarn and needle size.
For a child-size version, MaBe specifically suggests using 2.5 mm and 3 mm needles with a thinner yarn.
Because changing yarn and needle size affects both circumference and length, check your gauge carefully when making this type of modification.
Worked From the Bottom Up
Winterstorm Hat is constructed from the bottom up.
You begin at the lower edge of the hat and work upward toward the crown, introducing the snowflake colorwork according to the pattern chart.
This is a familiar construction for knitters who have already made basic beanies in the round.
Reading the Colorwork Chart
The snowflake design is presented as a chart.
In a colorwork chart, each square represents one stitch and the color of the square tells you which yarn color to use.
When knitting in the round, chart rows are generally read repeatedly in the same direction as you work around the hat. Follow the pattern's chart instructions carefully rather than assuming the direction.
Keep Your Floats Relaxed
One of the most important skills in stranded knitting is managing the yarn carried across the back of the work.
These strands are called floats.
If the floats are pulled too tightly, the hat can pucker and lose elasticity. If they are excessively loose, they may create untidy loops inside the hat.
Aim for floats that lie comfortably behind the stitches without pulling the fabric inward.
Spread the Stitches Along the Needle
A useful way to avoid tight floats is to spread the recently worked stitches along the right-hand needle before carrying the unused color behind them.
This encourages the float to span the true width of the knitted fabric rather than a compressed group of stitches.
Check your work regularly while knitting the first few colorwork rounds.
Colorwork Tension Matters
Many knitters naturally work stranded colorwork more tightly than ordinary stockinette.
If your colorwork section suddenly becomes narrower than the lower part of the hat, tight floats or tighter overall tension may be the cause.
Relax your hands and periodically stretch the stitches gently along the needle as you work.
Consider a Colorwork Swatch
A plain stockinette swatch does not always predict your stranded colorwork gauge accurately.
If fit is important, consider swatching using both colors and a motif similar to the actual pattern.
This gives you a better idea of how your yarn, needles and colorwork tension behave together.
Keep the Yarn Organized
Working with only two colors keeps this project relatively manageable, but the yarns can still twist around each other.
Develop a consistent method for holding the background and motif colors. Some knitters hold one yarn in each hand, while others carry both yarns in the same hand.
There is no single method that works best for everyone. The important thing is maintaining comfortable, even tension.
Understanding Color Dominance
In stranded knitting, the way the two yarns are carried can subtly affect how prominent each color appears.
This is often called color dominance.
Whichever yarn-holding method you choose, try to keep the relationship between the background and motif yarns consistent throughout the snowflake section.
Consistency helps the motif look uniform across the entire hat.
Check the Snowflake as It Develops
Colorwork charts can become surprisingly intuitive once the motif starts appearing on the fabric.
Stop occasionally and look at the developing snowflake.
If one section suddenly breaks the symmetry of the design, check the chart before continuing. Catching a misplaced color early can save a great deal of unraveling later.
Blocking Your Winterstorm Hat
Gentle blocking can make a noticeable difference to stranded colorwork.
It allows the stitches to settle, helps minor tension variations relax and can make the snowflake motif appear smoother and more even.
Use a blocking method appropriate for the fiber content of your chosen yarn and avoid overstretching the ribbing.
A Warm Winter Knitting Project
Winterstorm Hat combines a practical cold-weather shape with a decorative motif that immediately suggests snow and winter.
A wool or wool-rich DK yarn can produce a warm fabric while still allowing the stranded design to remain clearly defined.
The finished hat can make a thoughtful handmade winter gift, especially when the two colors are chosen specifically for the recipient.
Winterstorm Hat Pattern Availability
Vinterstormlua / Winterstorm Hat is currently a paid knitting pattern.
During our latest review, we searched for a legitimate currently available free version of this exact MaBe design but could not verify one.
The designer currently offers the original pattern through MaBe's Ravelry Store.
The listing includes both English and Norwegian versions and is currently priced at $5.95 USD.
Older pins or websites may describe the pattern as free. Pattern availability can change over time, so we use the designer's currently available listing rather than directing readers to unofficial copies.
Get the Winterstorm Hat Pattern
Visit MaBe's current pattern listing to see the complete pattern information and obtain the original Vinterstormlua / Winterstorm Hat instructions.
Get the Winterstorm Hat Pattern →
Vinterstormlua / Winterstorm Hat is designed by MaBe. Amazing Knitting does not reproduce the designer's copyrighted chart or complete row-by-row instructions. Pattern pricing and availability can change, so please check the designer's current listing for the latest information.
Discover More From the Archive
A fresh mix of knitting patterns and tutorials from the Amazing Knitting archive.