Skip to content

...

Mirabelle Texture Sampler Shawl - Free Pattern

Mirabelle Texture Sampler Shawl - Free Pattern
The photo above © Zehava Jacobs 2013
I found this beautiful knitting Shawl pattern on Pinterest...
Pretty, feminine and interesting to knit, Mirabelle makes the texture look good! Includes all written instructions (no charts). Knit in any sock/fingering weight yarn with the right yardage… a great sock yarn stash-busting project!

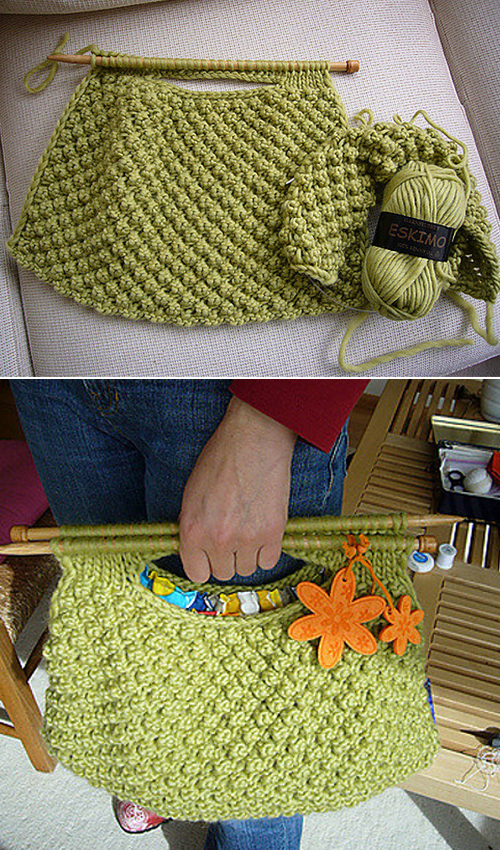
Knitting Needle Knitting Bag - Free Pattern

Knitting Needle Knitting Bag - Free Knitting Pattern
Photos above © fourchette
I found this wonderful knitting bag pattern on Pinterest...
Pam Allen indulged her fondness for the berry sew during this quick-and-easy knitting bag whose roll of tobacco form was galvanized by a bag she saw in a very catalog. For the front and back, she unwoven two slightly formed rectangles and seamed them on all-time low and partway up the perimeters. Instead of binding off, she placed the live stitches on wood knitting needles, squished them along to make soft gathers, and applied a touch superglue. Garter-stitch handles sewed to the front and back ar all that's required to complete the bag. This specific bag isn't lined. However, it'd be a simple refer use the front and back as pattern items and add a sunny print lining to stop needles from jab through.

Download Pattern: Knitting Needle Knitting Bag

Slouchy Socks - Free Pattern

Slouchy Socks - Free Pattern
Designed by  © Melissa Kemmerer
What beautiful socks knitting pattern! I found it on Pinterest...
These ultra-cozy socks are just the thing for relaxing after a long day. They’re also perfect to slip on when you wake up on the weekend and keep your feet warm as you snuggle on the couch. 

Download Pattern: Slouchy Socks 

Pine Cone Hedgehog – Free Easy Hedgehog Knitting Pattern

Pine Cone Hedgehog free easy hedgehog knitting pattern by Aga Tutak

Pine Cone Hedgehog. Photo © Aga Tutak

Pine Cone Hedgehog by Aga Tutak is a clever free knitting pattern that turns a real pine cone into an adorable little hedgehog.

Instead of knitting the entire animal, you knit a tiny head and combine it with a pine cone that forms the hedgehog's wonderfully realistic spiny body. Better still, the knitted part uses only about 11–16 yards (10–15 m) of Aran-weight yarn, making this a fantastic scrap-yarn project.

Pine Cone Hedgehog Pattern Details

  • Designer: Aga Tutak
  • Published: May 2019
  • Craft: Knitting
  • Category: Decorative knitted animal
  • Pattern availability: Free Ravelry download
  • Finished length: Approximately 11.5 cm (4.5 inches)
  • Yarn weight: Aran
  • Yardage: 11–16 yards (10–15 m)
  • Knitting needles: 4 double-pointed needles, 2.5 mm
  • Crochet hook: 2 mm
  • Gauge: 36 stitches × 42 rows = 4 inches in stockinette stitch
  • Construction: Worked in the round
  • Languages: English and Polish
  • Special material: A real pine cone

A Hedgehog Made With a Real Pine Cone

The most charming feature of this project is also the simplest: the pine cone becomes the hedgehog's spiny body.

You only need to knit the small head section that fits onto one end of the cone. Once assembled, the overlapping scales of the pine cone look surprisingly similar to a hedgehog's natural spines.

It is a lovely example of combining knitting with natural materials to create a small seasonal decoration.

A Tiny Scrap-Yarn Knitting Project

Pine Cone Hedgehog requires only about 10–15 metres (11–16 yards) of yarn.

That makes it an excellent project for using a small amount of Aran yarn left over from a larger sweater, hat, scarf or blanket.

You certainly don't need to buy a full skein specifically for one hedgehog if you already have a suitable scrap in your yarn stash.

Materials You'll Need

In addition to a small amount of yarn, the original pattern calls for:

  • A pine cone
  • Aran-weight yarn
  • Four 2.5 mm double-pointed knitting needles
  • A 2 mm crochet hook
  • A darning needle
  • A small amount of stuffing
  • Hot glue
  • Black cotton thread for embroidering the eyes and nose

Most of these supplies are things knitters and crafters may already have at home, which helps make this a wonderfully economical little project.

The Original Yarn

The current Ravelry listing suggests Novita 7 Veljestä, an Aran-weight wool-blend yarn.

Because such a tiny quantity is required, however, this pattern is especially suitable for experimenting with leftover yarn.

Choose a color that works naturally with your pine cone. Warm browns, beige, gray and other earthy shades can create a traditional woodland look, while a brighter yarn can make a more whimsical hedgehog.

Choosing the Pine Cone

Since the pine cone forms most of the finished animal, its shape has a big effect on the final appearance.

Look for a dry cone with an attractive, fairly even shape and scales that are nicely opened.

The knitted head needs to fit naturally against one end, so it can be useful to choose your pine cone before finishing the project rather than treating all cones as identical.

Worked in the Round

The knitted portion of the Pine Cone Hedgehog is worked in the round.

Aga Tutak specifies four double-pointed needles in size 2.5 mm.

This method allows the small head to be shaped as a three-dimensional piece rather than knitting two flat pieces and sewing them together.

Working With Double-Pointed Needles

Because the circumference is tiny, this project is a useful opportunity to practice knitting small objects on double-pointed needles.

Keep the stitches distributed comfortably between your needles and pay extra attention to the joins between needles so that loose ladders do not develop.

The small size also means you can practice the technique without committing to a much larger project such as socks or sleeves.

Finishing the Hedgehog's Face

The original materials list includes black cotton thread for embroidering the eyes and nose.

These tiny facial details are what transform the knitted shape and pine cone into a recognizable little hedgehog.

Because the features are embroidered rather than relying on plastic eyes, you can control their placement and expression while finishing your project.

Stuffing and Assembly

A small amount of stuffing gives the knitted section its shape before it is attached to the pine cone.

The materials list specifies hot glue for assembly. Take care when working with hot glue and allow the attachment to cool completely before handling the finished decoration.

This is a mixed-media decorative craft, so the finishing process is a little different from assembling a traditional fully knitted toy.

How Big Is the Finished Hedgehog?

The finished Pine Cone Hedgehog is approximately 11.5 cm (about 4.5 inches) long.

Since a real pine cone forms the body, the exact finished dimensions and proportions can naturally vary depending on the cone you use.

A Quick Woodland Knitting Project

With only a few yards of knitting required, this is a fun project when you want to make something small between larger projects.

It can also be a charming addition to an autumn woodland display, nature-inspired table decoration or handmade seasonal arrangement.

Make several with differently shaped pine cones and yarn colors and each little hedgehog can develop its own personality.

Skills Used in the Pine Cone Hedgehog

Useful techniques and crafting skills for this project include:

  • Knitting in the round
  • Working with double-pointed needles
  • Stockinette stitch
  • Basic shaping
  • Working with a small circumference
  • Stuffing a small knitted piece
  • Embroidering facial features
  • Using a crochet hook for finishing
  • Attaching the knitted section to a pine cone

Is Pine Cone Hedgehog Beginner Friendly?

The pattern itself is classified as Beginner on its current LoveCrafts listing.

The main consideration for a newer knitter is that the project is worked in the round on small double-pointed needles.

If you are already comfortable with DPNs, the tiny amount of knitting makes this a very manageable little project.

A Fun Way to Use Leftover Yarn

One of the best reasons to save small yarn leftovers is that patterns like this require almost no yardage.

Even a scrap that seems too small for a hat, dishcloth or pair of booties may contain enough yarn for a Pine Cone Hedgehog.

At only 11–16 yards, it is one of the smallest stash-busting knitting projects featured on Amazing Knitting.

A Nature-Inspired Handmade Decoration

The combination of wool and a natural pine cone gives this little hedgehog a rustic woodland character that would be difficult to create with yarn alone.

It is particularly well suited to autumn and woodland-themed decor, but the simple design can be displayed at any time of year.

Because every pine cone is different, no two finished hedgehogs need to look exactly alike.

Important Safety Note

The designer specifically warns to keep the finished Pine Cone Hedgehog away from fire.

It also contains a real pine cone, glue and small decorative elements, so it is best treated as a decorative craft rather than a washable soft toy.

Why Knit the Pine Cone Hedgehog?

This project manages to turn just a few yards of yarn and an ordinary pine cone into something genuinely charming.

It is quick, inexpensive and unusual, and it gives you a practical use for those tiny Aran-weight yarn scraps that are too good to throw away.

The natural pine-cone body also means much less knitting than a traditional stuffed hedgehog while still producing a recognizable little woodland animal.

Get the Free Pine Cone Hedgehog Knitting Pattern

The complete Pine Cone Hedgehog by Aga Tutak is currently available as a free downloadable knitting pattern from the designer's Ravelry store in English and Polish.

Get the Free Pine Cone Hedgehog Knitting Pattern →

Pattern availability was checked when this article was updated. Availability and pattern details on external websites may change over time.

Gina’s Brioche Hat and Cowl - Free Knitting Tutorial

Gina’s Brioche Hat and Cowl - Free Knitting Tutorial
Photos above © purlsoho
What beautiful knitting pattern! I found it on Pinterest...
This cowl and hat are so soft! Love it!

Full Post: Brioche Hat & Cowl

Arctic Wrap - Free Knitting Pattern & Tutorial

Arctic Wrap - Free Knitting Pattern & Tutorial
The photo above © purlsoho
What beautiful wrap knitting pattern! I found it on Pinterest...
You will feel a sense of accomplishment any time you wear the Iceberg Arctic Wrap. This gorgeous knit scarf pattern may take a while to complete, but it will be one of the most beautiful and intricate wraps you ever make. Made with five different colors of yarn, this free knitting pattern uses the fair isle stitch to create this stunning wrap. Once you get the hang of juggling three different yarns at a time, this is sure to be one of your favorite knitting stitches because of how vibrant and colorful it is.

Full Post: Arctic Wrap

Garter Bonnet - Free Knitting Pattern

Garter Bonnet - Free Knitting Pattern
Photos above © Destiny Meyer
What beautiful bonnet knitting pattern! I found it on Pinterest...
This sweet pixie bonnet is knit flat in one piece, with short row shaping for the back of the neck. The live stitches are grafted together in the back, and it’s adorned with classic I-cord ties. This pattern features three video tutorials to walk you through knitting short rows. How to graft the back and how to make the ties. It’s a great pattern for an adventurous beginner!

Full Post: Garter Bonnet 

Drop Stitch Cowl - Free Knitting Pattern

Drop Stitch Cowl - Free Knitting Pattern
The photo above © peachy3670
What beautiful cowl knitting pattern! I found it on Pinterest...
This super easy cowl is beautiful, light and airy.  It uses dropped yo stitches to create bands of simple lace.  It is worked back and forth, then the ends are sewn together to create the cowl.

Full Post: Drop Stitch Cowl 

How to knit the Slip Stitch Rib - Free Pattern & Tutorial

How to knit the Slip Stitch Rib - Free Pattern & Tutorial
Photos above © Sowoolly
What beautiful stitch knitting pattern! I found it on Pinterest...
An elegant variant of the well-known Rib stitch, the Slip Stitch Rib is perfect for scarves, cowls, bags, blankets, and many other projects...

Full Post: Slip Stitch Rib

Yummy Mummy Wristwarmers - Free Pattern

Yummy Mummy Wristwarmers - Free Pattern
The photo above © alexandraBrinck 
I found this wonderful Fingerless gloves/mitts knitting pattern on Ravelry.
Knitted in luscious alpaca and silk, these were designed to warm the wrists of a particularly stylish mum as she takes her new baby for walks on crisp spring days.

Download Pattern: Yummy Mummy Wristwarmers

Camp Out Fingerless Mitts - Free Pattern

Camp Out Fingerless Mitts - Free Pattern
the photo above © G-knits
What beautiful knit mitts pattern! I found it on Pinterest...
These fingerless mitts are worked in two directions. The hand portion is worked flat in garter stitch. Stitches are picked up and worked in rounds for the thumb and wrist portion.

Download Pattern: Camp Out Fingerless Mitts

Thorpe Earflap Hat – Top-Down Earflap Hat Knitting Pattern

Thorpe Earflap Hat knitting pattern by Kirsten Kapur

Thorpe Earflap Hat. Photo © Kirsten Kapur

Thorpe by Kirsten Kapur is a classic top-down earflap hat knitting pattern designed for children, teens and adults. Worked in cozy bulky-weight yarn, it combines practical winter warmth with plenty of opportunities for color and customization.

Originally published in 2007, Thorpe later received a major update from the designer. The revised pattern now includes five sizes from XS to XL, improved starting instructions, additional colorwork options and video support.

Availability update: Thorpe was previously distributed as a free pattern, which is why this older Amazing Knitting page originally described it as free. The updated edition is now a paid pattern.

Thorpe Earflap Hat Pattern Details

  • Designer: Kirsten Kapur
  • Originally published: December 2007
  • Publication: Through The Loops
  • Craft: Knitting
  • Category: Earflap hat
  • Yarn weight: Bulky
  • Suggested yarn: Malabrigo Chunky
  • Yardage: Approximately 90–200 yards (82–183 m)
  • Main needle: US 9 (5.5 mm)
  • Crochet hook: 4.5 mm for the optional edging
  • Gauge: 15 stitches × 25 rows = 4 inches (10 cm) in blocked stockinette
  • Sizes: XS, S, M, L and XL
  • Construction: Top down and worked in the round
  • Colorwork: Optional stranded colorwork
  • Finishing: Optional crochet edging and braids
  • Current availability: Paid digital pattern

Five Sizes from Child to Adult

The updated Thorpe pattern offers five finished hat circumferences:

  • XS: 15 inches / 38 cm
  • S: 17 inches / 43 cm
  • M: 19.25 inches / 49 cm
  • L: 21.25 inches / 54 cm
  • XL: 23.5 inches / 59.5 cm

Together, these sizes are designed to accommodate actual head circumferences of approximately 17–26.5 inches (43–67 cm).

This broad range makes Thorpe suitable for children, teens and adults rather than limiting the design to one age group.

Choose the Hat with Negative Ease

Thorpe is designed to be worn with approximately 2–3 inches (5–7.5 cm) of negative ease.

In other words, the finished hat should be smaller than the wearer's actual head circumference so that the knitted fabric stretches gently for a secure fit.

Measure around the widest part of the head and choose a finished circumference approximately 2–3 inches smaller.

A Top-Down Earflap Hat

Thorpe is worked from the top down.

The crown begins first, and the hat expands as you work toward the brim. The earflaps are then incorporated into the lower portion of the design.

Top-down construction is especially useful for a hat because it allows you to see the shape developing as you knit.

Worked in the Round

The main body of Thorpe is knitted in the round, creating a one-piece hat without a traditional back seam.

If you are new to circular knitting, this project can be a useful way to practice working relatively small circumferences while making a practical winter accessory.

The Updated Thorpe Pattern

Kirsten Kapur originally published Thorpe in 2007. More than a decade later, she revisited the design and brought the instructions in line with her newer pattern-writing style.

One important change was the beginning of the hat. The designer revised this section to make it easier to work and also created a video tutorial demonstrating the updated start.

The sizing was expanded as well, giving today's pattern a much wider fit range than the earliest version.

Solid or Colorwork

Thorpe does not have to be knitted in multiple colors.

A solid version allows the classic earflap shape to take center stage and can be an excellent choice for a beautiful hand-dyed bulky yarn.

If you enjoy colorwork, however, the pattern provides several ways to add stranded motifs.

Four Design Options

The updated pattern retains the original solid and all-over colorwork versions and adds two additional options featuring bands of colorwork.

This gives you four broad approaches to the same basic hat:

  • A simple solid-color Thorpe
  • The original all-over stranded colorwork version
  • A version with one style of colorwork band
  • A version with another colorwork-band arrangement

Changing the yarn colors can make each version look dramatically different.

Bulky Yarn for a Warm Winter Hat

The pattern calls for bulky-weight yarn, with Malabrigo Chunky listed as the suggested yarn.

The original yarn is 100% merino wool and contains approximately 104 yards per 100 grams.

Bulky yarn helps create a warm fabric while also allowing the hat to progress relatively quickly compared with a fingering-weight winter accessory.

How Much Yarn Do You Need?

The documented requirement ranges from approximately 90–200 yards (82–183 m).

The exact amount depends on the size and version you choose, particularly if you add colorwork, edging or braided ties.

When substituting yarn, compare yardage and gauge rather than relying only on the number of skeins.

Choosing Substitute Yarn

A warm bulky-weight wool or wool blend is a natural choice for an earflap hat designed for cold weather.

For colorwork versions, choose yarns with similar thickness and fiber behavior so that the stranded sections remain even.

Good contrast between colors will also make the motifs easier to see.

Needles and Gauge

The pattern specifies US 9 (5.5 mm) needles.

The documented blocked stockinette gauge is:

15 stitches × 25 rows = 4 inches (10 cm)

Gauge is important for a fitted hat because even a relatively small difference can noticeably change the finished circumference.

Swatch with your chosen yarn and adjust needle size when necessary.

Optional Crochet Edging

Thorpe includes an optional crochet edging around the lower edge and earflaps.

A 4.5 mm crochet hook is listed for this finishing option.

Using a contrasting color for the edging is an easy way to add another detail without committing to full stranded colorwork.

Optional Garter-Stitch Edging

The updated pattern also provides an alternative for knitters who do not want to crochet the edge.

Instructions are included for a contrasting garter-stitch edging finished with an Icelandic Bind-Off.

This creates another way to personalize the lower edge while keeping the finishing entirely within knitting techniques.

Icelandic Bind-Off

The revised Thorpe pattern uses the Icelandic Bind-Off for the optional garter-stitch edging.

Kirsten Kapur provides a video tutorial for this technique, making it easier to learn if you have never used this bind-off before.

Braided Ties

Braids can be added below the earflaps to give Thorpe its classic winter hat appearance.

They are also another opportunity to combine the colors used elsewhere in the hat.

A solid hat with contrasting braids can look just as distinctive as a full colorwork version.

Skills Used in the Thorpe Hat

Depending on the version you choose, useful skills include:

  • Knitting and purling
  • Knitting in the round
  • Top-down hat construction
  • Increasing and decreasing
  • Following written instructions
  • Reading colorwork charts
  • Stranded colorwork for the optional versions
  • Crochet edging, if selected
  • Making braided ties
  • Icelandic Bind-Off for the optional knitted edging

Is Thorpe Beginner Friendly?

The solid version is considerably more approachable than the all-over-colorwork version.

A knitter already comfortable working in the round can use the solid hat to become familiar with top-down construction and earflap shaping.

The colorwork options provide a natural next step if you want to add another skill to the project.

Start with the Solid Version

If Thorpe is your first earflap hat, consider beginning with one color.

This lets you concentrate on the unusual top-down construction, shaping and fit without simultaneously managing multiple strands of yarn.

Once you understand the construction, a second Thorpe can be a great opportunity to try one of the stranded versions.

Use the Designer's Video Tutorial

The beginning of Thorpe is unusual enough that Kirsten Kapur created a dedicated video tutorial when she updated the pattern.

Watching the technique before casting on can make the first portion much easier to visualize.

The updated pattern page also links to the designer's tutorial for the Icelandic Bind-Off used in one of the optional finishing methods.

A Unisex Winter Hat

Thorpe is designed as a unisex hat, and its five-size range makes it adaptable to many ages and head sizes.

The character of the finished hat can change dramatically with yarn choice: natural wool shades create a traditional outdoor look, while bright contrasting colors can emphasize the playful stranded motifs.

Why Knit the Thorpe Earflap Hat?

Thorpe has remained popular because it combines a practical cold-weather shape with a highly customizable design.

You can keep it simple with one color, add an all-over stranded motif, choose one of the newer colorwork bands, add contrasting edging, or finish the earflaps with braids.

The expanded XS–XL sizing also makes the updated version useful when you want to knit similar hats for different members of a family.

Get the Thorpe Earflap Hat Pattern

Thorpe by Kirsten Kapur is currently available as an updated paid digital knitting pattern.

View the Thorpe Earflap Hat Pattern →

Thorpe was originally published as a free pattern, but the designer's revised edition is currently paid. Pattern availability and pricing may change over time. Amazing Knitting does not reproduce or distribute the designer's copyrighted instructions.

Discover More From the Archive

A fresh mix of knitting patterns and tutorials from the Amazing Knitting archive.

Finding patterns from the archive…