Skip to content

...

Warm Feet Baby Booties - Knitting Pattern

Warm Feet Baby Booties - Knitting Pattern
Photo above © Julia Noskova
What beautiful baby booties knitting pattern! I found it on Ravelry...
The Booties are knitted on two needles. 
Such a classic look, these booties are perfect for both boys and girls! 
The sure way to keep baby’s feet snug and warm!

Herringbone Cowl - Free Pattern

Photo above © pnason
What beautiful cowl knitting pattern! I found it on Ravelry...
Super quick herringbone cowl. Just add buttons and you are good to go! I can be worn two ways- just wear the buttons on your right side for a loose fit or turn it so the buttons are on your left for a tighter fit.

Download Pattern: Herringbone Cowl 

Vite Cowl - Knitting Pattern

Vite Cowl - Free Pattern
 Photo above © SeaGemDi
I found This knitting pattern on Ravelry...
Vite (grapevine in Italian) is the perfect two-skein project with a bulky yarn doubled, or one skein with super bulky yarn. The lacy vine pattern makes this cowl/scarf less than overwhelming when doubled. Or wear it long and fashionable! But have fun when you wear it!

Full Post: Vite Cowl

Hugo - Free Pattern

Hugo - Free Pattern
Photo above © Gosia Grajdek
What beautiful poncho knitting pattern! I found it on Ravelry...
Hugo is very easy, seamless top-down poncho. The new version of the pattern (with a few explanations) is uploaded.

Download Pattern: Hugo 

Different Decrease Styles - Tutorial

Different Decrease Styles - Tutorial
Photo above © Super Needle
I found This knitting tutorial on Pinterest...
A great visual reference for different decrease styles on raglan sweaters.

Full Post: Decreases

Why You Should Make This Bind Off Your New BFF

Why You Should Make This Bind Off Your New BFF
Photos above © Terry Matz
I found this helpful article on Pinterest...
Conquer four different bind-offs (and learn when to use each one) with these detailed photo tutorials from knitting expert Terry Matz.

Andalusian Stitch - Free Pattern & Tutorial

Andalusian Stitch - Free Pattern & Tutorial
Photos above © Studio Knit
What beautiful knitting stitch! I found it on Pinterest...
A close look at how to knit up the easy Andalusian Stitch Pattern, seeing exactly how those knits and purls are knitted together to make this simple pattern.

Full Post: Andalusian Stitch

K1p1 invisible bind-off - Tutorial

K1p1 invisible bind-off - Tutorial
Photo above © Tani
I found This knitting tutorial on Pinterest...
Tani said: "since you end at the cuff when you knit toe-up, the bind-off must be loose and elastic. it would be a tragedy to have (unintentionally) slouchy socks after all the time you put into it. I found a k1p1 invisible bind-off that I thought might work for me described in the twisted sister’s sock workbook. the wording was a little confusing, but I plowed on…and thought to put what I learned up on the ol’ blog to share with you.  🙂
it may seem like a lot of work, but I think this bind-off is especially pretty and very elastic. I hope you enjoy it as much as I do!"

Mitered Squares Throw With a Fabric Lining – Knitting Project Guide

Mitered Squares Throw with a fabric lining knitted blanket project

This colorful Mitered Squares Throw With a Fabric Lining is a beautiful example of how a knitter can take the construction ideas from an established blanket pattern and give the finished project a very different look.

The version shown here was created by Elaine of Italian Dish Knits. Her project was inspired by Mitered Crosses Blanket by Kay Gardiner, but Elaine made several important modifications, including replacing the original crosses with colorful mitered squares and adding a fabric backing to the finished blanket.

The result has the visual character of both knitting and patchwork quilting: color-changing knitted squares are surrounded by broad light-colored borders, while the fabric lining gives the reverse side a clean, finished appearance.

Featured project and photos: Elaine / Italian Dish Knits. Original blanket design inspiration: Mitered Crosses Blanket by Kay Gardiner.

Mitered Squares Throw Project Overview

  • Featured project: Mitered Squares Throw With a Fabric Lining
  • Project by: Elaine / Italian Dish Knits
  • Based on: Mitered Crosses Blanket
  • Original designer: Kay Gardiner
  • Project type: Knitted throw / blanket
  • Main technique: Mitered garter-stitch knitting
  • Featured modification: Squares instead of crosses
  • Finishing modification: Fabric lining
  • Construction: Modular knitted blocks
  • Original pattern availability: Paid

About the Featured Mitered Squares Throw

Elaine originally discovered Kay Gardiner's Mitered Crosses Blanket and decided to use its modular construction as the starting point for her own throw.

Instead of reproducing the cross motif from the original design, she changed the colorful sections into mitered squares.

This creates a striking geometric effect: multicolored squares appear to float inside wide light-colored frames.

The individual blocks also make the project portable during much of the knitting process because the blanket does not become one large piece until the blocks are assembled.

The Original Mitered Crosses Blanket

The inspiration for this project is Mitered Crosses Blanket by Kay Gardiner, originally published in 2011.

Kay Gardiner's original blanket combines two modular knitting ideas: mitering and log-cabin construction.

Each original block begins with knitted miters that form a cross. The cross is then surrounded by garter-stitch strips to create a larger square block.

The blocks are eventually joined and finished with an applied edging.

How Elaine Changed the Design

The blanket featured in the photographs should not be confused with an unaltered sample of the original pattern.

Elaine deliberately changed several elements to create her own version.

Most noticeably, she chose mitered squares rather than mitered crosses for the colorful centers.

She then surrounded those colorful sections with a neutral background, producing the strong grid-like appearance visible in the finished throw.

What Is a Mitered Knitted Square?

A mitered square is shaped by strategically decreasing stitches around a central point.

As the decreases are repeated, the knitted fabric develops diagonal lines that travel toward the center of the square.

When worked in garter stitch with a self-striping or color-changing yarn, those diagonal lines can make the color changes look especially dramatic.

Once the technique becomes familiar, mitered squares can be satisfying small modules to knit one at a time.

A Portable Modular Blanket Project

One advantage Elaine noted about this style of blanket is its portability.

For much of the project, you are working on individual blocks rather than holding an entire blanket on your needles.

That makes modular blankets particularly convenient for knitters who like taking a project with them while traveling or working away from home.

Only later, when the blocks are assembled, does the project grow into its full blanket size.

Using Color-Changing Yarn

The colorful centers are especially effective when knitted with yarn that changes gradually from one shade to another.

Because the mitered construction creates diagonal lines, the changing colors develop differently across each square.

Surrounding those colorful centers with a quieter neutral shade helps define each block and prevents the overall blanket from becoming visually overwhelming.

This makes the project an interesting source of inspiration for combining self-striping yarn with a solid background color.

The Fabric Lining

One of the most useful ideas in Elaine's project is the fabric backing.

After completing the knitted blanket, she added fabric to the reverse side. This gives the throw a finished appearance similar to a quilt and hides the back of the knitted construction.

The combination of knitted blocks on the front and fabric on the back also creates an interesting meeting point between knitting and sewing.

Why Add Fabric to a Knitted Blanket?

A fabric lining can serve several purposes.

It can give the reverse side of a modular blanket a cleaner appearance, cover yarn ends or joins, and add another decorative element to the finished project.

However, knitted fabric and woven fabric behave differently. Knitting is naturally stretchy, while many woven fabrics have much less give.

For that reason, the lining should be attached carefully so that it does not pull, distort or restrict the knitted blanket.

Preparing the Knitting Before Adding Fabric

Before attaching a lining, finish the knitted portion completely.

Weave in loose ends and block the blanket according to the care requirements of your yarn.

Blocking first allows the knitted fabric to settle into its final dimensions before the lining is measured and attached.

This is especially useful for a modular blanket because blocking can help the individual sections sit more evenly.

Choosing Fabric for the Backing

If you want to use Elaine's project as inspiration for your own lined blanket, choose a backing fabric that works well with the weight and intended use of your knitting.

The fabric should be large enough for the finished dimensions of the blocked blanket, including any allowance required for finishing the edges.

Washable materials are practical when the finished throw will be used regularly, but always consider the care requirements of both the yarn and fabric before combining them.

Skills Used in This Style of Project

Depending on whether you follow the original Kay Gardiner design or create a modified version inspired by Elaine's throw, useful skills may include:

  • Garter stitch
  • Mitered knitting
  • Decreasing stitches
  • Picking up stitches
  • Modular knitting
  • Joining knitted blocks
  • Weaving in ends
  • Blocking
  • Basic sewing for adding a fabric backing

Original Pattern Specifications

For reference, the published information for Kay Gardiner's Mitered Crosses Blanket lists:

  • Yarn weight: Aran
  • Suggested yarn: Noro Silk Garden
  • Needles: US 6 / 4 mm
  • Gauge: 20 stitches and 40 rows = 4 inches in garter stitch
  • Original finished size: approximately 40 × 52 inches
  • Sizing: Easily adaptable larger or smaller

These specifications refer to Kay Gardiner's original Mitered Crosses Blanket, not necessarily to every modification used in Elaine's Mitered Squares Throw.

Important Pattern Availability Note

Older references to this project may describe the underlying pattern as a charity pattern or may point to an older download location.

The situation has changed over time.

Kay Gardiner's Mitered Crosses Blanket is currently a paid pattern.

For that reason, Amazing Knitting does not describe this project as a free knitting pattern.

Visit the Featured Mitered Squares Project

Elaine's original article explains how she adapted the Mitered Crosses idea into squares and how she added a fabric lining to her finished throw.

See the Mitered Squares Throw Project →

Get the Original Mitered Crosses Blanket Pattern

If you want to knit Kay Gardiner's original design rather than Elaine's modified project, the Mitered Crosses Blanket pattern is currently available as a paid Ravelry download.

View the Original Mitered Crosses Blanket Pattern →

Pattern Availability

Amazing Knitting links readers to legitimate designer or publisher sources whenever possible. Pattern prices, download locations and availability can change after an article is published.

Read Our Pattern Availability Policy →

Amazing Knitting is an independent pattern discovery and project-guide site. Mitered Crosses Blanket and its original knitting instructions remain the intellectual property of Kay Gardiner. The featured modification and photographs belong to their respective creator. This article provides project information and links readers to the credited sources rather than reproducing the complete knitting pattern.

Baby Angel Top – Seamless Baby Top Knitting Pattern

Baby Angel Top seamless baby top knitting pattern by OGE Knitwear Designs

Baby Angel Top. Photo © OGE Knitwear Designs

The Baby Angel Top by OGE Knitwear Designs is a sweet seamless baby top knitting pattern worked sideways in soft DK-weight yarn. Its simple shape makes it lovely for summer, while it can also be layered over long sleeves during cooler weather.

One of the most interesting features of this design is its side-to-side construction. The top is worked in one piece with no sewing required, and the pattern includes three sizes from 0–6 months to 1–2 years.

The designer also provides two versions of the top: a simpler version for newer knitters and a second version featuring decorative lace around the hemline and yoke.

Baby Angel Top Pattern Details

  • Designer: OGE Knitwear Designs
  • Pattern number: P057
  • Craft: Knitting
  • Category: Baby sleeveless top
  • Construction: Side to side
  • Seaming: Seamless / no sewing required
  • Yarn weight: DK / Light Worsted / 8-ply
  • Yardage: Approximately 252–378 yards (230–346 m)
  • Needles: US 6 (4 mm)
  • Gauge: 23 stitches × 36 rows = 4 inches (10 cm) in garter stitch
  • Sizes: 0–6 months, 6–12 months and 1–2 years
  • Languages: English; a German version is also currently listed
  • Current availability: Paid digital pattern

Three Baby and Toddler Sizes

Baby Angel Top includes three sizes:

  • 0–6 months
  • 6–12 months
  • 1–2 years

The approximate finished lengths are:

  • 0–6 months: 24 cm / 9½ inches
  • 6–12 months: 28 cm / 11 inches
  • 1–2 years: 33 cm / 13 inches

This size range lets you use the same basic design from early infancy into the toddler stage.

A Clever Side-to-Side Construction

Baby Angel Top is unusual because it is worked from side to side rather than from the neck down or hem upward.

The sideways construction allows the garment to be created as one continuous piece and eliminates traditional garment seaming.

This is particularly appealing if you enjoy knitting garments but prefer to avoid sewing several finished pieces together at the end.

No Sewing Required

The designer specifically describes Baby Angel Top as requiring absolutely no sewing.

That makes the construction itself one of the pattern's strongest features. Once the knitting and finishing details are complete, there are no major garment seams waiting to be assembled.

Two Versions in One Design

Another useful feature is that the designer created two versions of Baby Angel Top.

The first is intended as the more approachable version for a newer knitter. After gaining confidence, the knitter can progress to the more decorative version.

The second version introduces a lace pattern around the hemline and yoke, adding extra visual detail while retaining the same charming basic silhouette.

A Baby Top for More Than Summer

Although Baby Angel Top works beautifully as a lightweight summer garment, it does not have to be limited to warm weather.

The sleeveless shape can be layered over a long-sleeved top during autumn and winter, extending the usefulness of the finished garment.

Yarn fiber and color can also change the seasonal feel considerably.

Yarn Weight

The pattern calls for DK / Light Worsted / 8-ply yarn.

The original specification references Peter Pan Merino Baby DK, with approximately 126 yards (116 m) per 50-gram ball.

The documented total requirement is approximately 252–378 yards (230–346 m), depending on size.

How Much Yarn Do You Need?

Using the original 50-gram yarn specification, the designer lists:

  • 0–6 months: 2 balls
  • 6–12 months: 3 balls
  • 1–2 years: 3 balls

When substituting another DK yarn, compare the meterage or yardage per ball rather than relying only on the number of balls.

Choosing Substitute Yarn

Many DK-weight yarns can potentially work for this project as long as they produce the correct gauge and a comfortable fabric.

For a baby garment, softness and ease of care are particularly useful considerations.

Merino, washable wool blends, cotton blends and other baby-friendly DK yarns can produce different seasonal versions of the same design.

Needles and Gauge

Baby Angel Top uses US 6 (4 mm) needles.

The specified gauge is:

23 stitches × 36 rows = 4 inches (10 cm)
in garter stitch

Gauge matters more for a fitted baby garment than it does for something like a scarf. A significant difference can change both the finished size and the amount of yarn required.

Garter Stitch Texture

Garter stitch plays an important role in the construction and gives the garment a soft, textured appearance.

Because garter stitch is created primarily with the basic knit stitch when working flat, it also makes the simpler version approachable for knitters who are beginning to move from scarves and blankets into garments.

The Lace Version

Once you are comfortable with the simpler Baby Angel Top, the decorative version offers a natural next step.

Lace detailing around the hemline and yoke gives the garment a more delicate appearance without changing its fundamental side-to-side concept.

A smooth, solid or gently tonal yarn can help the lace remain clearly visible.

Buttons and Finishing

The pattern calls for approximately 2–3 buttons, depending on the version or size being made.

Buttons can also provide an opportunity to personalize the garment. Simple wooden, shell-look or colorful washable buttons can give the same knitted top very different personalities.

For garments intended for babies and young children, make sure buttons are attached very securely and inspect them regularly.

Skills Used in Baby Angel Top

Depending on which version you choose, useful techniques include:

  • Knitting and purling
  • Garter stitch
  • Side-to-side garment construction
  • Increasing and decreasing
  • Using stitch holders
  • Creating buttonholes
  • Picking up stitches where directed
  • Following a lace pattern for the decorative version
  • Blocking and finishing a baby garment

Is Baby Angel Top Beginner Friendly?

The designer specifically created a simpler version with the developing knitter in mind.

That makes Baby Angel Top an interesting project for someone who has mastered basic knitting and wants to begin exploring garment construction.

The more decorative lace version can then provide a natural progression once the simpler top feels comfortable.

Read the Construction Before Starting

Sideways garments can feel unfamiliar if you normally knit sweaters from the top down or bottom up.

Before casting on, read through the construction notes and identify how the garment grows from one side toward the other.

Understanding the overall direction of the knitting makes the individual shaping instructions much easier to visualize.

Why Swatching Matters

A gauge swatch is particularly worthwhile for this project because the pattern includes specific baby and toddler sizes.

Wash and dry your swatch as you intend to care for the finished garment, then measure the gauge after the fabric has settled.

This also lets you check whether your chosen yarn feels soft and flexible enough for a small child's garment.

A Handmade Baby Gift

Baby Angel Top can make a lovely handmade gift because it is more substantial than a small accessory while still requiring far less yarn than an adult garment.

Choosing a practical washable yarn can make the finished top easier for parents to use regularly.

If you are knitting ahead for a gift, consider choosing a larger size so the baby has room to grow into the garment.

Why Knit the Baby Angel Top?

Baby Angel Top combines several useful features in a relatively small garment: seamless construction, DK-weight yarn, three sizes and two versions with different skill levels.

The sideways construction also makes it more interesting than a standard baby vest while eliminating the need for traditional garment seaming.

Knit the simpler version for a clean garter-stitch look, or choose the lace version when you want a more decorative handmade baby garment.

Get the Baby Angel Top Knitting Pattern

Baby angel top – P057 by OGE Knitwear Designs is currently available as a paid digital knitting pattern.

View the Baby Angel Top Knitting Pattern →

Pattern availability and pricing can change over time. Amazing Knitting does not reproduce or distribute the designer's copyrighted pattern instructions.

Pfeilraupe - Free Pattern

Pfeilraupe Shawl free knitting pattern by Alpi Alpenrose

Pfeilraupe by Alpi Alpenrose is a distinctive asymmetrical knitted shawl that combines simple garter stitch with a clever construction detail: a series of openings that let you thread one end of the shawl through the fabric.

Those slots are more than decorative. They help hold the shawl in place and make it possible to arrange the finished piece in several different ways around the neck and shoulders.

Despite its unusual finished shape, Pfeilraupe is primarily a garter-stitch project, making the construction much more approachable than the finished shawl might initially suggest.

The original Pfeilraupe knitting pattern is currently available as a free download from the designer through Ravelry.

Design: Alpi Alpenrose. Featured project photo: christa-l.

Pfeilraupe Shawl Pattern Overview

  • Pattern: Pfeilraupe
  • Designer: Alpi Alpenrose
  • Publisher: Alpenrose Designs
  • Published: August 2015
  • Project type: Shawl / wrap
  • Shape: Elongated asymmetrical triangle
  • Yarn weight: Sport
  • Yardage: Approximately 571 yd / 522 m
  • Needles: US 4 / 3.5 mm
  • Gauge: 21 stitches × 48 rows = 4 in / 10 cm
  • Finished size: Approximately 160 × 45 cm
  • Size: One size
  • Main fabric: Garter stitch
  • Pattern availability: Free

What Makes Pfeilraupe Different?

At first glance, Pfeilraupe looks like an unusual asymmetrical shawl, but its most recognizable feature becomes clearer when you look at the openings worked into the wider section of the fabric.

These knitted slots allow the narrow end of the shawl to pass through the fabric.

That simple idea gives the shawl a practical advantage: it can stay wrapped around the wearer without relying entirely on a shawl pin or constant readjustment.

A Versatile Asymmetrical Shawl

Pfeilraupe is shaped as a long, stretched triangle rather than a traditional symmetrical triangular shawl.

The unusual proportions and strategically placed openings provide several possibilities for draping the finished piece.

It can be worn loosely over the shoulders, wrapped more closely around the neck, or arranged with the narrow end passing through one of the openings.

This versatility is one of the characteristics that made the design stand out among garter-stitch shawls.

Mostly Garter Stitch

The visual shape of Pfeilraupe may look complicated, but the basic knitted fabric is refreshingly simple.

The designer describes the shawl as essentially simple garter-stitch knitting with a few clever details.

Because garter stitch is created by knitting every row when working flat, much of the project has a comfortable repetitive rhythm.

The construction details and shaping provide the interest while the basic fabric remains straightforward.

Yarn and Yardage

The published pattern information lists approximately:

571 yards / 522 meters of sport-weight yarn.

The designer's original version was made using handspun yarn, which helps explain the organic texture and character of the original shawl.

A yarn with good stitch definition can help emphasize the horizontal garter ridges and the distinctive openings.

As with any shawl substitution, differences in fiber, elasticity and gauge may change the final dimensions and drape.

Needle Size

The published pattern calls for:

US 4 / 3.5 mm knitting needles.

Choose a needle type that is comfortable for holding the growing number of stitches. A circular needle can be convenient even though the shawl itself is worked flat.

Gauge

The listed gauge is:

21 stitches × 48 rows = 4 inches / 10 cm.

For a shawl, exact gauge is generally less critical than it would be for a fitted sweater, but it still affects the finished dimensions, fabric density and amount of yarn required.

If your gauge is substantially looser than the designer's, you may need more yarn than the amount listed in the pattern.

Finished Size

Using the designer's handspun yarn, the approximate finished dimensions after washing, without blocking, were:

  • Length: approximately 160 cm
  • Width: approximately 45 cm

Treat these measurements as a useful reference rather than a guarantee. Different yarns and individual knitting tension can produce different final dimensions.

The Signature Slots

The openings are the feature that transforms Pfeilraupe from a simple garter-stitch triangle into a highly recognizable shawl.

They are incorporated into the knitting rather than cut into the fabric afterward.

Once the shawl is finished, the narrow end can be threaded through a chosen opening to create different wrapped arrangements.

This means the openings serve both a decorative and functional purpose.

Shaping the Shawl

The elongated triangular shape develops through increases and shaping as the shawl progresses.

The design also uses short-row techniques to help create its distinctive geometry.

Although the main fabric is garter stitch, it is important to follow the designer's instructions carefully when you reach the shaping and slot sections.

Useful Skills for Pfeilraupe

It is helpful to be comfortable with:

  • Casting on
  • Knit stitches
  • Garter stitch
  • Increasing stitches
  • Short-row shaping
  • Binding off and casting on stitches within a row
  • Following repeated shaping instructions
  • Binding off
  • Weaving in yarn ends

Choosing Yarn for Pfeilraupe

Because the pattern creates a long shawl with several openings, yarn choice affects both appearance and function.

A yarn that produces a very loose or extremely slippery fabric may behave differently when the narrow end is passed through one of the slots.

A sport-weight yarn that creates a comfortable but reasonably stable garter-stitch fabric is a good starting point.

Before beginning, check that you have enough yarn to complete the full shawl, especially if you plan to alter the size.

Blocking and Finishing

After knitting, weave in the yarn ends securely and wash or block the shawl according to the care requirements of your chosen yarn.

Blocking can help settle the garter-stitch fabric and improve the overall shape, but avoid stretching the piece more aggressively than your yarn can comfortably tolerate.

The designer's published measurements were taken after washing without blocking, so your finished dimensions may differ depending on your finishing method.

Why Pfeilraupe Is Worth Knitting

Pfeilraupe is a good example of how a relatively simple knitted fabric can become an unusual finished accessory through thoughtful construction.

The garter stitch provides relaxed knitting, while the asymmetrical shaping, short rows and signature openings keep the project interesting.

The result is not simply another triangular shawl. The built-in slots give the finished piece multiple styling possibilities and help keep it securely wrapped.

Get the Free Pfeilraupe Knitting Pattern

The original Pfeilraupe pattern by Alpi Alpenrose is currently available as a free Ravelry download.

Use the designer's original pattern for the complete stitch counts, short-row sequence, slot construction and finishing instructions.

Get the Free Pfeilraupe Pattern →

More Free Shawl Knitting Patterns

Looking for another shawl project? Explore our collection of free shawl knitting patterns:

Explore 7 Free Shawl Knitting Patterns →

Pattern Availability

Amazing Knitting links readers to legitimate designer or publisher sources whenever possible. Pattern prices, download locations and availability can change after an article is published.

Read Our Pattern Availability Policy →

Amazing Knitting is an independent pattern discovery and project-guide site. Pfeilraupe and its original knitting instructions remain the intellectual property of Alpi Alpenrose. This guide provides project information and directs knitters to the designer's authorized pattern source rather than reproducing the complete pattern.

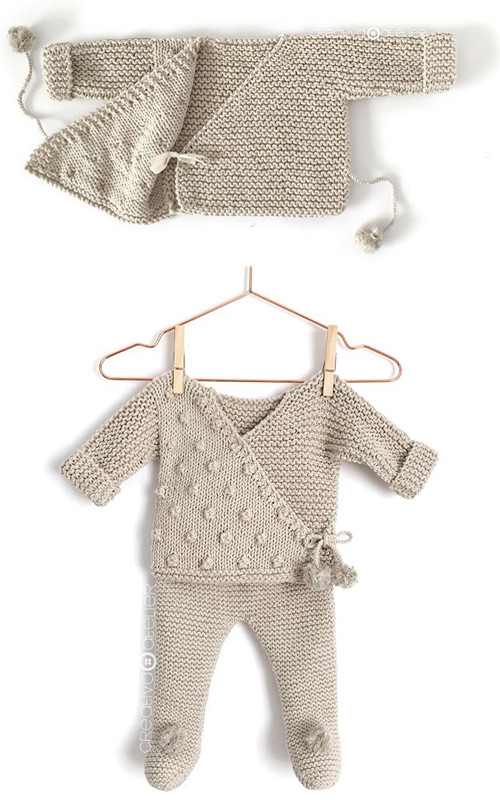
Kimono Jacket - Free Pattern

Kimono Jacket - Free Pattern
Photos above © Creativa Atelier
What beautiful kimono jacket knitting pattern! I found it on BeautifulSkills...
If there is one thing I’m completely certain about baby clothes, is that it has to be the most comfortable garment and it has to be super easy to put on and take off. So today, I want to show you how to make a knitted kimono jacket for babies which, for me, is the star of the tops and your best ally for your baby’s first weeks.

Full Post: Kimono Jacket

Discover More From the Archive

A fresh mix of knitting patterns and tutorials from the Amazing Knitting archive.

Finding patterns from the archive…