Skip to content

...

Showing posts sorted by date for query round blanket knitting pattern. Sort by relevance Show all posts

9 Free Baby Hat & Booties Knitting Patterns for Quick Handmade Gifts

9 free baby hat and booties knitting patterns for quick handmade gifts


Looking for a small and thoughtful project to knit for a new baby? These 9 free baby hat and booties knitting patterns include cozy newborn hats, an adorable pixie bonnet, classic baby booties, tiny cables and sweet ballerina-style shoes.

These projects are much quicker to make than a full baby blanket or sweater, making them especially useful for baby showers, newborn gifts and last-minute handmade presents.

Every pattern in this collection has been reviewed by Amazing Knitting, and each project below links to our updated pattern guide where you can find yarn, needle, sizing and construction information together with the current original free pattern source.

✓ All 9 patterns in this collection are currently free

1. Hello Baby Hat

Hello Baby Hat by Susan B. Anderson is a charming newborn hat designed to coordinate with the designer's Hello Baby Cardigan.

It uses worsted-weight yarn and US 7 (4.5 mm) needles and is sized for approximately newborn to 3 months. The smooth stockinette fabric keeps the design simple, while an optional tiny strawberry charm adds a playful finishing touch.

This is an especially nice choice when you want a classic baby hat that can be knitted on its own or turned into part of a matching handmade set.

See the Free Hello Baby Hat Pattern →

2. Little Eyes Baby Booties

If you enjoy tiny projects with beautiful stitch detail, Little Eyes by Inma Gijón is one of the most distinctive bootie patterns in this collection.

These newborn booties feature a decorative cable across the upper foot and are worked flat using light fingering yarn and 2 mm needles.

They require only about 30–60 yards (27–55 m), making them a wonderful project for a small amount of fine yarn left over from another baby knit.

See the Free Little Eyes Baby Booties Pattern →

3. Pixie Baby Hat

For something a little different from a traditional round baby beanie, try the Pixie Baby Hat by Marta Porcel of Creativa Atelier.

This adorable pointed bonnet is worked flat on straight needles, then folded and seamed to create its characteristic pixie shape.

The original tutorial is designed for approximately 1–3 months and uses DK/light yarn with 4 mm needles. An adjustable cord and tassels complete the playful look.

Because there is no need to knit a tiny circumference in the round, it can also be an appealing baby-hat project for knitters who prefer straight needles.

See the Free Pixie Baby Hat Pattern →

4. Baby Ballerina Booties

Baby Ballerina Booties by Marta Porcel of Creativa Atelier turn simple knitting into a sweet pair of ballerina-style baby shoes.

The design uses garter stitch and is worked on straight needles, making it an attractive option if you enjoy simple flat knitting and finishing.

The finished shoes have a delicate wraparound ballerina appearance, making them especially pretty for a baby shower or newborn gift.

See the Free Baby Ballerina Booties Tutorial →

5. Calming Baby Knit Hat

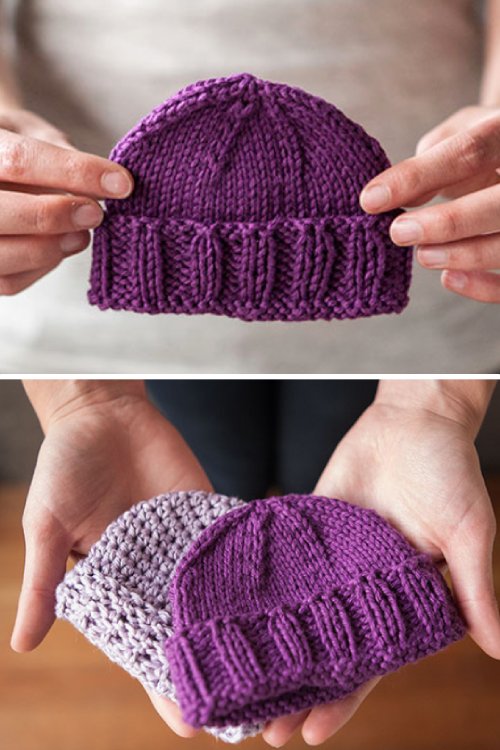
Calming Baby Knit Hat by Stacey Winklepleck is one of the most practical patterns in the collection because it includes Preemie, Baby and Toddler sizes.

The hat uses worsted-weight yarn, US 6 (4 mm) needles and approximately 109 yards (100 m) of yarn.

Its simple stockinette body and cozy folded cuff create a classic baby hat without complicated lace, cables or colorwork.

The range of sizes also makes this a useful pattern to keep for future baby gifts or suitable charity-knitting projects.

See the Free Calming Baby Knit Hat Pattern →

6. Saartje's Bootees

Saartje's Bootees by Saartje de Bruijn have become a classic among knitted baby-shoe patterns.

Originally published in 2007, these little booties are worked flat in fingering-weight yarn and feature distinctive crossover straps with buttons.

Garter stitch gives the shoes a beautifully textured handmade look, while the strap construction makes them immediately recognizable.

This is a particularly lovely choice if you want a vintage-inspired baby project rather than a conventional knitted sock or slipper.

See the Free Saartje's Bootees Pattern →

7. Hat for Hugs

Hat for Hugs by marianna mel is a simple DK-weight baby hat designed to coordinate with the designer's Baby Hug Boots.

The free pattern includes Large Preemie, 0–3 month and 6–9 month sizes.

Unlike many small baby hats, Hat for Hugs is worked flat and seamed, so you do not need to use double-pointed needles or Magic Loop.

Its straightforward construction and multiple baby sizes make it a useful little pattern for gifts and appropriate charity knitting.

See the Free Hat for Hugs Pattern →

8. Newborn Booties

Newborn Booties by Priscillia Uloho are a quick, traditional pair of knitted baby booties suitable for boys or girls.

The pattern uses DK-weight yarn and is worked flat before being seamed, with needle sizes of 2.75 mm and 3.25 mm used for different sections of the project.

Sizes include newborn and 0–6 months, making these a useful basic bootie pattern to keep bookmarked whenever you need a small handmade baby present.

See the Free Newborn Booties Pattern →

9. Dreamy Baby Booties

Our final project offers the widest age range among the booties in this collection.

Dreamy Baby Booties by Dream in Color are written in three sizes: 0–3, 3–6 and 6–9 months.

The pattern uses worsted-weight yarn and US 6 (4 mm) needles, making it a good option if you prefer working with a slightly heavier yarn than the fine yarn used for some traditional baby booties.

The original yarn includes merino, cashmere and nylon, but another soft worsted-weight yarn that produces the correct gauge can be considered when substituting.

See the Free Dreamy Baby Booties Pattern →

Which Baby Hat or Booties Should You Knit First?

If you want a simple classic hat, start with Hello Baby Hat or Calming Baby Knit Hat. If you prefer working flat on straight needles, Hat for Hugs and the Pixie Baby Hat are particularly interesting choices.

For booties, choose Little Eyes if you want to practice a small cable project, Baby Ballerina Booties for a delicate shoe-style design, or Saartje's Bootees for a classic crossover-strap look.

Dreamy Baby Booties are useful when you want several age options, while Newborn Booties make a practical traditional baby gift.

Tips for Knitting Baby Hats and Booties

  • Check the size carefully. Baby sizes vary considerably, so use the designer's measurements and gauge rather than relying only on an age label.
  • Choose soft yarn. Baby accessories are worn close to sensitive skin, so avoid yarn that feels rough or scratchy.
  • Think about washability. Easy-care yarn can make a handmade baby gift much more practical for parents.
  • Check your gauge. A small gauge difference can have a surprisingly large effect on tiny hats and booties.
  • Finish securely. Weave in ends carefully and make sure any buttons or decorative elements required by a design are securely attached.
  • Check donation rules first. Hospitals and charities may have their own requirements for yarn fibers, sizes, embellishments and construction.

Make a Matching Baby Gift Set

One of the easiest ways to turn these small projects into a more substantial handmade gift is to pair a hat with a set of booties.

A simple worsted-weight hat and booties in coordinating colors can make a beautiful newborn set, while a pixie bonnet paired with ballerina shoes creates a more decorative combination.

You can also combine one of these projects with a baby cardigan or blanket if you want to make a larger gift.

More Free Baby Knitting Patterns

If you enjoyed these small baby projects, explore our other curated collections of free knitting patterns on Amazing Knitting.

9 Free Baby Sweater & Cardigan Knitting Patterns →

7 Free Baby Blanket Knitting Patterns →

7 Free One-Skein Knitting Patterns →

Free Pattern Availability

All nine patterns in this collection were checked as free patterns when this article was prepared.

Pattern availability on external designer and publisher websites can change over time. Each link in the collection takes you first to our Amazing Knitting guide, where we maintain the pattern details and direct readers to the current authorized source whenever one is available.

Amazing Knitting does not reproduce designers' copyrighted pattern instructions. Pattern ownership remains with the credited designers and publishers.

Read Our Pattern Availability & Editorial Policy →

Let's Play Hopscotch Baby Blanket – Free Easy Knitting Pattern

Let's Play Hopscotch Baby Blanket free easy knitting pattern by Candylou Creations

Let's Play Hopscotch Baby Blanket by Candylou Creations is a colorful beginner-friendly knitting pattern inspired by the squares and lines of the classic childhood game of hopscotch.

The blanket combines simple knit-and-purl texture with broad blocks of color and contrasting transition rows. The result looks structured and modern while requiring only a small set of basic knitting skills.

The pattern can be made in several sizes, from a compact stroller blanket to a large throw, and the complete instructions are currently available free from the designer's official website.

Pattern and design © Candylou / Candylou Creations.

Let's Play Hopscotch Blanket Overview

  • Designer: Candylou / Candylou Creations
  • Pattern: Let's Play Hopscotch Baby Blanket
  • Craft: Knitting
  • Category: Baby blanket / stroller blanket / throw
  • Skill level: Beginner
  • Yarn weight: Worsted or Aran
  • Colors: Three
  • Needles: US 8 / 5 mm circular needles suggested
  • Circular needle length: Approximately 24 or 32 in
  • Gauge: Approximately 18 stitches = 4 in / 10 cm
  • Construction: Worked flat
  • Main techniques: Knit, purl, garter stitch, color changes and simple textured sections
  • Sizes: Stroller, Baby, Small, Medium and Large
  • Pattern availability: Free web pattern and free PDF from the designer

A Colorful Blanket Inspired by Hopscotch

The inspiration for this blanket comes from the familiar squares and dividing lines of a hopscotch court.

Instead of creating the effect with complicated colorwork, the design uses large blocks of simple textured knitting separated by narrow transition rows. This gives the blanket its geometric appearance while keeping the knitting straightforward.

The three-color layout also makes it easy to personalize. Soft nursery shades can create a gentle baby blanket, while stronger contrasting colors can give the same pattern a more graphic, modern look.

Why This Pattern Works Well for Beginners

Let's Play Hopscotch is designed around basic techniques rather than lace, cables or stranded colorwork.

The main skills used are:

  • Cast on
  • Knit
  • Purl
  • Bind off
  • Change yarn colors
  • Weave in ends

If you already know the knit and purl stitches, this project gives you a useful way to practice maintaining even tension and following a repeating sequence over a larger piece of fabric.

Simple Knit-and-Purl Texture

Within each color block, knit and purl stitches create a subtle geometric texture.

The pattern does not depend on complicated shaping. Instead, the visual interest comes from how the knit-and-purl sections repeat across the width of the blanket.

This is one reason the design can look more detailed than the actual techniques required to make it.

Three-Color Construction

The designer uses three colors, labeled A, B and C.

One color is worked for a section before transitioning to the next color. During the narrow transition rows, two strands are temporarily held together, which creates a stronger visual dividing line between the larger color blocks.

The sequence then repeats through the blanket.

This method gives the finished project a coordinated striped appearance without requiring traditional stranded colorwork.

Garter-Stitch Border

The blanket begins and ends with a simple garter-stitch border, and garter stitches are also maintained along the side edges.

This border frames the textured center and gives the finished blanket a clean, defined edge.

It also provides a useful contrast to the knit-and-purl pattern used in the main sections.

Available Blanket Sizes

One of the strongest features of the current pattern is that it includes several useful sizes rather than only one small baby blanket.

  • Stroller: approximately 22 × 28 in
  • Baby: approximately 28 × 36 in
  • Small: approximately 34 × 40 in
  • Medium: approximately 36 × 46 in
  • Large: approximately 42 × 50 in

The designer notes that finished dimensions are approximate and may vary with your yarn, needle size and personal tension.

How Much Yarn Will You Need?

For worsted or Aran-weight yarn at approximately 4.5 stitches per inch, the designer provides these estimated yarn requirements:

  • Stroller: about 600 yards
  • Baby: about 800 yards
  • Small: about 1,200 yards
  • Medium: about 1,700 yards
  • Large: about 2,200 yards

Because the blanket uses three colors, divide your yarn purchase according to the color sequence you plan to use rather than assuming every shade will be used in exactly the same amount.

Yarn for the Hopscotch Blanket

The pattern is designed for worsted or Aran-weight yarn.

The designer recommends practical fibers such as acrylic, superwash wool or wool blends for baby blankets.

These can be particularly useful choices for a project that may need regular washing.

The designer's examples use Hobby Lobby I Love This Yarn, but the pattern is not limited to that specific brand.

Choosing a Yarn Substitute

A substitute yarn should create a fabric you like while remaining reasonably close to the intended gauge.

For a baby blanket, consider:

  • Softness against the skin
  • Ease of washing
  • Durability
  • Good stitch definition
  • Availability in three coordinating colors

A smooth yarn will show the simple knit-and-purl texture more clearly than a very fuzzy yarn.

Needles

The pattern suggests US 8 / 5 mm circular needles with a 24-inch or 32-inch cord when using worsted-weight yarn.

Although the project is worked flat rather than in the round, circular needles are useful for blankets because the flexible cable can support a large number of stitches and the increasing weight of the fabric.

The designer also recommends adjusting your needle size when necessary to suit your yarn and desired fabric.

Gauge

A useful reference gauge is approximately:

18 stitches = 4 inches / 10 cm.

Exact gauge is not as critical for a blanket as it would be for a fitted sweater, but it still affects both the finished measurements and the amount of yarn required.

A looser gauge will generally create a larger, airier blanket, while tighter knitting can produce a smaller and denser fabric.

Skills You'll Practice

  • Casting on
  • Knit stitch
  • Purl stitch
  • Garter stitch
  • Working flat on circular needles
  • Changing yarn colors
  • Working with two strands together for transition rows
  • Using stitch markers
  • Following a repeating sequence
  • Binding off
  • Weaving in ends

Using Stitch Markers

The original instructions use stitch markers to separate the side borders from the main patterned area.

This is particularly helpful for newer knitters because the markers provide a clear reminder of where the edge stitches end and the central texture begins.

Once placed correctly, the markers can remain useful throughout the project.

Tips for Cleaner Color Changes

Keep your edge tension consistent. Color changes can become loose if the new yarn is not secured with comfortable, even tension.

Do not pull the new color too tightly. Tight joins can distort the side of the blanket.

Leave enough yarn tail for finishing. A proper tail is much easier to weave in securely than a very short one.

Check the color sequence before starting each new block. This reduces the chance of accidentally repeating the wrong color.

Tips for Straighter Blanket Edges

Maintaining consistent tension on the first and last stitches of every row can help the sides stay neat.

Avoid pulling the first stitch unusually tightly after turning your work. Instead, aim for the same tension used across the rest of the row.

The garter-stitch side borders in this design also help provide a stable frame for the patterned center.

Can You Change the Colors?

Yes. The three-color format is one of the easiest features to personalize.

For a soft nursery palette, consider combinations such as:

  • Cream, sage and beige
  • White, pale blue and gray
  • Ivory, dusty pink and taupe
  • Light gray, mint and white

For a more graphic look, choose colors with stronger contrast.

Before beginning, place the three yarns beside one another to make sure the transition from A to B to C creates the effect you want.

Can You Use More Than Three Colors?

The original design is organized around three repeating colors, but experienced knitters can use the basic structure as inspiration for a broader palette.

Keep in mind that changing the color sequence can increase the number of yarn ends that need to be woven in.

If this is your first blanket, following the original three-color structure is the simplest approach.

Baby Blanket Safety

Hand-knit blankets can be useful for supervised cuddling, stroller use, floor time and other age-appropriate situations.

Always follow current infant safe-sleep recommendations and avoid placing loose blankets in an infant sleep space when they are not recommended.

Is the Let's Play Hopscotch Blanket Pattern Free?

Yes. The Let's Play Hopscotch Baby Blanket is currently available free directly from Candylou Creations.

The designer publishes the complete pattern on the official website and also provides a free printable PDF version.

Amazing Knitting therefore sends readers directly to the designer's original source rather than reproducing the complete row-by-row pattern.

View the Free Let's Play Hopscotch Pattern →

Free Printable PDF

Candylou Creations also provides an official printable PDF edition of the pattern for knitters who prefer to work from a separate pattern document.

Download the Free Official PDF →

Why This Baby Blanket Is Worth Knitting

Let's Play Hopscotch is a strong choice for knitters who want a blanket that looks more detailed than a basic garter-stitch rectangle without introducing difficult techniques.

The knit-and-purl texture provides visual interest, the three-color arrangement makes the project easy to personalize, and the five available sizes make the pattern useful well beyond one small stroller blanket.

It is also a practical skill-building project for newer knitters who want to practice purling, color changes and working a larger number of stitches before moving on to more complicated garments.

Pattern Availability

Amazing Knitting links readers to legitimate designer or publisher sources whenever possible. Pattern prices, download locations and availability can change after an article is published.

Read Our Pattern Availability Policy →

Amazing Knitting is an independent pattern discovery and project-guide site. The Let's Play Hopscotch Baby Blanket design and complete knitting instructions remain the intellectual property of Candylou / Candylou Creations. This guide does not reproduce the designer's complete row-by-row pattern instructions.

Amina Earwarmer – Free Herringbone Knit Headband Pattern

Amina Earwarmer free herringbone knit headband pattern by Krysten Grymes

Amina Earwarmer. Photo © Krysten Grymes / yarnTh3ory

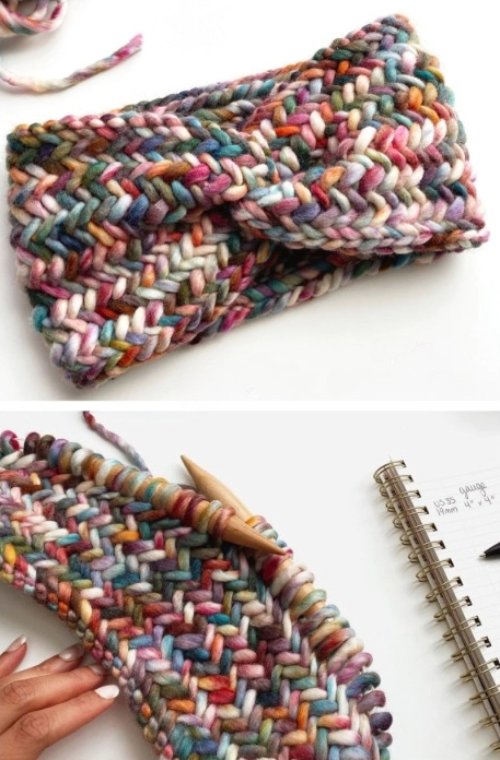
The Amina Earwarmer by Krysten Grymes of yarnTh3ory is a beautifully textured knit headband featuring an eye-catching herringbone stitch and a stylish twisted front.

Worked with super bulky yarn, the free adult version requires only about 68 yards (62 m), making it a quick winter accessory, market project or last-minute handmade gift.

Best of all, the adult-size knitting pattern is still available free from the designer. An expanded paid version is also available with four sizes and two yarn-weight options.

Amina Earwarmer Knitting Pattern Details

  • Designer: Krysten Grymes
  • Brand: yarnTh3ory
  • Published: November 2022
  • Craft: Knitting
  • Category: Earwarmer / knit headband
  • Free version: Adult size in super bulky yarn
  • Yarn weight: #6 Super Bulky
  • Suggested yarn: Malabrigo Rasta
  • Yardage: 68 yards (62 m)
  • Main needles: US 35 (19 mm)
  • Bind-off needles: US 17 (12 mm)
  • Gauge: 12 stitches × 9 rows = 4 inches (10 cm)
  • Finished adult circumference: 21 inches
  • Finished width: 5.75 inches
  • Skill level: Intermediate
  • Main texture: Herringbone knit stitch
  • Construction: Worked flat and seamed into a twisted earwarmer

What Makes the Amina Earwarmer Special?

The standout feature of this design is its herringbone knit texture.

Instead of a simple ribbed or garter-stitch headband, the fabric has a dense diagonal appearance that gives the finished accessory a polished, almost woven look.

The folded join at the front adds another design element, creating the fashionable twisted shape seen in the finished earwarmer.

The Free Amina Earwarmer Pattern

There are currently two versions of the knitting pattern, so it is useful to understand the difference before starting.

The designer's free version provides the instructions for the adult size using super bulky yarn.

This is a complete free pattern published directly on the yarnTh3ory website, not simply a preview of the paid PDF.

What Is Included in the Paid Version?

Knitters who need additional sizing or want to use a different yarn weight can choose the designer's expanded paid version.

The expanded pattern includes:

  • Baby size
  • Child size
  • Teen size
  • Adult size
  • Super bulky yarn instructions
  • Worsted-weight yarn instructions

If you only want to make the adult super-bulky version shown here, however, the designer continues to provide those instructions free.

Super Bulky Yarn Makes It Quick

The free version uses #6 super bulky yarn.

Krysten Grymes made her sample with Malabrigo Rasta in the color Molino.

Rasta is a thick merino wool yarn with excellent stitch definition, making it particularly effective for showing the strong diagonal lines of the herringbone texture.

Only 68 Yards of Yarn

One of the biggest attractions of the Amina Earwarmer is its modest yarn requirement.

The free adult version calls for approximately:

68 yards / 62 meters
of #6 super bulky yarn

That makes it a useful project for a partial skein left over from another super-bulky project, provided you have enough yardage and can achieve the required gauge.

Choosing Substitute Yarn

You do not have to use the original Malabrigo Rasta to make the earwarmer.

Look for a #6 super bulky yarn that produces a fabric close to the designer's gauge.

Because the herringbone texture is the main visual feature, a relatively smooth yarn with good stitch definition can help the diagonal pattern remain clearly visible.

Solid, tonal and gently variegated colors can all work well, although highly contrasting multicolored yarn may make the herringbone texture less obvious.

Needles

The free pattern uses two unusually large needle sizes:

  • US 35 (19 mm) circular needles for the main fabric
  • US 17 (12 mm) circular needles for binding off

The smaller needle is used at the finishing stage rather than for knitting the main herringbone fabric.

Gauge and Finished Size

The designer's gauge is:

12 stitches × 9 rows = 4 inches (10 cm)

The finished adult earwarmer measures approximately:

  • Circumference: 21 inches
  • Width: 5.75 inches

The free pattern also explains that the size can be adjusted by changing the number of stitches cast on, while the width can be changed by working more or fewer rows.

What Is Herringbone Knit Stitch?

Herringbone knitting creates a distinctive diagonal texture that resembles the classic herringbone pattern found in woven fabrics.

In the Amina Earwarmer, adjacent stitches are worked together in a special way while retaining one of the stitches to continue the sequence.

This creates the dense overlapping appearance that makes the finished headband look much more intricate than an ordinary stockinette accessory.

Is the Amina Earwarmer Beginner Friendly?

The designer rates the knitting pattern as intermediate.

The overall construction is simple, but the herringbone stitch requires more attention than standard knit and purl fabric.

If you are already comfortable handling needles and following a stitch sequence, this can be an excellent small project for learning a new texture without committing to a sweater or large blanket.

Learn the Herringbone Stitch First

Krysten Grymes provides a separate tutorial explaining the basics of the herringbone knit stitch.

It is worth practicing the technique on a small swatch before beginning the earwarmer.

Once your hands become accustomed to the movement, the repeated texture becomes much easier to work consistently.

Worked Flat

Although circular needles are listed, the earwarmer itself is worked flat.

You create a rectangular strip of herringbone fabric and then join the two ends during finishing.

This means you do not need to manage a small circumference in the round, which keeps the overall construction straightforward.

Creating the Twisted Front

The stylish front twist is created during finishing rather than through complicated shaping while knitting.

The ends of the completed strip are folded into position and sewn together. When the earwarmer is turned to the correct side, the folded seam forms the characteristic twist at the front.

The designer includes a demonstration of this finishing technique with the free pattern.

Why Use Smaller Needles for the Bind-Off?

The main fabric is worked on 19 mm needles, while the designer specifies 12 mm needles for the bind-off.

Following the designer's needle change helps reproduce the intended finishing behavior of the original sample.

Herringbone fabric behaves differently from ordinary stockinette, so it is worth following the specified finishing method before making your own adjustments.

Adjusting the Width

The free adult version is approximately 5.75 inches wide.

If you prefer a narrower earwarmer, the designer notes that you can work fewer rows. For additional coverage, work more rows before binding off.

Keep in mind that changing the dimensions will also change the amount of yarn required.

Adjusting the Circumference

The free adult sample finishes at approximately 21 inches in circumference.

The designer notes that the size can be adjusted by changing the number of stitches cast on.

If you make a substantial size adjustment, check your gauge and allow enough yarn before starting.

A Great Quick-Gift Project

The combination of super bulky yarn, a small finished size and only 68 yards of yarn makes the Amina Earwarmer especially appealing for gift knitting.

The designer specifically recommends it for market season and last-minute gifts.

Once you are comfortable with herringbone stitch, making several earwarmers in different colors can be an efficient way to turn small amounts of yarn into finished accessories.

A Useful Market-Knitting Project

Small accessories can be practical projects for craft markets because they require much less yarn and knitting time than full garments.

The strong texture and twisted front give the Amina Earwarmer a distinctive handmade appearance even though the overall construction remains relatively compact.

If you sell finished items, always check the designer's current terms before offering products made from a pattern.

Knitting vs Crochet Amina Earwarmer

Be aware that Krysten Grymes has designed both knit and crochet versions of the Amina Earwarmer.

They share the Amina name and a herringbone-inspired appearance, but they are separate patterns using different techniques and materials.

The pattern featured on this Amazing Knitting page is specifically the knit version published in November 2022.

Why Knit the Amina Earwarmer?

The Amina Earwarmer is a good choice when you want a small project that teaches something more interesting than basic ribbing or garter stitch.

Its herringbone fabric creates striking texture, the super bulky yarn helps the project progress quickly, and the twisted finishing technique gives the simple rectangular construction a stylish final shape.

With the adult instructions still available free from the designer, it is also an accessible way to try herringbone knitting before deciding whether you want the expanded multi-size pattern.

Get the Free Amina Earwarmer Knitting Pattern

The Amina Earwarmer (knit version) by Krysten Grymes is available free for the adult super-bulky version directly from yarnTh3ory.

Get the Free Amina Earwarmer Pattern →

The free designer version currently includes the adult size in super bulky yarn. An expanded paid version includes additional sizes and yarn-weight options. Pattern availability may change over time. Amazing Knitting does not reproduce or distribute the designer's copyrighted pattern instructions.

Calming Baby Knit Hat – Free Preemie to Toddler Hat Pattern

Calming Baby Knit Hat free preemie baby and toddler hat knitting pattern by Stacey Winklepleck

Calming Baby Knit Hat. Pattern design © Stacey Winklepleck

The Calming Baby Knit Hat by Stacey Winklepleck is a simple and practical free baby hat knitting pattern available in three sizes from preemie through toddler.

Worked in worsted-weight yarn with a cozy folded cuff and classic stockinette body, this little hat uses only about 109 yards (100 m) of yarn. That makes it an appealing quick knit for a new baby, charity knitting or a small handmade gift.

The pattern was originally published in the Helping Hands collection from Knit Picks and remains available as a free knitting pattern.

Calming Baby Knit Hat Pattern at a Glance

  • Designer: Stacey Winklepleck
  • Published: June 2015
  • Original publication: Helping Hands / Knit Picks
  • Craft: Knitting
  • Category: Baby beanie / toque
  • Sizes: Preemie, Baby and Toddler
  • Yarn weight: Worsted
  • Suggested yarn: Knit Picks Comfy
  • Yardage: Approximately 109 yards (100 m)
  • Needles: US 6 (4 mm)
  • Gauge: 20 stitches × 24 rows = 4 inches (10 cm)
  • Gauge pattern: Stockinette stitch in the round, blocked
  • Construction: Bottom up and worked in the round
  • Brim: Folded cuff
  • Language: English
  • Availability: Free

Three Sizes: Preemie, Baby and Toddler

One of the most useful features of the Calming Baby Knit Hat is that the pattern includes three sizes rather than only a single newborn size.

The listed finished measurements are approximately:

  • Preemie: up to 12 inches circumference × 6 inches high
  • Baby: up to 14 inches circumference × 6.5 inches high
  • Toddler: up to 16 inches circumference × 7 inches high

This makes the pattern useful for everything from a tiny preemie hat to a larger hat for a growing toddler.

A Simple Classic Baby Hat

The Calming Baby Knit Hat proves that a baby project does not need complicated lace, cables or colorwork to look beautiful.

Its design relies on a clean stockinette body and a folded brim, creating a classic shape that works well in almost any color.

The simplicity also makes the hat easy to personalize through yarn choice, stripes or carefully chosen colors.

The Cozy Folded Brim

The folded cuff is one of the most practical details in the design.

Folding the lower portion creates an extra layer of knitted fabric around the ears and forehead, adding warmth without requiring a complicated stitch pattern.

It also gives the otherwise simple stockinette hat a neat, finished appearance.

Bottom-Up Construction

The hat is worked from the bottom up.

You begin at the lower edge, establish the cuff and then continue upward through the body of the hat before shaping the crown.

This is a familiar construction method for many basic knitted hats and can be a useful introduction to hat knitting for someone already comfortable with basic knitting techniques.

Worked in the Round

Calming Baby Knit Hat is worked in the round, so the main hat does not require a traditional seam up the back.

Working stockinette in the round is especially straightforward because the smooth fabric is produced primarily by knitting each round.

As the crown becomes smaller, use your preferred method for knitting small circumferences as required by the original pattern.

Yarn for the Calming Baby Hat

The suggested yarn is Knit Picks Comfy Worsted.

This worsted-weight yarn is a blend of 75% Pima cotton and 25% acrylic, combining the softness of cotton with the practicality of an easy-care blend.

The yarn is listed at approximately 109 yards per 50 grams.

Only About 109 Yards

The pattern lists approximately:

109 yards / 100 meters
of worsted-weight yarn

That modest requirement makes this an attractive small project when you have a suitable partial skein in your stash.

Actual usage can vary with size, gauge and any modifications you make, so having a little extra yarn is always useful.

Choosing Substitute Yarn

You do not have to use the original Knit Picks yarn.

Look for a soft worsted-weight yarn that allows you to achieve the required gauge and produces a comfortable fabric.

For baby knitting, softness and washability are especially useful. Cotton blends, washable wool blends and other baby-friendly worsted yarns can all be worth considering.

Needles and Gauge

The pattern specifies US 6 (4 mm) needles.

The documented gauge is:

20 stitches × 24 rows = 4 inches (10 cm)
in stockinette stitch in the round, blocked

Gauge matters on a fitted baby hat. Even a small difference in stitches per inch can noticeably change the finished circumference.

Make a gauge swatch with your chosen yarn and change needle size if necessary.

Why Swatching Is Worthwhile

A baby hat may be small, but checking gauge is still useful because the intended sizes are based on specific finished measurements.

Blocking the swatch also shows how your yarn behaves after washing and whether the fabric remains soft enough for comfortable wear.

This is particularly useful when substituting a yarn with a different fiber composition from the original cotton-acrylic blend.

Stockinette Stitch Keeps It Simple

Most of the hat uses classic stockinette stitch.

That makes the design a good canvas for beautiful yarn while keeping the knitting itself relatively uncomplicated.

A smooth yarn will emphasize the clean surface, while a gently tonal yarn can add subtle color variation without hiding the simple shape.

Skills Used in the Calming Baby Knit Hat

Useful skills for this project include:

  • Casting on
  • Joining to knit in the round
  • Knitting and purling
  • Stockinette stitch in the round
  • Creating a folded cuff
  • Working decreases
  • Crown shaping
  • Working a small circumference
  • Basic finishing

Is the Calming Baby Hat Beginner Friendly?

The straightforward construction makes this a very approachable small project for a knitter who already understands the basic stitches and is ready to work in the round.

There are no elaborate cable or lace charts to manage. Most of the visual appeal comes from the classic shape and folded cuff.

If you are new to circular knitting, the small size also means you can practice the technique without committing to a large project.

A Quick Stash-Busting Project

With approximately 109 yards required, this little hat can be a useful way to turn leftover worsted yarn into a finished project.

Before using leftovers, weigh or measure your remaining yarn when possible and make sure you have enough for the size you intend to knit.

A contrasting cuff can also be a creative way to combine smaller amounts of compatible yarn.

A Practical Charity-Knitting Pattern

Calming Baby Knit Hat originally appeared in Helping Hands, a collection created around projects suitable for charitable giving.

Its small yarn requirement, straightforward construction and range from preemie to toddler make it particularly relevant for knitters interested in making baby hats for donation.

Always contact the hospital, charity or organization before knitting a donation. Requirements can differ for yarn fiber, colors, dimensions and finishing.

Knitting the Preemie Size

The smallest version is designed for a circumference of up to approximately 12 inches.

If you are making the preemie size specifically for donation, check the recipient organization's current requirements before starting.

Hospitals and neonatal programs may have specific rules about fiber, embellishments and acceptable hat dimensions.

Make It as a Baby Gift

A simple knitted hat can make a thoughtful addition to a larger handmade baby gift.

Pair it with baby booties, a cardigan or a blanket, or knit the hat by itself when you need a smaller project.

Because the design is simple, choosing a beautiful yarn color can make even a quick version feel special.

A Good Gender-Neutral Baby Knit

The classic beanie shape works easily as a gender-neutral baby project.

Soft neutrals, natural shades, pastels or brighter colors can all suit the design without requiring any change to the construction.

This can be useful when knitting a gift before parents have chosen colors or when making hats in advance for charity.

Baby Hat Safety

Keep baby hats simple and securely finished.

Avoid loose embellishments, cords or decorations that could detach, and check the finished hat regularly for damaged yarn or loose ends.

Baby hats and other loose accessories should be removed when appropriate for sleep. Follow current infant safe-sleep recommendations and use the hat under suitable adult supervision.

Why Knit the Calming Baby Hat?

Calming Baby Knit Hat combines several qualities that make a small knitting pattern genuinely useful: three sizes, worsted-weight yarn, simple construction and a modest yarn requirement.

The folded brim adds warmth without complicating the design, while the smooth stockinette body makes it easy to adapt through color and yarn choice.

Whether you are knitting for a new baby, using leftover yarn or making hats for charity, it is a practical pattern worth keeping in your project library.

Get the Free Calming Baby Knit Hat Pattern

Calming Baby Knit Hat by Stacey Winklepleck remains available as a free knitting pattern.

Get the Free Calming Baby Knit Hat Pattern →

Pattern availability was checked when this article was updated. Amazing Knitting does not reproduce the designer's complete copyrighted instructions. Please use the authorized pattern page above for the original free download.

Little Bonnie Cabled Earwarmer – Free Baby & Kids Headband Knitting Pattern

Little Bonnie Cabled Earwarmer free baby and kids headband knitting pattern

Little Bonnie Cabled Earwarmer Headband by marianna mel is a sweet, quick-knit accessory featuring a single decorative cable down the center.

The design is especially flexible because the length can be adjusted easily, making it suitable for babies from around 3 months old through older children. It can also be knitted in either DK or Aran-weight yarn depending on how light or cozy you want the finished earwarmer to be.

The complete pattern is currently available free from Marianna's Lazy Daisy Days, the designer's original website.

Design and original pattern © marianna mel / Marianna's Lazy Daisy Days.

Little Bonnie Cabled Earwarmer Pattern Overview

  • Designer: marianna mel
  • Source: Marianna's Lazy Daisy Days
  • Pattern: Little Bonnie Cabled Earwarmer Headband
  • Craft: Knitting
  • Category: Baby and children's headband / earwarmer
  • Published: January 2021
  • Age range: Approximately 3 months upwards
  • Yarn options: DK or Aran weight
  • DK needles: 4 mm
  • Aran needles: 5 mm
  • Additional tool: Cable needle
  • DK yarn amount: Approximately 20 g
  • Aran yarn amount: Approximately 30 g
  • DK width: Approximately 2¾ in / 7 cm
  • Aran width: Approximately 3½ in / 9 cm
  • Length: Approximately 12–17 in, adjustable
  • Main techniques: Knit, purl, cable knitting, seaming
  • Pattern availability: Free from the designer

A Simple Single-Cable Headband

The defining feature of Little Bonnie is the single cable running along the center of the headband.

The cable adds just enough texture to make the project feel more interesting than a basic ribbed or garter-stitch band, while keeping the construction simple enough for knitters who are new to cables.

Because the headband is worked as a narrow strip rather than in the round, it is also an approachable way to practice cable knitting without managing a large project.

Two Yarn Options

The designer provides instructions for both DK and Aran-weight yarn.

Using DK yarn creates a lighter, narrower earwarmer, while Aran yarn produces a thicker and warmer version.

This gives you some control over the final look and warmth without changing the basic cable design.

DK Version

For the lighter DK version, the designer recommends:

  • DK-weight yarn
  • Approximately 20 g of yarn
  • 4 mm knitting needles
  • Cable needle

The finished width is approximately 2¾ in / 7 cm.

The published tension is approximately:

22 stitches = 4 in / 10 cm in stockinette stitch.

Aran Version

For a warmer version, the designer suggests:

  • Aran-weight yarn
  • Approximately 30 g of yarn
  • 5 mm knitting needles
  • Cable needle

The finished width is approximately 3½ in / 9 cm.

The published tension is approximately:

18 stitches = 4 in / 10 cm in stockinette stitch.

Adjustable Length

One of the best features of this pattern is that the length is very easy to customize.

The designer gives a general range of approximately 12–17 inches, depending on the age and head size of the child.

The suggested guide is:

  • 0–3 months: about 12 in
  • 3–6 months: about 13 in
  • 6–12 months: about 14 in
  • 1–3 years: about 15 in
  • 3–12 years: about 17 in

These are rough guidelines, so measuring the child's head is always the most reliable approach.

How the Headband Is Constructed

Little Bonnie is worked flat as a long narrow strip.

The cable pattern repeats along the length until the band reaches the desired size.

After binding off, the cast-on and cast-off edges are joined with a short seam, creating the finished circular headband.

This construction is straightforward and avoids the need to knit on a small circumference.

The Cable Pattern

The central cable is worked over four stitches.

The designer explains that the cable can be crossed either to the front or to the back, as long as you remain consistent throughout the project.

That means you can choose the cable direction you find easiest or prefer visually.

A Good First Cable Project

Because the design uses only one repeating cable, Little Bonnie is an excellent small project for learning how cable stitches work.

You do not need to manage multiple crossing directions or complicated cable charts.

Once you understand how to move two stitches onto the cable needle and work them in the new order, the repeat becomes very easy to recognize.

Skills You'll Use

  • Casting on
  • Knit stitches
  • Purl stitches
  • Working flat
  • Using a cable needle
  • Working a 4-stitch cable
  • Repeating a short row sequence
  • Binding off
  • Seaming
  • Weaving in ends

Is Little Bonnie Beginner Friendly?

Little Bonnie is a good project for an advanced beginner who already knows how to knit and purl.

The only major new technique is the cable.

Because the project is small and uses a short repeating sequence, it is much less intimidating than learning cables on a sweater or large blanket.

Tips for Neater Cables

Use the same cable direction every time. The designer notes that you can hold the cable needle at the front or back, but consistency is important.

Do not pull too tightly after the cable cross. Tight tension can make the cable section narrower than the surrounding fabric.

Check the cable immediately after working it. It is easier to correct a mistake before several more rows have been knitted.

Use a row counter if needed. The repeat is short, but counting helps prevent accidental extra rows between cable crossings.

Choosing Yarn

This pattern is ideal for leftover yarn because it requires only a small amount.

A smooth yarn with good stitch definition will show the cable more clearly than a very fuzzy yarn.

For children's accessories, also consider softness and washability when choosing the fiber.

Why This Is a Good Scrap-Yarn Project

The DK version needs only around 20 g of yarn, while the Aran version uses roughly 30 g.

That makes Little Bonnie a practical way to use small leftover amounts from larger sweaters, blankets or cardigan projects.

You can also make several headbands in different colors from partial balls of yarn.

Finishing the Headband

Once the band reaches the desired length, bind off and join the two short ends.

Use a neat seam that is secure but not excessively bulky, since this area will sit against the head.

After seaming, weave in the yarn tails carefully.

Want an Adult Version?

Marianna also designed a larger version called Bonnie Cabled Earwarmer Headband.

The adult version uses a wider band and additional cables while keeping the same general style.

View the Adult Bonnie Earwarmer Pattern →

Is Little Bonnie a Free Knitting Pattern?

Yes. Little Bonnie Cabled Earwarmer Headband is currently available free directly from Marianna's Lazy Daisy Days.

The designer's page includes the complete instructions for both DK and Aran versions.

Amazing Knitting therefore links directly to the original designer source rather than reproducing the complete pattern or using an unofficial copy.

View the Free Little Bonnie Earwarmer Pattern →

Why This Headband Is Worth Knitting

Little Bonnie is a quick, practical project that teaches a useful cable technique without requiring much yarn.

The adjustable length makes it easy to customize for different ages, while the choice between DK and Aran yarn gives you control over the weight and warmth of the finished earwarmer.

It is especially useful as a small gift project, stash buster or first introduction to cable knitting.

Pattern Availability

Amazing Knitting links readers to legitimate designer or publisher sources whenever possible. Pattern prices, download locations and availability can change after an article is published.

Read Our Pattern Availability Policy →

Amazing Knitting is an independent pattern discovery and project-guide site. The Little Bonnie Cabled Earwarmer Headband design, photos and complete knitting instructions remain the intellectual property of marianna mel / Marianna's Lazy Daisy Days. This guide does not reproduce the designer's complete row-by-row pattern instructions.

Mini Snow Boots – Free Baby Booties Knitting Pattern

Mini Snow Boots free baby booties knitting pattern by DROPS Design with cables and ribbing

Mini Snow Boots by DROPS Design are cozy knitted baby booties with a charming combination of cables, ribbing and a snug sock-style fit. Designed for babies and young children, the pattern includes sizes ranging from approximately 1 month all the way to 4 years.

The tall ribbed cuff gives these little boots their winter-ready appearance, while the cable detail running down the front adds texture and makes the finished pair look much more elaborate than a basic knitted baby sock.

Best of all, the complete Mini Snow Boots pattern is still available free from DROPS Design, so knitters can follow the current official instructions directly from the original publisher.

Design and original pattern © DROPS Design / Garnstudio.

Mini Snow Boots Pattern Overview

  • Designer: DROPS Design
  • Pattern: Mini Snow Boots / DROPS Baby 31-25
  • Pattern number: pu-002-by
  • Craft: Knitting
  • Category: Baby socks / booties
  • Published: March 2018
  • Sizes: 1–3 months, 6–9 months, 12–18 months, 2 years and 3–4 years
  • Foot length: Approximately 10, 11, 12, 14 and 16 cm
  • Yarn group: DROPS Yarn Group B
  • Suggested yarn: DROPS Puna
  • Fiber: 100% alpaca
  • Yarn amount: Approximately 50 g for each listed size
  • Needles: 2.5 mm double-pointed needles
  • Additional tool: Cable needle
  • Gauge: 24 stitches and 34 rows = 10 × 10 cm in stockinette stitch
  • Construction: Worked in the round
  • Main techniques: Ribbing, cables, decreases and sock shaping
  • Pattern availability: Free official web pattern

Cozy Baby Boots With Classic Cable Detail

The feature that gives the Mini Snow Boots their distinctive look is the decorative cable running along the front of each boot.

Instead of relying only on plain stockinette stitch, the pattern combines ribbed texture and cables to create a pair of baby socks that looks almost like miniature winter boots.

The cable motif adds structure and visual interest without covering the entire piece, so the finished booties still retain a soft and comfortable appearance.

Sizes From Baby to Preschool Age

One particularly useful feature of this DROPS pattern is the wide size range. It is not limited to newborns.

The official pattern includes the following five sizes:

  • 1–3 months: approximately 10 cm foot length
  • 6–9 months: approximately 11 cm foot length
  • 12–18 months: approximately 12 cm foot length
  • 2 years: approximately 14 cm foot length
  • 3–4 years: approximately 16 cm foot length

This makes Mini Snow Boots useful for several stages of early childhood and also makes the pattern a good option for handmade baby gifts when you want more than a newborn-only size.

How the Mini Snow Boots Are Constructed

The Mini Snow Boots are worked in the round on double-pointed needles.

The knitting begins at the upper cuff and continues downward, with the decorative cable and rib structure worked according to the DROPS charts. As the piece develops, decreases shape the leg and foot.

Working the booties in the round means there is no long side seam running down the finished sock, helping create a smoother and more comfortable result.

The Ribbed Cuff

The upper section combines ribbed stitches with the central cable design. Ribbing is especially useful for baby socks because it allows the fabric to stretch while still helping the boot stay comfortably around the ankle.

When knitting the cuff, try to avoid pulling the stitches too tightly. A very firm cast-on edge can reduce the stretch of the opening and make the finished boot harder to put on.

Working the Cable Pattern

The cable detail is one of the main decorative elements in this pattern. DROPS provides charts for the patterned sections, so being comfortable reading a simple knitting chart will make the project easier to follow.

You will also need a cable needle to move stitches while creating the crossed cable sections.

If cables are still new to you, work slowly through the first repeat and check the orientation of each cable crossing before continuing. Once the repeat becomes familiar, the pattern becomes much easier to recognize.

Yarn for Mini Snow Boots

The original pattern uses DROPS Puna, a soft 100% alpaca yarn from DROPS Yarn Group B.

The official pattern calls for approximately 50 grams for each of the listed sizes, making this a relatively small-yarn project.

DROPS also allows compatible Yarn Group B alternatives, so you do not necessarily have to use the exact original yarn. The important point is to choose a substitute that allows you to obtain the required gauge and produces a comfortable fabric suitable for baby feet.

Why Gauge Matters for Baby Booties

The official gauge is:

24 stitches and 34 rows = 10 × 10 cm in stockinette stitch.

Gauge matters particularly on footwear because even a small difference can noticeably change the finished foot length and circumference.

If your stitches are larger than the pattern gauge, the booties may turn out too large. If your gauge is tighter, they may become too small or less stretchy.

For that reason, it is worth checking your tension before knitting the pair, especially if you are substituting yarn.

Needles and Tools

  • 2.5 mm double-pointed knitting needles
  • Cable needle
  • DK / DROPS Yarn Group B yarn
  • Tapestry needle for finishing
  • Stitch markers if you find them helpful for working in the round

The 2.5 mm needle size is a recommendation. As DROPS notes, you may need to adjust needle size to achieve the correct gauge for your individual knitting tension.

Skills You'll Use

  • Knitting in the round
  • Using double-pointed needles
  • Knit and purl stitches
  • Ribbing
  • Reading knitting charts
  • Working cables
  • Using a cable needle
  • Decreasing stitches
  • Shaping a sock or bootie
  • Finishing and weaving in ends

Is This a Beginner Knitting Pattern?

Mini Snow Boots are better suited to an advanced beginner or intermediate knitter than to someone making their very first knitting project.

The basic stitches themselves are familiar, but the project combines several techniques: knitting in the round, working with double-pointed needles, following cable charts and shaping a small sock.

If you already know how to knit and purl and would like to learn cables or small circular knitting, this can be an excellent next-step project.

Tips for Knitting a Neater Pair

Check your gauge first. Baby footwear is small enough that even a modest gauge difference can significantly change the final size.

Keep cable tension consistent. Cable crossings can sometimes become tighter than surrounding stitches, so avoid pulling the working yarn too firmly immediately after a cable.

Watch the joins between double-pointed needles. Moving the needle divisions occasionally can help reduce visible ladders in the fabric.

Count your decreases carefully. Correct stitch counts are important when shaping such a small piece.

Make both boots under similar conditions. Using the same needles and tension helps the finished pair match in size.

Is Mini Snow Boots a Free Knitting Pattern?

Yes. Mini Snow Boots / DROPS Baby 31-25 is currently available as a free knitting pattern directly from DROPS Design.

The official DROPS page includes the complete written instructions, pattern charts, size selection and supporting knitting resources.

Because DROPS Design is the original publisher of this pattern, we link directly to that official source rather than to third-party copies.

View the Free Mini Snow Boots Pattern at DROPS Design →

Why These Baby Boots Are Worth Knitting

Mini Snow Boots combine the practicality of warm knitted baby socks with the look of miniature cable-knit winter boots.

The small scale makes them a satisfying project when you want to practice cables without committing to a large sweater or blanket, while the five-size range gives the design much more flexibility than many newborn-only bootie patterns.

They can also make a thoughtful handmade baby gift, especially when knitted in a soft neutral yarn or a color chosen to coordinate with a baby's winter wardrobe.

Pattern Availability

Amazing Knitting links readers to legitimate designer or publisher sources whenever possible. Pattern prices, download locations and availability can change after an article is published.

Read Our Pattern Availability Policy →

Amazing Knitting is an independent pattern discovery and project-guide site. The Mini Snow Boots design and knitting pattern remain the intellectual property of DROPS Design / Garnstudio. This guide does not reproduce the publisher's complete row-by-row pattern instructions or charts.

Adult Knitted Slippers – Free Pattern

Adult Knitted Slippers free knitting pattern by Aglaé Laser

Adult Knitted Slippers, originally published as Chaussons pour les adultes – Slippers by Aglaé Laser, are cozy house slippers designed for adults who want warm feet without complicated sock construction.

The slippers are worked flat with yarn held double and use three familiar knitted fabrics: garter stitch for the sole, stockinette for the upper foot and ribbing around the ankle.

Once the knitting is finished, a small amount of seaming transforms the flat piece into the finished slipper.

Best of all, the original pattern is still available as a free download from the designer's Ravelry store.

Pattern and featured photo: Aglaé Laser.

Adult Knitted Slippers Pattern Overview

  • Original pattern: Chaussons pour les adultes – Slippers
  • Designer: Aglaé Laser
  • Published: October 2016
  • Category: Adult slippers / house shoes
  • Construction: Worked flat and seamed
  • Yarn: Yarn held double
  • Suggested yarn: Bergère de France Cho'7
  • Yarn weight: Sport
  • Yardage: Approximately 273–328 yd / 250–300 m
  • Needles: 5.5 mm and 6 mm
  • Gauge: 14 sts × 22 rows = 4 in / 10 cm in stockinette
  • Sizes: 36/37, 38/40 and 40/42
  • Languages: English, French and Italian
  • Pattern availability: Free

About the Adult Knitted Slippers

Aglaé Laser designed these slippers as a simple and practical way to make comfortable knitted footwear for adults.

Rather than using traditional sock construction with a heel turn, gusset and small-circumference knitting, the slippers are built as a flat piece.

The shaping is created while knitting, and the piece is then folded and seamed to form the finished slipper.

Three Simple Knitted Sections

One of the clever features of this pattern is the way three familiar stitch patterns are used for different parts of the slipper.

  • Garter stitch forms the sole section.
  • Stockinette stitch creates the upper part of the foot.
  • Ribbing forms the stretchy ankle cuff.

The combination creates a surprisingly shaped finished project from straightforward flat knitting.

Worked Flat Instead of in the Round

These slippers are particularly interesting for knitters who like the idea of handmade footwear but do not yet want to tackle traditional socks.

The project is worked back and forth, so you do not need to manage several double-pointed needles or use Magic Loop to knit the main slipper.

After the knitting is complete, the slipper is folded and the sole is seamed to create its final shape.

Adult Sizes

The original pattern includes several adult foot sizes:

  • 36–37
  • 38–40
  • 40–42

The pattern includes adjustments for making the slippers smaller or larger. Follow the designer's current instructions for the exact cast-on and shaping numbers for your chosen size.

Yarn

The original pattern suggests Bergère de France Cho'7, a sport-weight yarn.

Approximately 250–300 meters / 273–328 yards are listed for the project.

An important feature of the design is that the yarn is held double while knitting.

Using two strands together produces a thicker and warmer fabric than working with a single strand of the same yarn.

Needles

The published pattern information lists:

  • US 9 / 5.5 mm needles
  • US 10 / 6 mm needles

Needle choice can also be used as part of the sizing adjustments described by the designer, so consult the original pattern before casting on.

Gauge

The documented gauge is:

14 stitches × 22 rows = 4 inches / 10 cm in stockinette stitch.

Gauge matters for knitted slippers because the finished piece needs to fit closely enough to remain comfortably on the foot.

If your stitches are substantially tighter or looser than the pattern gauge, the finished dimensions can change even when you follow the same stitch counts.

Garter Stitch Sole

The first main section of the slipper uses garter stitch.

Garter stitch creates a flexible fabric with pronounced horizontal ridges and is one of the simplest knitted fabrics to work flat.

Its elasticity makes it useful in this construction before the slipper transitions into the shaped upper-foot section.

Stockinette Upper

The upper part of the foot transitions into stockinette stitch.

Decreases gradually change the shape of the knitted piece, creating the narrower section that will eventually wrap around the foot.

The exact decrease sequence varies with the sizing instructions, so use the original designer pattern for the complete row-by-row directions.

Ribbed Ankle Cuff

The final knitted section uses ribbing around the ankle.

Ribbing naturally stretches and contracts, making it well suited to the opening of a slipper where some flexibility helps the finished footwear sit comfortably around the ankle.

The designer also notes that the ribbed section can be knitted in a different color if you are running short of the original yarn, making this a useful stash-friendly detail.

Finishing the Slippers

After the knitting is complete, the flat piece is folded into its slipper shape and seamed.

A neat, reasonably flat seam is particularly important for house slippers because bulky finishing underneath the foot may become uncomfortable during wear.

Once the first slipper is complete, repeat the same process for the second slipper.

Useful Skills for This Pattern

The project uses a useful combination of basic knitting and simple shaping skills:

  • Casting on
  • Knit stitches
  • Purl stitches
  • Garter stitch
  • Stockinette stitch
  • K1, P1 ribbing
  • Working with two strands of yarn held together
  • Decrease stitches
  • Binding off
  • Folding and seaming knitted fabric
  • Weaving in yarn ends

A Good Alternative to Traditional Sock Knitting

Traditional socks often introduce several techniques at once, including working in the round, turning a heel, creating a gusset and shaping the toe.

These slippers take a different approach.

Because they are worked flat, knitters can concentrate on shaping and stitch changes while using ordinary back-and-forth knitting.

That makes the project an appealing introduction to knitted footwear before moving on to more traditional sock construction.

Tips for Better Knitted Slippers

Check your gauge. Footwear is more sensitive to size differences than a scarf or blanket.

Use the correct sizing adjustment. Follow the designer's current instructions rather than estimating the stitch count from the photograph.

Keep both slippers consistent. Write down any changes you make while knitting the first slipper so you can repeat them on the second.

Make the sole seam comfortable. Avoid creating an unnecessarily bulky ridge underneath the foot.

Slipper Safety

Hand-knitted slippers can be slippery on polished wood, tile and other smooth flooring.

If the slippers will be worn regularly on smooth surfaces, consider adding a suitable non-slip sole or fabric treatment designed for footwear.

Why These Adult Slippers Are Worth Knitting

Aglaé Laser's design turns basic knitted fabrics into practical handmade footwear without requiring conventional sock construction.

The combination of flat knitting, yarn held double and simple shaping makes the project approachable while still teaching useful techniques.

And because the original pattern includes multiple adult sizes, you can make pairs for different members of the family.

Get the Free Adult Knitted Slippers Pattern

The complete Chaussons pour les adultes – Slippers pattern by Aglaé Laser is currently available as a free download.

Use the designer's current pattern listing for the complete stitch counts, sizing adjustments, decrease sequence and finishing instructions.

Get the Free Adult Slippers Pattern →

More Free Sock & Slipper Knitting Patterns

If you enjoy knitted footwear projects, explore our recently reviewed collection of free socks, slippers and booties:

Explore 8 Free Sock & Slipper Knitting Patterns →

Pattern Availability

Amazing Knitting links readers to legitimate designer or publisher sources whenever possible. Pattern prices, download locations and availability can change after an article is published.

Read Our Pattern Availability Policy →

Amazing Knitting is an independent pattern discovery and project-guide site. Chaussons pour les adultes – Slippers and its original knitting instructions remain the intellectual property of Aglaé Laser. This guide provides project information and directs knitters to the designer's authorized pattern source rather than reproducing the complete pattern.

Lucky 4-Leaf Afghan Block – Free 12-Inch Knitting Pattern

Lucky 4-Leaf Afghan Block free 12-inch knitting pattern by Margaret MacInnis

Lucky 4-Leaf Afghan Block project shown above. Photo © ladybugaustin.

Lucky 4-Leaf Afghan Block by Margaret MacInnis is a striking knitted square built around four textured leaf shapes that meet in the center to create a four-leaf-clover effect.

Unlike a traditional blanket square worked back and forth from one edge to the other, this design is knitted from the center outward. The construction creates the four leaves as part of one continuous block, so you do not have to knit four separate leaves and sew them together.

The finished block measures approximately 12 inches square and the pattern is currently available as a free download.

Lucky 4-Leaf Afghan Block at a Glance

  • Designer: Margaret MacInnis
  • Published: February 2010
  • Source: Designs By Muggins
  • Craft: Knitting
  • Category: Afghan / blanket block
  • Finished size: Approximately 12 inches square
  • Construction: Center-out
  • Yarn weight: Aran
  • Suggested yarn: Lion Brand Vanna's Choice
  • Yardage: Approximately 150–175 yards (137–160 m)
  • Needles: US 7 / 4.5 mm
  • Gauge: 16 stitches and 24 rows = 4 inches in stockinette
  • Techniques: In-the-round, lace and textured knitting
  • Language: English
  • Availability: Free

A Knitted Four-Leaf Clover Block

The feature that immediately distinguishes this afghan block is the four-leaf motif formed across the center of the square.

Each leaf grows outward as the block expands, creating a symmetrical design that resembles a four-leaf clover.

Because the motif is created through the knitted structure rather than simply added afterward, texture and shaping become an important part of the finished appearance.

Inspired by Traditional Counterpane Knitting

Margaret MacInnis explains that the basic block has roots in an antique counterpane design.

Counterpanes are traditional knitted bed coverings often constructed from individual motifs or blocks that are later combined into a larger textile.

Many historical counterpane designs use geometric, floral and leaf motifs, making this four-leaf construction a natural fit for that tradition.

Margaret adapted the older concept specifically for use in afghan block exchanges and made her version available to knitters as a free pattern.

Worked From the Center Out

One of the most interesting features of the Lucky 4-Leaf Afghan Block is its center-out construction.

Instead of casting on enough stitches for one full side of the square, the knitter begins in the middle and gradually increases the circumference of the block.

As more stitches are added, the four leaf sections expand outward and the square gradually takes shape.

Why Center-Out Knitting Is Different

Center-out construction creates a very different knitting experience from working a conventional square in rows.

At the beginning, only a small number of stitches need to be managed. As the block grows, the rounds become progressively longer.

This method also makes it possible to create strong radial symmetry, which is especially useful for floral and geometric motifs.

Knitting in the Round

The Lucky 4-Leaf Afghan Block is worked in the round.

This allows the four sections of the design to develop simultaneously without creating seams between the individual leaves.

If you have mainly knitted flat scarves or dishcloths, this project can be an interesting opportunity to practice circular construction on a relatively small piece.

Starting With Double-Pointed Needles

Margaret's pattern begins the center-out construction using double-pointed needles (DPNs).

DPNs are useful at the center of a project because the initial circumference is too small for many standard circular needles.

The stitches are distributed across several needles while another needle is used to knit around the developing motif.

Moving to a Circular Needle

As the block grows, more stitches are created and the circumference becomes larger.

At that stage, many knitters find it more comfortable to transfer the stitches to a circular needle of the same size.

This can make the increasingly long rounds easier to manage and reduces the number of needle changes required while working around the square.

Aran-Weight Yarn

The published pattern calls for Aran-weight yarn.

Margaret's original recommendation is Lion Brand Vanna's Choice, a yarn frequently used for afghans and other practical home projects.

An Aran-weight yarn gives the leaf motif enough substance for the textured details to remain visible while producing a useful blanket block.

How Much Yarn Do You Need?

The 12-inch version lists approximately 150–175 yards (137–160 meters).

Actual yarn use can vary with your gauge, yarn substitution and finishing choices, so having a little extra yarn is sensible if you need the block to match a specific finished measurement.

Choosing Yarn for an Afghan Block

If you substitute another yarn, try to choose one with similar weight and suitable stitch definition.

Consider:

  • Aran or compatible worsted-weight construction
  • Good stitch definition
  • Washability
  • Durability
  • Colorfastness
  • How the yarn behaves after blocking

These considerations become particularly important when multiple blocks will eventually be joined into one blanket.

Solid Colors Show the Leaf Texture

A solid or gently tonal yarn can be especially effective for this pattern because it allows the shadows and raised areas of the leaf motif to remain visible.

Highly variegated yarn can still create an interesting block, but strong color changes may compete with some of the textured details.

If the four-leaf shape is the feature you most want to emphasize, consider a yarn with enough visual consistency for the stitch pattern to stand out.

Needle Size

The published recommendation is US 7 / 4.5 mm needles.

Use this as the starting point and adjust only when necessary to obtain the required gauge and finished block size.

For a modular afghan, consistent gauge is especially important because blocks that differ significantly in size can be difficult to join neatly.

Gauge for the 12-Inch Block

The listed gauge is approximately 16 stitches and 24 rows = 4 inches in stockinette.

Although the finished block contains texture and shaping rather than plain stockinette throughout, the published gauge gives you a useful reference for choosing needles and yarn.

Why Block Size Matters

If you are making only one square as a decorative piece, a small difference in finished size may not matter very much.

But if you plan to join several blocks into an afghan, matching their dimensions becomes much more important.

A consistent 12-inch size makes it easier to arrange blocks into rows and join them without stretching one square excessively to fit another.

Skills Used in the Lucky 4-Leaf Block

This project can introduce or reinforce several useful knitting skills, including:

  • Knitting in the round
  • Working with double-pointed needles
  • Center-out construction
  • Increasing
  • Decreasing
  • Following repeated motif sections
  • Lace-style shaping
  • Textured knitting
  • Managing a growing stitch count
  • Blocking a knitted square

Is This a Beginner Knitting Pattern?

Lucky 4-Leaf is probably better suited to a knitter who already knows the basic knit and purl stitches and is ready to work in the round.

The unusual center-out construction and use of DPNs can make the first few rounds feel more challenging than a simple flat square.

Once the block becomes larger and the motif is established, however, the construction can become easier to visualize.

The First Few Rounds May Feel Fiddly

This is common with many center-out projects.

A small number of stitches distributed across several double-pointed needles can feel awkward because there is very little fabric available to stabilize the needles.

Work slowly at the beginning and check that the stitches have not become twisted before the structure is firmly established.

Use Stitch Markers to Track the Four Sections

The strong four-part symmetry of the design can make stitch markers useful.

Separating the repeated sections can help you identify an increase or decrease error before it affects the entire round.

Always follow the original pattern's marker placement and stitch counts rather than adding markers where they might interfere with the motif.

Count Your Stitches Regularly

Center-out patterns rely on controlled increases to produce the intended geometry.

If an increase is missed, the mistake may not become visually obvious until several rounds later.

Checking stitch counts at useful points in the pattern can save much more time than discovering an error near the outer edge of the block.

Blocking the Finished Square

Blocking is particularly useful for an afghan block containing textured or lace-like shaping.

After knitting, the square may not immediately measure exactly 12 inches or the four leaf sections may look slightly uneven.

Gentle blocking can help the stitches settle and allow the square to reach a cleaner, more consistent shape.

Always use a blocking method appropriate for your yarn fiber.

Using the Block in a Knitted Afghan

One Lucky 4-Leaf block can be attractive on its own, but the design was created specifically with afghan exchanges and modular blankets in mind.

You could knit several matching blocks for a repeating four-leaf blanket or combine Lucky 4-Leaf with other 12-inch squares.

Using a consistent yarn weight and block size will make the final assembly much easier.

Try a Two-Color or Multi-Color Afghan

Although each individual block can be worked in a single color, the finished blanket does not need to be monochromatic.

For example, you could alternate light and dark blocks, create a gradient across the blanket, or use several coordinated colors while keeping the same four-leaf motif.

Repeating the same texture while changing color can produce a cohesive blanket without making every square identical.

A Useful Block for Afghan Exchanges

Margaret MacInnis originally developed her version of the block after using it in several afghan exchanges.

Standardized block sizes are useful for group projects because different knitters can make individual squares that are later assembled into one blanket.

The 12-inch format makes Lucky 4-Leaf particularly suitable for that type of modular project.

There Is Also a 9-Inch Version

Margaret MacInnis later published a separate 9-inch Lucky 4-Leaf Afghan Block.

In that version, the leaves were modified to be shorter and the border construction was changed to suit the smaller finished square.

If you need a smaller block for your blanket layout, make sure you select the 9-inch pattern rather than simply trying to reduce the 12-inch version yourself.

12-Inch vs. 9-Inch Lucky 4-Leaf

The two patterns are related but they are not identical.

  • 12-inch version: the original larger afghan block
  • 9-inch version: later adaptation with shorter leaves
  • Both: designed by Margaret MacInnis
  • Both: currently available free

Choose the version that matches the other squares in your planned blanket.

Get the Free Lucky 4-Leaf Afghan Block Pattern

The Lucky 4-Leaf Afghan 12" Block by Margaret MacInnis is currently available as a free authorized download through the designer's Ravelry listing.

Get the Free 12-Inch Lucky 4-Leaf Pattern →

If you prefer the smaller version, Margaret also offers the 9-inch Lucky 4-Leaf Afghan Block as a separate free pattern.

View the Free 9-Inch Version →

Lucky 4-Leaf Afghan Block is by Margaret MacInnis / Designs By Muggins. The designer notes that her block was developed from an older counterpane design and significantly adapted for afghan use. Amazing Knitting does not reproduce the designer's complete pattern instructions.

Read Our Pattern Availability Policy →

Cozy Cable Knit Hat – Free Bernat Knitting Pattern

Cozy Cable Knit Hat free Bernat knitting pattern

The Cozy Cable Knit Hat is a warm, textured hat from Bernat, featuring bold cables and a classic pompom finish.

Worked with chunky yarn and large needles, this is a satisfying cold-weather project for knitters who are ready to practice cable knitting while creating a practical winter accessory.

Best of all, the original pattern is still available as a free download from Yarnspirations.

Featured photo originally credited by Amazing Knitting to kubknits. Pattern: Bernat / Yarnspirations.

Cozy Cable Knit Hat Pattern Overview

  • Pattern: Cozy Cable Knit Hat
  • Brand: Bernat
  • Official source: Yarnspirations
  • Project: Cable knit hat
  • Skill level: Intermediate
  • Size: One size to fit the average adult
  • Yarn: Bernat Softee Chunky
  • Construction: Worked in the round
  • Techniques: Ribbing, cables and crown decreases
  • Finish: Pompom
  • Pattern availability: Free official download

About the Cozy Cable Knit Hat

This Bernat hat combines chunky yarn with a repeating cable texture for a classic winter look.

The cables create strong vertical definition around the hat, while the contrasting recessed sections help the raised stitches stand out.

A large pompom finishes the design and gives the hat its traditional cozy winter style.

Yarn

The original pattern calls for Bernat Softee Chunky, a substantial yarn that helps the cable texture remain clearly visible.

Chunkier yarn also means that the individual stitches are easy to see, which can be helpful when keeping track of cable crossings.

When substituting yarn, matching the original gauge is more important than simply choosing another yarn that looks similar.

Needles and Tools

According to the current official pattern information, you will need:

  • U.S. 10½ / 6.5 mm double-pointed knitting needles
  • U.S. 11 / 8 mm double-pointed knitting needles
  • A cable needle
  • A stitch marker
  • A yarn needle for finishing

Always check the official pattern before starting in case the publisher updates the materials or pattern information.

Size and Fit

The official pattern is written in a single size designed to fit the average adult.

Because hats depend on negative ease for a comfortable fit, achieving the pattern gauge is important.

If your stitches are significantly tighter or looser than the designer's gauge, the finished circumference can change noticeably.

Why Chunky Yarn Works Well for Cables

Cable knitting creates texture by crossing groups of stitches over one another. With a chunky yarn, those crossings become particularly prominent.

The larger stitches can also make it easier to understand how a cable is constructed because each individual stitch is more visible than it would be in a fine yarn.

This makes the project particularly appealing to knitters who already know the basics and want to become more comfortable with cable techniques.

Skill Level

Yarnspirations rates the Cozy Cable Knit Hat as an intermediate knitting project.

You should be comfortable with basic knitting before beginning. Helpful skills include:

  • Knitting and purling
  • Working in the round
  • Using double-pointed needles
  • Following a cable pattern or chart
  • Working cable crossings
  • Increasing and decreasing
  • Shaping the crown of a hat
  • Finishing and weaving in ends

Understanding the Cable Design

The hat uses repeating cable sections separated by textured background stitches.

Cable stitches are produced by temporarily changing the order in which groups of stitches are worked. Holding stitches toward the front or back creates the direction of each crossing.

Once the repeat becomes familiar, the fabric develops into a strong, three-dimensional cable pattern around the hat.

Working the Hat in the Round

This design is worked in the round, which avoids a back seam and creates a continuous cable pattern around the hat.

Take extra care when joining the cast-on stitches so that they are not twisted. A stitch marker makes it easier to identify the beginning of each round.

As the crown becomes smaller, double-pointed needles allow the decreasing circumference to continue comfortably.

Tips for Better Cable Knitting

Check each cable crossing before moving on. Cable mistakes are much easier to correct immediately than several rounds later.

Keep your tension consistent. The stitches immediately beside a cable can sometimes become loose when the stitches are rearranged.

Use stitch markers when helpful. They can make repeating sections easier to identify.

Do not skip the gauge swatch. Gauge affects both the finished fit and the amount of yarn required.

Adding the Pompom

The pompom gives this hat its finished winter look and balances the substantial cable texture below it.

The official pattern includes instructions for making and attaching the pompom, so follow the original directions when you reach the finishing stage.

Make sure the pompom is attached securely, especially if the hat will be worn frequently.

Why This Hat Is Worth Knitting

The Cozy Cable Knit Hat offers a good balance between a practical winter accessory and a project that develops knitting skills.

The chunky yarn makes the texture visually prominent, while the repeating cables give knitters useful practice with cable techniques without requiring a large project such as a sweater or blanket.

It can also make a beautiful handmade winter gift thanks to its classic, wearable style.

Get the Free Cozy Cable Knit Hat Pattern

The complete pattern is currently available directly from Yarnspirations. This is the official source and should be used instead of older third-party download links.

Get the Free Pattern from Yarnspirations →

Pattern Availability

Amazing Knitting links readers to legitimate designer or publisher sources whenever possible. Pattern prices, download locations and availability can change after an article is published.

Read Our Pattern Availability Policy →

Amazing Knitting is an independent pattern discovery and project-guide site. The Cozy Cable Knit Hat pattern, instructions and associated intellectual property belong to their respective designer and publisher. This article provides project information and directs knitters to the authorized pattern source rather than reproducing the complete pattern.

Discover More From the Archive

A fresh mix of knitting patterns and tutorials from the Amazing Knitting archive.

Finding patterns from the archive…