Skip to content

...

Showing posts sorted by date for query basketweave knitting. Sort by relevance Show all posts

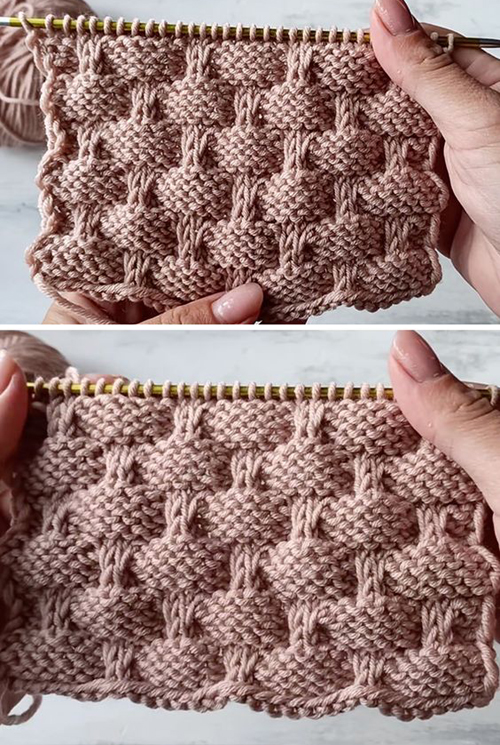
Basket Weave Stitch Knitting Tutorial

Basket Weave Stitch Knitting Tutorial
Photos above © Вяжем дома с Татьяной

What beautiful knitting stitch  (free pattern)! I found it on Pinterest...Learn how to work the basketweave knit stitch by watching this free video tutorial in English subtitles! Keep reading for tips on how to master the technique of knitting this original simple pattern.

Full Post: Basket Weave Stitch

Lattice with Seed Stitch - Knitting Stitch Guide

Lattice with Seed Stitch - Free Pattern
Photos above © mgb

Lattice with Seed Stitch is a beautiful textured knitting pattern that combines the appearance of broad woven bands with a background of small seed-stitch texture.

Although the finished fabric can look surprisingly complex, the underlying idea is created primarily with basic knit and purl stitches.

This Amazing Knitting guide explains how the texture is constructed, how to recognize the different sections, where it works best, and what to watch for when using it in your own knitting projects.

About This Stitch Guide

Lattice with Seed Stitch is a textured knit-and-purl stitch concept rather than one specific garment pattern. Different stitch references may arrange or begin the repeat differently, so always follow one complete version consistently when knitting a project.

Lattice with Seed Stitch at a Glance

Type: Textured knitting stitch

Main Techniques: Knit and purl

Visual Style: Lattice / basketweave over seed-stitch texture

Common Repeat: 18-row texture sequence

Common Flat-Knitting Multiple: Multiple of 14 + 2 stitches

Skill Level: Advanced beginner / confident beginner

Good For: Blankets, scarves, cushions, panels and home accessories

What Is Lattice with Seed Stitch?

Lattice with Seed Stitch is a textured knitting pattern that creates the illusion of broad strips passing over and under one another.

Between these larger visual bands is a smaller, pebbled texture similar to seed stitch.

Together, these elements create a fabric that can resemble woven basketry even though the effect is produced with ordinary knitting stitches rather than actual weaving.

It Looks More Complicated Than It Is

One of the most appealing things about this texture is the difference between its appearance and its underlying technique.

At first glance, the broad lattice sections can look like cables or crossed stitches.

In common versions of the stitch, however, the effect is created mainly by carefully arranging knit and purl stitches.

This makes it an interesting next step for someone who already knows the basic stitches but wants to create a more sophisticated-looking fabric.

Understanding the Three Textures

It helps to stop thinking of the design as one complicated pattern and instead look for the simpler textures inside it.

1. Seed-Stitch Areas

The small alternating knit-and-purl sections create the pebbled background.

Seed-style texture visually separates the larger bands and gives the fabric additional depth.

2. Smooth Vertical Sections

Columns of smoother stitches help form part of the apparent lattice.

Because smooth stockinette-style areas reflect light differently from seed stitch, they appear to sit above or apart from the background.

3. Horizontal Ridges

Horizontal garter-like sections interrupt the vertical areas.

When these sections alternate across successive repeats, the eye begins to interpret them as strips weaving over and under each other.

Why It Resembles Basketweave

Basketweave knitting does not require actual strands to cross one another.

Instead, contrasting knit-and-purl surfaces create blocks that appear to change direction.

Lattice with Seed Stitch takes that visual idea further by combining the larger woven-looking structure with a finer seed-textured background.

No Cable Needle Is Required

Despite the interlaced appearance, common versions of this stitch do not require traditional cable crossings.

That means you can achieve a surprisingly architectural texture using skills you may already know.

The Repeat Structure

Widely published versions of Lattice with Seed Stitch use an 18-row repeat.

For flat knitting, a commonly published setup is:

Multiple of 14 stitches + 2

The additional stitches help frame the repeating lattice units when the fabric is worked flat.

Why We Are Not Reprinting 18 Rows Here

A Note About Stitch Variations

Published references do not all begin and arrange the 18-row sequence in exactly the same way. Rather than mixing instructions from several tutorials, choose one complete version and follow it consistently from beginning to end.

This is especially important when comparing online stitch dictionaries.

Two instructions may create essentially the same visual texture while numbering the beginning of the repeat differently.

Mixing the first half of one version with the second half of another can destroy the alignment of the lattice.

Is Lattice with Seed Stitch Reversible?

Treat this as a right-side texture.

The decorative lattice effect is intended to be viewed from the front, while the reverse side has a different appearance.

This does not prevent you from using it in scarves or blankets, but it is worth considering when both sides of a finished project will be visible.

What Yarn Works Best?

This stitch is not tied to one specific yarn weight.

You can experiment with different yarns as long as you use needles appropriate for the yarn and create a fabric with enough definition to display the texture.

Smooth yarns usually make the lattice easier to see.

Solid Colors Show the Texture Clearly

If the lattice effect is the main feature of your project, a solid or gently tonal yarn is often a good choice.

The shadows created by knit and purl stitches become part of the design.

Highly variegated yarn can still be attractive, but strong color changes may compete visually with the stitch texture.

Choose Needles for the Fabric You Want

There is no single universal needle size for Lattice with Seed Stitch.

Choose a needle appropriate for your yarn, then make a swatch.

If the fabric is too loose, the woven-looking structure may become less distinct.

If it is too tight, the fabric can become stiff and the knitting may be uncomfortable to work.

Swatching Is Especially Useful

A swatch lets you evaluate more than gauge.

Before committing to a large project, check:

  • How clearly the lattice appears
  • Whether the seed texture is visible
  • How much the fabric curls or lies flat
  • The drape
  • The appearance of the wrong side
  • How the yarn behaves after washing or blocking

Keep Track of the 18-Row Repeat

The individual stitches are straightforward, but an 18-row sequence is long enough to lose your place.

A row counter can make this stitch much easier to manage.

You can also keep a printed or handwritten repeat beside your work and mark each completed row.

Learn to Read the Fabric

As the pattern develops, try to identify the lattice sections visually instead of relying only on the row number.

Ask yourself whether the next section should continue a vertical band, create a horizontal interruption, or return to the seeded background.

Learning to read the fabric makes mistakes easier to spot before they continue through several rows.

Watch Your Knit-to-Purl Transitions

Because this texture frequently switches between knit and purl stitches, pay attention to the position of the working yarn.

Move the yarn between the needle tips when changing from knit to purl or purl to knit.

Accidentally taking the yarn over the needle can create an unwanted extra stitch.

Seed Stitch Can Reveal Tension Differences

Alternating knit and purl stitches can make uneven tension more visible than plain stockinette.

Try to keep your movements relaxed and consistent.

With practice, the small irregularities often become less noticeable, especially after appropriate blocking.

Good Projects for Lattice with Seed Stitch

This texture works particularly well when you want the knitted fabric itself to be the main decorative feature.

  • Blankets and throws
  • Cushion and pillow fronts
  • Scarves
  • Home-decor panels
  • Bag panels
  • Sampler blankets
  • Textured garment panels

Using It for a Blanket

A blanket gives the lattice enough space to repeat several times across the fabric.

Before casting on a full-size blanket, knit a repeat swatch and measure its width after washing.

You can then use that measurement to estimate how many repeats are needed for your desired blanket width.

Using It for a Pillow

A cushion front is an excellent smaller project for experimenting with this texture.

The right side remains visible most of the time, so the non-reversible nature of the stitch is less important.

A simple stockinette or fabric back can keep the lattice as the main decorative feature.

Using It for a Scarf

Lattice with Seed Stitch can create an attractive textured scarf, but remember that the two sides look different.

If you want an identical appearance on both sides, choose a truly reversible stitch instead.

If you are happy with a decorative front and different reverse, the lattice can make a striking scarf fabric.

Is This a Beginner Stitch?

The individual techniques are beginner-friendly because the texture is based primarily on knit and purl stitches.

However, keeping track of a longer repeat requires more concentration than basic garter, stockinette or seed stitch.

For that reason, it is a particularly good project for a confident beginner or advanced beginner.

Skills to Know First

  • Casting on
  • Knit stitch
  • Purl stitch
  • Moving yarn correctly between knit and purl
  • Reading repeated instructions
  • Counting stitches
  • Binding off

Practice on a Small Swatch

There is no need to begin with an entire blanket.

Cast on enough stitches for a few repeats and work until you can clearly see the lattice forming.

A practice swatch gives you a chance to understand the structure before committing yarn to a larger project.

Blocking the Finished Texture

Gentle blocking can help even out the seed-stitch background and make the larger lattice sections look more consistent.

Always use a blocking method appropriate for the fiber content of your yarn.

Avoid overstretching the swatch, because excessive stretching can flatten the raised texture that gives the pattern its character.

Learn the Lattice Seed Stitch

For a complete current demonstration of this stitch, Studio Knit provides both written guidance and a video tutorial for flat knitting and knitting in the round.

View the Lattice Seed Stitch Tutorial →

More Knitting Stitches on Amazing Knitting

Explore More Stitch Tutorials

Before You Begin

Choose a smooth yarn that lets you see the texture clearly and make a small swatch before planning a larger project.

Keep track of your repeat carefully, pay particular attention when moving between knit and purl stitches, and periodically step back to check that the lattice sections remain aligned.

Most importantly, remember that online stitch references may begin the sequence at different points. Follow one complete version consistently rather than combining rows from several tutorials.

Editorial note: This Amazing Knitting page is an educational guide to the Lattice with Seed Stitch texture. Stitch dictionaries and tutorials may present variations or different starting points for similar lattice textures. Always follow the instructions for the specific version you choose.

Basketweave Chunky Knit Blanket - Free Pattern

Basketweave Blanket - Free Pattern
Photos above © iSeL

Basketweave Chunky Knit Blanket is a fast, beginner-friendly throw made with jumbo yarn and oversized knitting needles.

Originally published through Red Heart, this cozy blanket uses simple knit-and-purl texture to create a large basketweave effect without cables or complicated shaping.

Because the yarn is extremely thick and the needles are unusually large, the fabric grows very quickly compared with a conventional knitted blanket.

The original pattern is still officially available as a free download from Yarnspirations / Red Heart.

✓ Free Official Pattern Available

Red Heart's Basketweave Throw remains available as a free knitting pattern from Yarnspirations. The current official page provides the downloadable pattern and project information without requiring sign-up.

Basketweave Chunky Knit Blanket at a Glance

Pattern: Basketweave Throw / Basketweave Chunky Knit Blanket

Publisher: Red Heart / Yarnspirations

Original Credit: Laura Bain for Red Heart

Skill Level: Beginner

Category: Throw / Blanket

Original Yarn: Red Heart Boutique Irresistible

Yarn Weight: Jumbo / Weight 7

Original Amount: 9 balls

Needles: 35 mm / US 100 circular needle, 40 in or longer

Gauge: 2.5 sts and 4 rows = 4 in in garter stitch

Finished Size: Approx. 48 × 50 in / 122 × 127 cm

Availability: Free official download

About the Basketweave Blanket

This is an oversized-texture throw designed to make the most of very thick yarn.

The basketweave appearance comes from alternating blocks of knit and purl stitches rather than from cables.

The result looks more elaborate than the techniques actually required, which is one reason the pattern works so well for newer knitters.

Why This Blanket Knits So Quickly

Standard blankets can require hundreds of stitches across each row.

This design takes a completely different approach by using jumbo yarn and very large needles.

The thick yarn means fewer stitches are needed to create a wide piece of fabric, so each row covers much more physical distance than it would with worsted or DK yarn.

Original Yarn

The pattern was originally designed for Red Heart Boutique Irresistible.

This was a jumbo-weight yarn with a very plush, soft appearance that helped create the oversized, cozy texture shown in the original project.

The original version used approximately:

9 balls

Because older yarn lines may change or become difficult to find, do not rely only on the original product name when choosing a substitute.

Can You Substitute the Yarn?

Yes, but this project depends heavily on yarn thickness.

Look for a yarn that is genuinely close to jumbo / weight 7 and produces a fabric you like at the required gauge.

When comparing substitutes, pay attention to:

  • Yarn weight
  • Recommended needle range
  • Total yardage or meterage
  • Fiber softness
  • Washability
  • How firmly or loosely the yarn holds its shape

Don't Substitute by Ball Count Alone

Different jumbo yarns can contain dramatically different amounts of yarn per ball.

Buying nine balls of another brand does not automatically give you the same total yardage as nine balls of the original yarn.

Compare total yardage or meterage instead of relying only on the number of skeins.

Giant Knitting Needles

The original pattern uses:

35 mm / US 100 circular knitting needles

The circular needle is used for its long cable and ability to support the weight and width of the blanket.

You still work the project back and forth rather than joining it in the round.

Why Use Circular Needles for a Flat Blanket?

Circular needles are often easier to manage for large flat projects because much of the fabric can rest on the flexible cable.

This reduces the amount of weight supported directly by your wrists compared with trying to balance a large blanket on very long straight needles.

Getting Used to 35 mm Needles

Needles this large can feel unusual at first.

You may find it easier to work slowly and use broader hand movements rather than gripping the needles tightly.

Take breaks if your hands, wrists or shoulders become tired. Jumbo knitting requires fewer stitches, but each movement can be physically larger.

Gauge

The historical pattern information lists:

2.5 stitches = 4 inches
4 rows = 4 inches

measured in garter stitch.

That extremely open gauge reflects the very large yarn and needle combination.

Why Gauge Still Matters

Even though a blanket does not have to fit a body, gauge affects the final size, yarn requirement and fabric density.

If your stitches are substantially tighter, you may create a smaller, denser blanket and use more yarn.

If your fabric is much looser, the basketweave structure may lose definition.

Finished Size

The original version measures approximately:

48 × 50 inches

approximately 122 × 127 cm

This makes it a useful throw for a sofa, armchair or the foot of a bed rather than a small baby blanket.

How Basketweave Texture Works

Basketweave knitting creates the illusion of woven blocks by arranging knit and purl stitches in alternating sections.

Knit stitches visually recede or advance differently from purl stitches, depending on which side of the fabric you are viewing.

Switching the blocks after several rows creates the familiar over-and-under basket effect.

No Cables Required

Although the finished texture can look architectural, this design does not depend on traditional cable crossings.

That makes it far less complicated than many highly textured blankets.

If you can knit, purl and keep track of a repeating sequence, you already have the main skills required.

Garter Stitch Border

The blanket also uses garter stitch around the textured section.

A garter border gives the edges a simple visual frame and helps balance the stronger basketweave pattern in the center.

Counting Stitches Matters

Basketweave patterns look regular only when the blocks remain aligned.

An accidentally added or dropped stitch can shift later sections and make the error more noticeable.

Count occasionally and inspect the vertical alignment of your blocks as the blanket grows.

Use Stitch Markers if Helpful

For a simple repeat like this, markers can be placed between texture sections if you find yourself losing track.

They are not required by every knitter, but they can reduce counting mistakes when you are still learning the rhythm of the pattern.

Watch Your Knit-and-Purl Transitions

One common beginner issue occurs when moving the yarn between knit and purl stitches.

Make sure the working yarn moves between the needle tips rather than wrapping over the needle accidentally.

Otherwise, you may create an unintended extra stitch.

Skills Used in This Blanket

  • Casting on
  • Knit stitch
  • Purl stitch
  • Working flat on circular needles
  • Reading a simple repeat
  • Binding off
  • Weaving in ends

Is It Suitable for Beginners?

Yes.

Yarnspirations currently classifies the Basketweave Throw as a Beginner knitting project.

The main challenge is not complicated stitch technique but handling the unusually large yarn and needles while keeping the repeat consistent.

A Good First Blanket?

It can be.

A conventional full-size blanket may feel slow to a beginner, but this jumbo version grows very quickly.

That makes it especially satisfying if you want to practice knit and purl stitches while producing a substantial finished object.

One Thing Beginners Should Know

Faster does not necessarily mean physically effortless.

Jumbo yarn and 35 mm needles can place more strain on your hands than ordinary knitting needles.

Use a relaxed grip and stop when you feel fatigue rather than forcing yourself through long knitting sessions.

Weaving In Jumbo Yarn Ends

Very thick yarn ends can be more difficult to hide neatly than standard yarn.

The original pattern materials even mention an optional sewing needle and matching thread if the large ends are difficult to secure conventionally.

Follow the finishing guidance in the official pattern rather than trimming the yarn too close to the fabric.

Blocking and Finishing

Jumbo blankets usually do not require aggressive blocking.

Follow the current care instructions for whichever yarn you use and allow the blanket to settle naturally into shape.

Avoid excessive stretching, which could distort the large basketweave blocks.

Care Instructions Depend on Your Yarn

If you substitute the original yarn, use the care label on the replacement yarn rather than assuming the same washing method applies.

A large wet blanket can also become surprisingly heavy, so support it carefully during washing and drying.

Why This Pattern Still Works

The design combines three things that remain popular:

  • Very chunky texture
  • Simple beginner knitting
  • A neutral, modern home-decor look

The oversized basketweave blocks make the project visually impressive even though the underlying stitches are basic.

Important: There Are Many Basketweave Blanket Patterns

Same General Name, Different Patterns

Many designers publish blankets called Basketweave Blanket, Basketweave Throw or Basketweave Baby Blanket. The design featured on this Amazing Knitting page is the jumbo-yarn Red Heart Basketweave Throw associated with the Basketweave Chunky Knit Blanket description. Do not mix its yarn, needle size, gauge or measurements with unrelated basketweave designs.

Is the Basketweave Blanket Still Free?

Yes.

Yarnspirations currently publishes the Red Heart Basketweave Throw as a free knitting pattern.

The official listing identifies it as a beginner project and provides a completely free download without requiring registration.

Amazing Knitting does not reproduce the full row-by-row copyrighted pattern. Use the official Yarnspirations page for the complete current instructions.

Get the Free Basketweave Throw Pattern

Visit Yarnspirations / Red Heart for the official free download:

Get the Free Basketweave Throw Pattern →

More Free Blanket Patterns on Amazing Knitting

Explore More Blanket Knitting

Before You Cast On

Make sure your substitute yarn is genuinely close to jumbo weight, then test how it behaves on very large needles.

Check the gauge, keep your knit-and-purl blocks aligned, and use a relaxed grip while handling the oversized needles.

Most importantly, use the official Yarnspirations download for the complete instructions rather than copying an older reposted version from another site.

Pattern credit: Basketweave Throw is a Red Heart pattern, historically associated with Laura Bain for Red Heart. Amazing Knitting provides an independent editorial project guide and does not reproduce the complete copyrighted row-by-row pattern. Preserve the existing image credit: Photos above © iSeL.

Discover More From the Archive

A fresh mix of knitting patterns and tutorials from the Amazing Knitting archive.

Finding patterns from the archive…