Skip to content

...

Showing posts sorted by relevance for query knitting tutorial. Sort by date Show all posts

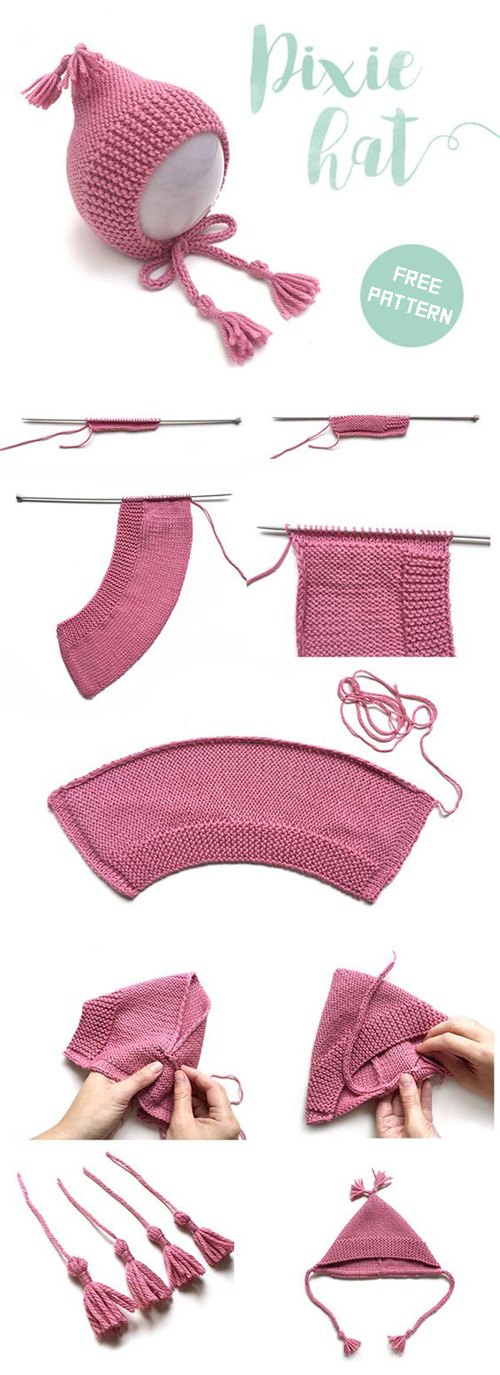
Pixie Baby Hat – Free Easy Baby Bonnet Knitting Pattern

Pixie Baby Hat free easy baby bonnet knitting pattern by Marta Porcel of Creativa Atelier

Pixie Baby Hat. Pattern, tutorial and photo © Marta Porcel / Creativa Atelier

This adorable Pixie Baby Hat by Marta Porcel of Creativa Atelier is a free baby bonnet knitting pattern with a charming pointed shape, adjustable cord and playful tassels.

The hat is worked flat on straight needles, making it especially appealing if you prefer not to knit small circumferences in the round. The knitted piece is folded and seamed at the back to create the distinctive pixie shape.

The original tutorial is written for approximately 1–3 months, but the designer also explains how the basic construction can be adjusted for larger sizes.

Pixie Baby Hat Pattern at a Glance

  • Designer: Marta Porcel
  • Source: Creativa Atelier
  • Published: November 2021
  • Craft: Knitting
  • Category: Baby bonnet / pixie hat
  • Original size: Approximately 1–3 months
  • Yarn weight: DK / Light
  • Suggested yarn: Katia Merino Classic
  • Main needles: 4 mm straight knitting needles
  • Optional crochet hook: 2.75 mm for the cord
  • Construction: Worked flat and seamed
  • Finishing: Adjustable cord and tassels
  • Current availability: Free web-based tutorial

A Classic Pointed Pixie Bonnet

The most recognizable feature of this little bonnet is its pointed pixie silhouette.

Instead of shaping a conventional rounded crown, the flat knitted fabric is folded and joined at the back. This simple construction produces the distinctive point at the top of the hat.

Tassels add even more character and give the finished bonnet a playful, traditional handmade appearance.

Worked Flat on Straight Needles

One of the best features of this pattern is that you do not need to knit the bonnet in the round.

The main fabric is worked back and forth on 4 mm straight needles.

This makes the project particularly useful for knitters who enjoy baby hats but are not yet comfortable using double-pointed needles, Magic Loop or other small-circumference techniques.

Original Size: 1–3 Months

Marta Porcel designed the tutorial specifically for a baby of approximately 1–3 months.

Rather than pretending that the free tutorial contains a complete multi-size grading system, it is important to note that the published stitch and row counts correspond to this original size.

The designer does, however, explain how the simple construction can be adapted if you want to make a larger bonnet.

How the Size Can Be Adjusted

Because the hat is based on a relatively simple flat construction, the designer suggests increasing both the initial number of stitches and the number of rows when making a larger size.

Taking the child's actual head measurements is the best approach whenever possible.

For gift knitting, the original tutorial also provides approximate head circumference references by age to help with planning.

Yarn for the Pixie Baby Hat

The original sample uses Katia Merino Classic in color 26.

The yarn is listed at approximately:

100 grams = 240 meters
DK / Light weight

The yarn was chosen to coordinate with a matching baby cardigan from Creativa Atelier.

Choosing Substitute Yarn

A smooth, soft DK-weight yarn is a sensible starting point when substituting for the original yarn.

Because this is a baby accessory, pay particular attention to softness and care requirements as well as yarn weight.

A washable wool, merino blend or another baby-friendly DK yarn can work well if it produces fabric with dimensions comparable to the designer's sample.

Needles and Other Materials

The original 1–3 month version uses:

  • 4 mm straight knitting needles
  • 2.75 mm crochet hook for the designer's preferred cord method
  • Tapestry needle for seaming and finishing
  • DK / Light yarn

The crochet hook is optional because the cord can be created using other methods if you prefer.

The Main Knitted Fabric

The bonnet is based largely on simple stockinette fabric.

The designer changes the direction of the stockinette at strategic points to create the sections that will later be folded during finishing.

This is a clever way to build useful construction lines directly into a simple rectangular piece of knitting.

A Simple Flat Construction

Instead of relying on complicated crown decreases, the Pixie Hat gets its shape from the way the knitted fabric is folded and seamed.

After completing the main piece, the fabric is folded in half and the appropriate edges are joined at the back.

The result is the characteristic pointed bonnet shape without having to shape a traditional rounded crown.

Seaming the Back

Because the bonnet is knitted flat, one of the main finishing steps is joining the back edges.

The designer notes that you can use a normal seam or an invisible seaming technique.

Taking a little extra time over this seam will help the finished point look neat and keep the inside comfortable.

The Adjustable Cord

A cord runs through the lower section of the bonnet and allows the hat to be adjusted around the baby's head.

Marta's sample uses approximately 55 cm of I-cord.

She demonstrates a crochet-hook method for making the cord, but also notes that there are several alternatives, including knitting or making a cord by hand.

Tassels or Pom-Poms

The original Pixie Hat is finished with four tassels.

Two decorate the ends of the cord and two are attached to the pointed area of the bonnet.

The designer also suggests replacing the tassels with pom-poms if you prefer a different look.

Customize the Pixie Hat

The simple construction gives you plenty of opportunities to personalize the finished bonnet.

You might choose a soft neutral for a traditional look, a bright color for a playful baby accessory, or coordinate the yarn with another handmade garment.

Tassels and cords can also be made in contrasting colors for an extra decorative touch.

Make the Matching Baby Set

Creativa Atelier also provides tutorials for a matching knitted baby cardigan and baby booties.

The Pixie Hat can therefore be made on its own as a quick accessory or combined with the coordinating pieces to create a complete handmade baby outfit.

This also makes the design especially attractive for baby-shower or newborn gift knitting.

Skills Used in the Pixie Baby Hat

Useful skills for this project include:

  • Casting on
  • Knitting and purling
  • Stockinette stitch
  • Working flat on straight needles
  • Binding off
  • Blocking
  • Basic seaming
  • Picking up stitches for finishing
  • Making a cord or I-cord
  • Making tassels or optional pom-poms

Is the Pixie Baby Hat Beginner Friendly?

The construction is relatively approachable because the main bonnet is worked flat and relies heavily on basic knit and purl techniques.

You do not need to manage circular knitting or complicated crown shaping.

The finishing introduces useful skills such as seaming, picking up stitches and making a cord, making this a nice progression beyond a simple scarf or square.

A Good First Baby Hat on Straight Needles

Many baby hat patterns are knitted in the round, which can be intimidating if you have only worked on straight needles.

This Pixie Hat provides a different route: knit the main shape flat and create the three-dimensional bonnet during finishing.

That makes it an interesting choice for newer knitters who want to make their first baby hat without immediately learning Magic Loop or double-pointed needles.

Blocking Before Assembly

The designer recommends blocking the knitted fabric before completing the seams.

This helps control the natural curling of stockinette stitch and makes the finishing process easier.

Always use a blocking method appropriate for the fiber in your chosen yarn rather than automatically applying heat or steam to every fiber.

A Quick Handmade Baby Gift

Small baby accessories are excellent projects when you want to make a thoughtful handmade gift without committing to a full blanket or sweater.

The pointed silhouette makes this bonnet more distinctive than a basic beanie, while the tassels give it plenty of handmade charm.

Pair it with knitted booties or the matching cardigan for a more complete gift set.

Baby Hat Safety

Because this design includes an adjustable cord and decorative tassels, it should be used appropriately and under adult supervision.

Check all finishing details regularly and make sure tassels and other decorative pieces remain securely attached.

Remove hats and accessories with cords or ties before sleep and follow current infant safe-sleep recommendations.

Why Knit the Pixie Baby Hat?

The Pixie Baby Hat combines a memorable shape with surprisingly simple construction.

It is knitted flat, uses familiar stockinette fabric and requires no complicated rounded crown shaping, yet the finished bonnet has a distinctive pointed silhouette.

The free tutorial, adjustable construction and matching baby garments also make it a useful pattern to keep bookmarked for future baby gifts.

Get the Free Pixie Baby Hat Pattern

Knitted PIXIE Hat by Marta Porcel of Creativa Atelier is still available as a free step-by-step knitting tutorial from the designer's website.

Get the Free Pixie Baby Hat Pattern →

Pattern availability was checked when this article was updated. Pattern, tutorial and original images belong to Marta Porcel / Creativa Atelier. Amazing Knitting does not reproduce the designer's complete instructions; please use the official tutorial above.

Baby Honeycomb Pattern - Tutorial

Baby Honeycomb Pattern - Tutorial
Photos above ©  Knitting Knife Crochet Paradise

Baby Honeycomb Stitch is a beautifully textured knitting pattern that creates a repeating surface inspired by small honeycomb cells.

It is especially attractive for baby blankets, cardigans, scarves and other projects where you want more depth and interest than plain stockinette or garter stitch.

This guide will help you understand the look of the stitch, how to practice it successfully, where it works best, and what to watch for before using it in a larger project.

The original Amazing Knitting post was inspired by a video tutorial from Knitting Knife Crochet Paradise. Rather than reproducing another creator's full instructions here, this updated page focuses on helping you understand and use the honeycomb texture with confidence.

About This Tutorial

This page is an Amazing Knitting educational guide to the Baby Honeycomb texture. It does not reproduce the complete instructions from the original video source.

Baby Honeycomb Stitch at a Glance

Type: Textured knitting stitch

Appearance: Repeating honeycomb / cell-like texture

Best For: Baby blankets, sweaters, cardigans, scarves and accessories

Fabric Character: Raised and dimensional

Recommended First Step: Practice on a swatch

Page Type: Educational stitch guide

What Does a Honeycomb Knitting Pattern Look Like?

Honeycomb knitting patterns use repeating stitches to create raised sections that resemble the cells of a honeycomb.

Depending on the exact technique, the shapes may appear as small hexagons, diamonds or softly rounded cells.

What makes the texture attractive is the combination of recessed and raised areas. Light catches the surface differently across the fabric, giving even a single-color yarn much more visual depth.

Why It Works So Well for Baby Knits

Textured stitches are especially popular in baby knitting because they can make a simple project feel special without relying on complicated colorwork.

A honeycomb texture can be used to add interest to:

  • Baby blankets
  • Cardigans
  • Pullovers
  • Hats
  • Scarves
  • Blanket borders
  • Decorative panels

Even a narrow section of honeycomb texture can become the focal point of an otherwise simple garment.

Start with a Swatch

Before using any textured stitch in a large project, make a generous practice swatch.

This is particularly useful with honeycomb patterns because the texture can change the width and elasticity of the fabric compared with plain stockinette.

A swatch lets you check:

  • Whether you like the texture in your chosen yarn
  • How much the fabric contracts
  • Whether the stitch definition is clear
  • How the fabric behaves after washing
  • Whether your needle size gives the drape you want

Choose Yarn with Good Stitch Definition

Honeycomb textures tend to look best when the individual stitches remain easy to see.

Very fuzzy yarn can soften the raised structure and make the honeycomb effect less obvious.

Smooth yarns often show the pattern particularly well, although the best choice depends on the project you plan to make.

Solid Colors Can Show the Texture Beautifully

You do not need complicated color changes to make this stitch interesting.

A single solid or lightly heathered shade often allows the raised honeycomb structure to stand out more clearly than a highly variegated yarn.

Soft cream, gray, pastel blue, blush, sage and warm neutral shades can all work beautifully for baby projects.

Watch Your Tension

Textured stitches can expose differences in tension more clearly than basic garter stitch.

Try to keep your working yarn relaxed and consistent throughout the repeat.

If some honeycomb cells look noticeably tighter or larger than others, check whether you are pulling certain stitches more firmly than the rest.

Do Not Judge the Texture Too Early

Many dimensional knitting stitches look slightly uneven during the first few rows.

Give the pattern enough vertical repeats to develop before deciding whether the stitch is working correctly.

The honeycomb effect often becomes much easier to recognize after several complete repeats.

Use a Light-Colored Practice Yarn

If you are learning the technique for the first time, a medium or light solid color makes it easier to see where each stitch belongs.

Very dark yarn can make the structure harder to read, particularly when you are trying to identify mistakes.

Count Your Stitches Regularly

Textured patterns often depend on maintaining an exact stitch repeat.

If you accidentally add or lose a stitch, the honeycomb cells can begin to shift out of alignment.

Count the stitches at the end of a repeat section rather than waiting until the fabric looks obviously wrong.

Use Stitch Markers for Wide Projects

If you adapt the stitch for a wide baby blanket, markers can help divide the row into smaller repeat sections.

That makes it easier to identify exactly where a mistake occurred instead of recounting an entire blanket-width row.

Honeycomb as an All-Over Pattern

One way to use the texture is across an entire project.

An all-over honeycomb baby blanket can look rich and detailed even when knitted in only one color.

If you choose this approach, consider adding a simpler border so the textured center remains the main visual feature.

Honeycomb as a Decorative Panel

You can also use the texture more selectively.

A central honeycomb panel surrounded by stockinette or garter stitch can add interest without making the whole project heavily textured.

This approach works particularly well on sweaters and cardigans.

Using Honeycomb in a Baby Blanket

If you want to design a simple blanket around a honeycomb stitch, begin by deciding the finished width and making a swatch.

Measure how many stitches your swatch produces per inch or centimeter, then use that measurement to estimate the number of repeats needed for your blanket.

Add border stitches separately if you want a garter, seed-stitch or ribbed frame.

Remember That Texture Changes Gauge

Do not assume the gauge from stockinette will be the same in the honeycomb pattern.

Raised and crossed structures can pull the fabric inward, sometimes producing a narrower piece than expected.

Measure the actual textured swatch rather than using the yarn-label gauge alone.

Blocking the Honeycomb Texture

Blocking can help even out the fabric after knitting, but avoid stretching the piece so aggressively that you flatten the texture.

The goal is to relax the stitches and straighten the edges while preserving the raised honeycomb structure.

Always use a blocking method appropriate for the fiber in your yarn.

Choosing Yarn for Baby Projects

If you plan to use the honeycomb stitch for a baby item, consider the practical qualities of the yarn as well as its appearance.

  • Soft against sensitive skin
  • Easy to wash
  • Durable enough for repeated use
  • Good stitch definition
  • Comfortable drape
  • Suitable care instructions for the recipient

Simple Borders Pair Well with Honeycomb

Because the center texture already provides plenty of visual detail, simple borders often work best.

Garter stitch, seed stitch or a basic rib can frame the honeycomb without competing with it.

Common Problems to Watch For

If your honeycomb fabric does not look as expected, check these common causes:

  • A missed stitch in the repeat
  • Uneven tension
  • Beginning the next repeat in the wrong place
  • Working the wrong-side row incorrectly
  • Losing track of the row number
  • Using yarn that hides too much stitch definition

Keep Track of Rows

A row counter or simple paper checklist can be extremely helpful.

Textured stitch patterns usually become easy once the rhythm is familiar, but losing your place halfway through a repeat is one of the easiest ways to distort the pattern.

Is Baby Honeycomb a Specific Garment Pattern?

No. The original Amazing Knitting page is best understood as a stitch tutorial, not as a complete baby sweater or blanket pattern with fixed sizing and yardage.

That is actually useful because the stitch can be adapted to many different knitting projects.

Looking for a Complete Baby Project?

If you like textured knitting but would rather follow a complete published baby pattern with established sizing and yarn requirements, these free patterns already verified in the Amazing Knitting archive are good places to continue:

Explore More Knitting Stitches

If stitch patterns are what brought you here, continue exploring Amazing Knitting:

Before You Use This Stitch in a Project

Knit a swatch first and allow several complete repeats to develop.

Measure the fabric in the actual honeycomb texture rather than relying on stockinette gauge, and wash or block the swatch the same way you plan to treat the finished project.

Once you are happy with the stitch definition, drape and dimensions, you can confidently adapt the texture to a blanket, scarf, cardigan panel or another project of your choice.

Source note: The original 2019 Amazing Knitting post credited its reference image and video inspiration to Knitting Knife Crochet Paradise. This updated Amazing Knitting article is an independent educational guide and does not reproduce another creator's complete video instructions.

Make Your Own Infinity Scarf In Half An Hour! - Arm Knitting Tutorial

Make Your Own Infinity Scarf In Half An Hour! - Arm Knitting Tutorial
Photos above © Nicole and Bianca
What beautiful knitting scarf  (Arm knitting tutorial )! I found it on Pinterest...
Arm knitting is a lesser-known knitting technique, yet it can save you a lot of time and trouble – especially if you are just starting out in the art of knitting! If you are tired of knitting caps and gloves and you feel a bit daring and adventurous this time, then the Infinity scarf tutorial is exactly what you need.

Pink Lady Baby Cardigan – Free 3-Month Knitting Pattern

Pink Lady Baby Cardigan free 3 month knitting pattern by Creativa Atelier

The Pink Lady Baby Cardigan by Marta Porcel of Creativa Atelier is a charming baby sweater with an unusual sideways construction. Instead of beginning at the neckline or lower edge, the cardigan starts at one sleeve and is worked across the body before finishing with the second sleeve.

The design combines garter stitch with the reverse side of stockinette stitch, creating a soft textured contrast across the garment.

A complete step-by-step tutorial for the 3-month size is currently available free from Creativa Atelier. Additional baby and child sizes are available separately as paid PDF patterns.

Design, images and original pattern © Marta Porcel / Creativa Atelier.

Pink Lady Baby Cardigan Pattern Overview

  • Designer: Marta Porcel
  • Source: Creativa Atelier
  • Pattern: Pink Lady Baby Cardigan
  • Craft: Knitting
  • Category: Baby cardigan
  • Free size: 3 months
  • Additional paid sizes: 6, 9, 12 and 18 months; 2, 4 and 6 years
  • Construction: Sideways, from one sleeve to the other
  • Main stitches: Garter stitch and reverse stockinette
  • Yarn weight: DK / Light
  • Suggested yarn: Katia Merino Classic
  • Yarn amount for 3 months: 1 ball / 100 g / approximately 240 m
  • Needles: 4 mm straight knitting needles
  • Gauge: 20 stitches × 38 rows in garter stitch
  • Closure: One button
  • Main techniques: Knit, purl, k2tog, KFB, casting on, binding off and seaming
  • Pattern availability: Free online tutorial for size 3 months

A Baby Cardigan Worked From Sleeve to Sleeve

The most distinctive feature of Pink Lady is its construction.

Instead of starting at the neck or hem, the project begins with one sleeve. Extra stitches are then added to form the front and back of the cardigan before the knitting continues sideways across the body.

After shaping the neckline and front opening, the body is completed and the second sleeve is worked at the opposite end.

This creates a garment with vertical rather than conventional horizontal construction.

Why the Sideways Construction Is Interesting

Sideways knitting changes the direction of the stitches across the finished cardigan.

It also allows the sleeves and body to form part of one continuous piece rather than requiring separate sleeve pieces to be knitted and attached later.

For knitters who have already made traditional bottom-up or top-down baby cardigans, Pink Lady offers a noticeably different construction method.

Garter Stitch and Reverse Stockinette

The cardigan combines two simple textures: garter stitch and reverse stockinette stitch.

Garter stitch creates a soft ridged fabric, while reverse stockinette uses the purl side of traditional stockinette as the visible surface.

This contrast gives the finished cardigan a distinctive appearance without requiring cables, lace or stranded colorwork.

Yarn for Pink Lady

The free 3-month tutorial uses:

1 ball of Katia Merino Classic, 100 g / approximately 240 m.

The yarn is classified as DK / Light weight.

A similar DK yarn can be substituted as long as you can achieve a comparable gauge and create a soft fabric suitable for a baby garment.

Choosing a Yarn Substitute

For a baby cardigan, consider yarn that is:

  • Soft against the skin
  • Comfortable and flexible
  • Easy to wash
  • Suitable for 4 mm needles
  • Close to DK / Light weight

Always make a small gauge swatch when changing yarn, because differences in fiber and thickness can affect the final size.

Needles and Materials

  • 4 mm straight knitting needles
  • DK / Light yarn
  • One wooden or decorative button
  • Tapestry needle
  • Scissors

The designer notes that you may need to adjust the needle size if necessary to obtain the intended tension.

Gauge

The designer lists:

20 stitches × 38 rows in garter stitch.

Gauge is important for a baby cardigan because the construction depends on specific widths and lengths as the knitting moves sideways across the garment.

If your stitches are significantly larger or smaller, the finished cardigan may not match the intended 3-month size.

Starting With the First Sleeve

The project begins at the cuff of the first sleeve.

The sleeve is knitted to the required length before additional stitches are added at both ends to create the front and back sections of the cardigan.

From this point, the work begins to resemble a sideways garment rather than a traditional sleeve.

Shaping the Body

Once the body stitches have been added, different stitch textures are used across the row.

The central sleeve and shoulder area uses garter stitch, while sections of the body use reverse stockinette.

This contrast helps define the structure of the cardigan visually.

Creating the Neck Opening

The neckline is shaped while working across the garment.

A section of stitches is bound off to create the opening, allowing the front and back portions to be worked separately for part of the construction.

This is one of the areas where it is especially useful to follow the designer's original step-by-step tutorial carefully.

The Front Opening and Buttonhole

The cardigan has a simple front opening secured with one button.

A buttonhole is incorporated into the smaller front section before the pieces are rejoined.

The single-button closure keeps the overall design clean and minimal.

Working the Second Sleeve

After the body is complete, stitches are bound off at both sides until only the sleeve stitches remain.

The second sleeve is then knitted to match the first.

This completes the main sideways piece of the cardigan.

Finishing the Cardigan

Once the knitting is complete, the sleeve and side seams are joined with a tapestry needle.

The button is then attached to the front.

The designer also discusses an optional lower hem to help control curling along the bottom edge.

Skills You'll Use

  • Casting on
  • Knit stitch
  • Purl stitch
  • Garter stitch
  • Reverse stockinette
  • Knit two together (k2tog)
  • Knit front and back (KFB)
  • Binding off
  • Adding stitches at the edge
  • Making a buttonhole
  • Sideways garment construction
  • Seaming
  • Attaching a button

Is Pink Lady Beginner Friendly?

The individual stitches are relatively simple, so a confident beginner who already knows how to knit and purl can learn a lot from this project.

The unusual sideways construction requires more concentration than a basic rectangular project, especially around the neckline and front opening.

Fortunately, the designer provides a detailed photographic tutorial that shows how the garment develops step by step.

Free Size vs. Paid Sizes

The important availability detail is that the 3-month size is available free in the online tutorial.

Creativa Atelier also offers additional pattern sizes:

  • 3 months
  • 6 months
  • 9 months
  • 12 months
  • 18 months
  • 2 years
  • 4 years
  • 6 years

The expanded sizes and printable PDF editions are sold separately by the designer.

Is Pink Lady a Free Knitting Pattern?

Yes, the complete online tutorial for the 3-month Pink Lady Baby Cardigan is currently available free from Creativa Atelier.

Larger baby and child sizes are available as paid PDF patterns from the same designer.

Amazing Knitting therefore links directly to Creativa Atelier, the original designer source, rather than to third-party copies.

View the Free Pink Lady Baby Cardigan Tutorial →

Want Another Size?

Creativa Atelier also offers paid downloadable PDF patterns for additional baby and child sizes.

These PDFs include detailed sizing information and printable row-by-row instructions.

View All Pink Lady Size Options →

Why This Baby Cardigan Is Worth Knitting

Pink Lady stands out because it teaches a different way of thinking about garment construction.

Rather than building the cardigan vertically from neck to hem or hem to neck, the sweater grows sideways from one sleeve to the other.

The use of garter stitch and reverse stockinette also gives the design a distinctive handmade texture without adding technically difficult stitch patterns.

For knitters who already understand basic stitches and want to explore a more unusual baby sweater construction, Pink Lady is an interesting next project.

Pattern Availability

Amazing Knitting links readers to legitimate designer or publisher sources whenever possible. Pattern prices, download locations and availability can change after an article is published.

Read Our Pattern Availability Policy →

Amazing Knitting is an independent pattern discovery and project-guide site. The Pink Lady Baby Cardigan design, images and complete knitting instructions remain the intellectual property of Marta Porcel / Creativa Atelier. This guide does not reproduce the designer's complete row-by-row pattern instructions.

Daybreak Tee – Free Easy Summer Top Knitting Pattern

Daybreak Tee free summer top knitting pattern by Destiny Meyer

The Daybreak Tee. Photos © Destiny Meyer

The Daybreak Tee by Destiny Meyer of Knifty Knittings is a free slightly cropped tee knitting pattern designed with a relaxed, flattering fit and a beautiful lace detail across the upper front.

Worked in soft DK-weight cotton yarn, the tee is knitted mainly in the round from the bottom up before the front and back are separated and worked flat. The pattern includes six sizes from XS through 2X and a detailed step-by-step video tutorial.

Daybreak Tee Pattern Details

  • Designer: Destiny Meyer / Knifty Knittings
  • Published: May 2019
  • Craft: Knitting
  • Category: Women's tee / summer top
  • Pattern availability: Free on the designer's website
  • Sizes: XS, S, M, L, XL and 2X
  • To fit bust: 28–50 inches (71–127 cm)
  • Fit: Approximately 1–3 inches of positive ease
  • Yarn: LB Collection Cotton Jeans
  • Yarn weight: DK
  • Yardage: 457–825 yards (418–755 m), depending on size
  • Needles: US 6 (4 mm) and US 7 (4.5 mm)
  • Gauge: 18 stitches × 25 rows = 4 inches (10 cm) in blocked stockinette stitch
  • Construction: Bottom up
  • Techniques: Worked in the round and flat
  • Features: Cropped fit, lace detail, short sleeves and ribbed edging
  • Tutorial: Step-by-step video included by the designer
  • Language: English

A Free Summer Tee Knitting Pattern

Daybreak Tee is a great example of how a relatively simple knitted top can become much more interesting with one carefully placed decorative feature.

Most of the garment uses straightforward stockinette stitch, while the lace section across the upper front adds an airy detail that gives the tee its distinctive appearance.

Combined with short sleeves and cotton yarn, the design works especially well as a lightweight knitted top for warmer weather.

Slightly Cropped With Positive Ease

Destiny Meyer designed Daybreak with a slightly cropped silhouette and approximately 1–3 inches of positive ease.

Positive ease means the finished garment circumference is slightly larger than the wearer's actual bust measurement, creating a relaxed rather than skin-tight fit.

The pattern provides both recommended bust measurements and finished garment measurements, making it easier to choose the amount of ease you prefer.

Six Sizes From XS to 2X

The free pattern includes six sizes: XS (S, M, L, XL, 2X).

They are designed to fit bust measurements of approximately:

  • XS: 28–30 inches (71–76 cm)
  • S: 32–34 inches (81.5–86.5 cm)
  • M: 36–38 inches (91.5–96.5 cm)
  • L: 40–42 inches (101.5–106.5 cm)
  • XL: 44–46 inches (112–117 cm)
  • 2X: 48–50 inches (122–127 cm)

The corresponding finished garment circumferences are approximately 31, 35, 39, 43, 47 and 51 inches.

Bottom-Up Construction

The Daybreak Tee begins at the lower edge and is knitted from the bottom up.

After the ribbed hem is complete, the main body is worked in stockinette stitch in the round. This creates the lower body without side seams.

When the work reaches the underarm area, the front and back stitches are separated and the two upper sections are worked flat.

How the Short Sleeves Are Made

One clever feature of Daybreak is that you do not knit two traditional sleeves separately and sew them into armholes.

Instead, additional stitches are cast on at each side when the front and back are separated.

These extra stitches become the short sleeves as the upper front and back are worked toward the shoulders.

This keeps the construction relatively simple and minimizes the amount of finishing required at the end.

Lace Detail Across the Front

The decorative lace appears on the upper front of the tee.

The pattern uses yarn overs and decreases to create two openwork sections around the center of the front.

Because the lower body and back remain relatively simple, the lace becomes a clear focal point without making the entire garment an intricate lace project.

Minimal Seaming

Although Daybreak combines knitting in the round with flat knitting, the finished garment requires relatively little sewing.

The shoulders are joined using a three-needle bind-off, and the remaining finishing includes small seams underneath the short sleeves.

If garment seaming is something you usually try to avoid, this construction provides a useful compromise between completely seamless knitting and a traditionally pieced sweater.

The Original Cotton Yarn

Destiny Meyer designed the tee using LB Collection Cotton Jeans, a DK-weight 100% cotton yarn.

The original yarn contains approximately 218 yards (200 m) per 100 g skein.

The designer used the Grey Fade colorway for the original sample and describes the yarn as soft and drapey, two useful characteristics for a knitted summer top.

How Much Yarn Does the Daybreak Tee Need?

The official pattern gives the following approximate yardage:

  • XS: 457 yards (418 m)
  • S: 532 yards (487 m)
  • M: 599 yards (548 m)
  • L: 672 yards (615 m)
  • XL: 748 yards (684 m)
  • 2X: 825 yards (755 m)

With the original Cotton Jeans yarn, the pattern calls for 3 (3, 3, 4, 4, 4) skeins.

Choosing a Substitute Yarn

If the original yarn is unavailable, look for a DK-weight yarn with good drape that can produce the required gauge.

Cotton or a cotton blend can be a natural choice for a warm-weather version, but the most important factors are gauge, fabric feel and drape.

Remember to compare total yardage rather than simply buying the same number of skeins, because skein sizes vary considerably between yarn brands.

Needles and Gauge

The pattern uses a US 6 (4 mm) circular needle for the ribbing and a US 7 (4.5 mm) circular needle for the main fabric.

The official blocked gauge is: 18 stitches and 25 rows = 4 inches (10 cm) in stockinette stitch using the larger needles.

The designer specifically recommends taking time to check gauge because it directly affects the finished fit.

Choosing Your Size

Before casting on, compare your actual bust measurement with both the recommended body measurements and the finished garment circumference.

The original design is intended to have approximately 1–3 inches of positive ease, but the amount you prefer can depend on how fitted or relaxed you want your tee to look.

A washed and blocked gauge swatch is particularly useful with cotton, because the behavior of the finished fabric matters just as much as the stitch count on the needles.

Adjusting the Length

The body is largely worked in stockinette before the front and back are divided, which gives you a natural opportunity to consider the overall length.

The pattern itself gives target measurements for each size, but you can work toward your preferred underarm length if you want the tee a little longer or shorter.

If you add length, remember that you will need additional yarn beyond the published yardage.

Skills Used in the Daybreak Tee

Useful techniques for this project include:

  • Knitting and purling
  • 1×1 ribbing
  • Stockinette stitch
  • Knitting in the round
  • Working flat
  • Cable cast-on
  • Yarn overs
  • K2tog and SSK decreases
  • Three-needle bind-off
  • Basic seaming
  • Blocking a finished garment

Is the Daybreak Tee Beginner Friendly?

Destiny Meyer describes Daybreak as a good project for an adventurous beginner.

The main body is straightforward, while the upper portion introduces several useful garment-making skills such as separating the front and back, adding sleeve stitches, working simple lace and joining shoulders.

You don't need to rely on the written instructions alone: the designer also provides a detailed video tutorial demonstrating the construction.

A 45-Minute Step-by-Step Video Tutorial

One of the strongest features of this free pattern is the accompanying approximately 45-minute video tutorial.

Destiny walks through the project step by step, making the tutorial particularly useful if this is one of your first knitted garments.

The video is linked from the original free pattern page, so you can use the written pattern and visual tutorial together.

Why Knit the Daybreak Tee?

Daybreak combines several appealing features in one approachable garment: DK cotton yarn, a slightly cropped silhouette, short sleeves, minimal seaming and just enough lace to make the upper front stand out.

It also offers a useful progression for knitters moving from scarves and shawls into garment knitting. The stockinette body provides plenty of straightforward knitting before you reach the more interesting construction and lace details at the top.

With six sizes from XS to 2X and a full video tutorial, the free version provides considerably more support than many simple summer top patterns.

Get the Free Daybreak Tee Knitting Pattern

The complete Daybreak Tee by Destiny Meyer is currently available free on the designer's official Knifty Knittings website, including the written instructions and step-by-step video tutorial.

Get the Free Daybreak Tee Knitting Pattern →

Pattern availability was checked when this article was updated. Availability and pattern details on external websites may change over time.

How to Knit Herringbone Stitch - Knitting Stitch Guide

Herringbone Stitch - Free Easy Pattern
Photo above © Room on  the left 

Herringbone Stitch is a beautiful knitting technique that creates a dense fabric with distinctive diagonal lines resembling classic woven herringbone.

At first glance, the finished fabric hardly looks knitted at all. Instead, the stitches appear to interlock and travel diagonally across the surface, creating the familiar V-shaped movement associated with herringbone textiles.

The technique can feel unusual the first time you try it, but once you understand how the stitches overlap, the movement becomes much easier to recognize.

In this guide, we'll explore how knitted herringbone is constructed, why tension matters so much, how to choose yarn and needles, common mistakes to avoid, and where this beautiful texture works best.

Knitting Stitch Guide

Herringbone is a general knitting technique rather than one specific garment pattern. There are several knitted herringbone methods and variations, so instructions from different tutorials may not be identical even when the finished fabrics have a similar woven look.

Herringbone Stitch at a Glance

Technique: Herringbone Stitch

Category: Textured knitting stitch

Appearance: Dense, diagonal, woven-looking texture

Worked: Flat or in the round, depending on the variation

Best For: Scarves, cowls, blankets, bags and textured accessories

Key Challenge: Maintaining loose, even tension

Skill Level: Advanced beginner to intermediate, depending on the variation

What Is Herringbone Stitch?

Herringbone Stitch is a family of knitting techniques designed to create diagonal lines that resemble the structure of traditional woven herringbone fabric.

Instead of seeing clearly separated columns of ordinary knit stitches, the surface develops overlapping diagonal movements.

This gives the fabric an unusually polished and almost woven appearance.

Why Does It Look Woven?

In a common form of knitted herringbone, neighboring stitches are worked together while part of the stitch remains available to interact with the next stitch.

This repeated overlap changes the direction in which the visible loops travel across the fabric.

When those diagonal movements alternate, they create the characteristic herringbone effect.

Herringbone Is Not Just One Stitch Pattern

This is important when following tutorials online.

There is no single universal knitting instruction called "the Herringbone Stitch."

Different designers and knitting teachers use several constructions to produce herringbone-like fabrics.

You may encounter:

  • Traditional dense herringbone techniques
  • Mini herringbone
  • Slip-stitch herringbone
  • Reversible herringbone variations
  • Herringbone worked in the round
  • Two-color herringbone effects

These methods can look related while using different stitch multiples, row repeats and techniques.

Traditional Herringbone Construction

One common herringbone method works neighboring stitches together while allowing one of those stitches to remain involved in the following movement.

Repeating this across the row produces overlapping stitches instead of independent vertical columns.

The reverse row changes the direction of the operation, helping create the distinctive alternating diagonal structure.

Why Tension Is So Important

Herringbone has a natural tendency to become dense.

If every stitch is pulled tightly against the needle, inserting the needle into the next pair of stitches can quickly become uncomfortable.

The finished fabric may also become much stiffer than intended.

Try to keep the working yarn relaxed as each stitch is formed.

Consider Using Larger Needles

Herringbone often benefits from a larger needle than you might normally choose for the same yarn.

The overlapping construction naturally compresses the fabric, so extra needle space can help the stitches move more easily and improve drape.

Do not choose a needle size from the yarn label alone.

Make a swatch and judge the actual herringbone fabric.

Swatching Is Especially Useful

Herringbone is one of those stitches where a small swatch can save a great deal of frustration.

Knit enough rows for the diagonal structure to become visible, then ask:

  • Can I insert the needle comfortably?
  • Does the fabric bend easily?
  • Are the diagonal lines visible?
  • Is the fabric too stiff?
  • Would a larger needle improve the drape?

If the knitting feels difficult, changing needle size may be more useful than simply trying to force the stitches.

Choosing Yarn for Herringbone Stitch

Smooth yarns are particularly useful when you want the diagonal structure to remain clearly visible.

A highly fuzzy yarn can soften the lines, while a smooth wool or wool blend tends to emphasize the interlocking texture.

Herringbone can be worked with many yarn weights, but your yarn and needle combination will strongly influence the density of the finished fabric.

Solid Colors

A solid yarn allows the shadows created by the overlapping stitches to define the pattern.

Neutral colors can make herringbone look especially similar to classic woven textiles.

Rich solid colors can give the same structure a more contemporary appearance.

Variegated and Gradient Yarn

Herringbone can also interact beautifully with color-changing yarn.

Because the stitches overlap diagonally rather than forming ordinary vertical columns, color changes can appear to travel across the fabric in unusual ways.

The result depends heavily on the length and frequency of the color changes, so a swatch is highly recommended.

What Projects Work Well in Herringbone?

The dense, textured fabric makes herringbone especially attractive for projects where structure and warmth are useful.

Good possibilities include:

  • Scarves
  • Cowls
  • Blankets
  • Throws
  • Cushion covers
  • Bags
  • Headbands
  • Textured garment panels

Herringbone Scarves

Scarves are one of the easiest ways to experiment with this stitch.

Their simple rectangular construction lets you concentrate on learning the technique rather than shaping a garment.

The dense fabric can also produce a warm accessory with an elegant tailored appearance.

Herringbone Cowls

Some herringbone variations can be worked in the round, making them particularly attractive for cowls.

Working in the round also avoids having a traditional scarf edge and can emphasize the continuous diagonal movement of the stitch.

Herringbone Blankets

Herringbone can produce a substantial, warm fabric that works beautifully in blankets and throws.

Keep in mind that a dense stitch may consume more yarn and take longer to work than a simple stockinette or garter-stitch fabric.

A generous swatch will help you estimate both gauge and yarn usage before committing to a large blanket.

Common Problem: The Stitches Are Too Tight

This is probably the most common difficulty when learning dense herringbone.

If inserting the needle into neighboring stitches requires significant force, stop and examine your tension.

Try:

  • Relaxing the working yarn
  • Forming stitches farther up the needle rather than at the narrow tip
  • Using a larger needle
  • Choosing a smoother yarn while learning

Common Problem: The Pattern Is Hard to See

Do not judge the stitch after only one or two rows.

Herringbone needs enough fabric for its diagonal structure to become obvious.

Work several rows, gently relax the fabric, and look at it from a little distance.

Common Problem: Uneven Diagonal Lines

Uneven tension can make one section look compressed while another looks loose.

Concentrate on forming each stitch with approximately the same amount of yarn.

Consistency usually improves naturally as the hand movement becomes more familiar.

Is Herringbone Reversible?

It depends on the version.

Some herringbone methods have a clearly different right and wrong side, while other variations are designed to look attractive from both sides.

This is another reason to check the exact tutorial or project pattern you are using instead of assuming that all herringbone methods behave identically.

Mini Herringbone

Mini Herringbone is a popular variation that creates a refined, all-over texture reminiscent of classic herringbone tweed.

It can be a useful next step once you understand how overlapping stitches create diagonal movement.

Purl Soho maintains a detailed free tutorial showing its particular Mini Herringbone technique.

View the Mini Herringbone Tutorial →

Try Herringbone in a Free Project

Once you understand the basic idea, working an actual project is one of the best ways to develop consistent tension.

Purl Soho's free Mini Herringbone Scarf is a useful example of how this dense woven-looking texture can be used in a simple rectangular accessory.

View the Free Mini Herringbone Scarf →

Another Herringbone Variation

Wool and the Gang also maintains a free educational guide to a herringbone knitting method.

Comparing different legitimate tutorials can be helpful because it shows how several knitting constructions can create related herringbone textures.

Explore Another Herringbone Technique →

Herringbone vs. Ordinary Stockinette

Stockinette produces recognizable vertical columns of V-shaped knit stitches.

Herringbone disrupts those vertical columns and redirects the visible stitches diagonally.

It generally produces a denser and more structured fabric, which is why the same yarn can behave very differently in the two stitch patterns.

Before Starting a Large Project

Do not jump directly from learning the technique to casting on a large blanket.

First make a generous practice swatch.

Experiment with needle size until the stitches are comfortable to work and the finished fabric has the amount of drape you want.

Once your hands understand the unusual stitch movement, herringbone becomes much more enjoyable.

More Knitting Stitch Guides

Continue building your knitting skills with these Amazing Knitting resources:

Final Tips for Learning Herringbone Stitch

The biggest secret is not speed — it is tension.

Keep your stitches relaxed, give yourself enough needle space, and allow several rows for the diagonal structure to develop before deciding whether your swatch is successful.

Also remember that different herringbone tutorials may use genuinely different techniques.

Choose one method, learn its movement consistently, and then experiment with other variations once you understand how the woven-looking texture is created.

Editorial note: Herringbone is a general family of knitting techniques with multiple variations. Amazing Knitting provides this independent educational guide rather than reproducing another publisher's tutorial. External tutorials linked above remain the work of their respective authors and publishers. Please retain the existing photograph and its original credit from the old Amazing Knitting post.

Skimmer Socks Revisited – Free No-Show Sock Knitting Pattern

Skimmer Socks Revisited free no-show sock knitting pattern by Sheila Toy Stromberg

Skimmer Socks Revisited by Sheila Toy Stromberg is a clever free knitting pattern for low-cut, no-show socks designed to sit comfortably inside shoes while still providing a secure knitted fit.

Unlike traditional ankle socks, the upper portion is kept deliberately low. The pattern uses toe-up construction, short-row shaping and a ribbed back section to create a sock that covers the foot without extending far above the shoe line.

The updated version includes six sizes and is designed to accommodate a wide range of feet, from larger children through adult sizes. The designer also provides a free tutorial video for knitters who are learning toe-up sock construction.

Design and original pattern © Sheila Toy Stromberg.

Skimmer Socks Revisited Pattern Overview

  • Designer: Sheila Toy Stromberg
  • Pattern: Skimmer Socks Revisited
  • Craft: Knitting
  • Category: No-show socks / footie socks
  • Published: May 2018
  • Construction: Toe-up, worked in the round
  • Sizes: Extra Small, Small, Medium, Large, Extra Large and Extra-Extra Large
  • Arch circumference: Approximately 5.75–10.75 in / 14.5–27.5 cm depending on size
  • Yarn weight: Fingering / sock weight
  • Suggested yarn: Hedgehog Fibres Sock
  • Yardage: Approximately 125–185 yd / 115–170 m
  • Main needles: US 1 / 2.25 mm
  • Smaller needles: US 0 / 2 mm
  • Gauge: Approximately 32–34 stitches × 40 rows = 4 in / 10 cm in stockinette stitch
  • Main techniques: Judy's Magic Cast-On, knitting in the round, increases, decreases, short rows and picking up stitches
  • Language: English
  • Pattern availability: Free from the designer

A No-Show Sock Designed for Real Shoes

The main appeal of Skimmer Socks Revisited is the low-profile shape. Traditional hand-knit socks often extend well above the ankle, but this design is intended to disappear almost completely inside many everyday shoes.

That makes the pattern useful when you want the comfort of hand-knit socks without a tall cuff showing above sneakers, loafers or other low-cut footwear.

The sock still includes a structured back section to help protect the heel from rubbing while helping the finished sock stay in position.

Why the Revisited Version Is Different

Skimmer Socks Revisited is an updated version of Sheila Toy Stromberg's earlier Skimmer Socks design.

The designer created the original pattern after finding very few no-show sock patterns available in a broad range of sizes. Several years later, she reworked the design with improved shaping and a larger size range.

The revised version is intended to fit many different feet, including larger children, teens and adults.

Choosing the Right Size

Unlike some sock patterns that rely only on shoe size, Skimmer Socks Revisited places particular importance on arch circumference and foot length.

The available arch measurements are approximately:

  • Extra Small: 5.75 in / 14.5 cm
  • Small: 6.75 in / 17 cm
  • Medium: 7.75 in / 19.5 cm
  • Large: 8.75 in / 22 cm
  • Extra Large: 9.75 in / 25 cm
  • Extra-Extra Large: 10.75 in / 27.5 cm

Because knitted socks usually rely on some negative ease for a secure fit, taking accurate measurements before choosing a size is especially important.

Toe-Up Construction

These socks are knitted from the toe upward.

The project begins with Judy's Magic Cast-On, a popular method for starting toe-up socks because it creates a smooth, nearly seamless beginning at the toe.

After the toe is established, increases shape the front of the foot and the sock continues in the round toward the heel.

Heel Shaping

The pattern includes shaped heel construction designed specifically for the low-cut profile of the sock.

Short rows are used during the shaping process, along with picked-up stitches to form the surrounding structure.

This is one of the areas where working carefully is worthwhile. A well-fitted heel helps prevent a no-show sock from sliding downward inside the shoe.

The Ribbed Back Section

A taller ribbed section at the back of the heel is one of the practical features of the design.

It provides additional coverage where the shoe may rub against the back of the foot while helping the knitted sock remain secure.

The ribbing also gives the fabric elasticity, allowing it to stretch over the foot without making the entire sock tall.

Yarn Requirements

The pattern uses approximately 125–185 yards / 115–170 meters of sock-weight yarn depending on the selected size.

This relatively small yardage makes Skimmer Socks Revisited an excellent project for using leftover fingering-weight yarn from larger sock projects.

The sample was knitted with Hedgehog Fibres Sock, but another suitable fingering-weight sock yarn can be used as long as you can achieve the required gauge and produce a durable fabric.

Why Sock Yarn Works Well

Sock yarn is generally designed to create a thin but durable fabric suitable for frequent wear.

A smooth fingering-weight yarn also allows the sock to remain relatively low-bulk inside shoes, which is particularly important for a no-show design.

If substituting yarn, choose one that provides enough elasticity and abrasion resistance for footwear.

Needles and Notions

  • US 1 / 2.25 mm circular or double-pointed needles
  • US 0 / 2 mm circular or double-pointed needles
  • 1 locking stitch marker
  • Small stitch holder
  • Tapestry needle

The exact needle size may need to change depending on your individual tension. The goal is to achieve the pattern gauge rather than automatically using the listed needle size.

Skills You'll Use

  • Knitting in the round
  • Judy's Magic Cast-On
  • Toe-up sock construction
  • Basic increases
  • Basic decreases
  • Short-row shaping
  • Picking up stitches
  • Stockinette stitch
  • Ribbing
  • Measuring for sock fit
  • Finishing and weaving in ends

Is This a Good First Sock Pattern?

The designer describes Skimmer Socks Revisited as suitable for experienced knitters who are beginners to sock knitting.

That is a useful distinction. Someone who already feels comfortable knitting in the round and following shaping instructions may find this a very approachable introduction to toe-up socks.

A complete beginner may want to practice circular knitting and basic increases or decreases before beginning.

Free Video Tutorial

Sheila Toy Stromberg also created a tutorial video for Skimmer Socks Revisited to help knitters understand the construction.

The video is particularly useful if you are new to toe-up socks or would like to see how the shaping develops before attempting the pattern yourself.

Watch the Skimmer Socks Tutorial →

Tips for a Better Fit

Measure the foot before choosing a size. Arch circumference and foot length are more reliable than choosing only by shoe size.

Check your gauge. Socks rely heavily on accurate gauge because even a small difference can noticeably change the fit.

Keep the fabric firm. A sock fabric that is too loose may stretch excessively during wear.

Pay close attention to the heel. Correct heel shaping is especially important in a no-show design because the sock needs to stay securely around the back of the foot.

Try the sock on as you work. One advantage of toe-up construction is that you can check the developing length before completing the upper section.

Is Skimmer Socks Revisited a Free Knitting Pattern?

Yes. Skimmer Socks Revisited is currently available as a free knitting pattern directly from designer Sheila Toy Stromberg.

The designer's official page currently lists the pattern at $0.00 and provides access to the pattern together with sizing, materials and tutorial information.

Because the official designer source is available and the exact pattern is still free, Amazing Knitting links directly to that source rather than to third-party pattern copies.

Get the Free Skimmer Socks Revisited Pattern →

Why These Socks Are Worth Knitting

Skimmer Socks Revisited fills an unusual niche in hand-knit footwear. Instead of producing another conventional ankle or crew sock, it gives knitters a practical no-show option designed specifically for low-cut shoes.

The broad size range, small yarn requirement and free tutorial make it especially appealing if you want to learn toe-up sock construction or use leftover fingering-weight yarn.

It is also a useful pattern to keep available once you find your preferred size because additional pairs can be made from many different sock yarns and color combinations.

Pattern Availability

Amazing Knitting links readers to legitimate designer or publisher sources whenever possible. Pattern prices, download locations and availability can change after an article is published.

Read Our Pattern Availability Policy →

Amazing Knitting is an independent pattern discovery and project-guide site. The Skimmer Socks Revisited design and knitting pattern remain the intellectual property of Sheila Toy Stromberg. This guide does not reproduce the designer's complete row-by-row pattern instructions.

Knit Barfi Stitch – Easy Diamond Stitch Tutorial

Knit Barfi Stitch diamond knitting stitch tutorial
Photo © Knit with Suman

The Knit Barfi Stitch is an eye-catching textured knitting stitch with a repeating diamond or rhombus-like appearance. Its geometric surface can add strong visual interest even when worked in a single yarn color.

This stitch can be a beautiful choice for projects such as blankets, scarves, cushion covers, wraps and decorative knitted panels. The original tutorial linked below demonstrates how the stitch is worked.

What Is the Barfi Stitch?

Barfi Stitch is a decorative knitting stitch distinguished by repeating geometric shapes across the fabric. The finished texture creates diamond-like sections that stand out clearly against the surrounding stitches.

Because the design itself provides the visual detail, it can work well in a solid color where the texture remains the main feature of the finished project.

What Does the Barfi Stitch Look Like?

The stitch produces a structured surface made up of repeating diamond or rhombus motifs. These motifs create a decorative all-over pattern rather than a plain stockinette fabric.

Choosing a smooth yarn with good stitch definition can make the geometric texture easier to see. Very fuzzy yarns may soften or hide some of the detail.

Projects You Can Make With Barfi Stitch

A textured stitch like Barfi can be adapted to many rectangular or repeating-pattern knitting projects.

Blankets: Use the repeating texture for baby blankets, throws or larger afghans.

Scarves: A solid-color scarf can showcase the diamond pattern clearly.

Cushion Covers: The structured surface can create an attractive decorative panel.

Wraps and Shawls: Use the motif as an all-over textured fabric or a feature section.

Garment Panels: The stitch can also provide decorative texture in suitable sweater or cardigan designs.

Choosing Yarn for a Textured Knitting Stitch

For a stitch pattern with strong geometric detail, a smooth yarn is usually useful because it allows individual stitches and raised areas to remain visible.

Light and medium shades can make shadows within the texture easier to see, while darker yarns can produce a more subtle effect.

Before using Barfi Stitch in a large project, knit a small swatch with your chosen yarn and needles. This lets you check the appearance, drape and width of the repeating pattern before committing to a larger piece.

Tips Before You Start

Watch the complete stitch repeat before beginning so you can see how the geometric sections develop. Keeping an even tension is particularly helpful with textured stitches because uneven tension can distort the repeated shapes.

If you plan to incorporate the stitch into your own blanket, scarf or garment, first determine the stitch-repeat requirements shown in the original tutorial and make a gauge swatch.

A row counter or simple notes can also be useful when working repeated textured sections, especially on larger projects.

Watch the Knit Barfi Stitch Tutorial

The original video tutorial featured on this page is from Knit with Suman. Use the button below to watch the demonstration and follow the stitch construction directly from the source.

Amazing Knitting provides an editorial introduction to the stitch and directs readers to the original tutorial rather than reproducing the complete row-by-row instructions.

How To Make Rib Stitch Neater - Tutorial

How To Make Rib Stitch Neater - Tutorial
Photos above © Button and Blue

Does your knitting ribbing sometimes look loose, uneven, or less defined than you would like? One simple technique worth trying is twisted rib stitch.

Twisted rib is a variation of ordinary ribbing in which selected stitches are worked through the back loop. This small change twists the stitch and can create sharper, more clearly defined columns — especially around cuffs, sweater hems, neckbands, and hat brims.

Twisted Rib Stitch at a Glance

Technique: Twisted Rib Stitch

Craft: Knitting

Skill Level: Beginner / Easy

Based on: Knit and purl ribbing

Main Technique: Working stitches through the back loop

Best For: Cuffs, hems, neckbands and hat brims

Result: Firm, clearly defined rib columns

Why Does Regular Ribbing Sometimes Look Uneven?

Ribbing looks simple because it is built from basic knit and purl stitches, but achieving perfectly even rib columns can take practice.

One common trouble spot occurs when the working yarn moves between a knit stitch and a purl stitch. That transition can introduce a little extra yarn between stitches, making one side of a rib column appear looser than the other.

Differences between your knit and purl tension can make the effect even more noticeable, particularly in 1x1 and 2x2 ribbing.

What Is Twisted Rib Stitch?

Twisted rib is a variation of standard ribbing. Instead of working every stitch in the usual way, one or more stitches are worked through the back loop.

Working through the back loop changes the orientation of the stitch and creates the characteristic twisted appearance.

On the finished fabric, the knit columns can look narrower and more sharply defined than they do in ordinary ribbing.

How to Knit a Twisted Knit Stitch

The abbreviation ktbl means knit through the back loop.

  1. Keep the working yarn behind your knitting.
  2. Insert the right needle into the back of the next stitch on the left needle.
  3. Wrap the working yarn around the right needle.
  4. Pull the new loop through the stitch.
  5. Slide the old stitch off the left needle.

Unlike an ordinary knit stitch, working through the back loop twists the base of the stitch.

How to Purl Through the Back Loop

You may also encounter the abbreviation ptbl, meaning purl through the back loop.

  1. Bring the working yarn to the front.
  2. Approach the back loop of the next stitch with the right needle.
  3. Wrap the yarn as required for a purl stitch.
  4. Draw the new loop through.
  5. Slide the completed stitch from the left needle.

Purling through the back loop can feel awkward at first. Work slowly until the needle movement becomes comfortable.

Simple 1x1 Twisted Rib

A common way to experiment with twisted rib is to replace the knit stitches in ordinary 1x1 ribbing with knit-through-the-back-loop stitches.

Simple twisted rib repeat:

*K1 tbl, P1; repeat from * across.

This produces twisted knit columns separated by ordinary purl stitches. Depending on the project, pattern, and desired appearance, other twisted-rib variations may twist both knit and purl stitches.

Twisted Rib vs. Regular Rib

Both techniques create vertical ribbing, but the finished fabrics are not identical.

Regular ribbing generally produces a soft, highly elastic fabric. It is the familiar choice for sweater cuffs, hems, neckbands, socks, and hats.

Twisted ribbing tends to create tighter-looking, more defined stitch columns. Because twisting changes the structure of the stitches, however, the fabric can behave differently from ordinary ribbing.

For that reason, twisted rib is not automatically a replacement for every ribbed section. The best choice depends on the look, stretch, and structure you want for the project.

Where Can You Use Twisted Rib?

Twisted rib can be an attractive choice anywhere you want a neat, structured ribbed edge, including:

  • Sweater cuffs
  • Sweater hems
  • Cardigan bands
  • Hat brims
  • Sock cuffs
  • Neckbands
  • Mittens
  • Decorative knitted panels

More Ways to Make Ribbing Look Neater

Twisted stitches are not the only solution for uneven ribbing. If your regular rib stitch still looks loose or irregular, try these simple adjustments:

  • Watch the knit-to-purl transition. Avoid leaving excess slack when moving the yarn.
  • Keep your tension consistent. Uneven knit and purl tension can exaggerate irregular columns.
  • Try smaller needles. Many patterns already use a smaller needle for ribbed cuffs and hems.
  • Experiment with your yarn. Fiber, twist, and elasticity can affect stitch definition.
  • Make a swatch. Compare regular and twisted rib before committing to an entire garment.

Should You Always Use Twisted Rib?

Not necessarily.

Twisting stitches changes more than their appearance. It can also change the elasticity, density, and overall behavior of the fabric.

If a knitting pattern specifically calls for ordinary ribbing, consider making a small swatch before substituting twisted rib. This is particularly important for fitted cuffs, necklines, socks, and other areas where stretch matters.

Practice Before Using It in a Project

The easiest way to understand the difference is to make two small swatches using the same yarn and needles.

Knit one in ordinary 1x1 rib and the other in twisted 1x1 rib. Compare the stitch definition, width, stretch, and overall appearance.

This simple experiment will show you whether twisted rib gives you the result you want for your next project.

Original Tutorial Inspiration

This Amazing Knitting article was originally published after discovering a twisted-rib tutorial from Button and Blue. The original photographs on this page are credited to Button and Blue.

The original external tutorial may no longer be consistently available online, so this page has been expanded with an independent Amazing Knitting explanation of the technique rather than reproducing the original author's tutorial.

More Knitting Stitch Tutorials

Continue learning with more knitting stitch tutorials, rib stitch ideas, and knitting stitches from the Amazing Knitting archive.

Diagonal Rib Stitch - Easy Reversible Knitting Guide

Diagonal Rib Knit Stitch - Free Pattern
Photos above © Studio Knit

Diagonal Rib Stitch is an easy knit-and-purl texture that creates the look of slanting ribs without cables or complicated techniques.

It is reversible, lies relatively flat, and is a useful stitch to know for scarves, blankets, cushions and other projects where both sides may be visible.

Educational Stitch Guide

Diagonal Rib is a knitting stitch rather than a complete project pattern. It uses only knit and purl stitches to create its distinctive diagonal texture.

What Is Diagonal Rib Stitch?

Think of ordinary ribbing, but instead of keeping the knit and purl columns perfectly vertical, their positions gradually shift across the fabric.

That simple change produces the diagonal lines visible in the swatch above. It looks more complicated than it actually is — no cable needle is required.

Stitch at a Glance

Difficulty: Easy

Techniques: Knit and purl

Repeat: 8 rows

Stitch Multiple: Multiple of 4

Reversible: Yes

Good For: Scarves, blankets, cushions and textured panels

Why Try This Stitch?

Diagonal Rib is a good next step if you already know how to knit and purl but want a fabric with more visual interest than standard ribbing.

The shifting knit-and-purl sections create depth and movement while keeping the technique beginner-friendly.

Learn the Diagonal Rib Stitch

Kristen McDonnell at Studio Knit provides a complete tutorial with written instructions, photographs, a knitting chart and video guidance.

Learn the Diagonal Rib Stitch →

More Knitting Stitches

Editorial note: This page is an independent Amazing Knitting stitch guide. The complete Studio Knit tutorial, photographs and instructional materials belong to their respective creator. We link to the original tutorial rather than reproducing it.

Lattice with Seed Stitch - Knitting Stitch Guide

Lattice with Seed Stitch - Free Pattern
Photos above © mgb

Lattice with Seed Stitch is a beautiful textured knitting pattern that combines the appearance of broad woven bands with a background of small seed-stitch texture.

Although the finished fabric can look surprisingly complex, the underlying idea is created primarily with basic knit and purl stitches.

This Amazing Knitting guide explains how the texture is constructed, how to recognize the different sections, where it works best, and what to watch for when using it in your own knitting projects.

About This Stitch Guide

Lattice with Seed Stitch is a textured knit-and-purl stitch concept rather than one specific garment pattern. Different stitch references may arrange or begin the repeat differently, so always follow one complete version consistently when knitting a project.

Lattice with Seed Stitch at a Glance

Type: Textured knitting stitch

Main Techniques: Knit and purl

Visual Style: Lattice / basketweave over seed-stitch texture

Common Repeat: 18-row texture sequence

Common Flat-Knitting Multiple: Multiple of 14 + 2 stitches

Skill Level: Advanced beginner / confident beginner

Good For: Blankets, scarves, cushions, panels and home accessories

What Is Lattice with Seed Stitch?

Lattice with Seed Stitch is a textured knitting pattern that creates the illusion of broad strips passing over and under one another.

Between these larger visual bands is a smaller, pebbled texture similar to seed stitch.

Together, these elements create a fabric that can resemble woven basketry even though the effect is produced with ordinary knitting stitches rather than actual weaving.

It Looks More Complicated Than It Is

One of the most appealing things about this texture is the difference between its appearance and its underlying technique.

At first glance, the broad lattice sections can look like cables or crossed stitches.

In common versions of the stitch, however, the effect is created mainly by carefully arranging knit and purl stitches.

This makes it an interesting next step for someone who already knows the basic stitches but wants to create a more sophisticated-looking fabric.

Understanding the Three Textures

It helps to stop thinking of the design as one complicated pattern and instead look for the simpler textures inside it.

1. Seed-Stitch Areas

The small alternating knit-and-purl sections create the pebbled background.

Seed-style texture visually separates the larger bands and gives the fabric additional depth.

2. Smooth Vertical Sections

Columns of smoother stitches help form part of the apparent lattice.

Because smooth stockinette-style areas reflect light differently from seed stitch, they appear to sit above or apart from the background.

3. Horizontal Ridges

Horizontal garter-like sections interrupt the vertical areas.

When these sections alternate across successive repeats, the eye begins to interpret them as strips weaving over and under each other.

Why It Resembles Basketweave

Basketweave knitting does not require actual strands to cross one another.

Instead, contrasting knit-and-purl surfaces create blocks that appear to change direction.

Lattice with Seed Stitch takes that visual idea further by combining the larger woven-looking structure with a finer seed-textured background.

No Cable Needle Is Required

Despite the interlaced appearance, common versions of this stitch do not require traditional cable crossings.

That means you can achieve a surprisingly architectural texture using skills you may already know.

The Repeat Structure

Widely published versions of Lattice with Seed Stitch use an 18-row repeat.

For flat knitting, a commonly published setup is:

Multiple of 14 stitches + 2

The additional stitches help frame the repeating lattice units when the fabric is worked flat.

Why We Are Not Reprinting 18 Rows Here

A Note About Stitch Variations

Published references do not all begin and arrange the 18-row sequence in exactly the same way. Rather than mixing instructions from several tutorials, choose one complete version and follow it consistently from beginning to end.

This is especially important when comparing online stitch dictionaries.

Two instructions may create essentially the same visual texture while numbering the beginning of the repeat differently.

Mixing the first half of one version with the second half of another can destroy the alignment of the lattice.

Is Lattice with Seed Stitch Reversible?

Treat this as a right-side texture.

The decorative lattice effect is intended to be viewed from the front, while the reverse side has a different appearance.

This does not prevent you from using it in scarves or blankets, but it is worth considering when both sides of a finished project will be visible.

What Yarn Works Best?

This stitch is not tied to one specific yarn weight.

You can experiment with different yarns as long as you use needles appropriate for the yarn and create a fabric with enough definition to display the texture.

Smooth yarns usually make the lattice easier to see.

Solid Colors Show the Texture Clearly

If the lattice effect is the main feature of your project, a solid or gently tonal yarn is often a good choice.

The shadows created by knit and purl stitches become part of the design.

Highly variegated yarn can still be attractive, but strong color changes may compete visually with the stitch texture.

Choose Needles for the Fabric You Want

There is no single universal needle size for Lattice with Seed Stitch.

Choose a needle appropriate for your yarn, then make a swatch.

If the fabric is too loose, the woven-looking structure may become less distinct.

If it is too tight, the fabric can become stiff and the knitting may be uncomfortable to work.

Swatching Is Especially Useful

A swatch lets you evaluate more than gauge.

Before committing to a large project, check:

  • How clearly the lattice appears
  • Whether the seed texture is visible
  • How much the fabric curls or lies flat
  • The drape
  • The appearance of the wrong side
  • How the yarn behaves after washing or blocking

Keep Track of the 18-Row Repeat

The individual stitches are straightforward, but an 18-row sequence is long enough to lose your place.

A row counter can make this stitch much easier to manage.

You can also keep a printed or handwritten repeat beside your work and mark each completed row.

Learn to Read the Fabric

As the pattern develops, try to identify the lattice sections visually instead of relying only on the row number.

Ask yourself whether the next section should continue a vertical band, create a horizontal interruption, or return to the seeded background.

Learning to read the fabric makes mistakes easier to spot before they continue through several rows.

Watch Your Knit-to-Purl Transitions

Because this texture frequently switches between knit and purl stitches, pay attention to the position of the working yarn.

Move the yarn between the needle tips when changing from knit to purl or purl to knit.

Accidentally taking the yarn over the needle can create an unwanted extra stitch.

Seed Stitch Can Reveal Tension Differences

Alternating knit and purl stitches can make uneven tension more visible than plain stockinette.

Try to keep your movements relaxed and consistent.

With practice, the small irregularities often become less noticeable, especially after appropriate blocking.

Good Projects for Lattice with Seed Stitch

This texture works particularly well when you want the knitted fabric itself to be the main decorative feature.

  • Blankets and throws
  • Cushion and pillow fronts
  • Scarves
  • Home-decor panels
  • Bag panels
  • Sampler blankets
  • Textured garment panels

Using It for a Blanket

A blanket gives the lattice enough space to repeat several times across the fabric.

Before casting on a full-size blanket, knit a repeat swatch and measure its width after washing.

You can then use that measurement to estimate how many repeats are needed for your desired blanket width.

Using It for a Pillow

A cushion front is an excellent smaller project for experimenting with this texture.

The right side remains visible most of the time, so the non-reversible nature of the stitch is less important.

A simple stockinette or fabric back can keep the lattice as the main decorative feature.

Using It for a Scarf

Lattice with Seed Stitch can create an attractive textured scarf, but remember that the two sides look different.

If you want an identical appearance on both sides, choose a truly reversible stitch instead.

If you are happy with a decorative front and different reverse, the lattice can make a striking scarf fabric.

Is This a Beginner Stitch?

The individual techniques are beginner-friendly because the texture is based primarily on knit and purl stitches.

However, keeping track of a longer repeat requires more concentration than basic garter, stockinette or seed stitch.

For that reason, it is a particularly good project for a confident beginner or advanced beginner.

Skills to Know First

  • Casting on
  • Knit stitch
  • Purl stitch
  • Moving yarn correctly between knit and purl
  • Reading repeated instructions
  • Counting stitches
  • Binding off

Practice on a Small Swatch

There is no need to begin with an entire blanket.

Cast on enough stitches for a few repeats and work until you can clearly see the lattice forming.

A practice swatch gives you a chance to understand the structure before committing yarn to a larger project.

Blocking the Finished Texture

Gentle blocking can help even out the seed-stitch background and make the larger lattice sections look more consistent.

Always use a blocking method appropriate for the fiber content of your yarn.

Avoid overstretching the swatch, because excessive stretching can flatten the raised texture that gives the pattern its character.

Learn the Lattice Seed Stitch

For a complete current demonstration of this stitch, Studio Knit provides both written guidance and a video tutorial for flat knitting and knitting in the round.

View the Lattice Seed Stitch Tutorial →

More Knitting Stitches on Amazing Knitting

Explore More Stitch Tutorials

Before You Begin

Choose a smooth yarn that lets you see the texture clearly and make a small swatch before planning a larger project.

Keep track of your repeat carefully, pay particular attention when moving between knit and purl stitches, and periodically step back to check that the lattice sections remain aligned.

Most importantly, remember that online stitch references may begin the sequence at different points. Follow one complete version consistently rather than combining rows from several tutorials.

Editorial note: This Amazing Knitting page is an educational guide to the Lattice with Seed Stitch texture. Stitch dictionaries and tutorials may present variations or different starting points for similar lattice textures. Always follow the instructions for the specific version you choose.

Discover More From the Archive

A fresh mix of knitting patterns and tutorials from the Amazing Knitting archive.

Finding patterns from the archive…