Skip to content

...

Showing posts sorted by relevance for query knitting stitch. Sort by date Show all posts

Knit Barfi Stitch – Easy Diamond Stitch Tutorial

Knit Barfi Stitch diamond knitting stitch tutorial
Photo © Knit with Suman

The Knit Barfi Stitch is an eye-catching textured knitting stitch with a repeating diamond or rhombus-like appearance. Its geometric surface can add strong visual interest even when worked in a single yarn color.

This stitch can be a beautiful choice for projects such as blankets, scarves, cushion covers, wraps and decorative knitted panels. The original tutorial linked below demonstrates how the stitch is worked.

What Is the Barfi Stitch?

Barfi Stitch is a decorative knitting stitch distinguished by repeating geometric shapes across the fabric. The finished texture creates diamond-like sections that stand out clearly against the surrounding stitches.

Because the design itself provides the visual detail, it can work well in a solid color where the texture remains the main feature of the finished project.

What Does the Barfi Stitch Look Like?

The stitch produces a structured surface made up of repeating diamond or rhombus motifs. These motifs create a decorative all-over pattern rather than a plain stockinette fabric.

Choosing a smooth yarn with good stitch definition can make the geometric texture easier to see. Very fuzzy yarns may soften or hide some of the detail.

Projects You Can Make With Barfi Stitch

A textured stitch like Barfi can be adapted to many rectangular or repeating-pattern knitting projects.

Blankets: Use the repeating texture for baby blankets, throws or larger afghans.

Scarves: A solid-color scarf can showcase the diamond pattern clearly.

Cushion Covers: The structured surface can create an attractive decorative panel.

Wraps and Shawls: Use the motif as an all-over textured fabric or a feature section.

Garment Panels: The stitch can also provide decorative texture in suitable sweater or cardigan designs.

Choosing Yarn for a Textured Knitting Stitch

For a stitch pattern with strong geometric detail, a smooth yarn is usually useful because it allows individual stitches and raised areas to remain visible.

Light and medium shades can make shadows within the texture easier to see, while darker yarns can produce a more subtle effect.

Before using Barfi Stitch in a large project, knit a small swatch with your chosen yarn and needles. This lets you check the appearance, drape and width of the repeating pattern before committing to a larger piece.

Tips Before You Start

Watch the complete stitch repeat before beginning so you can see how the geometric sections develop. Keeping an even tension is particularly helpful with textured stitches because uneven tension can distort the repeated shapes.

If you plan to incorporate the stitch into your own blanket, scarf or garment, first determine the stitch-repeat requirements shown in the original tutorial and make a gauge swatch.

A row counter or simple notes can also be useful when working repeated textured sections, especially on larger projects.

Watch the Knit Barfi Stitch Tutorial

The original video tutorial featured on this page is from Knit with Suman. Use the button below to watch the demonstration and follow the stitch construction directly from the source.

Amazing Knitting provides an editorial introduction to the stitch and directs readers to the original tutorial rather than reproducing the complete row-by-row instructions.

Easy Knitting Projects for Beginners - Where to Start

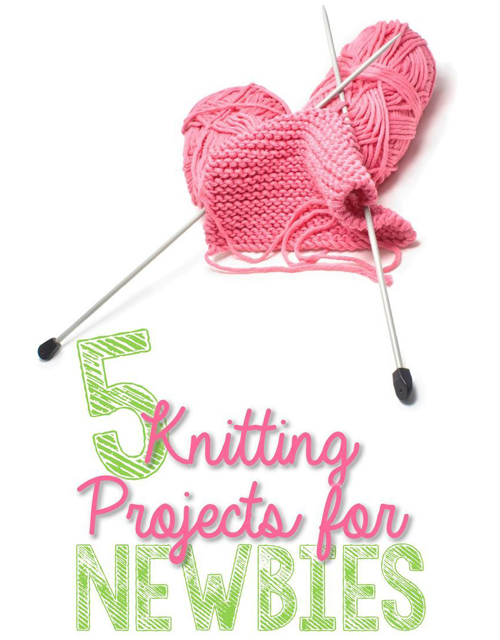
Knitting Projects for Newbies
Photo above © You put it up

Looking for your first knitting project can be more confusing than learning the knit stitch itself.

Hundreds of patterns are described as "easy" or "beginner friendly," but not every easy-looking project is suitable for someone who has only just picked up knitting needles.

A good first project should help you practice a small number of skills, give you visible progress, and be forgiving enough that a few uneven stitches do not ruin the finished result.

This guide will help you choose beginner knitting projects in a sensible order — from simple rectangular pieces to hats, baby projects, lace and your first sweater.

Beginner Knitting Guide

This page is an independent Amazing Knitting learning resource rather than one specific knitting pattern. Use it to choose a project that matches the skills you already know and the skill you want to learn next.

What Makes a Good First Knitting Project?

The best beginner project is not necessarily the smallest or the simplest-looking project.

A useful first project usually has several of these characteristics:

  • A manageable number of stitches
  • Little or no complicated shaping
  • A short repeating stitch pattern
  • Yarn that is easy to see and handle
  • Enough repetition to build muscle memory
  • A finished item you actually want to use

Your first few projects should gradually introduce new techniques rather than requiring you to learn everything at once.

Skills to Learn Before Your First Project

You do not need to know dozens of knitting techniques before starting.

For a very simple first project, focus on:

  • Making a slip knot
  • Casting on stitches
  • The knit stitch
  • Keeping stitches on the needle
  • Binding off
  • Weaving in yarn ends

Once those movements feel comfortable, add the purl stitch, decreases, increases and circular knitting one project at a time.

1. Start with a Garter Stitch Scarf

A garter stitch scarf remains one of the most practical first knitting projects.

When worked flat, you can create garter stitch simply by knitting every row.

That gives you time to practice:

  • Holding the needles
  • Controlling yarn tension
  • Recognizing stitches
  • Turning your work
  • Binding off

The shape is just a rectangle, so there is no garment fitting or complex shaping to worry about.

Why a Scarf Is Useful for Learning

Repetition is one of the fastest ways to make the basic knitting movement feel natural.

A scarf gives you hundreds of opportunities to repeat the same motion while still producing something useful.

The main disadvantage is that a full-length scarf can take time, so a small headband or cowl may be more motivating if you prefer quick projects.

2. Try a Dishcloth or Washcloth

A knitted washcloth is a good alternative when you want a project that finishes quickly.

It gives you a small square where you can practice basic stitches without worrying about exact garment fit.

Cotton yarn is commonly chosen for washable household cloths.

Once you know the knit stitch, a washcloth can also become your practice space for:

  • Purl stitches
  • Seed stitch
  • Ribbing
  • Simple eyelets
  • Textured stitch patterns

3. Knit a Simple Cowl

A cowl can feel more like a finished wearable than a practice square while still remaining relatively simple.

Some beginner cowls are worked flat as rectangles and seamed at the end. Others introduce circular needles and knitting in the round.

Choose the flat version first if circular knitting is still unfamiliar.

4. Try an Easy Baby Blanket

A baby blanket can be an excellent first larger project because it does not require body measurements or garment shaping.

Simple blanket patterns often repeat the same stitches across many rows, allowing you to improve consistency.

The main consideration is commitment: even a baby blanket contains many more stitches than a washcloth or headband.

Free Beginner Blanket Idea: Waffle Blanket

Once you are comfortable maintaining a repeating texture, explore the free Waffle Blanket pattern in the Amazing Knitting archive.

Explore the Waffle Blanket →

5. Move On to a Simple Hat

A basic hat introduces one important new idea: shaping.

Many hats gradually decrease stitches near the crown.

Depending on the pattern, a hat may be:

  • Worked flat and seamed
  • Worked in the round on circular needles
  • Finished with double-pointed needles or another small-circumference method

If you are completely new, a flat-knit hat may feel easier.

6. Try a Textured Scarf

After plain garter stitch feels comfortable, a textured scarf is a good way to learn something new without adding garment shaping.

You can practice new stitches while keeping the overall project shape extremely simple.

Free Next-Step Project: Morning Surf Scarf

Morning Surf Scarf is a verified free pattern already available in the Amazing Knitting archive.

It is a useful option when you are ready to move from plain knitting into a more decorative fabric.

View Morning Surf Scarf →

7. Learn Your First Lace Pattern

Lace does not have to mean an enormous, complicated shawl.

A small lace scarf is a much friendlier introduction because the stitch count is limited and the overall shape remains rectangular.

Before starting, become comfortable with:

  • Yarn overs
  • Basic decreases
  • Counting stitches
  • Reading repeat instructions

Free Beginner Lace Project: Little Leaf Lace Scarf

Little Leaf Lace Scarf by Sivia Harding is a particularly useful bridge into lace knitting because it combines a straightforward scarf shape with a repeating leaf motif.

Explore Little Leaf Lace Scarf →

8. Try Your First Triangle Shawl

A triangular shawl introduces increases and teaches you how knitted shaping develops row by row.

The project can look sophisticated even when the basic construction is relatively logical.

Free Shawl Idea: June Bunnies Shawl

June Bunnies Shawl is a customizable top-down triangular shawl and is especially useful when you are ready to explore simple lace.

Explore June Bunnies Shawl →

9. Try a Baby Cardigan

A baby cardigan can be a practical introduction to garment knitting because the project is much smaller than an adult sweater.

It may introduce:

  • Garment sizing
  • Increasing
  • Sleeves
  • Button bands
  • Reading a multi-size pattern

A top-down construction can be particularly attractive because you can see the garment shape develop as you work.

Free Baby Cardigan: Fuss Free Baby Cardigan

Louise Tilbrook's Fuss Free Baby Cardigan is a free DK-weight pattern with a top-down raglan construction and is a useful next step once your basic knitting feels secure.

Explore Fuss Free Baby Cardigan →

10. Knit Your First Simple Sweater

You do not need to wait years before making a sweater.

The important thing is to choose a design whose construction matches the skills you already have.

Look for patterns with:

  • Simple shapes
  • Clear sizing
  • Minimal complicated stitch work
  • Good construction notes
  • Few finishing steps

Free First-Sweater Idea: French Macaroon

French Macaroon by The Noble Thread is a small garter-stitch children's pullover with a simple boat-neck shape and uncomplicated construction.

It can be a useful way to understand how knitted pieces become a garment without beginning with a large adult sweater.

Explore French Macaroon →

A Simple Beginner Project Progression

A practical learning path:

1. Garter-stitch square or washcloth

2. Simple scarf or headband

3. Textured scarf or cowl

4. Simple blanket

5. Hat with basic shaping

6. Lace scarf or shawl

7. Baby cardigan

8. Simple sweater

This is not a rule. If one particular project excites you, motivation can be more valuable than following a perfect sequence.

What Yarn Is Easiest for Beginners?

A smooth, medium-weight yarn is often easier to learn with than extremely thin, fuzzy or novelty yarn.

You want to be able to see individual stitches clearly so that you can recognize mistakes.

Avoid choosing yarn only because it looks beautiful in the skein.

For your first project, ease of handling is usually more useful than an unusual texture.

Light Colors Can Be Easier to Read

Very dark yarn can make it difficult to see where one stitch ends and the next begins.

A light or medium color can make the structure clearer while you are learning.

Once you can recognize stitches easily, yarn color becomes much less important.

Don't Begin with Extremely Fuzzy Yarn

Mohair-like or heavily textured yarns can hide stitches.

They can also be difficult to unravel when you need to correct an error.

Save highly fuzzy yarn for a later project unless you are already comfortable identifying stitches by touch.

What Needles Should a Beginner Use?

Choose the needle size required by the pattern and appropriate for the yarn rather than buying one universal "beginner needle."

For practice knitting, medium-sized needles and medium-weight yarn can make the stitches easier to see and manipulate.

The important thing is that the needle should not make the fabric so tight that inserting the tip becomes difficult.

Wood or Metal Needles?

Both can work well.

Wooden or bamboo needles tend to offer more surface grip, which some new knitters find reassuring because stitches are less likely to slide away.

Smooth metal needles can feel faster once you become comfortable controlling the stitches.

There is no single correct material for every beginner.

Don't Choose a Project Only Because It Says "Easy"

Difficulty labels vary between designers.

Before starting, scan the skills required.

A project described as beginner-friendly may still require techniques such as:

  • Knitting in the round
  • Cables
  • Lace
  • Short rows
  • Picking up stitches
  • Seaming

None of these techniques is impossible for a beginner, but you should know what you are agreeing to learn.

Choose One New Skill at a Time

A particularly effective approach is to choose each new project because it adds one unfamiliar technique.

For example:

  • Project 1: knit stitch
  • Project 2: purl stitch
  • Project 3: ribbing
  • Project 4: decreases
  • Project 5: knitting in the round
  • Project 6: yarn overs and lace
  • Project 7: garment shaping

This prevents a single project from becoming a collection of ten new problems at once.

Make a Swatch When Size Matters

You can often practice freely on a scarf or washcloth.

But once you begin hats, sweaters, cardigans or fitted baby garments, gauge becomes much more important.

A gauge swatch tells you whether your personal knitting tension produces the dimensions expected by the pattern.

Learn How to Fix Mistakes

Becoming a confident knitter does not mean never making mistakes.

It means learning to recognize and repair them.

Useful early skills include:

  • Recognizing a dropped stitch
  • Unknitting stitches one at a time
  • Counting stitches
  • Checking pattern repeats
  • Using stitch markers
  • Using a lifeline in lace

Finish Your First Projects

A very simple finished project often teaches more than five ambitious projects abandoned halfway through.

Finishing teaches additional skills such as binding off, weaving in ends, seaming and blocking.

Choose something achievable enough that you are likely to reach that final stage.

Don't Worry About Perfect Tension

Your first rows may look different from your twentieth row.

That is normal while your hands are learning a completely new movement.

Concentrate on forming stitches consistently rather than trying to make your first project look machine-made.

More Beginner-Friendly Patterns on Amazing Knitting

Beginner Knitting Stitch Guides

When you want to practice new textures before using them in a full project, explore these Amazing Knitting stitch guides:

Explore More Easy Knitting Patterns

What Should You Knit First?

If you have never completed a project before, start with a small rectangle: a washcloth, headband or simple scarf.

If you already know knit and purl, choose a project that adds one new skill — perhaps ribbing, a simple decrease or a textured stitch.

If you can comfortably follow a basic pattern, move to a hat, shawl or baby cardigan.

The goal is not to remain a "beginner" until you know every technique. Each finished project should teach you enough to make the next project slightly more interesting.

Editorial note: This Amazing Knitting page is an independent beginner-knitting resource. It does not reproduce another publisher's pattern collection or copyrighted instructions. Individual project pages linked above identify and direct readers to their respective designers and authorized pattern sources. Please retain the photograph and original photo credit from the previous version of this page.

That Nice Stitch - Free Pattern

That Nice Stitch - Free Pattern
Photos above © stitchnerd

Looking for a simple but eye-catching free cowl knitting pattern? That Nice Stitch by Susan Ashcroft is a clever accessory pattern that uses an easy slipped-stitch texture to create a fabric that looks interesting on both sides.

The design was created especially to show off variegated yarns, which can sometimes be difficult to match with the right knitting pattern. The result is a lightweight, textured cowl that can be adjusted in length and adapted to different yarn weights.

That Nice Stitch Pattern at a Glance

Pattern: That Nice Stitch

Designer: Susan Ashcroft

Published by: Stitchnerd Designs

Craft: Knitting

Category: Cowl

Technique: Slipped-stitch texture

Suggested Needle Size: US 6 / 4.0 mm

Gauge: 22 stitches = 4 inches

Yardage: Approximately 219–437 yards (200–400 m)

Size: Length is easy to adjust

Pattern Availability: Free

About That Nice Stitch

That Nice Stitch is a cowl pattern designed by Susan Ashcroft of Stitchnerd Designs. The pattern grew from a request from the designer's mother, who wanted a cowl made with the same attractive stitch texture Susan had used in another design.

The finished fabric has a subtle woven-looking texture created with slipped stitches. One of the most appealing features of the pattern is that both sides of the fabric look attractive, making it particularly well suited to a cowl that naturally twists and folds while being worn.

A Great Pattern for Variegated Yarn

Variegated yarns can be beautiful in the skein but sometimes difficult to pair with complicated stitch patterns. That Nice Stitch was designed specifically to make the most of those changing colors.

The slipped-stitch texture adds visual interest without competing too strongly with the color changes in the yarn. This makes the pattern an appealing option for hand-dyed, multicolored, and other variegated yarns.

Yarn and Yardage

The original version was made using sock-style yarn, with the designer suggesting yarns such as Malabrigo Sock and Malabrigo Arroyo.

The published yardage range is approximately:

219–437 yards (200–400 meters)

The exact amount you need will depend on your yarn choice and how long or wide you decide to make the cowl.

Needles and Gauge

The pattern lists US 6 / 4.0 mm needles and a published gauge of:

22 stitches = 4 inches

If you substitute a different yarn weight, your gauge and finished measurements will change. Check the designer's original notes before choosing yarn and needles.

Adjustable Length and Size

One of the useful features of this pattern is its flexibility. The length can be adjusted, so you can make a shorter single-loop cowl or a longer version that can be wrapped around the neck more than once.

The original sample was designed as a relatively slim double-loop accessory, but the pattern also includes guidance for adapting the project to different yarn weights and finished sizes.

Skills Used in This Pattern

That Nice Stitch uses a relatively simple textured knitting technique, but the complete cowl also introduces a few useful finishing skills.

  • Slipped stitches
  • Working a repeating texture pattern
  • Provisional cast-on
  • Grafting / Kitchener stitch

The stitch pattern itself is described by the designer as easy to knit. The finishing techniques help create a continuous-looking cowl with an attractive result on both sides.

Why This Pattern Has Stayed Popular

That Nice Stitch combines several qualities knitters often look for in an accessory: a memorable texture, simple repetitive knitting, flexible sizing, and the ability to showcase colorful yarn.

It is also a practical project when you have a special skein of variegated yarn and want the yarn itself to remain the focus of the finished piece.

Is That Nice Stitch Free?

Yes. That Nice Stitch by Susan Ashcroft is currently available as a free Ravelry download.

The pattern and knitting instructions remain the copyrighted work of Susan Ashcroft. Amazing Knitting does not reproduce the pattern instructions here.

Get the Free That Nice Stitch Pattern

Visit the designer's original Ravelry page to download the pattern and view the complete instructions, sizing guidance, yarn information, and any updates.

Get the Free That Nice Stitch Pattern →

Pattern credit: That Nice Stitch was designed by Susan Ashcroft and published through Stitchnerd Designs. Pattern availability and technical details are controlled by the designer and may change over time.

More Knitting Stitch and Cowl Inspiration

If you enjoy textured knitting, explore more knitting stitch patterns and free cowl knitting patterns from the Amazing Knitting archive.

Before You Start

Check the original pattern page before choosing your yarn so you can confirm the latest yarn suggestions, gauge, finishing instructions, and pattern updates.

5 Easy Ways to Make Neater Knitting Edges

Five Genius Knitting Edges You'll Definitely Want to Get to Know Better
Photo above © bluprint

Neat knitting edges can make a simple project look much more polished. The best selvedge depends on whether the edge will stay visible, be seamed later, or be used for picking up stitches.

Here are five useful knitting edges to try, with links to detailed tutorials for each technique.

1. Basic Slip-Stitch Selvedge

A slipped-stitch selvedge creates a clean, chain-like line along the side of the fabric. It is a useful choice when the edge will remain visible, such as on scarves, shawls and open-front pieces.

The basic idea is to slip an edge stitch instead of working it on every row, producing a smoother and more defined side edge.

Learn the Basic Slip-Stitch Selvedge →

2. German Slip-Stitch Selvedge

The German slip-stitch selvedge creates a similarly tidy edge, but the slipped stitch is worked at the end of the row rather than at the beginning.

This small change produces a distinctive edge and is worth trying if you want an alternative to the more familiar slipped-first-stitch method.

Learn the German Slip-Stitch Selvedge →

3. Garter Stitch Selvedge

A garter stitch selvedge is one of the simplest ways to create a stable edge.

It works especially well beside textured stitch patterns such as garter stitch, seed stitch and moss stitch, and it can also provide a useful edge when stitches will later be picked up.

Learn the Garter Stitch Selvedge →

4. Chain Selvedge

The chain selvedge creates a decorative row of elongated stitches along the side of the knitting.

It is especially attractive on scarves, shawls and other projects where the edge remains visible. It can also be useful when picking up stitches for a border.

It is not always the best choice for a seam, however, because the larger edge stitches can create a looser join.

Learn the Chain Selvedge at Interweave →

5. Reverse Garter Stitch Selvedge

Reverse garter stitch is a simple variation of the regular garter selvedge.

Instead of knitting the edge stitches, the edge is formed with purl stitches. The result behaves in a similar way while giving the edge a slightly different texture.

This is a useful option when a purl-textured edge blends more naturally with the stitch pattern in the rest of your project.

Learn the Reverse Garter Selvedge →

Which edge should you choose? Use a decorative chain or slipped-stitch edge when the side will remain visible. For edges that will be seamed or used to pick up stitches, consider a firmer selvedge that makes the next construction step easier.

More Knitting Tips

Editorial note: This Amazing Knitting guide introduces several common selvedge techniques and links to external educational tutorials for further instruction. Different knitting traditions may use slightly different variations of the same edge.

How to Start Knitting - 5 Easy Steps for Beginners

How to Knit: Get Started Knitting
Photo above © Faithful Provisions - Kelly Hancock

Want to learn how to knit but don't know where to begin? You only need a few basic skills to get started.

Follow these five beginner steps in order, and use the linked tutorials whenever you need a closer look at a technique.

What You Need to Start Knitting

You don't need a large collection of supplies for your first practice piece. Start with:

  • A pair of knitting needles
  • A ball of yarn
  • Scissors
  • A yarn needle for finishing

For your first practice swatch, choose a yarn that is easy to see and comfortable to handle rather than a very fuzzy or highly textured yarn.

1. Make a Slip Knot

A slip knot is a simple way to place your first loop of yarn onto the knitting needle.

Once you can make one comfortably, you're ready to cast on the rest of your stitches.

Learn How to Make a Slip Knot →

2. Cast On Your Stitches

Casting on creates the first set of stitches on your needle and forms the starting edge of your knitting.

There are many cast-on methods, so don't worry about learning them all at once. Begin with one simple method and practice until it feels comfortable.

Learn How to Cast On →

3. Learn the Knit Stitch

The knit stitch is the most important basic knitting stitch to learn.

If you knit every row of a flat piece, you create garter stitch — one of the easiest fabrics for a beginner to practice.

Learn the Knit Stitch →

4. Learn the Purl Stitch

Purl is the second fundamental knitting stitch.

Once you understand both knit and purl stitches, you can begin creating many familiar stitch patterns, including stockinette, ribbing, seed stitch and more.

Learn the Purl Stitch →

5. Bind Off

When your knitting reaches the desired length, binding off secures the final row and allows you to remove the finished piece from the needles.

Try not to bind off too tightly, as this can make the finished edge noticeably narrower than the rest of your knitting.

Learn How to Bind Off →

Your first practice project: Cast on a small number of stitches, knit every row until you have a small square, then bind off. Don't worry about perfect tension yet — the goal is simply to become comfortable making stitches.

Ready for Your First Knitting Project?

Once you can cast on, make the knit stitch and bind off, you already have enough skills to try a simple garter-stitch project.

After that, learn the purl stitch and gradually explore ribbing, stockinette and other easy stitch patterns.

More Beginner Knitting Help

Editorial note: This is an original Amazing Knitting beginner guide. The external links above lead to additional educational tutorials for individual knitting techniques.

How To Make Rib Stitch Neater - Tutorial

How To Make Rib Stitch Neater - Tutorial
Photos above © Button and Blue

Does your knitting ribbing sometimes look loose, uneven, or less defined than you would like? One simple technique worth trying is twisted rib stitch.

Twisted rib is a variation of ordinary ribbing in which selected stitches are worked through the back loop. This small change twists the stitch and can create sharper, more clearly defined columns — especially around cuffs, sweater hems, neckbands, and hat brims.

Twisted Rib Stitch at a Glance

Technique: Twisted Rib Stitch

Craft: Knitting

Skill Level: Beginner / Easy

Based on: Knit and purl ribbing

Main Technique: Working stitches through the back loop

Best For: Cuffs, hems, neckbands and hat brims

Result: Firm, clearly defined rib columns

Why Does Regular Ribbing Sometimes Look Uneven?

Ribbing looks simple because it is built from basic knit and purl stitches, but achieving perfectly even rib columns can take practice.

One common trouble spot occurs when the working yarn moves between a knit stitch and a purl stitch. That transition can introduce a little extra yarn between stitches, making one side of a rib column appear looser than the other.

Differences between your knit and purl tension can make the effect even more noticeable, particularly in 1x1 and 2x2 ribbing.

What Is Twisted Rib Stitch?

Twisted rib is a variation of standard ribbing. Instead of working every stitch in the usual way, one or more stitches are worked through the back loop.

Working through the back loop changes the orientation of the stitch and creates the characteristic twisted appearance.

On the finished fabric, the knit columns can look narrower and more sharply defined than they do in ordinary ribbing.

How to Knit a Twisted Knit Stitch

The abbreviation ktbl means knit through the back loop.

  1. Keep the working yarn behind your knitting.
  2. Insert the right needle into the back of the next stitch on the left needle.
  3. Wrap the working yarn around the right needle.
  4. Pull the new loop through the stitch.
  5. Slide the old stitch off the left needle.

Unlike an ordinary knit stitch, working through the back loop twists the base of the stitch.

How to Purl Through the Back Loop

You may also encounter the abbreviation ptbl, meaning purl through the back loop.

  1. Bring the working yarn to the front.
  2. Approach the back loop of the next stitch with the right needle.
  3. Wrap the yarn as required for a purl stitch.
  4. Draw the new loop through.
  5. Slide the completed stitch from the left needle.

Purling through the back loop can feel awkward at first. Work slowly until the needle movement becomes comfortable.

Simple 1x1 Twisted Rib

A common way to experiment with twisted rib is to replace the knit stitches in ordinary 1x1 ribbing with knit-through-the-back-loop stitches.

Simple twisted rib repeat:

*K1 tbl, P1; repeat from * across.

This produces twisted knit columns separated by ordinary purl stitches. Depending on the project, pattern, and desired appearance, other twisted-rib variations may twist both knit and purl stitches.

Twisted Rib vs. Regular Rib

Both techniques create vertical ribbing, but the finished fabrics are not identical.

Regular ribbing generally produces a soft, highly elastic fabric. It is the familiar choice for sweater cuffs, hems, neckbands, socks, and hats.

Twisted ribbing tends to create tighter-looking, more defined stitch columns. Because twisting changes the structure of the stitches, however, the fabric can behave differently from ordinary ribbing.

For that reason, twisted rib is not automatically a replacement for every ribbed section. The best choice depends on the look, stretch, and structure you want for the project.

Where Can You Use Twisted Rib?

Twisted rib can be an attractive choice anywhere you want a neat, structured ribbed edge, including:

  • Sweater cuffs
  • Sweater hems
  • Cardigan bands
  • Hat brims
  • Sock cuffs
  • Neckbands
  • Mittens
  • Decorative knitted panels

More Ways to Make Ribbing Look Neater

Twisted stitches are not the only solution for uneven ribbing. If your regular rib stitch still looks loose or irregular, try these simple adjustments:

  • Watch the knit-to-purl transition. Avoid leaving excess slack when moving the yarn.
  • Keep your tension consistent. Uneven knit and purl tension can exaggerate irregular columns.
  • Try smaller needles. Many patterns already use a smaller needle for ribbed cuffs and hems.
  • Experiment with your yarn. Fiber, twist, and elasticity can affect stitch definition.
  • Make a swatch. Compare regular and twisted rib before committing to an entire garment.

Should You Always Use Twisted Rib?

Not necessarily.

Twisting stitches changes more than their appearance. It can also change the elasticity, density, and overall behavior of the fabric.

If a knitting pattern specifically calls for ordinary ribbing, consider making a small swatch before substituting twisted rib. This is particularly important for fitted cuffs, necklines, socks, and other areas where stretch matters.

Practice Before Using It in a Project

The easiest way to understand the difference is to make two small swatches using the same yarn and needles.

Knit one in ordinary 1x1 rib and the other in twisted 1x1 rib. Compare the stitch definition, width, stretch, and overall appearance.

This simple experiment will show you whether twisted rib gives you the result you want for your next project.

Original Tutorial Inspiration

This Amazing Knitting article was originally published after discovering a twisted-rib tutorial from Button and Blue. The original photographs on this page are credited to Button and Blue.

The original external tutorial may no longer be consistently available online, so this page has been expanded with an independent Amazing Knitting explanation of the technique rather than reproducing the original author's tutorial.

More Knitting Stitch Tutorials

Continue learning with more knitting stitch tutorials, rib stitch ideas, and knitting stitches from the Amazing Knitting archive.

Double Seed Stitch Blanket – Free Easy Blanket Knitting Pattern

Double Seed Stitch Blanket free easy textured blanket knitting pattern by Purl Soho

Double Seed Stitch Blanket. Photo © Purl Soho

The Double Seed Stitch Blanket by Purl Soho is a wonderfully simple free blanket knitting pattern that turns basic knit and purl stitches into a rich, nubbly texture.

Originally designed in cozy bulky-weight merino, this reversible blanket is available in five sizes from Baby to Queen. The straightforward repeating stitch pattern makes it a relaxing project while still producing a beautifully textured finished blanket.

Best of all, the original pattern is still available free from Purl Soho.

Double Seed Stitch Blanket Pattern Details

  • Designer: Purl Soho
  • Originally published: January 2013
  • Craft: Knitting
  • Category: Baby blanket, throw and bed blanket
  • Pattern availability: Free
  • Yarn weight: Bulky
  • Original yarn: Purl Soho Super Soft Merino
  • Needles: US 13 (9 mm) circular needles
  • Gauge: 11 stitches = 4 inches in Double Seed Stitch
  • Construction: One-piece rectangle worked flat
  • Stitch pattern: Double Seed Stitch
  • Texture: Reversible
  • Sizes: Baby, Crib, Throw, Twin and Queen

Five Blanket Sizes

One of the most useful features of the original Double Seed Stitch Blanket pattern is its wide range of sizes.

The approximate finished dimensions are:

  • Baby: 28 × 30 inches
  • Crib: 45 × 60 inches
  • Throw: 60 × 60 inches
  • Twin: 66 × 90 inches
  • Queen: 90 × 95 inches

This means you can use the same basic design for anything from a small baby blanket to a substantial bed-sized blanket.

What Is Double Seed Stitch?

Double Seed Stitch is a textured knitting pattern created entirely from knit and purl stitches.

Instead of alternating every stitch and every row exactly as you would in traditional seed stitch, the arrangement changes over a short repeating sequence.

The result is a dense field of small raised textures that gives the blanket its distinctive nubbly surface.

A Simple Knit-and-Purl Blanket

One of the biggest attractions of this design is that the texture looks more complicated than the techniques required to create it.

There are no cables, lace motifs or complicated colorwork sections. The visual interest comes from arranging basic knit and purl stitches into a consistent repeating pattern.

Once you become familiar with the sequence, the blanket can settle into a relaxing rhythm.

A Reversible Knitted Texture

Double Seed Stitch creates an attractive texture on both sides of the fabric.

This is particularly useful for blankets because there is no need to worry about keeping one specific side facing outward when the blanket is being used.

A reversible stitch also gives the finished project a clean, well-finished appearance from either direction.

Original Yarn: Super Soft Merino

The original Purl Soho version was designed using Super Soft Merino, a bulky-weight merino wool.

The original sample color was Oyster Gray, which emphasizes the stitch texture without distracting from it.

Bulky yarn also gives the blanket a substantial feel and allows the textured stitches to appear large and clearly defined.

How Much Yarn Do You Need?

The approximate yardage listed for the five original sizes is:

  • Baby: 522 yards / 477 m
  • Crib: 1,479 yards / 1,352 m
  • Throw: 1,914 yards / 1,750 m
  • Twin: 3,132 yards / 2,864 m
  • Queen: 4,524 yards / 4,137 m

These amounts are based on the original bulky yarn and pattern gauge. Your actual requirement may change if you substitute yarn or alter the blanket dimensions.

Choosing Substitute Yarn

You do not have to use the original Purl Soho yarn to knit this blanket.

Look for a bulky-weight yarn that produces a pleasant fabric at the required gauge. A smooth yarn with good stitch definition will help show off the Double Seed Stitch texture.

For a blanket that will receive frequent use, also consider fiber care. Washable wool blends or other easy-care fibers may be practical choices, particularly for baby and family blankets.

Needles and Gauge

The original pattern uses US 13 (9 mm) circular needles.

The specified gauge is:

11 stitches = 4 inches (10 cm)
in Double Seed Stitch

Circular needles are useful even though the blanket is worked flat. Their flexible cable provides room to hold the large number of stitches, especially for the larger sizes.

Why Use Circular Needles for a Flat Blanket?

Circular needles are not only for knitting in the round.

When knitting a wide blanket flat, a long circular needle can distribute the weight of the project across the cable rather than forcing all the stitches onto a pair of long straight needles.

This becomes increasingly useful as the blanket grows heavier.

Is the Double Seed Stitch Blanket Beginner Friendly?

This is a very approachable project for knitters who already know the basic knit and purl stitches.

The construction is a simple rectangle, and the texture does not require complicated shaping.

The main skill is learning to recognize whether the next stitch should be knitted or purled and keeping your place in the repeating sequence.

A Good First Textured Blanket

If you have already knitted plain garter or stockinette projects and want to try something with more texture, Double Seed Stitch is a natural next step.

It demonstrates how dramatically a fabric can change simply by arranging knit and purl stitches in a different sequence.

Because the same texture continues throughout the blanket, you also get plenty of practice reading your knitting.

Learn to Read Your Knitting

A project like this becomes much easier once you can recognize knit and purl stitches visually.

Rather than relying entirely on counting every stitch from the beginning of each row, look at the texture directly below the stitch on your needle.

Learning to recognize the structure of the fabric can help you catch mistakes before they continue across several rows.

Use Stitch Markers on Larger Blankets

Although the original construction is straightforward, optional stitch markers can be helpful when working one of the larger sizes.

Dividing a very long row into manageable sections gives you convenient checkpoints for spotting mistakes.

Just remember that these markers are an optional organizational aid, not a required part of the original design.

Keep Your Tension Relaxed

Textured knit-and-purl patterns can become tight if the yarn is pulled firmly every time it moves between the front and back of the work.

Try to maintain an even, relaxed tension as you alternate between knit and purl stitches.

A consistent gauge will help the finished texture look regular across the entire blanket.

A Great Solid-Color Blanket

Double Seed Stitch is particularly effective in a single color because the shadows created by the raised texture provide plenty of visual interest on their own.

Neutral shades can create a timeless blanket, while brighter colors can transform the same simple stitch pattern into a cheerful baby or family throw.

Tonal yarns can also work beautifully as long as the color changes do not obscure the stitch definition.

Make It a Baby Blanket

The smallest original size measures approximately 28 × 30 inches, making it suitable as a compact baby blanket.

If knitting for a baby, consider choosing an easy-care yarn that is soft against the skin and appropriate for frequent washing.

Always follow current safe-sleep guidance when deciding how and where a handmade blanket should be used with an infant.

Make It a Cozy Throw

The original Throw size measures approximately 60 × 60 inches.

Combined with bulky yarn and the dense Double Seed Stitch texture, this creates a substantial blanket for a sofa or favorite chair.

It is also a good option when you want a simple pattern that allows the quality and color of the yarn to become the focus.

There Is Also a Cotton Pure Version

Purl Soho later published a separate Double Seed Stitch Blanket in Cotton Pure.

That version uses sport-weight cotton and smaller needles, creating a lighter and more delicate interpretation of the same reversible stitch pattern.

The Cotton Pure version includes Crib and Throw sizes and is also currently available free from Purl Soho.

Bulky Merino or Cotton?

Choose the original bulky version if you want a thick, warm blanket with bold stitch definition.

Consider the later Cotton Pure version if you prefer a lighter blanket, plant-based fiber or a fabric suitable for machine washing according to the yarn's care instructions.

Both designs use the same basic Double Seed Stitch idea, but the different yarn weights produce noticeably different fabrics.

Why Knit the Double Seed Stitch Blanket?

This pattern is a great example of simple knitting producing a polished result.

You need only basic knit-and-purl skills to create a rich reversible texture, while the five original sizes allow the same design to become anything from a baby blanket to a full-size bed blanket.

It is an especially appealing project when you want relaxing knitting without ending up with a completely plain fabric.

Get the Free Double Seed Stitch Blanket Pattern

Double Seed Stitch Blanket by Purl Soho is still available as a free knitting pattern from its original publisher.

Get the Free Pattern from Purl Soho →

Pattern availability was checked when this article was updated. Amazing Knitting does not reproduce the designer's complete pattern; use the official Purl Soho page above for the original instructions.

Easy Knitting Patterns for Beginners - Free Projects & Guides

Knitting for Beginners: 50+ Easy Knitting Patterns
Photo above © allfreeknitting

Photo above © AllFreeKnitting

New to knitting? You do not need to start with a complicated sweater or an intimidating stitch pattern. The best beginner projects help you practice a few essential skills while still giving you something useful and beautiful to enjoy when you finish.

This Amazing Knitting beginner guide brings together easy projects, simple stitches and helpful resources from our knitting archive so you can choose a comfortable place to start.

New to knitting?

Start small, choose a project you genuinely want to make, and focus on learning one or two new skills at a time. You do not need to master everything before beginning your first project.

What Should a Beginner Knitter Learn First?

Before tackling more advanced projects, it helps to become comfortable with a few knitting basics: casting on, the knit stitch, the purl stitch, binding off and recognizing the stitches on your needles.

Once knit and purl stitches begin to feel natural, you can create an impressive variety of textures without learning complicated techniques.

Easy Free Knitting Projects for Beginners

Ready to make something? These beginner-friendly projects from the Amazing Knitting archive are good places to explore.

1. Easy Striped Baby Blanket

A baby blanket gives you plenty of repetition for practicing consistent tension. This striped design combines straightforward knitting with a simple textured border.

Explore the Easy Striped Baby Blanket →

2. Jordan Baby Blanket

If you want to see how basic knit and purl stitches can create beautiful texture, the Jordan Baby Blanket is an excellent example. No complicated colorwork is needed.

Explore the Jordan Baby Blanket →

3. Fuss Free Baby Cardigan

Ready to move beyond flat rectangular projects? A simple baby cardigan is a manageable way to begin exploring garment construction without committing to a full adult sweater.

Explore the Fuss Free Baby Cardigan →

4. French Macaroon Baby Sweater

Small garments are useful confidence-building projects because they let you practice garment techniques on a much smaller scale.

Explore the French Macaroon Baby Sweater →

5. Rice Stitch Baby Blanket

This textured blanket is a useful next step once you are comfortable switching between knit and purl stitches. The simple texture keeps the knitting interesting without requiring elaborate lace or colorwork.

Explore the Rice Stitch Baby Blanket →

Easy Knitting Stitches to Practice

You do not always need to make a complete project to improve your knitting. Small stitch swatches are a quick way to practice new techniques and learn how different combinations of knit and purl stitches change the fabric.

Twisted Rib Stitch

Learn how twisted stitches can create crisp, defined columns of ribbing that are useful for cuffs, hems and decorative details.

Learn the Twisted Rib Stitch →

Diagonal Rib Stitch

Once ordinary ribbing feels comfortable, diagonal rib is an interesting way to explore how simple stitch placement can create movement across knitted fabric.

Explore the Diagonal Rib Stitch Guide →

Herringbone Knitting

Herringbone knitting can be created in several ways. Our guide explains the family of herringbone-style techniques and helps you understand the distinctive woven-looking fabric they produce.

Explore Herringbone Knitting →

Beginner Knitting Tips

Do not worry about knitting quickly. Consistent stitches and understanding what is happening on your needles are more useful than speed.

Choose a light or medium-colored smooth yarn when learning because the individual stitches are easier to see. If you make a mistake, use it as an opportunity to examine the fabric rather than immediately starting the entire project again.

It also helps to keep track of repeated rows when working textured patterns. We have a simple guide for that too:

Easy Trick for Tracking Repeated Knitting Rows →

What Should You Knit First?

If this is your very first project, a scarf, washcloth or simple blanket is usually easier to manage because you can concentrate on your stitches without worrying about complicated shaping.

After that, try textured blankets, baby garments or other small projects that introduce one new technique at a time.

Beginner Tip

The easiest pattern is not necessarily the best first project. Choose something simple enough to learn from but interesting enough that you will actually want to finish it.

Keep Learning with Amazing Knitting

As your confidence grows, explore more free patterns, knitting stitches and tutorials throughout the Amazing Knitting archive. Start with the basics, practice regularly and add new techniques gradually.

Every finished swatch and project teaches you something new — and that is how beginner knitters become confident knitters.

Editorial note: This page is an original Amazing Knitting beginner resource. Patterns featured in linked project guides belong to their respective designers and publishers. Amazing Knitting provides educational guidance and links to authorized pattern sources rather than reproducing complete copyrighted pattern instructions.

Slip Stitch Sampler Throw - Free Pattern

Slip Stitch Sampler Throw - Free Pattern
Photos above © DrBron

Slip Stitch Sampler Throw by Irina Poludnenko is a colorful free knitting pattern originally published by Lion Brand. It combines slip-stitch colorwork with a modular log-cabin-inspired construction to create a large, eye-catching throw.

Six sections use the same basic log-cabin design in different color combinations, producing a sampler-style blanket without requiring complicated stranded colorwork.

The pattern is still available as a free knitting pattern, with a current downloadable version available through LoveCrafts.

✓ Free Pattern Availability

Slip Stitch Sampler Throw, Lion Brand pattern L10347, is currently available as a free downloadable knitting pattern. Use the current pattern source below for the complete instructions.

Slip Stitch Sampler Throw at a Glance

Pattern: Slip Stitch Sampler Throw

Designer: Irina Poludnenko

Publisher: Lion Brand Yarn

Pattern Number: L10347

Category: Blanket / Throw

Yarn Weight: Aran

Original Yarn: Lion Brand Vanna's Choice

Needles: US 8 / 5 mm

Gauge: 16 stitches × 24 rows = 4 in / 10 cm in slip-stitch pattern

Yardage: Approx. 3,570 yd / 3,264 m

Finished Size: Approx. 50 × 75 in / 127 × 190.5 cm

Construction: Modular squares, seamed

Techniques: Slip stitches, mosaic-style colorwork, stripes

Availability: Free downloadable pattern

About the Slip Stitch Sampler Throw

Slip Stitch Sampler Throw was designed by Irina Poludnenko for Lion Brand Yarn.

Rather than making one enormous uninterrupted panel, the blanket uses the same log-cabin-inspired design six times in different color combinations.

Once the individual sections are complete, they are assembled into a large rectangular throw.

The result is a colorful sampler blanket with strong geometric structure and plenty of visual variety.

Finished Size

The published finished dimensions are approximately:

50 × 75 inches / 127 × 190.5 cm

This is a substantial throw rather than a small lap blanket, so expect it to become a fairly large project both in knitting time and total yarn requirement.

Original Yarn

The pattern was designed using Lion Brand Vanna's Choice, an Aran-weight acrylic yarn.

The original yarn is listed at approximately 170 yards per 100-gram ball.

The published blanket uses multiple colors to create the changing combinations across its six main sections.

Original Color Plan

The published version uses nine colors:

  • Dusty Blue
  • Chocolate
  • Rust
  • Olive
  • Dusty Purple
  • Brick
  • Pea Green
  • Mustard
  • Purple

The original quantities total 21 balls of Vanna's Choice.

Dusty Blue, Olive and Dusty Purple use three balls each, while the other six colors use two balls each.

Total Yardage

Ravelry records total published yardage of approximately:

3,570 yards / 3,264 meters

That large quantity reflects both the generous finished dimensions and the nine-color construction.

If substituting yarn, calculate your requirements carefully before beginning, particularly if some colors will be difficult to replace later from the same dye lot.

Needles

The published needle size is:

US 8 / 5 mm

Needle size is only a starting point. Use the size that allows you to obtain the required gauge with your chosen yarn.

Gauge

The published gauge is:

16 stitches × 24 rows = 4 × 4 inches / 10 × 10 cm

This gauge is measured in the slip-stitch pattern.

Even though a blanket does not need to fit a body, gauge still matters here because six separate sections eventually need to work together as one finished throw.

What Is Slip-Stitch Colorwork?

Slip-stitch colorwork can create surprisingly elaborate-looking patterns without requiring you to work several yarn colors across the same row at once.

Selected stitches are slipped rather than worked, allowing color from an earlier row to remain visible in the new row.

The technique can produce geometric color effects while keeping the actual knitting relatively approachable.

Why Slip Stitches Work Well Here

The strong colors already give this blanket plenty of visual energy. Slip stitches add another layer of texture and pattern without requiring complex stranded colorwork across every row.

They also complement the geometric log-cabin structure particularly well.

Keep Slipped Stitches Relaxed

One of the most important habits in slip-stitch knitting is avoiding excessive tension.

If the yarn carried past slipped stitches is pulled too tightly, the fabric can become compressed or distorted.

Allow the stitches to remain comfortably spaced on the needle as you work across each section.

Log-Cabin-Inspired Construction

Traditional log-cabin knitting builds outward in sections, creating strong geometric blocks of color.

Slip Stitch Sampler Throw uses this visual idea repeatedly, creating six versions of the same basic design in different color combinations.

This repetition is useful because once you understand how one section develops, the overall construction becomes much easier to visualize.

Six Main Sections

The throw is modular rather than one-piece.

Six major sections are knitted and later assembled to create the finished 50 × 75-inch blanket.

Modular construction has an important practical advantage: you do not need to carry the entire weight of a large blanket on your needles throughout the project.

Managing Nine Colors

A nine-color project benefits from a little organization.

Before casting on, label your colors according to the pattern and keep leftover yarn clearly identified.

Avoid relying only on memory, especially when several shades are similar.

A simple note showing the yarn name, color letter and remaining ball count can prevent confusion later in the project.

Choosing Your Own Palette

You do not have to reproduce the original Lion Brand colors exactly.

The geometric construction makes this an excellent project for creating your own coordinated palette.

Consider combining:

  • Warm autumn shades
  • Cool blues and greens
  • Muted vintage colors
  • Bright contrasting colors
  • Neutrals with a few strong accent shades

Whatever palette you choose, make sure neighboring colors have enough contrast for the slip-stitch pattern to remain visible.

Substituting the Yarn

If you use another Aran-weight yarn, make a slip-stitch swatch before buying the full quantity.

Look for a yarn that provides:

  • Good stitch definition
  • Consistent gauge
  • Comfortable drape
  • Colors with useful contrast
  • Care instructions suitable for a large blanket

Wash your swatch according to the yarn manufacturer's directions to see how the finished fabric changes.

Assembly Matters

Ravelry classifies the design as seamed.

Because separate sections eventually form one large geometric blanket, careful assembly is important.

Before sewing, block the sections if appropriate for your yarn and lay them out in the intended arrangement.

Check orientation and color placement before joining anything permanently.

Keep the Seams Flexible

A blanket seam should be secure without becoming a rigid ridge.

Pulling the joining yarn too tightly can cause the assembled throw to pucker along the seams.

Periodically lay the work flat while joining the sections to make sure the seam tension remains comfortable.

Important Pattern Correction

Important Before You Knit

Lion Brand published corrections for pattern L10347 on April 17, 2013. For that reason, use a current corrected version of the pattern rather than relying on an old copy saved from the original publication period.

Corrections are one of the main reasons Amazing Knitting links readers back to legitimate current pattern sources rather than reproducing old instructions.

Skill Level

Lion Brand classified the project as:

Easy+ / Level 3

The blanket is large, but the modular construction and repetition mean that project size should not automatically be confused with technical difficulty.

Skills Used in This Project

  • Knitting and purling
  • Slipping stitches
  • Changing colors
  • Reading repeating stitch patterns
  • Modular knitting
  • Picking up or working from existing sections as directed
  • Maintaining consistent gauge
  • Seaming knitted sections
  • Weaving in multiple yarn ends
  • Blocking and finishing a large blanket

Is Slip Stitch Sampler Throw Still Free?

Yes.

Slip Stitch Sampler Throw by Irina Poludnenko is still listed as a free knitting pattern, and a free downloadable PDF of Lion Brand pattern L10347 is currently available through LoveCrafts.

Amazing Knitting does not reproduce the designer's complete copyrighted instructions. Use the legitimate pattern source for the complete knitting directions.

Get the Free Slip Stitch Sampler Throw Pattern

The Lion Brand L10347 pattern is currently available as a free downloadable PDF from LoveCrafts:

Get the Free Slip Stitch Sampler Throw Pattern →

You can also view the Ravelry pattern record for project examples, specifications and historical pattern information:

View Slip Stitch Sampler Throw on Ravelry →

More Free Blanket Knitting Patterns

If you enjoy textured and colorful blanket projects, explore more verified free patterns in the Amazing Knitting archive:

Before You Start

This is a large multi-color project, so organize your nine colors before casting on and make a swatch in the actual slip-stitch pattern.

Pay particular attention to keeping slipped stitches relaxed and keeping the dimensions of the modular sections consistent so that assembly is easier later.

Most importantly, use a current corrected version of Lion Brand L10347 rather than an old copied version of the instructions.

Pattern credit: Slip Stitch Sampler Throw was designed by Irina Poludnenko for Lion Brand Yarn. The existing project photographs on this Amazing Knitting page are credited to DrBron. Amazing Knitting provides an independent project guide and does not reproduce the designer's complete copyrighted knitting instructions.

Stockinette Chevron Stitch - Easy Knitting Guide

Stockinette Chevron - Free Pattern
Photos above © knittingstitches.org

Stockinette Chevron is a classic knitting texture that turns smooth stockinette fabric into repeating zigzag waves.

The distinctive peaks and valleys are created by carefully balancing increases and decreases across the row, making this stitch especially attractive for scarves, blankets and colorful striped projects.

Stitch note: Stockinette Chevron is a general chevron-style knitting technique rather than one single universal pattern. Published versions may use different stitch counts, increases and decreases to create a similar zigzag effect.

How Stockinette Chevron Works

A basic stockinette fabric normally forms straight horizontal rows. In a chevron pattern, strategically placed increases add stitches at the peaks while decreases remove stitches around the valleys.

Repeating this shaping across the row causes the fabric itself to change direction, creating the familiar V-shaped or zigzag effect.

Why This Stitch Works Well With Color

Stockinette Chevron is particularly effective with striped, self-striping or gradient yarn.

Instead of forming straight horizontal bands, the color changes follow the knitted peaks and valleys, emphasizing the chevron shape.

Good Projects for Stockinette Chevron

  • Baby blankets and throws
  • Scarves
  • Cushion fronts
  • Colorful knitted panels
  • Sampler projects

A Few Tips Before You Begin

Keep your increases and decreases in the correct positions so that the peaks remain aligned from one repeat to the next.

A row counter or stitch markers can help when working several repeats across a wider project.

Stockinette fabric also tends to curl, so projects such as blankets and scarves may benefit from an appropriate border.

Different Versions of the Stitch

You may find Stockinette Chevron instructions online with different stitch multiples and row repeats.

This does not necessarily mean that one version is wrong. Chevron construction can be achieved with several combinations of increases and decreases, producing slightly different angles and proportions.

For best results, choose one complete version and follow its stitch counts consistently rather than combining instructions from different tutorials.

More Knitting Stitch Guides

Editorial note: This Amazing Knitting page is an educational guide to the Stockinette Chevron stitch family. Different knitting references may use different stitch multiples and shaping methods to create a stockinette chevron effect.

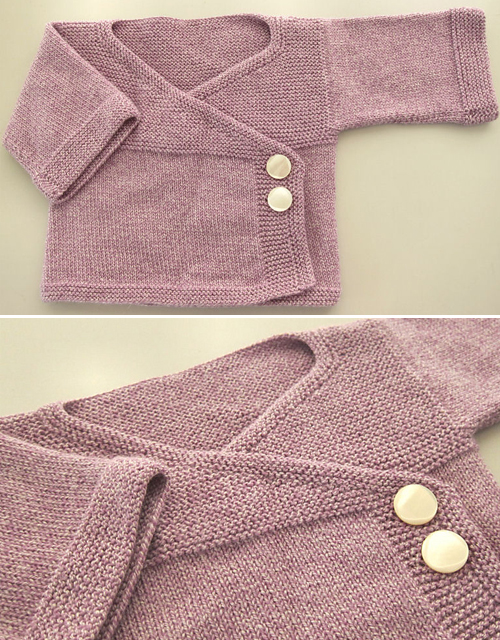
Baby Kimono - Free Knitting Pattern

Baby Kimono - Free Knitting Pattern
Photos above © Tichiro

Garter Stitch Baby Cardigan by Joji Locatelli, often known by knitters as the Garter Stitch Baby Kimono, is a sweet wrap-style baby cardigan worked almost entirely in garter stitch.

Its crossover front gives the little sweater its kimono-inspired appearance, while the simple stitch pattern makes it an appealing project for knitters ready to try a small baby garment.

✓ Free Pattern

This project is commonly referred to as the Baby Kimono, but the pattern's official name is Garter Stitch Baby Cardigan by Joji Locatelli. A free copy of the designer's original pattern remains available online.

Baby Kimono at a Glance

Official Pattern: Garter Stitch Baby Cardigan

Designer: Joji Locatelli

Craft: Knitting

Category: Baby Cardigan / Kimono-Style Sweater

Sizes: Newborn, 1–3 months, 3–6 months

Main Stitch: Garter stitch

Needles: 2.5–3 mm

Gauge: 28 stitches = 10 cm in garter stitch

Yarn: Approximately 100–150 g, depending on size

Notions: Two approximately 15 mm buttons

Availability: Free pattern

About the Garter Stitch Baby Kimono

Joji Locatelli originally wrote down this design after the knitted cardigan attracted considerable interest from other knitters.

The result is a simple wrap-style baby cardigan with overlapping fronts. Because garter stitch forms most of the fabric, the visual interest comes primarily from the shape of the garment rather than complicated stitch patterns.

The crossover construction also makes it quite different in appearance from a conventional button-front baby cardigan.

Three Baby Sizes

The original pattern includes three sizes:

  • Newborn
  • 1–3 months
  • 3–6 months

The published finished chest measurements are approximately:

  • Newborn: 40 cm / 16 inches
  • 1–3 months: 45 cm / 18 inches
  • 3–6 months: 50 cm / 20 inches

Finished total lengths are approximately 20, 24 and 26 cm (8, 9.5 and 11 inches) respectively.

When possible, choose a size from the finished measurements rather than relying only on the baby's age.

Yarn Requirements

Joji's original sample was knitted with an acrylic yarn called NUBE Dralón, which she found in Argentina.

However, the pattern specifically allows another suitable yarn to be substituted.

The approximate yarn quantities given in the original pattern are:

  • Smaller size: approximately 100 g
  • Larger sizes: approximately 150 g

Rather than choosing a substitute based only on fibre or label, make sure your yarn can produce the required gauge and a fabric appropriate for a soft baby cardigan.

Needles and Gauge

The original pattern recommends needles in the range of:

2.5–3 mm

The designer also notes that you should use whatever needle size is necessary to obtain the correct gauge.

Published gauge is:

28 stitches = 10 cm / 4 inches in garter stitch

Making a small swatch is especially worthwhile for a baby garment because even a modest difference in gauge can noticeably change such a small finished size.

Why Garter Stitch Works So Well

Garter stitch is created by knitting every row when working flat. It produces a fabric with distinctive horizontal ridges and plenty of natural stretch.

It also lies relatively flat, making it particularly useful for a wrap-style cardigan where clean edges help the overlapping fronts sit comfortably.

For a newer knitter, using one familiar stitch throughout much of the garment means more attention can be given to learning the construction and shaping.

The Kimono-Style Front

The crossover front is what gives this cardigan its familiar “baby kimono” nickname.

Rather than meeting at the center like a conventional cardigan, one front overlaps the other. The original design uses buttons together with an inside fastening to help hold the layers in position.

The pattern calls for two buttons approximately 15 mm in diameter.

Skills That Help

Useful skills for this project include:

  • Casting on
  • Garter stitch
  • Basic shaping
  • Increasing and decreasing
  • Making buttonholes
  • Picking up stitches
  • Working sleeves
  • Binding off
  • Simple finishing
  • Weaving in yarn ends

Use Joji Locatelli's original pattern for the exact stitch counts, shaping sequence, sleeve construction and finishing instructions.

A Popular Little Cardigan

One reason this design has remained recognizable for so many years is its simplicity.

Thousands of knitters have made versions of the Garter Stitch Baby Cardigan, experimenting with different yarns, colours and small finishing modifications while retaining the characteristic wrap-front shape.

That makes the Ravelry project gallery especially useful for inspiration before choosing yarn for your own version.

Choosing Yarn for a Baby Cardigan

In addition to matching gauge, consider how the finished garment will be used.

Softness matters for clothing worn close to a baby's skin, while easy washing can be valuable for an everyday garment. Also check that the finished garter-stitch fabric is not excessively dense or loose.

A smooth yarn can emphasize the simple garter ridges, while a gently heathered or subtly variegated yarn can add colour interest without competing with the clean construction.

Is the Baby Kimono Pattern Free?

Yes. The Garter Stitch Baby Cardigan pattern by Joji Locatelli was released as a free knitting pattern.

Amazing Knitting does not reproduce Joji's copyrighted row-by-row instructions. Instead, we link readers to the existing pattern source.

Get the Free Baby Kimono Pattern

The pattern is available as a PDF under its original name, Garter Stitch Baby Kimono / Garter Stitch Baby Cardigan.

View the Free Baby Kimono Pattern →

More Free Baby Cardigans

If you enjoy small wrap-style garments, continue exploring the Amazing Knitting archive for more free baby sweaters and cardigans.

Explore Free Baby Cardigan Patterns →

You can also browse free baby sweaters, newborn knitting patterns, and garter-stitch baby cardigans.

Before You Start

Choose your size from the finished measurements, make a garter-stitch gauge swatch, and check that your yarn creates a soft but stable fabric before beginning the cardigan.

Read the complete original pattern before casting on so that you understand how the overlapping fronts, sleeves and fastenings come together.

Pattern credit: Garter Stitch Baby Cardigan / Baby Kimono was designed by Joji Locatelli. The existing photographs on this Amazing Knitting page are credited to Tichiro. Amazing Knitting does not reproduce the designer's copyrighted row-by-row knitting instructions.

Discover More From the Archive

A fresh mix of knitting patterns and tutorials from the Amazing Knitting archive.

Finding patterns from the archive…